This is the second tutorial in a three-part tutorial series about building a license controlled WordPress plugin and theme update system.
In the first part of the series, we created a WordPress plugin for storing and handling software licenses. In part three, we will make a WordPress theme and plugin use that license manager server to check for updates and download them.
In this tutorial, we will build the interface between the two: an API with two actions that can be called from an external site to get information about a product and its license and to download the product.
While working on the plugin, you will learn about the following topics:
- Building an API on top of a WordPress plugin.
- Creating a settings page.
- Uploading files to Amazon Simple Storage Service (S3)
- Using the AWS SDK to create signed URLs that can be used to download private files from S3.
We will continue building the plugin on top of the code we created in part 1 of the tutorial and so, you should be able to build a working plugin by following the steps. If you want to follow the tutorial using the readymade code, check out the source code in the Tuts+ Github repository linked on the right.
Let's get started.
Creating the License Manager API
An API can mean many different things. In this tutorial, it means a set of actions (often referred to as methods) that can be called over an HTTP connection to access a well defined, limited, part of the application's functionality.
In part three of the series, we will use this API in a premium WordPress plugin or theme to check for license validity and to download updates, but the API itself sets no limitations for this. The application using the API could just as well be a game that needs to be activated with a license key before playing it.
Our API will be accessible through the URL http://<yoursite>/api/license-manager/v1/, where yoursite is the URL to your WordPress site running the WP License Manager plugin. The API will have two functions:
-
info: Returns information about the requested product if the given license key is valid. -
get: Returns the downloadable file if the given license key is valid.
Let's build it!
Step 1: Create a Class For the API Functionality
So far, we have done alright by just using the existing classes from the WordPress Plugin Boilerplate, but now, to keep things clean, let's add a new class for storing the API specific functionality.
An API is a public facing part of the plugin, so the new class needs to go to the public directory in the plugin boilerplate. Call the API class Wp_License_Manager_API and place it in a file called class-wp-license-manager-api.php.
Make it an empty class for now:
/**
 * The API handler for handling API requests from themes and plugins using
 * the license manager.
 *
 * @package    Wp_License_Manager
 * @subpackage Wp_License_Manager/public
 * @author     Jarkko Laine <[email protected]>
 */
class Wp_License_Manager_API {

}
Link the newly created class to your Wp_License_Manager_Public class to make it available when needed. First, add a field for the API class:
/**
 * @var     License_Manager_API     The API handler
 */
private $api;
Then, initialize it in the constructor (line 11 is the new one, everything else is there already from part one):
/**
 * Initialize the class and set its properties.
 *
 * @var      string    $plugin_name       The name of the plugin.
 * @var      string    $version    The version of this plugin.
 */
public function __construct( $plugin_name, $version ) {
    $this->plugin_name = $plugin_name;
    $this->version = $version;

    $this->api = new Wp_License_Manager_API();
}
Now, we are all set for building the API functionality.
Step 2: Define Query Variables For the API
As I mentioned above, we'll start by creating a special URL format for accessing the API. This way, we can separate the API calls for other requests to the site without getting confused by the rest of the WordPress site's content.
By default (and under the hood), WordPress URLs are a combination of index.php and a set of query parameters, for example: http://<yoursite>/?p=123 (index.php is omitted in the URL, but that's where the request goes). Most sites use prettier permalink settings — and we will too — to make the URLs more readable, but that's just a layer of decoration on top of this core functionality.
So, to create our API, the first thing is to add a custom query variable, __wp_license_api, to use instead of p. Then, once that's working, we'll add custom permalink settings to make the API more readable.
At the end of the function define_public_hooks in the class Wp_License_Manager, add the following lines to link a filter to the hook query_vars:
// The external API setup
$this->loader->add_filter( 'query_vars', $plugin_public, 'add_api_query_vars' );
Then, add the function in the class Wp_License_Manager_Public:
/**
 * Defines the query variables used by the API.
 *
 * @param $vars     array   Existing query variables from WordPress.
 * @return array    The $vars array appended with our new variables
 */
public function add_api_query_vars( $vars ) {
    // The parameter used for checking the action used
    $vars []= '__wp_license_api';

    // Additional parameters defined by the API requests
    $api_vars = $this->api->get_api_vars();

    return array_merge( $vars, $api_vars );
}
This function adds our query variables to WordPress's whitelist by adding them to the $vars array passed in by the filter and returning the appended array:
Line 9: Add the variable for specifying the API action (and recognizing that the request is actually meant for the API), __wp_license_api.
Line 12: Give the API class a chance to add any extra parameters used by its functions.
Line 14: Return the updated $vars array.
To make the code work, we still need to create the function get_api_vars:
/**
 * Returns a list of variables used by the API
 *
 * @return  array    An array of query variable names.
 */
public function get_api_vars() {
    return array( 'l',  'e', 'p' );
}
For now, as the API is still very simple, I decided to make this function simple and just include all the parameters in one array and return them.
Step 3: Catch the API Requests
We have now whitelisted our query variables, but they don't do anything yet. For the variables to make a difference, we need to create functionality for catching the API requests.
This can be done using the WordPress action parse_request.
In Wp_License_Manager's define_public_hooks, link a function to the action:
$this->loader->add_action( 'parse_request', $plugin_public, 'sniff_api_requests' );
Now, all future requests to this WordPress installation will go through this function before being passed to WordPress's own request handling functions. That means that we need to keep the handler function lightweight: Check if __wp_license_api has been set and if not, return quickly and let WordPress continue. If yes, it's OK to do some more complex handling — this is our request and we'll handle it.
The function, sniff_api_requests, goes into Wp_License_Manager_Public:
/**
 * A sniffer function that looks for API calls and passes them to our API handler.
 */
public function sniff_api_requests() {
    global $wp;
    if ( isset( $wp->query_vars['__wp_license_api'] ) ) {
        $action = $wp->query_vars['__wp_license_api'];
        $this->api->handle_request( $action, $wp->query_vars );

        exit;
    }
}
Line 6: Check if the API action query variable is present. If yes, this is a call for this API to handle.
Lines 7-8: Pass the request to the API class's function handle_request to be handled. We'll create this function next.
Line 10: Stop the execution of the WordPress request once we have handled the API call. This one's important as otherwise, the execution would continue to WordPress itself and render a 404 error page after the API output.
Next, let's add the function handle_request.
For now, it's a bare bones implementation that we can use to check that our framework is working. I have included placeholders for the two actions that we are going to create in this tutorial and a default response that will be sent if a user uses an API action that we don't support.
/**
 * The handler function that receives the API calls and passes them on to the
 * proper handlers.
 *
 * @param $action   string  The name of the action
 * @param $params   array   Request parameters
 */
public function handle_request( $action, $params ) {
    switch ( $action ) {
        case 'info':
            break;

        case 'get':
            break;

        default:
            $response = $this->error_response( 'No such API action' );
            break;
    }

    $this->send_response( $response );
}
Line 17: $response is an array with the information that should be passed to the application calling the API.
Line 21: Print out the response as a JSON encoded string.
To make the function work, we still need to add the helper functions it uses: send_response and error_response.
First, send_response:
/**
 * Prints out the JSON response for an API call.
 *
 * @param $response array   The response as associative array.
 */
private function send_response( $response ) {
    echo json_encode( $response );
}
Then error_response. This function creates an array with the given error message. By using a function for generating the array, we can make sure all error messages are formatted in the same way and easily change the formatting if needed later in the plugin's life cycle.
For now, I decided to go with a basic version with nothing but an error message inside the array:
/**
 * Generates and returns a simple error response. Used to make sure every error
 * message uses same formatting.
 *
 * @param $msg      string  The message to be included in the error response.
 * @return array    The error response as an array that can be passed to send_response.
 */
private function error_response( $msg ) {
    return array( 'error' => $msg );
}
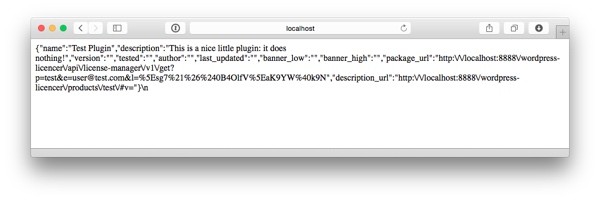
Now, you have built the structure inside which we can start creating the API actions. To test it, try calling a non-existing API action, for example http://<yoursite>/?__wp_license_api=dummy-action, in a browser window.
You should see something like this:

Even if the API still returns just an error message, the test shows that the request gets directed to the correct handler function and isn't mixed up with the rest of the WordPress flow. Just like we wanted.
Now, before we start adding API functionality, let's make the API URL a little easier to remember.
Step 4: Create a Custom URL Format For the API
While http://<yoursite>/?__wp_license_api=<action> works, it's not very pretty, and it also exposes just a little bit too much of the internals of the API implementation in my opinion. So, let's create a nicer URL format to use in its place.
As a reminder from the beginning of this section, here's the URL we'll be using: http://<yoursite>/api/license-manager/v1/
I added v1 to the API URL is just in case we will at some point find ourselves supporting multiple different versions of the API. Having the version info there right from the beginning makes adding new versions later easier.
First, to make "pretty" URLs like this work, set the Permalinks option in WordPress settings to something other than the default value (all other options except "Default" are fine).
Then, let's add a filter to create a new rewrite rule. Add the filter registration to Wp_License_Manager's define_public_hooks:
$this->loader->add_action( 'init', $plugin_public, 'add_api_endpoint_rules' );
Then, create the function (in Wp_License_Manager_Public):
/**
 * The permalink structure definition for API calls.
 */
public function add_api_endpoint_rules() {
    add_rewrite_rule( 'api/license-manager/v1/(info|get)/?',
        'index.php?__wp_license_api=$matches[1]', 'top' );

    // If this was the first time, flush rules
    if ( get_option( 'wp-license-manager-rewrite-rules-version' ) != '1.1' ) {
        flush_rewrite_rules();
        update_option( 'wp-license-manager-rewrite-rules-version', '1.1' );
    }
}
Line 5: Using a regular expression, define a new URL rewrite rule to send the requests formatted according to what we had in mind to the URL we used in the previous step. (info|get) defines the api methods the API should accept.
Lines 9-12: Save the rewrite rules to make them active. flush_rewrite_rules is a resource consuming call so I have added a check around it to make sure the flushing is only done when the rules have been changed.
Now, with this step completed, any requests made to http://<yoursite>/api/license-manager/v1/<action> is converted into a request to http://<yoursite>/?__wp_license_api=<action>. Test this with the same dummy action from the previous step — you should now get the same result using both URLs.
The API's framework is now in place and we can start adding functionality to it.
Step 5: Create the Functionality for Verifying Licenses
Both of the API actions we are going to build in this tutorial start by verifying the user's license.
At first, I wrote the license verification code for both of them separately, but looking at the two handlers, I soon noticed that they were exactly the same. For me, this is a good sign that it's time to do some refactoring.
To save some of your time, let's skip the step where we write the same code twice and instead go straight to the final version and put the common code in a function of its own.
In Wp_License_Manager_API, create a function called verify_license_and_execute. This function will be used as an extra step in between the function we created earlier and the actual handling of the requests.
/**
 * Checks the parameters and verifies the license, then forwards the request to the
 * actual API request handlers.
 *
 * @param $action_function  callable    The function (or array with class and function) to call
 * @param $params           array       The WordPress request parameters.
 * @return array            API response.
 */
private function verify_license_and_execute( $action_function, $params ) {
    if ( ! isset( $params['p'] ) || ! isset( $params['e'] ) || ! isset( $params['l'] ) ) {
        return $this->error_response( 'Invalid request' );
    }

    $product_id = $params['p'];
    $email = $params['e'];
    $license_key = $params['l'];

    // Find product
    $posts = get_posts(
        array (
            'name' => $product_id,
            'post_type' => 'wplm_product',
            'post_status' => 'publish',
            'numberposts' => 1
        )
    );

    if ( ! isset( $posts[0] ) ) {
        return $this->error_response( 'Product not found.' );
    }

    // Verify license
    if ( ! $this->verify_license( $posts[0]->ID, $email, $license_key ) ) {
        return $this->error_response( 'Invalid license or license expired.' );
    }

    // Call the handler function
    return call_user_func_array( $action_function, array( $posts[0], $product_id, $email, $license_key ) );
}
Lines 10-12: Verify that all license related parameters are present. p is the slug of the product, e is the user's email address, and l is the license key.
Lines 14-16: Collect and sanitize the parameters.
Lines 19-26: Look up the post matching the given product id. As I mentioned above, the product id is actually the product's post slug to make it easier for the user to know the proper value for it.
Lines 28-30: If the product is not found, return an error.
Lines 33-35: Do the actual license key validation. We'll create this function next.
Line 38: Call the function responsible for handling the API action. As a development idea for the future, this would be a great place for a filter that other plugins could use to replace the handler function if needed...
Next, let's add the function for verifying the license:
/**
 * Checks whether a license with the given parameters exists and is still valid.
 *
 * @param $product_id   int     The numeric ID of the product.
 * @param $email        string  The email address attached to the license.
 * @param $license_key  string  The license key.
 * @return bool                 true if license is valid. Otherwise false.
 */
private function verify_license( $product_id, $email, $license_key ) {
    $license = $this->find_license( $product_id, $email, $license_key );
    if ( ! $license ) {
        return false;
    }

    $valid_until = strtotime( $license['valid_until'] );
    if ( $license['valid_until'] != '0000-00-00 00:00:00' && time() > $valid_until ) {
        return false;
    }

    return true;
}
Lines 10-13: Look up the license from the database (we'll add this function next) using the parameters sent. If the license is not found, it can't be valid, so we can return false.
Lines 15-18: If the license exists, check if it has expired. In the first part of the tutorial, we defined that 0000-00-00 00:00:00 is used for a license that never expires.
Line 20: All checks passed, the license is valid.
Finally, to complete the license validation code, we need the function for retrieving a license from the database.
Add the function, find_license:
/**
 * Looks up a license that matches the given parameters.
 *
 * @param $product_id   int     The numeric ID of the product.
 * @param $email        string  The email address attached to the license.
 * @param $license_key  string  The license key
 * @return mixed                The license data if found. Otherwise false.
 */
private function find_license( $product_id, $email, $license_key ) {
    global $wpdb;
    $table_name = $wpdb->prefix . 'product_licenses';

    $licenses = $wpdb->get_results(
        $wpdb->prepare( "SELECT * FROM $table_name WHERE product_id = %d AND email = '%s' AND license_key = '%s'",
            $product_id, $email, $license_key ), ARRAY_A );

    if ( count( $licenses ) > 0 ) {
        return $licenses[0];
    }

    return false;
}
In this function, we make a SQL query to search for a license with the exact parameters sent in, product id, email and license key. This way, we don't need to do any additional parsing of the response than seeing if there is a result or not.
If a license is found, the function returns it. Otherwise, it returns false.
Step 6: Add the Product Information API Action
Next, let's add the first of the two actions, info. In the function handle_request that we created a little while ago, fill in the case branch for the action:
case 'info':
    $response = $this->verify_license_and_execute( array( $this, 'product_info' ), $params );
    break;
The line we added calls our function verify_license_and_execute with two parameters:
- The first parameter should be familiar to you from the WordPress actions and filters we have been creating throughout the tutorial series. It passes the name of the function we want to use to handle the action once the license has been verified. Because the function is inside a class, we need to pass an array instead of just the name of the function.
- The second parameter is the list of all request parameters sent to WordPress.
We already looked at what happens inside verify_license_and_execute, so now, let's add the product_info function. This function will collect information about the product and return it as an array.
As you probably remember from part one of the tutorial, products are stored in the license manager plugin as a custom post type with a meta box for entering some additional product information. In this function, we will tap into that data and fill the $response array with information about the requested product:
/**
 * The handler for the "info" request. Checks the user's license information and
 * returns information about the product (latest version, name, update url).
 *
 * @param   $product        WP_Post   The product object
 * @param   $product_id     string    The product id (slug)
 * @param   $email          string    The email address associated with the license
 * @param   $license_key    string  The license key associated with the license
 *
 * @return  array           The API response as an array.
 */
private function product_info( $product, $product_id, $email, $license_key ) {
    // Collect all the metadata we have and return it to the caller
    $meta = get_post_meta( $product->ID, 'wp_license_manager_product_meta', true );

    $version = isset( $meta['version'] ) ? $meta['version'] : '';
    $tested = isset( $meta['tested'] ) ? $meta['tested'] : '';
    $last_updated = isset( $meta['updated'] ) ? $meta['updated'] : '';
    $author = isset( $meta['author'] ) ? $meta['author'] : '';
    $banner_low = isset( $meta['banner_low'] ) ? $meta['banner_low'] : '';
    $banner_high = isset( $meta['banner_high'] ) ? $meta['banner_high'] : '';

    return array(
        'name' => $product->post_title,
        'description' => $product->post_content,
        'version' => $version,
        'tested' => $tested,
        'author' => $author,
        'last_updated' => $last_updated,
        'banner_low' => $banner_low,
        'banner_high' => $banner_high,
        "package_url" => home_url( '/api/license-manager/v1/get?p=' . $product_id . '&e=' . $email . '&l=' . urlencode( $license_key ) ),
        "description_url" => get_permalink( $product->ID ) . '#v=' . $version
    );
}
Line 14: Retrieve product information from the post meta data.
Lines 16-21: Collect the data from the meta data fields.
Lines 23-34: Build the response. Mostly this is just about placing the data from lines 16-21 into the array. One line, line 32, deservers some more attention, though.
This is for the WordPress update system which we will use in the next tutorial in the series. To make things easy for that step, the info action returns a URL pointing to the API's other action, get, with all required parameters.
Step 7: Test the API Action
You have now created the first of our two API functions. If you like, you can test the functionality by calling the API method in a web browser. Just make sure to set up the data properly before making the call: there needs to be a product and a license for it in the system for the API action to work.
Another catch is that you'll need to url encode the email and license key parameters before placing them in the URL as they contain special characters.
The output will look somewhat like this, depending on what you have saved as your product's data:
Storing Files in Amazon S3
With the first half of the API completed, it's time to look into the second API function, get. This API function will check the license key using the same method we used with info and then return the downloadable file.
For the API action to make sense, it's important that the download cannot be accessed without a valid license key simply by bypassing the API and going straight to the file itself. Amazon's Simple Storage Service (S3) gives us this functionality easily and affordably (almost free for most users) while also making the download reliable.
In the next steps, we will first look at how to upload the files to Amazon S3 using the AWS (Amazon Web Services) online dashboard. Then, once the file has been uploaded, we'll add the download functionality to our API.
If you are already using Amazon S3 and know your way around it, you can skip straight to the next section and start implementing the get action. If you are new to S3, read on.
Step 1: Create an Account
Creating an AWS account is well documented, but it does have many steps, so let's go through it quickly.
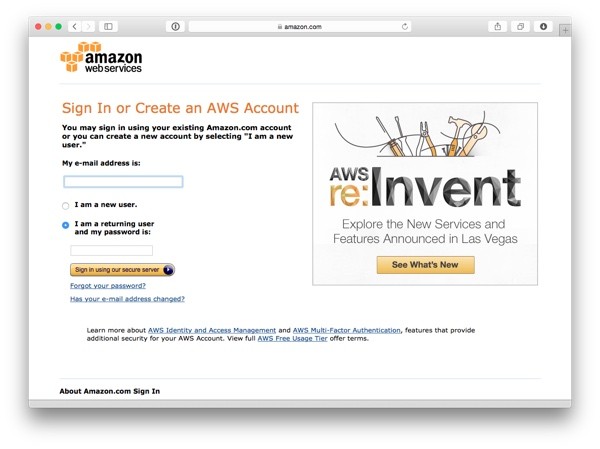
First, go to aws.amazon.com and click on "Sign Up" in the top right corner.
In the following screen, you have the option to create a new Amazon account or use an existing one that you have used for other Amazon services (for example the online store itself):
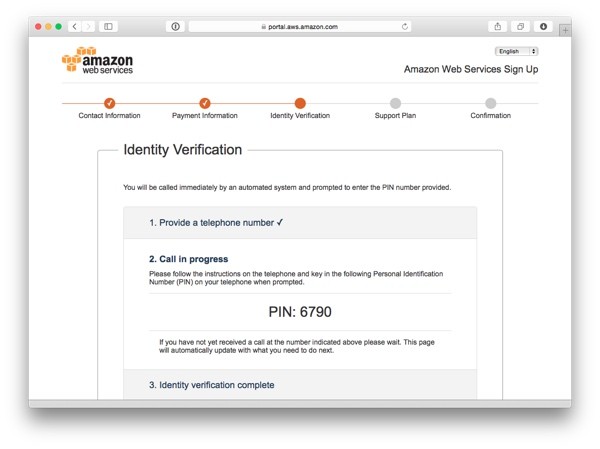
The choice is up to you: If you decide to create a new account, that will be done next. If you use your existing account, the flow jumps right into the five-step flow of setting up your AWS account. During the registration, you will be asked to enter your credit card information — for most common uses you won't need to worry about the price.
After entering your credit card information, before your account is accepted, you will have to verify your phone number. Amazon automatically places a call to your phone number and asks you to enter the four digit code shown on your screen. When I tried it again as I was writing this tutorial, I had trouble entering the code with the iPhone keypad. However, saying the numbers out loud one by one worked perfectly.
The final step is choosing a support plan. I suggest you pick the free option for now. There really isn't much support needs for S3 and you can reconsider the option if you decide to use the more advanced features.
Now that you have created and activated your account, let's add a file.
Step 2: Create Bucket
Launch the AWS management console and choose S3 from the option screen:
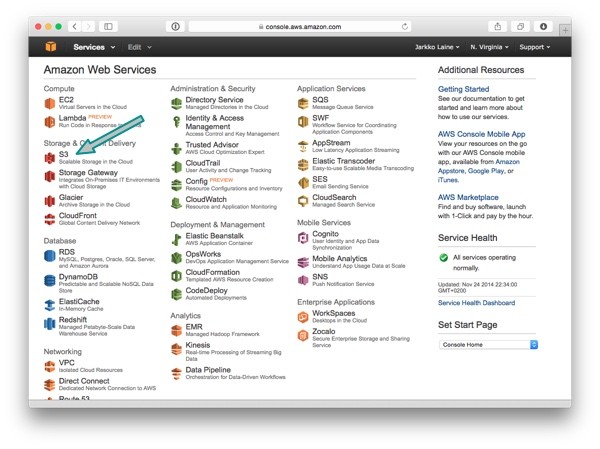
There are lots of features available in the AWS admin, but you can ignore the rest for now (they are advanced stuff that most WordPress developer will never need — I use only S3 and EC2 at the moment myself).
Now that you are in the S3 admin console, start by creating a bucket. A bucket is a top level container for your S3 files that can contain folders and files. Here's how the AWS documentation describes the concept:
Every object you store in Amazon S3 resides in a bucket. You can use buckets to group related objects in the same way that you use a directory to group files in a file system. Buckets have properties, such as access permissions and versioning status, and you can specify the region where you want them to reside.
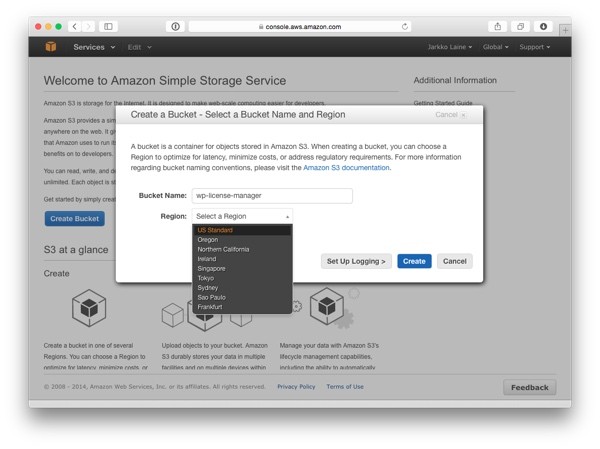
Give your bucket a name consisting of lower case letters (a-z), numbers, dashes and dots (for more detailed requirements, check out the documentation) and click on "Create".
If you like, you can also choose a Region for where to store your files. It's however, perfectly OK to leave the setting to its default option.
Once you have created the bucket, you will see a file browser view with that bucket created:

In this screen, you can create as many new buckets as you like. For now, one is enough. Click on the name of the bucket to add files to it.
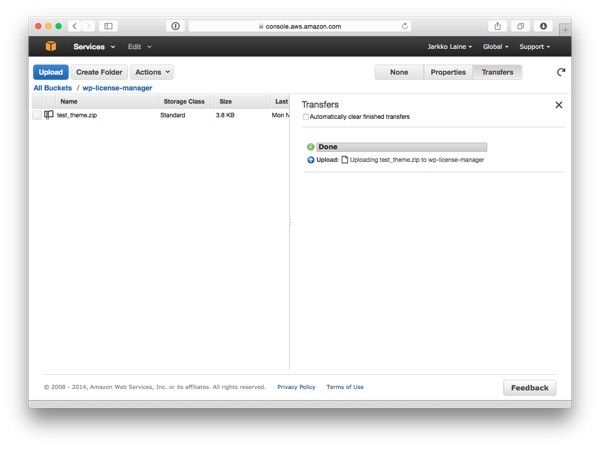
Step 3: Upload File
The bucket we just created will contain the downloads for your license manager installation. We won't be creating the downloadable themes and plugins until the third and last part of the tutorial, so for testing, just create a zip file with something (for example a text file) in it.
Click on the Upload button at the top left corner of the S3 admin screen. An upload screen appears:

Choose Add Files to select the file(s) to upload. Then click on Start Upload.
We could use Set Details to set the file permissions, but as we don't want to make the download publicly available, the default options are just what we want.
Once the file has been uploaded, you'll see it in your bucket:
Close the transfer window by clicking on the cross in the top right corner. Then select the file and choose Properties from the top right menu:
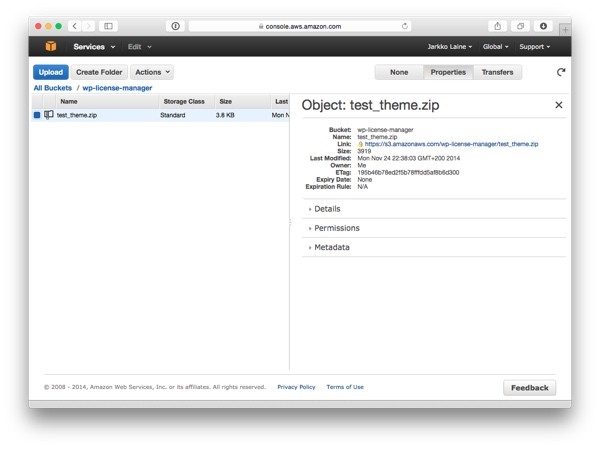
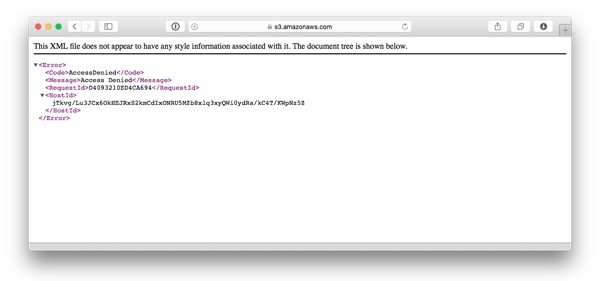
In this screen, you can still tweak the file's permissions and other settings. You'll also find the file's URL in the information. Copy the link and open it in a browser to test what happens when you try to download the file.
If all is correctly setup, you can't do that: Even if a random visitor knew the exact URL to your download file, he or she won't be able to download it by skipping the license check in the API call.
If you see an error like this, everything is set up correctly and you can start creating the code for downloading this file:
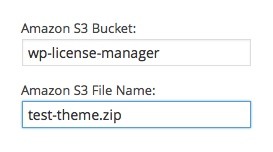
As the last step before some more coding, create a product in WordPress using our license manager plugin (or update an existing one) and add the download file's information:
Serving the Download From S3
Now that you have successfully uploaded a file to Amazon S3, let's make the license manager API return the file when requested — but only if the user's license is valid.
To do this, we will fill in the API action placeholder that we added to our API handling function handle_request earlier in this tutorial. The action will first check the license using verify_license_and_execute and then use Amazon's official AWS library to create and return a signed download link to the product's downloadable file.
Step 1: Download and Include AWS Library
To get started, first, download the AWS SDK for PHP from Amazon.
There are many ways to include the SDK in your project, but I suggest using the zip download in this project even if it is already a bit old-fashioned: The SDK contains functionality for using all of the AWS features — as you saw earlier, there are a lot of them — and we are using only one, S3. Downloading the zip release and including it in your project manually gives you the opportunity to remove all of the extra files that only take up space in the plugin's download.
Once you have downloaded the AWS SDK, create a directory called lib in the wp-license-manager directory. Inside it, create a directory called aws containing the contents of the SDK's zip package.
Now, if you like, you can trim the contents of the directory, leaving only the directories Common and S3 inside Aws. If the plugin's size isn't an issue, you can just as well skip this step and leave the SDK as it is.
Next, connect the AWS SDK to the WP License Manager plugin on the code level.
The SDK uses namespaces, a PHP feature that was added only in PHP 5.3. The official PHP requirement for WordPress is 5.2.6, so using the SDK will not work for all WordPress users.
A way to get past this limitation is to use a third party S3 library or write one yourself. However, as using the official SDK is the more recommended way in general, let's go that route this time. In the version of the plugin published to the WordPress plugin repository I have included both the AWS SDK version and a fallback version using this standalone S3 library. The plugin picks the right one to use at runtime, based on the PHP version of the system on which the plugin is running.
In this tutorial, however, we will keep things a little simpler and just have one version of the AWS SDK.
Create a new class, Wp_License_Manager_S3 and place it in the plugin's includes directory:
<?php
/**
 * A wrapper for our Amazon S3 API actions.
 *
 * @package    Wp_License_Manager
 * @subpackage Wp_License_Manager/includes
 * @author     Jarkko Laine <[email protected]>
 */
class Wp_License_Manager_S3 {

}
To include the class in the project, add the following lines to the class Wp_License_Manager's function load_dependencies:
/**
 * A wrapper class for our Amazon S3 connectivity.
 */
require_once plugin_dir_path( dirname( __FILE__ ) ) . 'includes/class-wp-license-manager-s3.php';
require_once plugin_dir_path( dirname( __FILE__ ) ) . 'lib/aws/aws-autoloader.php';
The first require line includes the wrapper class created above and the second one includes the AWS SDK's autoloader, a piece of code responsible for requiring the SDK source files as needed.
Step 2: Create the Function For Generating the Download Link
Inside the Wp_License_Manager_S3 class you just created, add the following function for generating a signed download link that can be used to download the protected file from Amazon S3:
/**
 * Returns a signed Amazon S3 download URL.
 *
 * @param $bucket       string  Bucket name
 * @param $file_name    string  File name (URI)
 * @return string       The signed download URL
 */
public static function get_s3_url( $bucket, $file_name ) {
    $options = get_option( 'wp-license-manager-settings' );

    $s3_client = Aws\S3\S3Client::factory(
        array(
            'key'    => $options['aws_key'],
            'secret' => $options['aws_secret']
        )
    );

    return $s3_client->getObjectUrl( $bucket, $file_name, '+10 minutes' );
}
Let's go through the function to see what id does:
Lines 11-16: Create an Amazon S3 client class instance for creating the download link. The SDK requires AWS security credentials, which we will store in WordPress options, using a settings screen we will create in the next step.
Line 18: Use the SDK to generate a download link for the given bucket and file name. The download link will be valid for 10 minutes from this moment forward so that the user will have enough time to start the download.
Step 3: Create a Settings Page for AWS Settings
As you noticed in the previous step, we need to store an AWS API key and secret in the WordPress options so that the plugin can be configured to be used with different AWS accounts.
To do this, let's use the Settings API. Creating a setting page using the Settings API consists of three steps: initializing the settings fields, adding the setting page, and defining functions for rendering the different pieces of the settings page.
It all starts by adding two actions, one to admin_init and one to admin_menu:
// Plugin settings menu
$this->loader->add_action( 'admin_init', $plugin_admin, 'add_plugin_settings_fields');
$this->loader->add_action( 'admin_menu', $plugin_admin, 'add_plugin_settings_page');
Now that you have added the actions, create the functions for handling them. They both need to be added to the class Wp_License_Manager_Admin.
First, add the function add_plugin_settings_fields that will initialize a settings section and then two settings fields to go inside it:
/**
 * Creates the settings fields for the plugin options page.
 */
public function add_plugin_settings_fields() {
    $settings_group_id = 'wp-license-manager-settings-group';
    $aws_settings_section_id = 'wp-license-manager-settings-section-aws';
    $settings_field_id = 'wp-license-manager-settings';

    register_setting( $settings_group_id, $settings_field_id );

    add_settings_section(
        $aws_settings_section_id,
        __( 'Amazon Web Services', $this->plugin_name ),
        array( $this, 'render_aws_settings_section' ),
        $settings_group_id
    );

    add_settings_field(
        'aws-key',
        __( 'AWS public key', $this->plugin_name ),
        array( $this, 'render_aws_key_settings_field' ),
        $settings_group_id,
        $aws_settings_section_id
    );

    add_settings_field(
        'aws-secret',
        __( 'AWS secret', $this->plugin_name ),
        array( $this, 'render_aws_secret_settings_field' ),
        $settings_group_id,
        $aws_settings_section_id
    );
}
Lines 5-7: Initialize three variables with the names of the settings field and section names. This helps us make sure we don't insert typos...
Line 9: Register the settings item 'wp-license-manager-settings'. It'll be an array in which the two settings, aws-key and aws-secret will be stored.
Lines 11-16: Add the settings section that will contain both of the settings fields.
Lines 18-32: Add our two settings fields (aws-key and aws-secret), placing them in the settings section created on lines 11-16.
Now, add the second function, add_plugin_settings_page. This function will create the settings page as a child of the main Settings menu, using the function add_options_page.
/**
 * Adds an options page for plugin settings.
 */
public function add_plugin_settings_page() {
    add_options_page(
        __( 'License Manager', $this->plugin_name ),
        __( 'License Manager Settings', $this->plugin_name ),
        'manage_options',
        'wp-license-settings',
        array( $this, 'render_settings_page' )
    );
}
Each of the elements in the Settings API functions above (the settings page, the settings section and both settings fields) take a rendering function as a parameter.
To complete the settings page setup, create those display functions:
/**
 * Renders the plugin's options page.
 */
public function render_settings_page() {
    $settings_group_id = 'wp-license-manager-settings-group';
    require plugin_dir_path( dirname( __FILE__ ) ) . 'admin/partials/settings_page.php';
}

/**
 * Renders the description for the AWS settings section.
 */
public function render_aws_settings_section() {
    // We use a partial here to make it easier to add more complex instructions
    require plugin_dir_path( dirname( __FILE__ ) ) . 'admin/partials/aws_settings_group_instructions.php';
}

/**
 * Renders the settings field for the AWS key.
 */
public function render_aws_key_settings_field() {
    $settings_field_id = 'wp-license-manager-settings';
    $options = get_option( $settings_field_id );
    ?>
        <input type='text' name='<?php echo $settings_field_id; ?>[aws_key]' value='<?php echo $options['aws_key']; ?>' class='regular-text'>
    <?php
}

/**
 * Renders the settings field for the AWS secret.
 */
public function render_aws_secret_settings_field() {
    $settings_field_id = 'wp-license-manager-settings';
    $options = get_option( $settings_field_id );
    ?>
       <input type='text' name='<?php echo $settings_field_id; ?>[aws_secret]' value='<?php echo $options['aws_secret']; ?>' class='regular-text'>
    <?php
}
The settings field rendering functions render_aws_key_settings_field and render_aws_secret_settings_field are basically copies of each other: first, they retrieve the plugin's options and then they print out a text field with the setting's name and current value.
The functions for rendering the settings page (render_settings_page) and settings section (render_aws_settings_section) are similar, but instead of printing the HTML right there in the function, they use separate HTML templates. This is by no means the only right way to do it — I chose this approach because these functions render a bit more HTML, and might be needed to be extended at some later point in time.
Here's what goes into the templates. First, admin/partials/settings_page.php, the partial for the settings page:
<?php
/**
 * The view for the plugin's options page.
 *
 * @package    Wp_License_Manager
 * @subpackage Wp_License_Manager/admin/partials
 */
?>

<div class="wrap">
    <div id="icon-edit" class="icon32 icon32-posts-post"></div>

    <h2>
        <?php _e( 'WP License Manager Settings', $this->plugin_name ); ?>
    </h2>

    <form action='options.php' method='post'>
        <?php
        settings_fields( $settings_group_id );
        do_settings_sections( $settings_group_id );
        submit_button();
        ?>
    </form>
</div>
The interesting part is at the end of the PHP file, where we create the form and insert the settings fields, sections, and the submit button.
The partial for the settings section (admin/partials/aws_settings_group_instructions.php) is currently almost empty, printing out a short line of instructions:
<?php
/**
 * The view for the AWS settings section's description on the plugin's settings page.
 *
 * @package    Wp_License_Manager
 * @subpackage Wp_License_Manager/admin/partials
 */
?>

<?php _e( 'Enter your AWS credentials below.', $this->plugin_name ); ?>
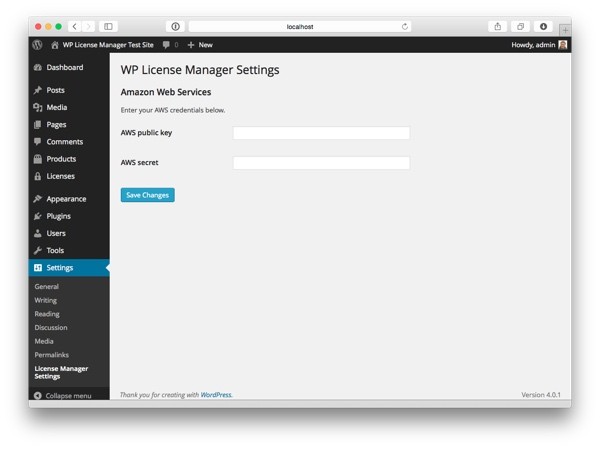
Now, we have created the settings page. Visit the WordPress dashboard to see it in action:
Step 4: Get an AWS API Key and Secret
To test the functionality, you still need to retrieve an API key and a secret from AWS and store it in the settings fields you just created.
To do this, return to the AWS admin console and click on your name on the top right menu. In the drop down that is shown, choose Security Credentials.
Next, you will be shown the following popup:
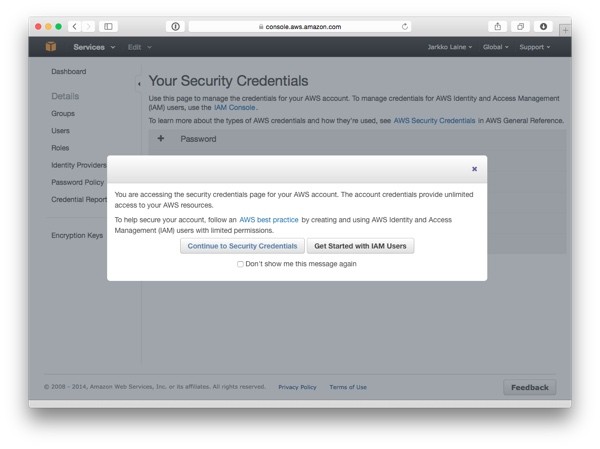
Select the option, Get Started with IAM Users. This way, instead of using your global security credentials everywhere, you can create separate user names (and access credentials) for any different AWS uses you might have.
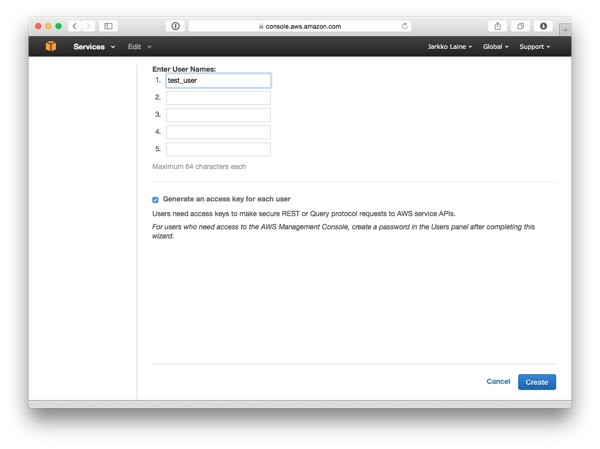
Next, create a user to use for your WP License Manager installation.
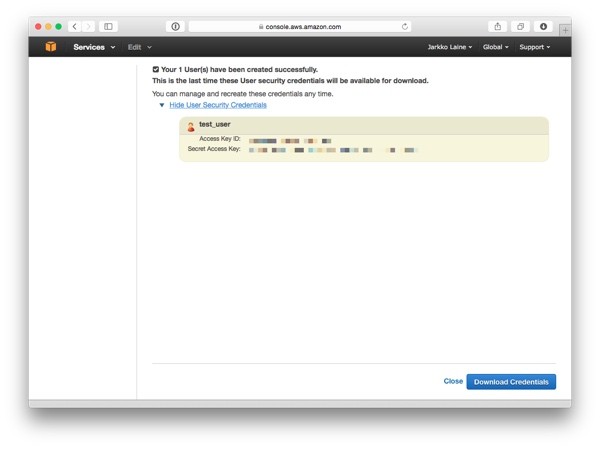
First, click on Create Users at the top of the page. Then, on the next page, enter a user name that makes sense to you (I used simply test_user, but a better option would probably be license-manager, or something that will tell you what the user is used for) and click on Create.
The user is created and on the next page, you will see its security credentials. Copy them and place in the settings fields we created in the previous step.
Step 5: Create the API Function
Now, we have built all the pieces needed for the get API action. Let's put them together and create the action itself.
First, fill in the switch..case block we left for the get action in the handle_request function inside Wp_License_Manager_API:
case 'get':
    $response = $this->verify_license_and_execute( array( $this, 'get_product' ), $params );
    break;
The function verify_license_and_execute is already done, so what's left is adding the handler function, get_product.
Here's the function:
/**
 * The handler for the "get" request. Redirects to the file download.
 *
 * @param   $product    WP_Post     The product object
 */
private function get_product( $product, $product_id, $email, $license_key ) {
    // Get the AWS data from post meta fields
    $meta = get_post_meta( $product->ID, 'wp_license_manager_product_meta', true );
    $bucket = isset ( $meta['file_bucket'] ) ? $meta['file_bucket'] : '';
    $file_name = isset ( $meta['file_name'] ) ? $meta['file_name'] : '';

    if ( $bucket == '' || $file_name == '' ) {
        // No file set, return error
        return $this->error_response( 'No download defined for product.' );
    }

    // Use the AWS API to set up the download
    // This API method is called directly by WordPress so we need to adhere to its
    // requirements and skip the JSON. WordPress expects to receive a ZIP file...

    $s3_url = Wp_License_Manager_S3::get_s3_url( $bucket, $file_name );
    wp_redirect( $s3_url, 302 );
}
Let's go through the function to see what it does:
Lines 7-10: Read the bucket and file name settings from the product's meta data.
Lines 12-15: If the meta data is not set, return an error response.
Line 21: Use the AWS SDK to create a signed URL for the requested product's downloadable file.
Line 22: Redirect to the signed download URL at S3. As we'll see in the next step part of the tutorial, WordPress expects this request to return the actual file so we have to divert from our JSON based API a little bit here and just do what works best for WordPress.
You have now finished building the license manager plugin. If you want, you can test the download in the same way we tested the info request earlier to see if everything is working and instead of showing the error we saw when accessing the file on S3 directly, your browser will download the zip file you uploaded to S3.
Conclusion
With the API finished, we have now completed the license manager plugin. While there are many features that could be added, the current version is fully functional and can be used to successfully handle licenses.
In the next, and final, part of the tutorial series, we will put it all together and make a WordPress theme and plugin use our license manager server to check for updates.

Comments