In this two-part series, I will be showing you how to create the classic game of hangman. This version comes with a surprise ending, however. If you win the game the hangman does a happy dance. Along the way, you will learn about Corona's drawing API, scene management, dispatching custom events, how to utilize a sprite sheet, and how to use modules to emulate classes in the Lua programming language.
In the second part of this series, we will make the hangman dance if the user wins the round. During the hangman's dance, we play some music that was created by knarmahfox, licensed under the Creative Commons Attribution License.
1. New Project
Open the Corona Simulator, click New Project, and configure the project as shown below.
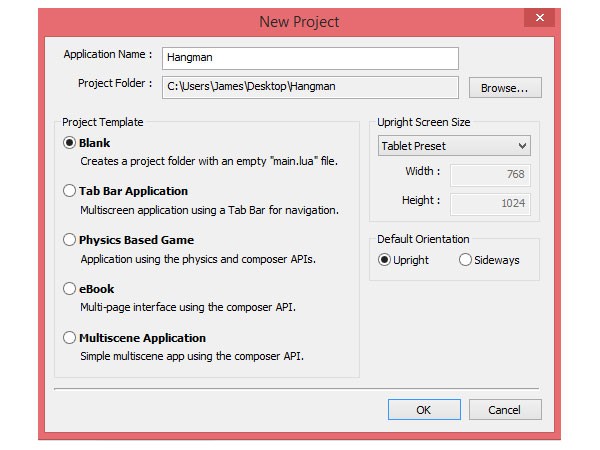
Select a location to save your project and click OK. This will create a folder with a number of icons and three files that are of interest to us, main.lua, config.lua, and build.settings. We'll take a look at each file in the next few steps.
2. Build Settings
The build.settings file is responsible for the build time properties of the project. Open this file, remove its contents, and populate it with the following configuration.
settings =
{
    orientation =
    {
        default ="portrait",
        supported =
        {
          "portrait"
        },
    },
}
In build.settings, we are setting the default orientation and restricting the application to only support a portrait orientation. You can learn which other settings you can include in build.settings by exploring the Corona documentation.
3. Application Configuration
The config.lua file handles the application's configuration. As we did with build.settings, open this file, remove its contents, and add the following configuration.
application =
{
    content =
    {
      width = 768,
      height = 1024,
      scale = "letterbox",
      fps = 30,
    }
}
This sets the default width and height of the screen, uses letterbox to scale the images, and sets the frame rate to 30. Visit the Corona documentation to learn more about the other properties you can set in config.lua.
4. Entry Point
The main.lua file is the file that the application loads first and uses to bootstrap the application. We will be using main.lua to set a few default settings for the application and the Composer library to load the first screen.
If you're not familiar with Corona's Composer library, then I recommend giving the
documentation
a quick read. In short, Composer is the built-in solution to scene
(screen) creation and management in Corona. The library provides
developers with an easy way to create and transition between scenes.
The newer Composer module replaces the older and now deprecated StoryBoard module. A migration guide is available to help convert your old projects over to use Composer.
Step 1: Hide Status Bar
We don't want the status bar showing in our application. Add the following code snippet to main.lua to hide the status bar.
display.setStatusBar(display.HiddenStatusBar)
Step 2: Set Default Anchor Points
To set the default anchor or registration points, add the following code block to main.lua.
display.setDefault( "anchorX", 0.5)
display.setDefault( "anchorY", 0.5)
The anchorX and anchorY properties specify where you want the registration point of your display objects to be. Note that the value ranges from 0.0 to 1.0. For example, if you want the registration point to be the top left of the display object, then you'd set both properties to 0.0.
Step 3: Seed Random Generator
Our game will be using Lua's math.random
function to generate random numbers. To make sure that the numbers are
truly random each time the application runs, you must provide a seed
value. If you don't provide a seed value, the application will generate
the same randomness every time.
A good seed value is Lua's os.time function since it will be different each time the
application is run. Add the following code snippet to main.lua.
math.randomseed( os.time() )
Step 4: Require Composer
Before we can use the Composer module, we must first require it. Add the following to main.lua.
local composer = require( "composer" )
Step 5: Load the GameScreen Scene
Add the following code snippet to main.lua. This will make the application go to the scene named gamescreen, which is also a Lua file, gamescreen.lua. You don't need to append the file extension when calling the gotoScene function.
composer.gotoScene( "gamescreen" )
5. GameScreen
Create a new Lua file named gamescreen.lua in the project's main directory. This will be a composer file, which means we need to require the Composer module and create a composer scene. Add the following snippet to gamescreen.lua.
local composer = require( "composer" )
local scene = composer.newScene()
return scene
The call to newScene makes gamescreen.lua part of composer's scene hierarchy. This means that it becomes a screen within the game, which we can call composer methods on.
From here on out, the code added to gamescreen.lua should be placed above the return statement.
Step 1: Local Variables
The following snippet includes the local variables we will need for the gamescreen scene.
local widget = require ("widget") -- Needed for the button widget
local growText = require("growtext") -- A module providing a growing text effect
local words5 = {} -- Holds words 5 characters or less in length
local words9 = {} -- Holds words 9 characters or less in length
local words13 = {} -- Holds words 13 characters or less in length
local hangmanGroup
local alphabetArray = {"A","B","C","D","E","F","G","H","I","J","K","L","M","N","O","P","Q","R","S","T","U","V","W","X","Y","Z"}
local guessWordText
local theWord -- The actual word
local guessWord -- The word the player has guessed
local numWrong = 0
local gameButtons = {} -- holds all the buttons
local winLoseText
local wonGame = false
It's important to understand that local variables in the main chunk only get called once, when the scene is loaded for the first time. When navigating through the composer scenes, for example, by invoking methods like gotoScence, the local variables will already be initialized.
This is important to remember if you want the local variables to be reinitialized when
navigating
back to a particular scene. The easiest way to do this is to remove the
scene from the composer hierarchy by calling the removeScence
method. The next time you navigate to that scene, the scene will automatically be reloaded. That's the approach we'll be taking in this
tutorial.
To be able to use Corona's ButtonWidget, we must require the Widget library. The growText module is a custom module we will create to provide a growing text effect. Create a new file in your project folder named growtext.lua.
Step 2: Composer Events
If you've taken the time to read the documentation of the Composer library, which I linked to earlier, you will have noticed the documentation includes a template that contains every possible composer
event. The comments are very useful as they indicate which events to
leverage for initializing assets, timers, etc. We are interested in the scene:create, scene:show, and scene:hide methods for this tutorial.
scene:create
Add the following code snippet to gamescreen.lua.
function scene:create( event )
    local group = self.view
end
This method is called when the scene's view doesn't exist yet. This is
where you should initialize the display objects and add them to the
scene. The group variable is pointing to self.view, which is a GroupObject for the entire scene.
scene:show
Composer's scene:show method has two phases. The will phase is called when the scene is still off-screen, but is about to come on-screen. The did
phase is called when the scene is on-screen. This is where you want to
add code to make the scene come alive, start timers, add event
listeners, play audio, etc.
In this tutorial, we are only interested in the did phase. Add the following code snippet to gamescreen.lua.
function scene:show( event )
    local phase = event.phase
    local previousScene = composer.getSceneName( "previous" )
	if(previousScene~=nil) then

		composer.removeScene(previousScene)
	end
   if ( phase == "did" ) then

   end

end
We declare a local variable phase, which we use to check which phase the show method is in. Since we will be coming back to this scene later in the game, we
check to see if there is a previous scene and, if true, remove it.
scene:hide
Composer's scene:hide method also has two phases. The will
phase is called when the scene is on-screen, but is about to go
off-screen. Here you will want to stop any timers, remove event
listeners, stop audio, etc. The did phase is called once the scene has gone off-screen.
In this tutorial, we are only interested in the will phase.
function scene:hide( event )
    local phase = event.phase
    if ( phase == "will" ) then

    end
end
Step 3: Add Scene Listeners
We need to add scene listeners for the create, show, and hide methods. Add the following code to gamescreen.lua.
scene:addEventListener( "create", scene )
scene:addEventListener( "show", scene )
scene:addEventListener( "hide", scene )
scene:addEventListener( "destroy", scene )
Step 4: Test Progress
You should now test the project to make sure there are no errors. An easy way to confirm that the project is working as it should is by putting a print statement in the scene:show method as shown below.
function scene:show( event )
    local phase = event.phase
    --SNIP--
   if ( phase == "did" ) then
    	print("Working") -- Temporary print statement
   end
end
If you test the app and look in the console you should see "Working" has been printed out. You can remove the print statement now that you have verified the project is working as it should.
6. Drawing the Chalkboard
We will draw a "chalkboard" that will be used as the background for the game. Enter the following code in gamescreen.lua.
function drawChalkBoard(r,g,b)
local chalkBoard = display.newRect( 0, 0, display.contentWidth, display.contentHeight )
    chalkBoard:setFillColor(r,g,b)
    chalkBoard.anchorX = 0
	chalkBoard.anchorY = 0
	scene.view:insert(chalkBoard)
end
The newRect method draws a rectangle onto the screen. It takes as parameters the x and y positions of the rectangle, and the width and height. We use display.contentWidth and display.contentHeight, which represent the original width and height of the content in pixels. These default to the screen's width and height.
The setFillColor takes as parameters the R, G, and B values as a percentage, ranging from 0 to 1. By passing in the R,G, B values as parameters, we can easily change the color of the chalkboard.
Earlier in this tutorial, we have set the default anchorX and anchorY to 0.5. We set them to 0 here so the rectangle will be drawn from the top left of the display. We insert the chalkboard into the scene's view so that it will be removed when the scene itself is removed.
Next, we need to invoke this method in the scene:create method as shown in the following code snippet.
function scene:create( event )
    local group = self.view
	drawChalkBoard(1,1,1)
end
7. Drawing API
The Corona SDK provides a drawing API through the Display class. We will only be using the drawing methods newCircle and newLine in this tutorial. We used the newRect drawing method in the previous step. The Display class also provides a method for drawing polygons. Check out the documentation for more info.
Step 1: Adding the hangmanGroup
The game will draw the hangman and place it into a GroupObject, hangmanGroup. This will allow us to operate on the drawn pieces as a group. Add the following to the scene:create method.
function scene:create( event )
    --SNIP--
    hangmanGroup = display.newGroup()
	group:insert(hangmanGroup)
    hangmanGroup.x = 180
    hangmanGroup.y = 180
end
Step 2: Drawing the Hangman
drawGallows
Add the following code to gamescreen.lua.
function drawGallows()
    local gallows = display.newLine( hangmanGroup,20,380,360, 380)
	gallows:append(290,380,290,50,180,50,180,90)
    gallows:setStrokeColor(0, 0, 0)
    gallows.strokeWidth = 3
end
Here we use the newLine method to draw the gallows. The parameters to newLine are the group in which to draw the line, the the starting x and y positions of the line, and the ending x and y positions of the line.
The append method lets us add extra x and y pairs to the original line. The method setStrokeColor sets the color of the line and the strokeWidth property sets the width of the line.
Invoke this method in scene:create.
function scene:create( event )
    --SNIP--
	hangmanGroup.x = 180
	hangmanGroup.y = 180
	drawGallows()
end
If you test the game at this point, you should see the gallows drawn to the screen.

drawHead
The following code draws the head.
 function drawHead()
    local head = display.newCircle(hangmanGroup,150,90,30)
 	head:setStrokeColor(0,0,0)
 	head:setFillColor(0,0,0,0)
 	head.strokeWidth = 3
    head.anchorX = 0
 	head.anchorY = 0
 end
The newCircle method takes as parameters the group into which to draw the circle, the x and y positions, and the radius of the circle. With the setFillColor method we pass in an extra 0, which is the alpha property. We don't want a filled circle, so by passing in 0 the fill will be completely transparent. The other options should be familiar if you have been following along.
drawBody
The drawBody function draws a vertical line representing the hangman's body.
function drawBody()
    local body = display.newLine(hangmanGroup,180,150,180,300)
    body:setStrokeColor(0, 0, 0)
    body.strokeWidth = 3
end
drawArm1 and drawArm2
The drawArm1 and drawArm2 functions draw the hangman's arms.
function drawArm1()
    local arm = display.newLine(hangmanGroup,180,200,130,190)
	arm:setStrokeColor(0, 0, 0)
    arm.strokeWidth = 3
end

function drawArm2()
	local arm= display.newLine(hangmanGroup,180,200,230,190)
	arm:setStrokeColor(0, 0, 0)
    arm.strokeWidth = 3
end
drawLeg1 and drawLeg2
The drawLeg1 and drawLeg2 functions draw the hangman's legs.
function drawLeg1()
    local leg = display.newLine(hangmanGroup,180,300,130,330)
    leg:setStrokeColor(0, 0, 0)
    leg.strokeWidth = 3
end

function drawLeg2()
	local leg = display.newLine(hangmanGroup,180,300,230,330)
    leg:setStrokeColor(0, 0, 0)
    leg.strokeWidth = 3
end
8. Testing Progress
Now that we have all the methods in place to draw the hangman, we can test and make sure everything is working as it should. All we need to do is invoke each of the previous methods in the scene:create method.
function scene:create( event )
    --SNIP--
	drawGallows()
	drawHead()
	drawBody()
	drawArm1()
	drawArm2()
	drawLeg1()
	drawLeg2()
end

You can now remove all the function calls we just added. We do not want the hangman being drawn as soon as the game starts. Make sure you do leave the drawGallows method though.
Conclusion
This brings the first of this two-part series to a close. In the second part, we will implement the gameplay and get the hangman dancing to some happy music. Thanks for reading and I hope to see you in the second part.

Comments