Introduction
In this tutorial, you'll learn how to create a mobile 2D game using C# and Unity. We'll be taking advantage of the Dolby Audio Plugin for Unity to enhance the game's audial experience. The objective of the game is simple, reaching the other side of the level while avoiding enemies and collecting coins.
In this tutorial, you will learn the following aspects of Unity game development:
- setting up a 2D project in Unity
- creating Prefabs
- movement and action buttons
- working with physics collisions
- using a sprite sheet
- integrating the Dolby Audio API
1. Create a New Unity Project
Open Unity and select New Project from the File menu to open the new project dialog. Tell Unity where you want to save the project and set the Set up defaults for: drop-down menu to 2D.

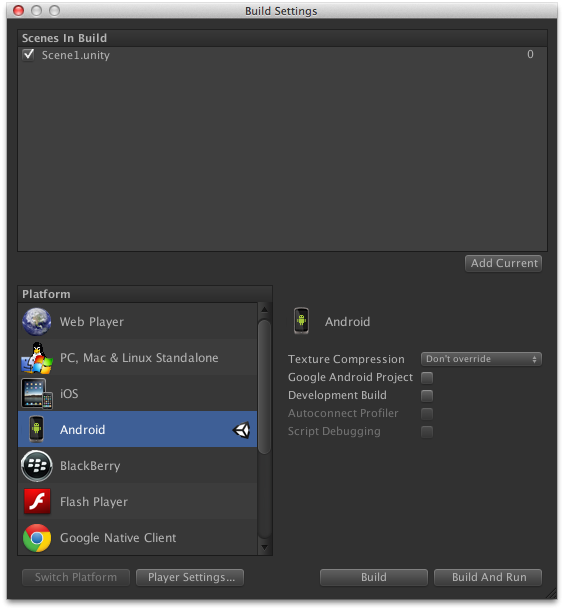
2. Build Settings
In the next step, you're presented with Unity's user interface. Set the project up for mobile development by choosing Build Settings from the File menu and select Android as the target platform.
3. Devices
Since we're about to create a 2D game, the first thing we need to do after selecting the target platform is choosing the size of the artwork that we'll use in the game. Because Android is an open platform, there's a wide range of devices, screen resolutions, and pixel densities available on today's market. A few of the more common ones are:
- Samsung Galaxy SIII: 720px x 1280px, 306 ppi
- Asus Nexus 7 Tablet: 800px x 1280px, 216 ppi
- Motorola Droid X: 854px x 480px, 228 ppi
Even though we'll be focusing on the Android platform in this tutorial, you can use the same code to target any of the other platforms that Unity supports.
4. Export Graphics
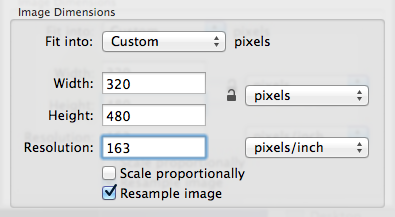
Depending on the devices you're targeting, you may need to convert the artwork for the game to the recommended size and pixel density. You can do this in your favorite image editor. I've used the Adjust Size... function under the Tools menu in OS X's Preview application.
5. Unity User Interface
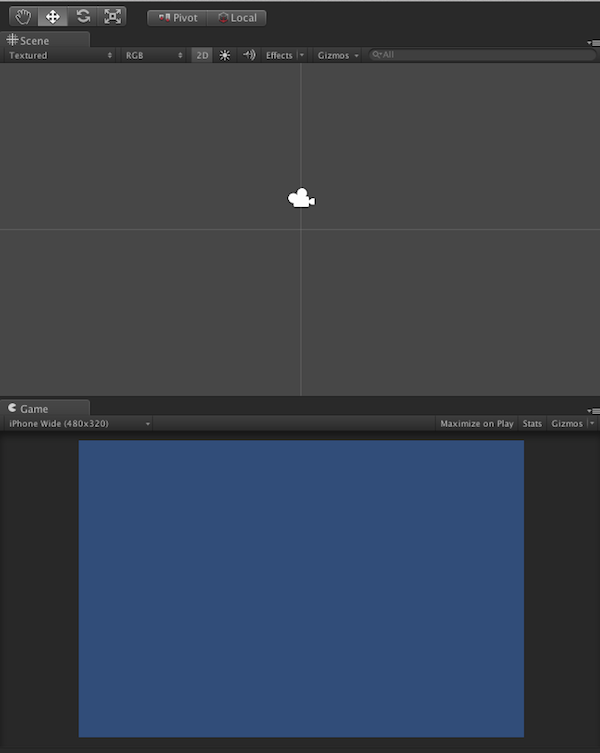
Before we get started, make sure to click the 2D button in the Scene panel. You can also modify the resolution that's being displayed in the Game panel.
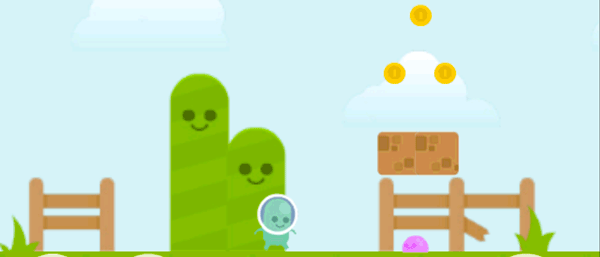
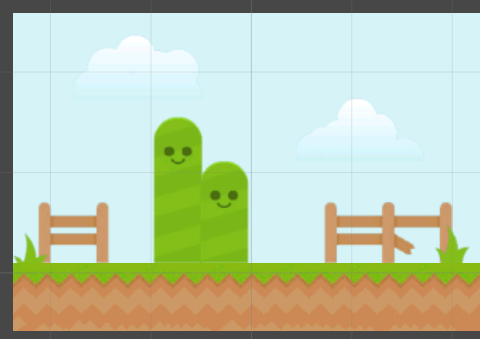
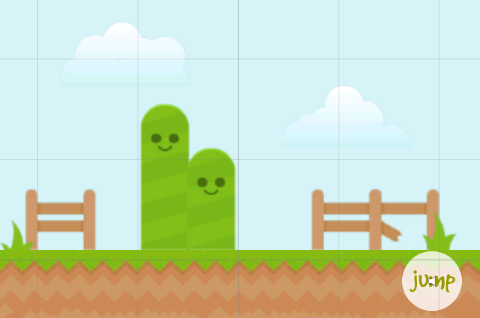
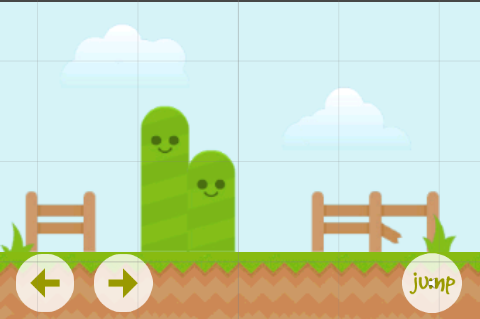
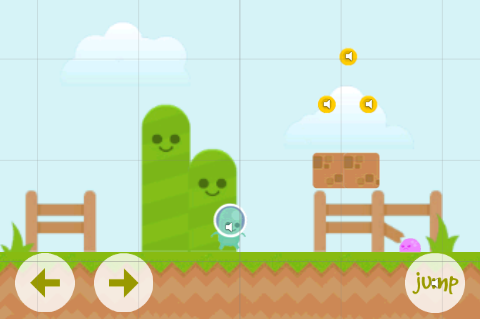
6. Game Interface
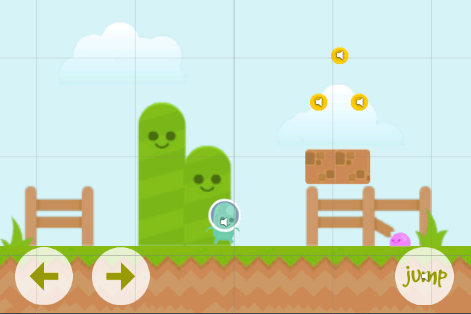
The interface of our game will be straightforward. The above screenshot gives you an idea of the artwork we'll be using and how the final game interface will end up looking. You can find the artwork for this tutorial in the source files of this tutorial.
7. Programming Language
You can use one of three programming languages when using Unity, C#, UnityScript, a variation of JavaScript, and Boo. Each of these programming languages has its pros and cons and it's up to you to decide which one you prefer. My personal preference goes to the C# programming language so that's the language I'll be using in this tutorial.
If you decide to use another programming language, make sure to take a look at Unity's Script Reference for examples.
8. 2D Graphics
Unity has built a name for being a great platform for creating 3D games for various platforms, such as Microsoft's Xbox 360, Sony's PS3, Nintendo's Wii, the web, and various mobile platforms.
While it's always been possible to use Unity for 2D game development, it wasn't until the release of Unity 4.3 that it included native 2D support. We'll learn how to work with images as sprites instead of textures in the next steps.
9. Sound Effects
I'll use a number of sounds to create a great audial experience for the game. The sound effects used in this tutorial were obtained from as3sfxr and PlayOnLoop.
10. Import Assets
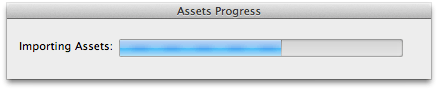
Before we start coding, we need to add our assets to the Unity project. You can do this one of several ways:
- select Import New Asset from the Assets menu
- add the items to the assets folder in your project
- drag and drop the assets in the project window
After completing this step, you should see the assets in your project's Assets folder in the Project panel.
11. Create Scene
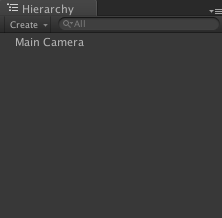
We're ready to create the scene of our game by dragging objects to the Hierarchy or Scene panel.
12. Background
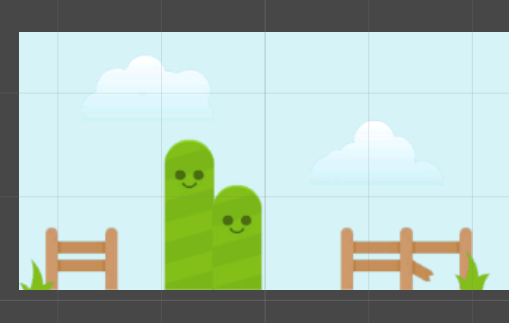
Start by dragging and dropping the background into the Hierarchy panel. It should automatically appear in the Scene panel.
Because the Scene panel is set to display a 2D view, you'll notice that selecting the Main Camera in the Hierarchy shows a preview of what the camera is going to display. You can also see this in the Game view. To make the entire scene visible, change the Size value of the Main Camera to 1.58 in the Inspector panel.
13. Floor
The floor is used to keep our main character from falling once we've added physics to the game. Drag it from the Assets folder and position it in the scene as shown below.
14. Floor Collider
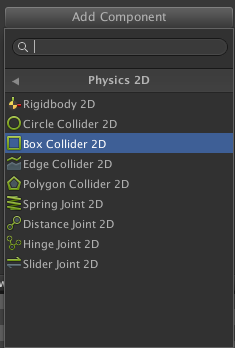
In order to make the floor detect when the character is touching it, we need to add a component, a Box Collider 2D to be precise.
Select the floor in the scene, open the Inspector panel, and click Add Component. From the list of components, select Box Collider 2D from the Physics 2D section.
15. Jump Button
We'll use buttons to control our main character in the game. Drag and position the jump button in the Scene and add a Circle Collider2D component as shown in the previous step.
16. Jump Sound
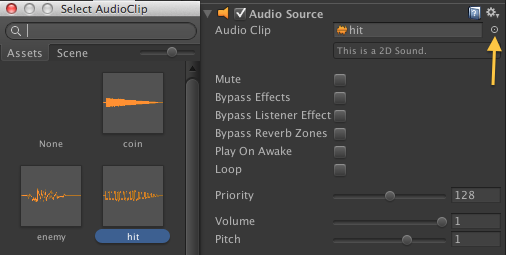
To play a sound when the character jumps, we first need to attach it to the jump button. Select it from the Hierarchy or Scene view, click the Add Component button in the Inspector panel, and select Audio Source in the Audio section.
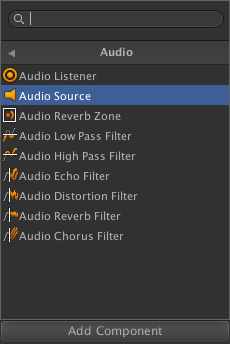
Uncheck Play on Awake and click the little dot on the right, below the gear icon, to select the sound we want to play when the player taps the button. In the next step, we'll implement the logic for playing the sound when the player taps the button.
17. Jump Script
Let's create the script that will control our character. Select the jump button and click the Add Component button in the Inspector panel. Select New Script and name it Jump. Don't forget to change the language to C#.
Open the newly created file and add the following code snippet.
using UnityEngine;
using System.Collections;

public class Jump : MonoBehaviour
{
    public float jumpForce;
    private GameObject hero; //used to reference our character (hero) on the scene

    // Use this for initialization
    void Start()
    {
        hero = GameObject.Find("Hero"); //gets the hero game object
    }

    // Update is called once per frame
    void Update()
    {
		/* Check if the user is touching the button on the device */

        if (Application.platform == RuntimePlatform.Android)
        {
            if (Input.touchCount > 0)
            {
                if (Input.GetTouch(0).phase == TouchPhase.Began)
                {
                    CheckTouch(Input.GetTouch(0).position, "began"); // function created below
                } else if (Input.GetTouch(0).phase == TouchPhase.Ended)
                {
                    CheckTouch(Input.GetTouch(0).position, "ended");
                }
            }
        }

		/* Check if the user is touching the button on the Editor, change OSXEditor value if you are on Windows */

        if (Application.platform == RuntimePlatform.OSXEditor)
        {
            if (Input.GetMouseButtonDown(0))
            {
                CheckTouch(Input.mousePosition, "began");
            }

            if (Input.GetMouseButtonUp(0))
            {
                CheckTouch(Input.mousePosition, "ended");
            }
        }
    }

    void CheckTouch(Vector3 pos, string phase)
    {
		/* Get the screen point where the user is touching */
        Vector3 wp = Camera.main.ScreenToWorldPoint(pos);
        Vector2 touchPos = new Vector2(wp.x, wp.y);
        Collider2D hit = Physics2D.OverlapPoint(touchPos);

		/* if button is touched... */

        if (hit.gameObject.name == "JumpButton" && hit && phase == "began")
        {
            hero.rigidbody2D.AddForce(new Vector2(0f, jumpForce)); //Add jump force to hero
            audio.Play(); // play audio attached to this game object (jump sound)
        }
    }
}
The code snippet may seem daunting, but it's actually pretty straightforward. We first get a reference to the hero object, an instance of the GameObject class, so we can use it later. We then detect if the user is touching the jump button and, if they are, add a force to the hero object. Last but not least, we play the jump sound when the jump button is tapped.
18. Movement Buttons
The steps to add and implement the movement buttons, left and right, are very similar. Start by placing the buttons in the scene and add a Circle Collider 2D to each button like we did with the jump button.
19. Movement Scripts
Create a new script, attach it to the left button, and name it MoveLeft. Replace its contents with the following code snippet, which contains the MoveLeft method.
using UnityEngine;
using System.Collections;

public class MoveLeft : MonoBehaviour
{
    public Vector3 moveSpeed = new Vector3();
    private bool moving = false;
    private GameObject[] scene; //array of game objects that conform the scene
    private GameObject bg;

    // Use this for initialization
    void Start()
    {
        scene = GameObject.FindGameObjectsWithTag("Moveable"); //Game objects with Moveable tag
        bg = GameObject.Find("Background"); //Game Background
    }

    // Update is called once per frame
    void Update()
    {
       /* Detect touch */
		if (Application.platform == RuntimePlatform.Android)
        {
            if (Input.touchCount > 0)
            {
                if (Input.GetTouch(0).phase == TouchPhase.Began)
                {
                    CheckTouch(Input.GetTouch(0).position, "began");
                } else if (Input.GetTouch(0).phase == TouchPhase.Ended)
                {
                    CheckTouch(Input.GetTouch(0).position, "ended");
                }
            }
        }

        if (Application.platform == RuntimePlatform.OSXEditor)
        {
            if (Input.GetMouseButtonDown(0))
            {
                CheckTouch(Input.mousePosition, "began");
            }

            if (Input.GetMouseButtonUp(0))
            {
                CheckTouch(Input.mousePosition, "ended");
            }
        }

        // Move if button is pressed
        if (moving && bg.transform.position.x < 4.82f)
        {
            for (int i = 0; i < scene.Length; i++)
            {
                if (scene [i] != null)
                {
                    scene [i].transform.position += moveSpeed;
                }
            }
        }
    }

    void CheckTouch(Vector3 pos, string phase)
    {
        Vector3 wp = Camera.main.ScreenToWorldPoint(pos);
        Vector2 touchPos = new Vector2(wp.x, wp.y);
        Collider2D hit = Physics2D.OverlapPoint(touchPos);

        if (hit.gameObject.name == "LeftButton" && hit && phase == "began")
        {
            moving = true;
        }

        if (hit.gameObject.name == "LeftButton" && hit && phase == "ended")
        {
            moving = false;
        }
    }
}
In this script, we create an array of the elements tagged as Moveable—we'll tag them later in this tutorial—to make it easier to move them all at once. To move the elements, we first check if the button is being touched and change the position using moveSpeed in the Update function. It's as simple as that.
Create another script, attach it to the right button, and name it MoveRight. This script contains the MoveRight method and its implementation is similar to that of the MoveLeft method we saw a moment ago. We change the direction of the movement by replacing += moveSpeed with -= moveSpeed. This will move the scene in the opposite direction.
In the MoveRight script, we also check if the player has completed the level.
using UnityEngine;
using System.Collections;

public class MoveRight : MonoBehaviour
{
    public Vector3 moveSpeed = new Vector3();
    private bool moving = false;
    private GameObject[] scene;
    private GameObject bg;
    public AudioClip completeSound;
    private GameObject[] buttons;
    private GameObject completeText;
    private bool ended = false;
    public Font goodDog;

    // Use this for initialization
    void Start()
    {
        scene = GameObject.FindGameObjectsWithTag("Moveable");
        bg = GameObject.Find("Background");
        buttons = GameObject.FindGameObjectsWithTag("Buttons");
    }

    // Update is called once per frame
    void Update()
    {
        if (Application.platform == RuntimePlatform.Android)
        {
            if (Input.touchCount > 0)
            {
                if (Input.GetTouch(0).phase == TouchPhase.Began)
                {
                    CheckTouch(Input.GetTouch(0).position, "began");
                } else if (Input.GetTouch(0).phase == TouchPhase.Ended)
                {
                    CheckTouch(Input.GetTouch(0).position, "ended");
                }
            }
        }

        if (Application.platform == RuntimePlatform.OSXEditor)
        {
            if (Input.GetMouseButtonDown(0))
            {
                CheckTouch(Input.mousePosition, "began");
            }

            if (Input.GetMouseButtonUp(0))
            {
                CheckTouch(Input.mousePosition, "ended");
            }
        }

        // Move if button is pressed && stage is not over
        if (moving && bg.transform.position.x > -4.8f)
        {
            for (int i = 0; i < scene.Length; i++)
            {
                if (scene [i] != null)
                {
                    scene [i].transform.position -= moveSpeed;
                }
            }
        }

        // Stage Completed
        if (bg.transform.position.x <= -4.8f && ended == false)
        {
            Alert("complete");
        }
    }

    void CheckTouch(Vector3 pos, string phase)
    {
        Vector3 wp = Camera.main.ScreenToWorldPoint(pos);
        Vector2 touchPos = new Vector2(wp.x, wp.y);
        Collider2D hit = Physics2D.OverlapPoint(touchPos);

        if (hit.gameObject.name == "RightButton" && hit && phase == "began")
        {
            moving = true;
        }

        if (hit.gameObject.name == "RightButton" && hit && phase == "ended")
        {
            moving = false;
        }
    }

    public void Alert(string action)
    {
        ended = true;

        completeText = new GameObject();
        completeText.AddComponent("GUIText");
        completeText.guiText.font = goodDog;
        completeText.guiText.fontSize = 50;
        completeText.guiText.color = new Color(255, 0, 0);

        if (action == "complete")
        {
            AudioSource.PlayClipAtPoint(completeSound, transform.position);

            completeText.guiText.text = "Level Complete!";
            completeText.guiText.transform.position = new Vector3(0.24f, 0.88f, 0);

        } else
        {
            completeText.guiText.text = "Game Over";
            completeText.guiText.transform.position = new Vector3(0.36f, 0.88f, 0);
        }

        bg.GetComponent().Stop();

        for(int i = 0; i < buttons.Length; i++)
        {
            buttons[i].renderer.enabled = false;
            Invoke("restart", 2);
        }
    }

    void restart()
    {
        Application.LoadLevel(Application.loadedLevel);
    }
}
The Alert function creates and displays a message to the player and plays the sound attached to the background sprite. For this to work, add the corresponding sound to the background sprite as we saw earlier in this tutorial. We also hide the buttons and restart the game with a delay of two seconds.
20. Sprite Sheet
We'll use a sprite sheet for the rest of the game elements. Unity has a sprite editor that makes using sprites a breeze. The artwork used in this tutorial was obtained from OpenGameArt.org.

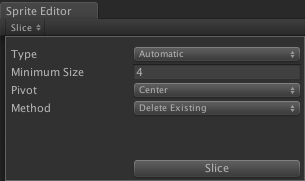
Import the artwork, select it from the Assets panel, and change the Sprite Mode option to Multiple in the Inspector panel.
Open the Sprite Editor by clicking the button below and select Slice > Automatic.
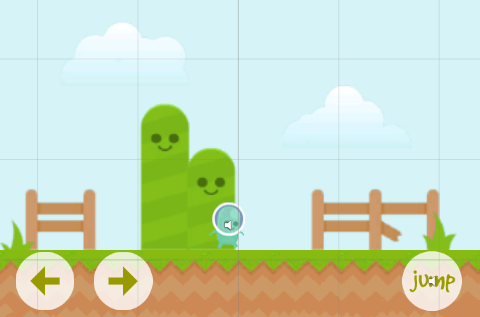
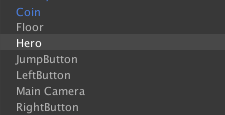
21. Hero
With the sprite sheet sliced and ready to use, click the arrow that appears when the sprite sheet is selected and choose the sprite for the hero, the main character of our game. Place it on the scene and add a Collider 2D component to it.
22. Hero RigidBody 2D
To detect a collision with our hero, at least one of the colliding objects needs to have a RigidBody 2D component attached to it. To add one to our hero, select Add Component in the Inspector panel, followed by Physics 2D > RigidBody 2D.
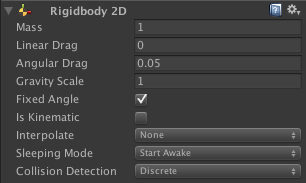
Check the Fixed Angle box to prevent the hero from rotating if a collision occurs.
23. Hero Sound
When our hero is hit by an enemy, we play another sound to give the player feedback. If you've ever played Super Mario Bros., then you probably know what effect we're after. To accomplish this, we first need to add the sound. Select it from the Hierarchy or Scene view, click the Add Component button in the Inspector panel, and select Audio Source in the Audio section.
The details of the audio component will show up in the Inspector Panel. Click the dot below the gear icon and select the hit sound.
24. Collecting Coins
As in many traditional 2D platformers, you can collect coins in our game. Because we'll use this object multiple times in the game, we'll convert it to a Prefab once we've added all the necessary components.

Drag the coin from the Assets folder and add a Collider2D as we saw in the previous steps.
25. Coin Sound
We play a sound whenever our hero collects a coin. Add an Audio Source component as we saw a moment ago and select the coin sound from the project's assets.
26. Coin Script & Prefab
Attach this simple script to the coin. It detects when the coin and the hero collide. The coin is destroyed and a sound is played to indicate that the coin has been collected by the hero.
using UnityEngine;
using System.Collections;

public class GrabCoin : MonoBehaviour
{
    void OnTriggerEnter2D(Collider2D other)
    {
        if (other.gameObject.name == "Hero")
        {
            audio.Play();
            Destroy(gameObject.collider2D);
            gameObject.renderer.enabled = false;
            Destroy(gameObject, 0.47f);// Destroy the object -after- the sound played
        }
    }
}
With all the components in place, drag the coin from the Hierarchy panel to the Assets panel to convert it to a Prefab. You'll notice the text becomes blue indicating it's now a Prefab.
27. Enemy
Let's not forget the enemies of the game. Drag the artwork for the enemy from the Assets folder and add two Collider 2D components as shown in the screenshot below.

The colliders are reduced in size to prevent the hero from colliding with both colliders at once. Change the settings of each Collider 2D component as below.
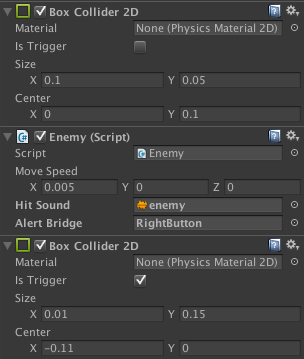
The first collider in the panel is the topmost collider that we've added to the enemy. It will detect if the hero jumps on top of the enemy and destroys it. The logic for this action is shown in the script below.
We mark the second collider as a trigger by checking the checkbox labeled Is Trigger. It detects when the enemy runs into the hero or vice versa. When that happens, the player loses the game.
The script attached to the enemy is shown below and implements the logic we just discussed. As you can see, the enemy is moved to the left in every frame and the script detects when the hero jumps on top of the enemy or when the hero runs into the enemy.
using UnityEngine;
using System.Collections;

public class Enemy : MonoBehaviour
{
    public Vector3 moveSpeed;
    public AudioClip hitSound;
    public GameObject alertBridge;

    // Use this for initialization
    void Start()
    {
    }

    // Update is called once per frame
    void Update()
    {
        transform.position -= moveSpeed; //Move the enemy to the left
    }

    void OnCollisionEnter2D(Collision2D other) //Hero jumps on enemy
    {
        if (other.gameObject.name == "Hero")
        {
            AudioSource.PlayClipAtPoint(hitSound, transform.position);
            Destroy(gameObject);
        }

    }

    void OnTriggerEnter2D(Collider2D other) //hero hits side of enemy
    {
        if (other.gameObject.name == "Hero")
        {
            other.gameObject.audio.Play(); //Play audio
            Destroy(other.gameObject.collider2D); //Remove collider to avoid audio replaying
            other.gameObject.renderer.enabled = false; //Make object invisible
            Destroy(other.gameObject, 0.626f); //Destroy object when audio is done playing, destroying it before will cause the audio to stop
            alertBridge.GetComponent().Alert("gameover");
        }
    }
}
28. Bricks
Bricks are used as platforms. The hero can jump on the bricks to avoid enemies and collect coins. Drag the brick artwork from the Assets panel and add a Collider 2D component to it. Don't forget to convert it to a Prefab, because it will be used quite a bit in the game.
29. The End
We'll use a sprite to show the finish line of the level. Drag it from the Assets panel to the Scene as shown in the screenshot below.

30. Dolby Audio Plugin

Let's enhance the audial experience of our game by using the Dolby Audio Plugin for Unity. However, let me first explain why you should be using the Dolby Audio Plugin and how it will improve your game.
Dolby Digital Plus is an advanced audio solution built into many mobile devices including tablets. Mobile applications can leverage the Dolby Digital Plus capabilities via API. Some of the benefits include Audio Optimization, Volume Maximization, and Volume Leveling. Dolby has made its API available for several platforms, including Android and Kindle Fire. In our game, we will take advantage of the Dolby Audio Plugin for Unity.
Note that the plugin for Unity is free to use and very easy to integrate. In other words, there's no reason not to include it in your next game.
Start by downloading Dolby's Unity plugin. You can download it from the Unity Asset Store or directly from Dolby's developer website. If you choose the latter option, then create a free account to download the plugin or log in if you already have a Dolby developer account. Extract the package and copy the version you need to Assets > Plugins > Android. That's how easy it is to install the plugin for Unity.

Create a new script and attach it to an object that is always present in the game like the background or the camera. Name the script Dolby and populate it with the following code snippet.
using UnityEngine;
using System.Collections;

using System.Runtime.InteropServices; //Allows us to use DLLImport

public class Dolby : MonoBehaviour
{
    private GameObject debugText;
    public Font arial;

	/* Import plugin functions */

    [DllImport("DSPlugin")]
    public static extern  bool isAvailable();
    [DllImport("DSPlugin")]
    public static extern  int initialize();
    [DllImport("DSPlugin")]
    public static extern  int setProfile(int profileid);
    [DllImport("DSPlugin")]
    public static extern  int suspendSession();
    [DllImport("DSPlugin")]
    public static extern  int restartSession();
    [DllImport("DSPlugin")]
    public static extern void release();

    // Use this for initialization
    void Start()
    {
		/* Textfield created for feedback */
		debugText = new GameObject();
        debugText.AddComponent("GUIText");
        debugText.guiText.font = arial;
        debugText.guiText.fontSize = 14;
        debugText.guiText.color = new Color(255, 0, 0);
        debugText.transform.position = new Vector3(0, 1, 0);

        /* Initialize Dolby if Available */

        if (isAvailable())
        {
            Invoke(Init, 0.1f); // Wait 100ms to make sure Dolby service is enabled
        }
        else
        {
            debugText.guiText.text = "Dolby Sound Not Available";
        }
    }

    void Init()
    {
        debugText.guiText.text = "Dolby Sound Available";
        setProfile(2); /* Set Profile to "Game" */
        initialize();
    }

    void OnApplicationPause()
    {
        suspendSession();// Dolby sound stops if app switched or paused
    }

    void OnApplicationFocus()
    {
        restartSession(); // Restart Dolby sound if app is active
    }

    void OnApplicationQuit()
    {
        release(); //Stops Dolby Sound completely
    }
}
I'm sure you agree that it's very easy to integrate the Dolby Audio API into your game. We first create a debugText object, which is of type GameObject, to receive feedback from the device. We then import the necessary functions defined by the Dolby Audio API and initialize the Dolby Audio API if the user's device supports it.
To ensure that the Dolby service is enabled, we briefly wait (0.1s) before calling the initialize() method. If we don't do this, there's a chance you receive a -1 error, which can happen when you try to set Dolby on when the service is getting established.
Dolby has also included functions to suspend and restart the sound when needed, which is useful when we switch to another application and we don't need the sound enhancement. This is important to conserve battery power and other device resources. We can also stop the sound enhancement completely by invoking release as we do in OnApplicationQuit.
31. Testing
It's time to test the game. Press Command-P to play the game in Unity. If everything works as expected, you are ready for the final steps.
32. Player Settings
When you're happy with your game, it's time to select Build Settings from the File menu and click the Player Settings button. This should bring up the Player Settings in the Inspector panel where you can set the parameters for your application.
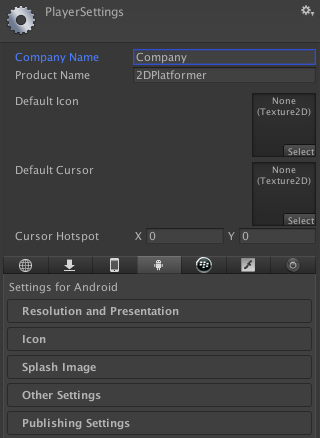
These settings are application specific and include the creator or company, application resolution, display mode, etc. These settings depend on the devices you're targeting and the stores or markets you will be publishing your game on.
33. Icons and Splash Images
Using the graphics you created earlier, you can now create a nice icon and a splash image for your game. Unity shows you the required sizes, which depend on the platform you're building for.
34. Build and Play
Once your project is properly configured, it's time to revisit the Build Settings and click the Build button. That's all it takes to build your game for testing and/or distribution.
Conclusion
In this tutorial, we've learned about the new Dolby Audio Plugin for Unity, sprite sheets, controls, collision detection, and other aspects of game development using Unity. I encourage you to experiment with the result and customize the game to make it your own. I hope you liked this tutorial and found it helpful.

Comments