In the previous article, we learned about NSManagedObject and how easy it is to create, read, update, and delete records using Core Data. However, I didn't mention relationships in that discussion. Aside from a few caveats you need to be aware of, relationships are just as easy to manipulate as attributes. In this article, we will focus on relationships and we'll also continue our exploration of NSFetchRequest.
1. Relationships
We've already worked with relationships in the Core Data model editor and what I'm about to tell you will therefore sound familiar. Relationships are, just like attributes, accessed using key-value coding. Remember that the data model we created earlier in this series defines a Person entity and an Address entity. A person is linked to one or more addresses and an address is linked to one or more persons. This is a many-to-many relationship.
To fetch the addresses of a person, we simply invoke valueForKey: on the person, an instance of NSManagedObject, and pass in addresses as the key. Note that addresses is the key we defined in the data model. What type of object do you expect? Most people new to Core Data expect a sorted NSArray, but Core Data returns an NSSet, which is unsorted. Working with NSSet has its advantages as you'll learn later.
Creating Records
Enough with the theory, open the project from the previous article or clone it from GitHub. Let's start by creating a person and then link it to an address. To create a person, update the application:didFinishLaunchingWithOptions: method as shown below.
- (BOOL)application:(UIApplication *)application didFinishLaunchingWithOptions:(NSDictionary *)launchOptions {
    // Initialize Window
    self.window = [[UIWindow alloc] initWithFrame:[[UIScreen mainScreen] bounds]];

    // Configure Window
    [self.window setBackgroundColor:[UIColor whiteColor]];
    [self.window makeKeyAndVisible];

    // Create Person
    NSEntityDescription *entityPerson = [NSEntityDescription entityForName:@"Person" inManagedObjectContext:self.managedObjectContext];
    NSManagedObject *newPerson = [[NSManagedObject alloc] initWithEntity:entityPerson insertIntoManagedObjectContext:self.managedObjectContext];

    // Set First and Lats Name
    [newPerson setValue:@"Bart" forKey:@"first"];
    [newPerson setValue:@"Jacobs" forKey:@"last"];
    [newPerson setValue:@44 forKey:@"age"];

    return YES;
}
This should look familiar if you've read the previous article. Creating an address looks similar as you can see below.
// Create Address
NSEntityDescription *entityAddress = [NSEntityDescription entityForName:@"Address" inManagedObjectContext:self.managedObjectContext];
NSManagedObject *newAddress = [[NSManagedObject alloc] initWithEntity:entityAddress insertIntoManagedObjectContext:self.managedObjectContext];

// Set First and Last Name
[newAddress setValue:@"Main Street" forKey:@"street"];
[newAddress setValue:@"Boston" forKey:@"city"];
Because every attribute of the Address entity is marked as optional, we don't need to assign a value to each attribute. In the above example, we only set the record's street and city attributes.
Creating a Relationship
To link the newAddress to the newPerson, we invoke setValue:forKey:, passing in addresses as the key. The value that we pass in is a NSSet that contains newAddress. Take a look at the following code block for clarification.
// Add Address to Person
[newPerson setValue:[NSSet setWithObject:newAddress] forKey:@"addresses"];

// Save Managed Object Context
NSError *error = nil;
if (![newPerson.managedObjectContext save:&error]) {
    NSLog(@"Unable to save managed object context.");
    NSLog(@"%@, %@", error, error.localizedDescription);
}
We call save: on the managed object context of the newPerson object to propagate the changes to the persistent store. Remember that calling save: on a managed object context saves the state of the managed object context. This means that newAddress is also written to the backing store as well as the relationships we just defined.
You may be wondering why we didn't link newPerson to newAddress, because we did define an inverse relationship in our data model. Core Data creates this relationship for us. If a relationship has an inverse relationship, then Core Data takes care of this automatically. You can verify this by asking the newAddress object for its persons.
Fetching and Updating a Relationship
Updating a relationship isn't difficult either. The only caveat is that we need to add or remove elements from the immutable NSSet instance Core Data hands to us. To make this task easier, however, NSManagedObject declares a convenience method mutableSetValueForKey:, which returns an NSMutableSet object. We can then simply add or remove an item from the collection to update the relationship.
Take a look at the following code block in which we create another address and associate it with newPerson. We do this by invoking mutableSetValueForKey: on newPerson and adding otherAddress to the mutable set. There is no need to tell Core Data that we've updated the relationship. Core Data keeps track of the mutable set that it gave us and updates the relationship accordingly.
// Create Address
NSManagedObject *otherAddress = [[NSManagedObject alloc] initWithEntity:entityAddress insertIntoManagedObjectContext:self.managedObjectContext];

// Set First and Last Name
[otherAddress setValue:@"5th Avenue" forKey:@"street"];
[otherAddress setValue:@"New York" forKey:@"city"];

// Add Address to Person
NSMutableSet *addresses = [newPerson mutableSetValueForKey:@"addresses"];
[addresses addObject:otherAddress];
Deleting a Relationship
Deleting a relationship is as simple as invoking setValue:forKey:, passing in nil as the value and the name of the relationship as the key. This unlinks every address from newPerson.
// Delete Relationship
[newPerson setValue:nil forKey:@"addresses"];
2. One-To-One and One-To-Many Relationships
One-To-One Relationships
Even though our data model doesn't define a one-to-one relationship, you've learned everything you need to know to work with this type of relationship. Working with a one-to-one relationship is identical to working with attributes. The only difference is that the value you get back from valueForKey: and the value you pass to setValue:forKey: is an NSManagedObject instance.
Let's update our data model to illustrate this. Open Core_Data.xcdatamodeld and select the Person entity. Create a new relationship and name it spouse. Set the Person entity as the destination and set the spouse relationship as the inverse relationship.
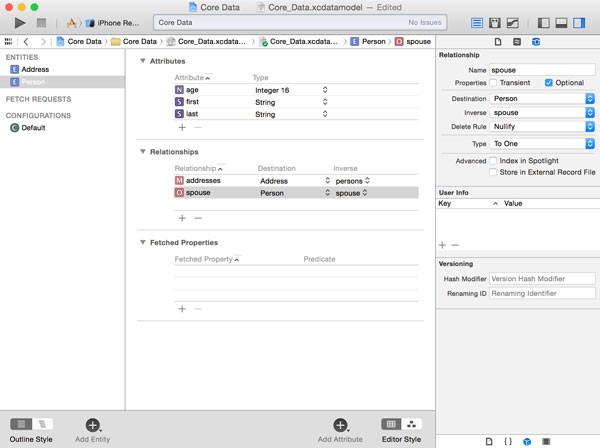
As you can see, it's perfectly possible to create a relationship in which the destination of the relationship is the same entity as the entity that defines the relationship. Also note that we always set the inverse of the relationship. As the documentation states, there are very few situations in which you would want to create a relationship that doesn't have an inverse relationship.
Do you know what will happen if you were to build and run the application? That's right, the application would crash. Because we changed the data model, the existing store, a SQLite database in this example, is no longer compatible with the data model. To remedy this, remove the application from your device or iOS Simulator and run the application. Don't worry though, we'll solve this problem more elegantly in a future installment using migrations.
If you can run the application without problems, then it's time for the next step. Head back to the application delegate class and add the following code block.
// Create Another Person
NSManagedObject *anotherPerson = [[NSManagedObject alloc] initWithEntity:entityPerson insertIntoManagedObjectContext:self.managedObjectContext];

// Set First and Last Name
[anotherPerson setValue:@"Jane" forKey:@"first"];
[anotherPerson setValue:@"Doe" forKey:@"last"];
[anotherPerson setValue:@42 forKey:@"age"];
To set anotherPerson as the spouse of newPerson, we invoke setValue:forKey: on newPerson and pass in anotherPerson and @"spouse" as the arguments. We can achieve the same result by invoking setValue:forKey: on anotherPerson and passing in newPerson and @"spouse" as the arguments.
// Create Relationship
[newPerson setValue:anotherPerson forKey:@"spouse"];
One-To-Many Relationships
Let's finish with a look at one-to-many relationships. Open Core_Data.xcdatamodeld, select the Person entity, and create a relationship named children. Set the destination to Person , set the type to To Many, and leave the inverse relationship empty for now.
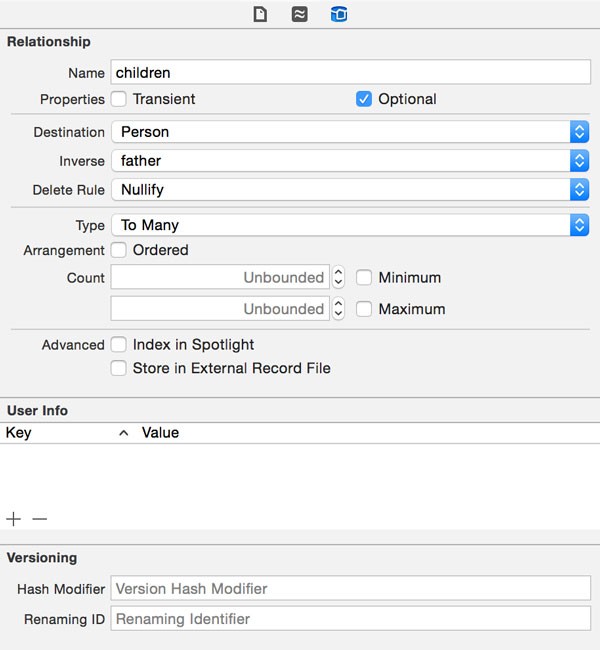
Create another relationship named father, set the destination to Person, and set the inverse relationship to children. This will automatically populate the inverse relationship of the children relationship we left blank a moment ago. We've now created a one-to-many relationship, that is, a father can have many children, but a child can only have one father.

Head back to the application delegate and add the following code block. We create another Person record, set its attributes, and set it as a child of newPerson by asking Core Data for a mutable set for the key children and adding the new record to the mutable set.
// Create a Child Person
NSManagedObject *newChildPerson = [[NSManagedObject alloc] initWithEntity:entityPerson insertIntoManagedObjectContext:self.managedObjectContext];

// Set First and Last Name
[newChildPerson setValue:@"Jim" forKey:@"first"];
[newChildPerson setValue:@"Doe" forKey:@"last"];
[newChildPerson setValue:@21 forKey:@"age"];

// Create Relationship
NSMutableSet *children = [newPerson mutableSetValueForKey:@"children"];
[children addObject:newChildPerson];
The following code block accomplishes the same result by setting the father attribute of anotherChildPerson. The result is that newPerson becomes the father of anotherChildPerson and anotherChildPerson becomes a child of newPerson.
// Create Another Child Person
NSManagedObject *anotherChildPerson = [[NSManagedObject alloc] initWithEntity:entityPerson insertIntoManagedObjectContext:self.managedObjectContext];

// Set First and Last Name
[anotherChildPerson setValue:@"Lucy" forKey:@"first"];
[anotherChildPerson setValue:@"Doe" forKey:@"last"];
[anotherChildPerson setValue:@19 forKey:@"age"];

// Create Relationship
[anotherChildPerson setValue:newPerson forKeyPath:@"father"];
3. More Fetching
The data model of our sample application has grown quite a bit in terms of complexity. We've created one-to-one, one-to-many, and many-to-many relationships. We've seen how easy it is to create records, including relationships. However, if we also want to be able to pull that data from the persistent store, then we need to know more about fetching. Let's start with a simple example in which we see how to sort the results returned by a fetch request.
Sort Descriptors
To sort the records we get back from the managed object context, we use the NSSortDescriptor class. Take a look at the following code snippet.
// Fetching
NSFetchRequest *fetchRequest = [[NSFetchRequest alloc] initWithEntityName:@"Person"];

// Add Sort Descriptor
NSSortDescriptor *sortDescriptor = [NSSortDescriptor sortDescriptorWithKey:@"first" ascending:YES];
[fetchRequest setSortDescriptors:@[sortDescriptor]];

// Execute Fetch Request
NSError *fetchError = nil;
NSArray *result = [self.managedObjectContext executeFetchRequest:fetchRequest error:&fetchError];

if (!fetchError) {
    for (NSManagedObject *managedObject in result) {
        NSLog(@"%@, %@", [managedObject valueForKey:@"first"], [managedObject valueForKey:@"last"]);
    }

} else {
    NSLog(@"Error fetching data.");
    NSLog(@"%@, %@", fetchError, fetchError.localizedDescription);
}
We initialize a fetch request by passing in the entity that we're interested in, Person. We then create an NSSortDescriptor object by invoking sortDescriptorWithKey:ascending:, passing in the attribute of the entity we'd like to sort by, first, and a boolean indicating whether the records need to be sorted in ascending or descending order.
We tie the sort descriptor to the fetch request by invoking setSortDescriptors: on the fetch request, passing in an array that includes the sort descriptor. Because setSortDescriptors: accepts an array, it is possible to pass in more than one sort descriptor. We'll take a look at this option in a moment.
The rest of the code block should look familiar. The fetch request is passed to the managed object context, which executes the fetch request when we invoke executeFetchRequest:error:. It's important to always pass in a pointer to an NSError object to know what went wrong if the execution of the fetch request fails.
Run the application and inspect the output in Xcode's console. The output should look similar to what is shown below. As you can see, the records are sorted by their first name.
Core Data[1080:613] Bart, Jacobs
Core Data[1080:613] Jane, Doe
Core Data[1080:613] Jim, Doe
Core Data[1080:613] Lucy, Doe
If you see duplicates in the output, then make sure to comment out the code we wrote earlier to create the records. Every time you run the application, the same records are created, resulting in duplicate records.
As I mentioned earlier, it's possible to combine multiple sort descriptors. Let's sort the records by their last name and age. We first set the key of the first sort descriptor to last. We then create another sort descriptor with a key of age and add it to the array of sort descriptors that we pass to setSortDescriptors:.
// Add Sort Descriptor
NSSortDescriptor *sortDescriptor1 = [NSSortDescriptor sortDescriptorWithKey:@"last" ascending:YES];
NSSortDescriptor *sortDescriptor2 = [NSSortDescriptor sortDescriptorWithKey:@"age" ascending:YES];
[fetchRequest setSortDescriptors:@[sortDescriptor1, sortDescriptor2]];
The output shows that the order of the sort descriptors in the array is important. The records are first sorted by their last name and then by their age.
Core Data[1418:613] Lucy, Doe (19)
Core Data[1418:613] Jim, Doe (21)
Core Data[1418:613] Jane, Doe (42)
Core Data[1418:613] Bart, Jacobs (44)
Predicates
Sort descriptors are great and easy to use, but predicates are what really makes fetching powerful in Core Data. While sort descriptors tell Core Data how the records need to be sorted, predicates tell it what records you're interested in. The class we'll be working with is NSPredicate.
Let's start by fetching every member of the Doe family. This is very easy to do and the syntax will remind some of you of SQL.
// Fetching
NSFetchRequest *fetchRequest = [[NSFetchRequest alloc] initWithEntityName:@"Person"];

// Create Predicate
NSPredicate *predicate = [NSPredicate predicateWithFormat:@"%K == %@", @"last", @"Doe"];
[fetchRequest setPredicate:predicate];

// Add Sort Descriptor
NSSortDescriptor *sortDescriptor1 = [NSSortDescriptor sortDescriptorWithKey:@"last" ascending:YES];
NSSortDescriptor *sortDescriptor2 = [NSSortDescriptor sortDescriptorWithKey:@"age" ascending:YES];
[fetchRequest setSortDescriptors:@[sortDescriptor1, sortDescriptor2]];

// Execute Fetch Request
NSError *fetchError = nil;
NSArray *result = [self.managedObjectContext executeFetchRequest:fetchRequest error:&fetchError];

if (!fetchError) {
    for (NSManagedObject *managedObject in result) {
        NSLog(@"%@, %@", [managedObject valueForKey:@"first"], [managedObject valueForKey:@"last"]);
    }

} else {
    NSLog(@"Error fetching data.");
    NSLog(@"%@, %@", fetchError, fetchError.localizedDescription);
}
We haven't changed much apart from creating an NSPredicate object by invoking predicateWithFormat: and tying the predicate to the fetch request by passing it as an argument of a setPredicate: call. The idea behind predicateWithFormat: is similar to stringWithFormat: in that it accepts a variable number of arguments.
Note that the predicate format string uses %K for the property name and %@ for the value. As stated in the Predicate Programming Guide, %K is a variable argument substitution for a key path while %@ is a variable argument substitution for an object value. This means that the predicate format string of our example evaluates to last == "Doe".
If you run the application one more time and inspect the output in Xcode's console, you should see the following result:
Core Data[1582:613] Lucy, Doe (19)
Core Data[1582:613] Jim, Doe (21)
Core Data[1582:613] Jane, Doe (42)
There are many operators we can use for comparison. In addition to = and ==, which are identical as far as Core Data is concerned, there's also >= and =>, <= and =>, != and <>, and > and <. I encourage you to experiment with these operators to learn how they affect the results of the fetch request.
The following predicate illustrates how we can use the >= operator to only fetch Person records with an age attribute greater than 30.
NSPredicate *predicate = [NSPredicate predicateWithFormat:@"%K >= %@", @"age", @(30)];
We also have operators for string comparison, CONTAINS, LIKE, MATCHES, BEGINSWITH, and ENDSWITH. Let's fetch every Person record whose name CONTAINS the letter j.
NSPredicate *predicate = [NSPredicate predicateWithFormat:@"%K CONTAINS %@", @"first", @"j"];
If you run the application now, the array of results will be empty since the string comparison is case sensitive by default. We can change this by adding a modifier like so:
NSPredicate *predicate = [NSPredicate predicateWithFormat:@"%K CONTAINS[c] %@", @"first", @"j"];
You can also create compound predicates using the keywords AND, OR, and NOT. In the following example, we fetch every person whose first name contains the letter j and is younger than 30.
NSPredicate *predicate = [NSPredicate predicateWithFormat:@"%K CONTAINS[c] %@ AND %K < 30", @"first", @"j", @"age", @(30)];
Predicates also make it very easy to fetch records based on their relationship. In the following example, we fetch every person whose father's name is equal to Bart.
NSPredicate *predicate = [NSPredicate predicateWithFormat:@"%K == %@", @"father.first", @"Bart"];
The above predicate works as expected, because %K is a variable argument substitution for a key path, not just a key.
What you need to remember is that predicates enable you to query the backing store without you knowing anything about the store. Even though the syntax of the predicate format string is reminiscent of SQL in some ways, it doesn't matter if the backing store is a SQLite database or an in-memory store. This is a very powerful concept that isn't unique to Core Data. Rails's Active Record is another fine example of this paradigm.
There is much more to predicates than what I've shown you in this article. If you'd like to learn more about predicates, I suggest you take a peak at Apple's Predicate Programming Guide. We'll also work more with predicates in the next few articles of this series.
Conclusion
We now have a good grasp of the basics of Core Data and it's time to start working with the framework by creating an application that leverages its power. In the next article, we meet another important class of the Core Data framework, NSFetchedResultsController. This class will help us manage a collection of records, but you'll learn that it does quite a bit more than that.

Comments