In the previous installments of this series, we covered the fundamentals of the Core Data framework. It's time we put our knowledge to use by building a simple application powered by Core Data.
In this tutorial, we'll also meet another star player of the Core Data framework, the NSFetchedResultsController class. The application that we're about to create manages a list of to-do items. With the application, we can add, update, and delete to-do items. You'll quickly learn that the NSFetchedResultsController class makes this very easy to do.
1. Project Setup
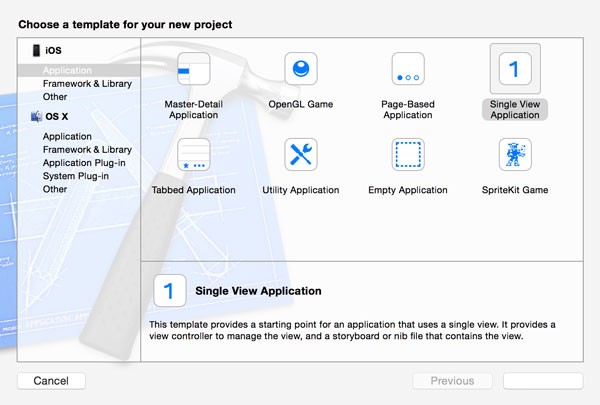
Open Xcode, select New > Project... from the File menu, and choose the Single View Application template from the iOS > Application category.
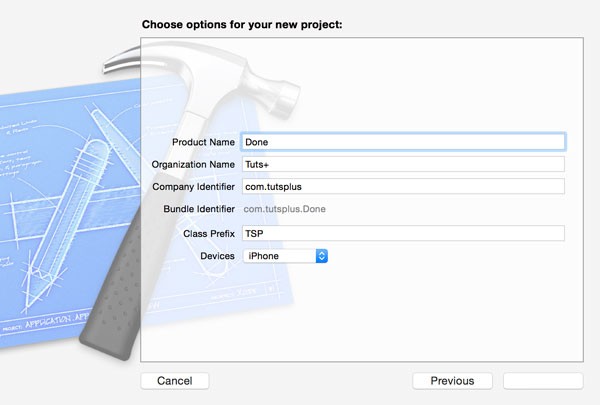
Name the project Done, set Devices to iPhone, and tell Xcode where you want to save the project.
Because we chose the Single View Application template, Xcode hasn't created a Core Data setup for us. However, setting up the Core Data stack should be easy, if you've read the previous installments of this series.
2. Core Data Setup
Open the implementation file of the application delegate class, TSPAppDelegate.m, and declare three properties in a private class extension, managedObjectContext, managedObjectModel, and persistentStoreCoordinator. If you're confused by this step, then I recommend you revisit the first article of this series, which covers the Core Data stack in detail.
Note that I've also added an import statement for the Core Data framework at the top of TSPAppDelegate.m.
#import "TSPAppDelegate.h"

#import <CoreData/CoreData.h>

@interface TSPAppDelegate ()

@property (strong, nonatomic) NSManagedObjectContext *managedObjectContext;
@property (strong, nonatomic) NSManagedObjectModel *managedObjectModel;
@property (strong, nonatomic) NSPersistentStoreCoordinator *persistentStoreCoordinator;

@end
As you may remember, the Core Data stack is set up lazily. This means that we instantiate the managed object context, the managed object model, and the persistent store coordinator the moment they are needed by the application. In other words, the aforementioned objects are instantiated in the getters of their corresponding properties. The following code snippets should look very familiar.
- (NSManagedObjectContext *)managedObjectContext {
    if (_managedObjectContext) {
        return _managedObjectContext;
    }

    NSPersistentStoreCoordinator *coordinator = [self persistentStoreCoordinator];

    if (coordinator) {
        _managedObjectContext = [[NSManagedObjectContext alloc] init];
        [_managedObjectContext setPersistentStoreCoordinator:coordinator];
    }

    return _managedObjectContext;
}
- (NSManagedObjectModel *)managedObjectModel {
    if (_managedObjectModel) {
        return _managedObjectModel;
    }

    NSURL *modelURL = [[NSBundle mainBundle] URLForResource:@"Done" withExtension:@"momd"];

    _managedObjectModel = [[NSManagedObjectModel alloc] initWithContentsOfURL:modelURL];

    return _managedObjectModel;
}
- (NSPersistentStoreCoordinator *)persistentStoreCoordinator {
    if (_persistentStoreCoordinator) {
        return _persistentStoreCoordinator;
    }

    NSURL *applicationDocumentsDirectory = [[[NSFileManager defaultManager] URLsForDirectory:NSDocumentDirectory inDomains:NSUserDomainMask] lastObject];
    NSURL *storeURL = [applicationDocumentsDirectory URLByAppendingPathComponent:@"Done.sqlite"];

    NSError *error = nil;
    _persistentStoreCoordinator = [[NSPersistentStoreCoordinator alloc] initWithManagedObjectModel:[self managedObjectModel]];

    if (![_persistentStoreCoordinator addPersistentStoreWithType:NSSQLiteStoreType configuration:nil URL:storeURL options:nil error:&error]) {
        NSLog(@"Unresolved error %@, %@", error, [error userInfo]);
        abort();
    }

    return _persistentStoreCoordinator;
}
There are three things you should be aware of. First, the data model, which we'll create next, will be named Done.momd. Second, we'll name the backing store Done and it will be a SQLite database. Third, if the backing store is incompatible with the data model, we invoke abort, killing the application. As I mentioned earlier in this series, while this is fine during development, you should never call abort in production. We'll revisit migrations and incompatibility issues later in this series.
While our application won't crash if you try to run it, the Core Data stack won't get properly set up. The reason is simple, we haven't created a data model yet. Let's take care of that in the next step.
3. Creating the Data Model
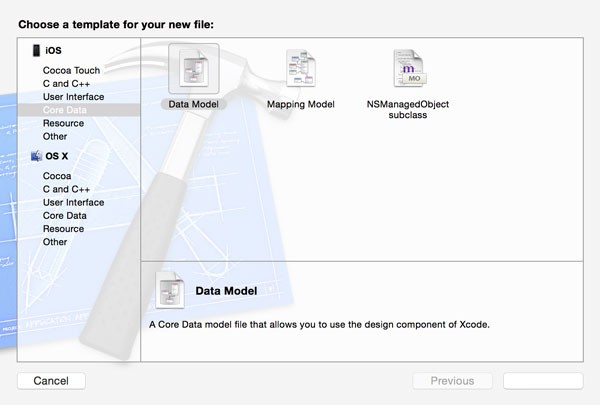
Select New > File... from the File menu and choose Data Model from the iOS > Core Data category.
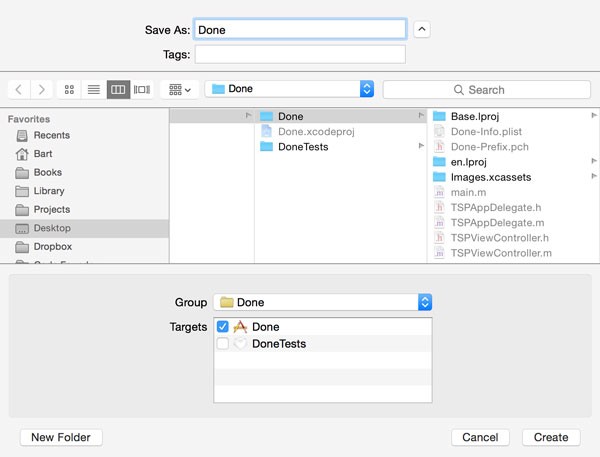
Name the file Done, double-check that it's added to the Done target, and tell Xcode where it needs to be saved.
The data model is going to be very simple. Create a new entity and name it TSPItem. Add three attributes to the entity, name of type String, createdAt of type Date, and done of type Boolean.
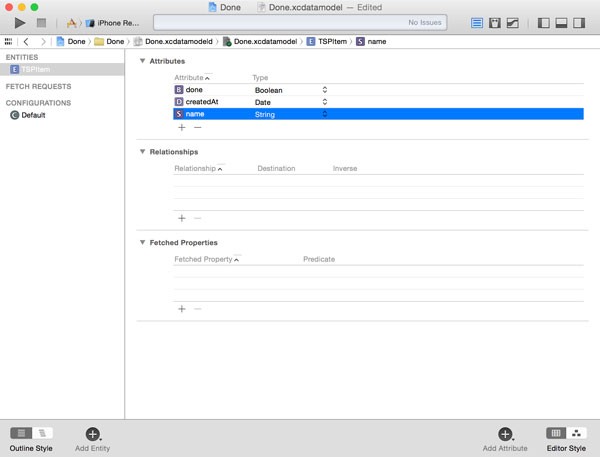
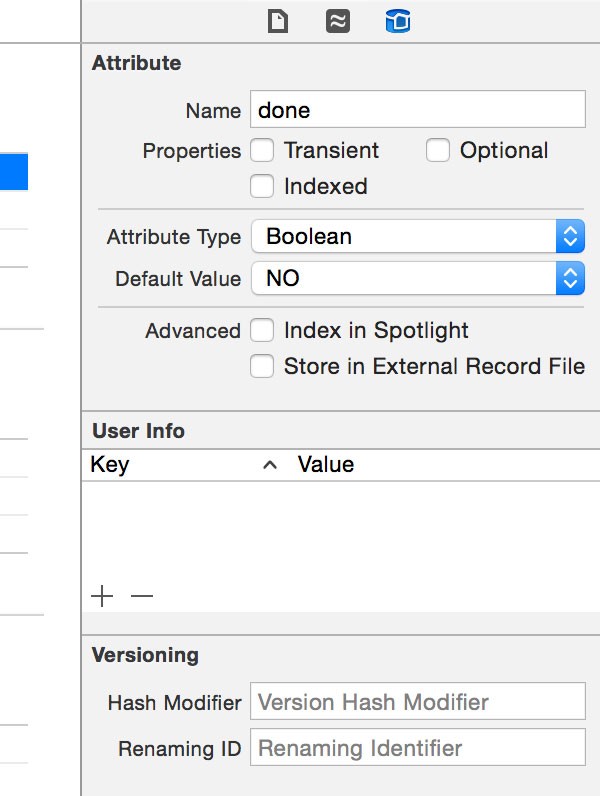
Mark the attributes as required, not optional, and set the default value of the done attribute to NO.
The Core Data stack is set up and the data model is configured correctly. It's time to become familiar with a new class of the Core Data framework, the NSFetchedResultsController class.
4. Managing Data
This article isn't just about the NSFetchedResultsController class, it's about what the NSFetchedResultsController class does behind the scenes. Let me clarify what I mean by this.
If we were to build our application without the NSFetchedResultsController class, we would need to find a way to keep the application's user interface synchronized with the data managed by Core Data. Fortunately, Core Data has an elegant solution to this problem.
Whenever a record is inserted, updated, or deleted in a managed object context, the managed object context posts a notification through notification center. A managed object context can post three types of notifications:
-
NSManagedObjectContextObjectsDidChangeNotification: This notification is posted every time a record in the managed object context is inserted, updated, or deleted. -
NSManagedObjectContextWillSaveNotification: This notification is posted by the managed object context before pending changes are committed to the backing store. -
NSManagedObjectContextDidSaveNotification: This notification is posted by the managed object context immediately after pending changes have been committed to the backing store.
The contents of these notifications are identical, that is, the object property of the notification is the NSManagedObjectContext instance that posted the notification and the notification's userInfo dictionary contains the records that were inserted, updated, and deleted.
The gist is that it requires a fair amount of boilerplate code to keep the results of a fetch request up to date. In other words, if we were to create our application without using the NSFetchedResultsController class, we would have to implement a mechanism that monitored the managed object context for changes and update the user interface accordingly. Let's see how the NSFetchedResultsController can help us with this task.
5. Setting Up the User Interface
Working with the NSFetchedResultsController class is pretty easy. An instance of the NSFetchedResultsController class takes a fetch request and has a delegate object. The NSFetchedResultsController object makes sure that it keeps the results of the fetch request up to date by monitoring the managed object context the fetch request was executed by.
If the NSFetchedResultsController object is notified of any changes by the NSManagedObjectContext object of the fetch request, it notifies its delegate. You may be wondering how this is different from a view controller directly monitoring the NSManagedObjectContext object. The beauty of the NSFetchedResultsController class is that it processes the notifications it receives from the NSManagedObjectContext object and tells the delegate only what it needs to know to update the user interface in response to these changes. The methods of the NSFetchedResultsControllerDelegate protocol should clarify this.
- (void)controllerWillChangeContent:(NSFetchedResultsController *)controller;
- (void)controllerDidChangeContent:(NSFetchedResultsController *)controller;

- (void)controller:(NSFetchedResultsController *)controller didChangeSection:(id<NSFetchedResultsSectionInfo>)sectionInfo atIndex:(NSUInteger)sectionIndex forChangeType:(NSFetchedResultsChangeType)type;
- (void)controller:(NSFetchedResultsController *)controller didChangeObject:(id)anObject atIndexPath:(NSIndexPath *)indexPath forChangeType:(NSFetchedResultsChangeType)type newIndexPath:(NSIndexPath *)newIndexPath;
The signatures of the above delegate methods reveal the true purpose of the NSFetchedResultsController class. On iOS, the NSFetchedResultsController class was designed to manage the data displayed by a UITableView or a UICollectionView. It tells its delegate exactly which records changed, how to update the user interface, and when to do this.
Don't worry if you're still unsure about the purpose or advantages of the NSFetchedResultsController class. It'll make more sense once we've implemented the NSFetchedResultsControllerDelegate protocol. Let's revisit our application and put the NSFetchedResultsController class to use.
Step 1: Populating the Storyboard
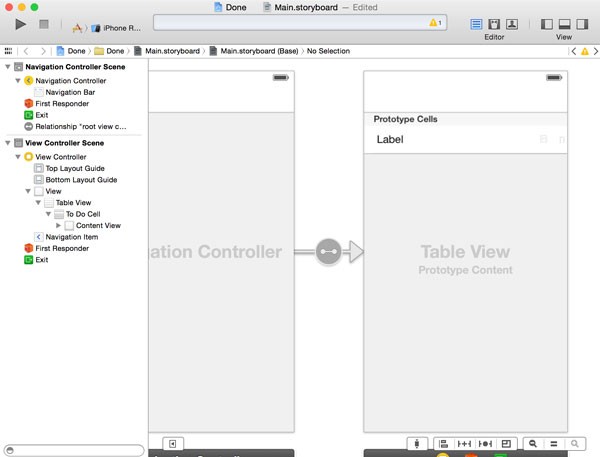
Open the project's main storyboard, Main.storyboard, select the View Controller Scene, and embed it in a navigation controller by selecting Embed In > Navigation Controller from the Editor menu.
Drag a UITableView object in the View Controller Scene, create an outlet in the TSPViewController class, and connect it in the storyboard. Don't forget to make the TSPViewController class conform to the UITableViewDataSource and UITableViewDelegate protocols.
#import <UIKit/UIKit.h>

@interface TSPViewController : UIViewController <UITableViewDataSource, UITableViewDelegate>

@property (weak, nonatomic) IBOutlet UITableView *tableView;

@end
Select the table view, open the Connections Inspector, and connect the table view's dataSource and delegate outlets to the View Controller object. With the table view selected, open the Attributes Inspector and set the number of Prototype Cells to 1.
Before we continue, we need to create a UITableViewCell subclass for the prototype cell. Create a new Objective-C subclass, TSPToDoCell, and set its superclass to UITableViewCell. Create two outlets, nameLabel of type UILabel and doneButton of type UIButton.
Head back to the storyboard, select the prototype cell in the table view, and set the class to TSPToDoCell in the Identity Inspector. Add a UILabel and a UIButton object to the cell's content view and connect the outlets in the Connections Inspector. With the prototype cell selected, open the Attributes Inspector and set the identifier of the prototype cell to ToDoCell. This identifier will serve as the cell's reuse identifier. The prototype cell's layout should look something like the screenshot below.
Create a new UIViewController subclass and name it TSPAddToDoViewController. Declare an outlet textField of type UITextField in the view controller's header file and conform the view controller to the UITextFieldDelegate protocol.
#import <UIKit/UIKit.h>

@interface TSPAddToDoViewController : UIViewController <UITextFieldDelegate>

@property (weak, nonatomic) IBOutlet UITextField *textField;

@end
Before we add the view controller to the storyboard, add the following two actions to the view controller's implementation file.
#pragma mark -
#pragma mark Actions
- (IBAction)cancel:(id)sender {

}

- (IBAction)save:(id)sender {

}
Open the storyboard one more time and add a bar button item with an identifier of Add to the right of the navigation bar of the TSPViewController. Add a new view controller to the storyboard and set its class to TSPAddToDoViewController in the Identity Inspector. With the view controller selected, choose Embed In > Navigation Controller from the Editor menu.
The new view controller should now have a navigation bar. Add two bar button items to the navigation bar, one on the left with an identity of Cancel and one on the right with an identity of Save. Connect the cancel: action to the left bar button item and the save: action to the right bar button item.
Add a UITextField object to the view controller's view and position it 20 points below the navigation bar. The text field should remain at 20 points below the navigation bar. Note that the layout constraint at the top references the top layout guide, a very convenient addition that was added in iOS 7.

Connect the text field with the corresponding outlet in the view controller and set the view controller as the text field's delegate. Finally, control drag from the bar button item of the TSPViewController to the navigation controller of which the TSPAddToDoViewController is the root view controller. Set the segue type to modal and set the segue's identifier to addToDoViewController in the Attributes Inspector. That was a lot to take in. The interesting part is yet to come though.
Step 2: Implementing the Table View
Before we can take our application for a spin, we need to implement the UITableViewDataSource protocol in the TSPViewController class. However, this is where the NSFetchedResultsController class comes into play. To make sure that everything is working return 0 from the tableView:numberOfRowsInSection: method. This will result in an empty table view, but it will allow us to run the application without running into a crash.
- (NSInteger)tableView:(UITableView *)tableView numberOfRowsInSection:(NSInteger)section {
    return 0;
}
Step 3: Save & Cancel
Open the TSPAddToDoViewController class and implement the cancel: and save: methods as shown below. We'll update their implementations later in this tutorial.
#pragma mark -
#pragma mark Actions
- (IBAction)cancel:(id)sender {
    // Dismiss View Controller
    [self dismissViewControllerAnimated:YES completion:nil];
}

- (IBAction)save:(id)sender {
    // Dismiss View Controller
    [self dismissViewControllerAnimated:YES completion:nil];
}
Build and run the application in the iOS Simulator to see if everything is wired up correctly. You should be able to tap the add button in the top right to bring up the TSPAddToDoViewController and dismiss the latter by tapping the cancel or save button.
6. Implementing the NSFetchedResultsController Class
The NSFetchedResultsController class is part of the Core Data framework and it's meant to manage the results of a fetch request. The class was designed to work seamlessly with UITableView and UICollectionView on iOS and NSTableView on OS X. However, it can be used for other purposes as well.
Step 1: Laying the Groundwork
Before we can start working with the NSFetchedResultsController class, however, the TSPViewController class needs access to an NSManagedObjectContext instance, the NSManagedObjectContext instance we created earlier in the application delegate. Start by declaring a property managedObjectContext of type NSManagedObjectContext in the header file of the TSPViewController class.
#import <UIKit/UIKit.h>

@interface TSPViewController : UIViewController <UITableViewDataSource, UITableViewDelegate>

@property (weak, nonatomic) IBOutlet UITableView *tableView;

@property (strong, nonatomic) NSManagedObjectContext *managedObjectContext;

@end
Open Main.storyboard, select the storyboard's initial view controller, an UINavigationController instance, and set its Storyboard ID to rootNavigationController in the Identity Inspector.
In the application delegate's application:didFinishLaunchingWithOptions: method, we get a reference to the TSPViewController instance, the root view controller of the navigation controller, and set its managedObjectContext property. The updated application:didFinishLaunchingWithOptions: method looks as follows:
- (BOOL)application:(UIApplication *)application didFinishLaunchingWithOptions:(NSDictionary *)launchOptions {
    // Fetch Main Storyboard
    UIStoryboard *mainStoryboard = [UIStoryboard storyboardWithName:@"Main" bundle: nil];

    // Instantiate Root Navigation Controller
    UINavigationController *rootNavigationController = (UINavigationController *)[mainStoryboard instantiateViewControllerWithIdentifier:@"rootNavigationController"];

    // Configure View Controller
    TSPViewController *viewController = (TSPViewController *)[rootNavigationController topViewController];

    if ([viewController isKindOfClass:[TSPViewController class]]) {
        [viewController setManagedObjectContext:self.managedObjectContext];
    }

    // Configure Window
    [self.window setRootViewController:rootNavigationController];

    return YES;
}
Don't forget to add an import statement for the TSPViewController class at the top of TSPAppDelegate.m.
To make sure that everything is working, add the following log statement to the viewDidLoad method of the TSPViewController class.
#pragma mark -
#pragma mark View Life Cycle
- (void)viewDidLoad {
    [super viewDidLoad];

    NSLog(@"%@", self.managedObjectContext);
}
Step 2: Initializing the NSFetchedResultsController Instance
Open the implementation file of the TSPViewController class and declare a property of type NSFetchedResultsController in a private class extension. Name the property fetchedResultsController. An NSFetchedResultsController instance also has a delegate property that needs to conform to the NSFetchedResultsControllerDelegate protocol. Because the TSPViewController instance will serve as the delegate of the NSFetchedResultsController instance, we need to conform the TSPViewController class to the NSFetchedResultsControllerDelegate protocol as shown below.
#import "TSPViewController.h"

#import <CoreData/CoreData.h>

@interface TSPViewController () <NSFetchedResultsControllerDelegate>

@property (strong, nonatomic) NSFetchedResultsController *fetchedResultsController;

@end
It's time to initialize the NSFetchedResultsController instance. The heart of a fetched results controller is the NSFetchRequest object, because it determines which records the fetched results controller will manage. In the view controller's viewDidLoad method, we initialize the fetch request by passing @"TSPItem" to the initWithEntityName: method. This should be familiar by now and so is the next line in which we add sort descriptors to the fetch request to sort the results based on the value of the createdAt attribute of each record.
- (void)viewDidLoad {
    [super viewDidLoad];

    // Initialize Fetch Request
    NSFetchRequest *fetchRequest = [[NSFetchRequest alloc] initWithEntityName:@"TSPItem"];

    // Add Sort Descriptors
    [fetchRequest setSortDescriptors:@[[NSSortDescriptor sortDescriptorWithKey:@"createdAt" ascending:YES]]];

    // Initialize Fetched Results Controller
    self.fetchedResultsController = [[NSFetchedResultsController alloc] initWithFetchRequest:fetchRequest managedObjectContext:self.managedObjectContext sectionNameKeyPath:nil cacheName:nil];

    // Configure Fetched Results Controller
    [self.fetchedResultsController setDelegate:self];

    // Perform Fetch
    NSError *error = nil;
    [self.fetchedResultsController performFetch:&error];

    if (error) {
        NSLog(@"Unable to perform fetch.");
        NSLog(@"%@, %@", error, error.localizedDescription);
    }
}
The initialization of the fetched results controller is pretty straightforward. The initWithFetchRequest:managedObjectContext:sectionNameKeyPath:cacheName: method takes four arguments:
- the fetch request
- the managed object context the fetched results controller will be monitoring
- a section key path if you want the results to be split up into sections
- a cache name if you want to enable caching
We pass nil for the last two parameters for now. The first argument is obvious, but why do we need to pass a NSManagedObjectContext object as well? Not only is the passed in managed object context used to execute the fetch request, it is also the managed object context that the fetched results controller will be monitoring for changes. This will become clearer in a few minutes when we start implementing the delegate methods of the NSFetchedResultsControllerDelegate protocol.
Finally, we need to tell the fetched results controller to execute the fetch request we passed it. We do this by invoking performFetch: and pass it a pointer to an NSError object. This is similar to the executeFetchRequest:error: method of the NSManagedObjectContext class.
Step 3: Implementing the Delegate Protocol
With the fetched results controller set up and ready to use, we need to implement the NSFetchedResultsControllerDelegate protocol. The protocol defines five methods, three of which are of interest to us in this tutorial:
controllerWillChangeContent:-
controllerDidChangeContent:
-
controller:didChangeObject:atIndexPath:forChangeType:newIndexPath:
The first and second methods tell us when the data the fetched results controller is managing will and did change. This is important to batch update the user interface. For example, it's perfectly possible that multiple changes occur at the same time. Instead of updating the user interface for every change, we batch update the user interface once every change has been made.
In our example, this boils down to the following implementations of controllerWillChangeContent: and controllerDidChangeContent:.
- (void)controllerWillChangeContent:(NSFetchedResultsController *)controller {
    [self.tableView beginUpdates];
}
- (void)controllerDidChangeContent:(NSFetchedResultsController *)controller {
    [self.tableView endUpdates];
}
The implementation of controller:didChangeObject:atIndexPath:forChangeType:newIndexPath: is a bit trickier. This delegate method takes no less than five arguments:
- the
NSFetchedResultsControllerinstance - the
NSManagedObjectinstance that changed - the current index path of the record in the fetched results controller
- the type of change, that is, insert, update, or delete
- the new index path of the record in the fetched results controller, after the change
Note that the index paths have nothing to do with our table view. An NSIndexPath is nothing more than an object that contains one or more indexes to represent a path in a hierarchical structure, hence the class's name.
Internally the fetched results controller manages a hierarchical data structure and it notifies its delegate when that data structure changes. It's up to us to visualize those changes in, for example, a table view.
The implementation of controller:didChangeObject:atIndexPath:forChangeType:newIndexPath: looks daunting, but let me walk you through it.
- (void)controller:(NSFetchedResultsController *)controller didChangeObject:(id)anObject atIndexPath:(NSIndexPath *)indexPath forChangeType:(NSFetchedResultsChangeType)type newIndexPath:(NSIndexPath *)newIndexPath {
    switch (type) {
        case NSFetchedResultsChangeInsert: {
            [self.tableView insertRowsAtIndexPaths:[NSArray arrayWithObject:newIndexPath] withRowAnimation:UITableViewRowAnimationFade];
            break;
        }
        case NSFetchedResultsChangeDelete: {
            [self.tableView deleteRowsAtIndexPaths:[NSArray arrayWithObject:indexPath] withRowAnimation:UITableViewRowAnimationFade];
            break;
        }
        case NSFetchedResultsChangeUpdate: {
            [self configureCell:(TSPToDoCell *)[self.tableView cellForRowAtIndexPath:indexPath] atIndexPath:indexPath];
            break;
        }
        case NSFetchedResultsChangeMove: {
            [self.tableView deleteRowsAtIndexPaths:[NSArray arrayWithObject:indexPath] withRowAnimation:UITableViewRowAnimationFade];
            [self.tableView insertRowsAtIndexPaths:[NSArray arrayWithObject:newIndexPath] withRowAnimation:UITableViewRowAnimationFade];
            break;
        }
    }
}
There are four possible change types:
NSFetchedResultsChangeInsertNSFetchedResultsChangeDeleteNSFetchedResultsChangeUpdateNSFetchedResultsChangeMove
The names are pretty self-explanatory. If the type is NSFetchedResultsChangeInsert, we tell the table view to insert a row at newIndexPath. Similarly, if the type is NSFetchedResultsChangeDelete, we remove the row at indexPath from the table view.
If a record is updated, we update the corresponding row in the table view by invoking configureCell:atIndexPath:, a helper method that accepts a UITableViewCell object and an NSIndexPath object. We'll implement this method in a moment.
If the change type is equal to NSFetchedResultsChangeMove, we remove the row at indexPath and insert a row at newIndexPath to reflect the record's updated position in the fetched results controller's internal data structure.
Step 4: Implementing the UITableViewDataSource Protocol
That wasn't too difficult. Was it? Implementing the UITableViewDataSource protocol is much easier, but there are a few things you should be aware of. Let's start with the numberOfSectionsInTableView: and tableView:numberOfRowsInSection: methods.
Even though the table view in our sample application will only have one section, let's ask the fetched results controller for the number of sections. We do this by calling sections on it, which returns an array of objects that conform to the NSFetchedResultsSectionInfo protocol.
Objects conforming to the NSFetchedResultsSectionInfo protocol need to implement a few methods, including numberOfObjects. This gives us what we need to implement the first two methods of the UITableViewDataSource protocol.
- (NSInteger)numberOfSectionsInTableView:(UITableView *)tableView {
    return [[self.fetchedResultsController sections] count];
}
- (NSInteger)tableView:(UITableView *)tableView numberOfRowsInSection:(NSInteger)section {
    NSArray *sections = [self.fetchedResultsController sections];
    id<NSFetchedResultsSectionInfo> sectionInfo = [sections objectAtIndex:section];

    return [sectionInfo numberOfObjects];
}
Next up is the tableView:cellForRowAtIndexPath: and configureCell:atIndexPath: methods. Start by adding an import statement for the header of the TSPToDoCell class.
#import "TSPToDoCell.h"
The implementation of tableView:cellForRowAtIndexPath: is short, because we move most of the cell's configuration to configureCell:atIndexPath:. We ask the table view for a reusable cell with reuse identifier @"ToDoCell" and pass the cell and the index path to configureCell:atIndexPath:.
- (UITableViewCell *)tableView:(UITableView *)tableView cellForRowAtIndexPath:(NSIndexPath *)indexPath {
    TSPToDoCell *cell = (TSPToDoCell *)[tableView dequeueReusableCellWithIdentifier:@"ToDoCell" forIndexPath:indexPath];

    // Configure Table View Cell
    [self configureCell:cell atIndexPath:indexPath];

    return cell;
}
The magic happens in configureCell:atIndexPath:. We ask the fetched results controller for the item at indexPath. The fetched results controller returns an NSManagedObject instance to us. We update the nameLabel and the state of the doneButton by asking the record for its name and done attributes.
- (void)configureCell:(TSPToDoCell *)cell atIndexPath:(NSIndexPath *)indexPath {
    // Fetch Record
    NSManagedObject *record = [self.fetchedResultsController objectAtIndexPath:indexPath];

    // Update Cell
    [cell.nameLabel setText:[record valueForKey:@"name"]];
    [cell.doneButton setSelected:[[record valueForKey:@"done"] boolValue]];
}
We'll revisit the UITableViewDataSource protocol later in this tutorial when we delete items from the list. We first need to populate the table view with some data.
7. Adding Records
Let's finish this tutorial by adding the ability to create to-do items. Open the TSPAddToDoViewController class, add an import statement for the Core Data framework, and declare a property managedObjectContext of type NSManagedObjectContext.
#import <UIKit/UIKit.h>

#import <CoreData/CoreData.h>

@interface TSPAddToDoViewController : UIViewController <UITextFieldDelegate>

@property (weak, nonatomic) IBOutlet UITextField *textField;

@property (strong, nonatomic) NSManagedObjectContext *managedObjectContext;

@end
Head back to the TSPViewController class and implement the prepareForSegue:sender: method. In this method, we set the managedObjectContext property of the TSPAddToDoViewController instance. If you've worked with storyboards before, then the implementation of prepareForSegue:sender: should be straightforward.
- (void)prepareForSegue:(UIStoryboardSegue *)segue sender:(id)sender {
    if ([segue.identifier isEqualToString:@"addToDoViewController"]) {
        // Obtain Reference to View Controller
        UINavigationController *nc = (UINavigationController *)[segue destinationViewController];
        TSPAddToDoViewController *vc = (TSPAddToDoViewController *)[nc topViewController];

        // Configure View Controller
        [vc setManagedObjectContext:self.managedObjectContext];
    }
}
If the user enters text in the text field of the TSPAddToDoViewController and taps the Save button, we create a new record, populate it with data, and save it. This logic goes into the save: method we created earlier.
- (IBAction)save:(id)sender {
    // Helpers
    NSString *name = self.textField.text;

    if (name && name.length) {
        // Create Entity
        NSEntityDescription *entity = [NSEntityDescription entityForName:@"TSPItem" inManagedObjectContext:self.managedObjectContext];

        // Initialize Record
        NSManagedObject *record = [[NSManagedObject alloc] initWithEntity:entity insertIntoManagedObjectContext:self.managedObjectContext];

        // Populate Record
        [record setValue:name forKey:@"name"];
        [record setValue:[NSDate date] forKey:@"createdAt"];

        // Save Record
        NSError *error = nil;

        if ([self.managedObjectContext save:&error]) {
            // Dismiss View Controller
            [self dismissViewControllerAnimated:YES completion:nil];

        } else {
            if (error) {
                NSLog(@"Unable to save record.");
                NSLog(@"%@, %@", error, error.localizedDescription);
            }

            // Show Alert View
            [[[UIAlertView alloc] initWithTitle:@"Warning" message:@"Your to-do could not be saved." delegate:nil cancelButtonTitle:@"OK" otherButtonTitles:nil] show];
        }

    } else {
        // Show Alert View
        [[[UIAlertView alloc] initWithTitle:@"Warning" message:@"Your to-do needs a name." delegate:nil cancelButtonTitle:@"OK" otherButtonTitles:nil] show];
    }
}
The save: method looks pretty impressive, but there's nothing in there that we haven't covered yet. We create a new managed object by passing an NSEntityDescription instance and a NSManagedObjectContext instance. We then populate the managed object with a name and date. If saving the managed object context is successful, we dismiss the view controller, otherwise we show an alert view. If the user taps the save button without entering any text, we also show an alert view.
Run the application and add a few items. I'm sure you agree that the NSFetchedResultsController class makes the process of adding items incredibly easy. It takes care of monitoring the managed object context for changes and we update the user interface, the table view of the TSPViewController class, based on what the NSFetchedResultsController instance tells us through the NSFetchedResultsControllerDelegate protocol.
Conclusion
In the next article, we'll finish our application by adding the ability to delete and update to-do items. It's important that you understand the concepts we discussed in this article. The way Core Data broadcasts the changes of a managed object context's state is essential so make sure you understand this before moving on.

Comments