In this tutorial, we continue our exploration of the NSFetchedResultsController class by adding the ability to update and delete to-do items. You'll notice that updating and deleting to-do items is surprisingly easy thanks to the groundwork we laid in the previous tutorial.
1. Updating a Record's Name
Step 1: Create View Controller
Start by creating a new UIViewController subclass named TSPUpdateToDoViewController. In TSPUpdateToDoViewController.h, declare an outlet, textField of type UITextField, and two properties, managedObjectContext of type NSManagedObjectContext and record of type NSManagedObject. Add an import statement for the Core Data framework at the top.
#import <UIKit/UIKit.h>

#import <CoreData/CoreData.h>

@interface TSPUpdateToDoViewController : UIViewController

@property (weak, nonatomic) IBOutlet UITextField *textField;

@property (strong, nonatomic) NSManagedObjectContext *managedObjectContext;

@property (strong, nonatomic) NSManagedObject *record;

@end
In the view controller's implementation file, TSPUpdateToDoViewController.m, create two actions, cancel: and save:. Their implementations can remain empty for the time being.
#import "TSPUpdateToDoViewController.h"

@implementation TSPUpdateToDoViewController

#pragma mark -
#pragma mark Actions
- (IBAction)cancel:(id)sender {

}

- (IBAction)save:(id)sender {

}

@end
Step 2: Update Storyboard
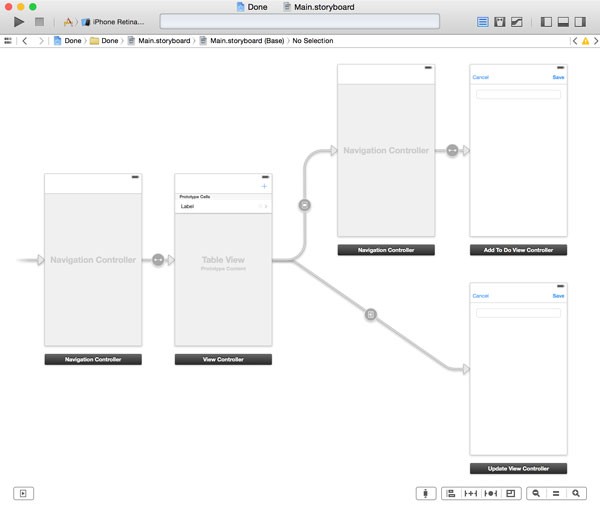
Open the main storyboard, Main.storyboard, add a new view controller object, and set its class to TSPUpdateToDoViewController in the Identity Inspector. Create a manual segue from the TSPViewController class to the TSPUpdateToDoViewController class. In the Attributes Inspector, set the segue's style to push and its identifier to updateToDoViewController.
Add a UITextField object to the view of the TSPUpdateToDoViewController object and configure it just like we did with the text field of the TSPAddToDoViewController class. Don't forget to connect the view controller's outlet with the text field.
As in the TSPAddToDoViewController class, add two bar button items to the view controller's navigation bar, set their identities to Cancel and Save respectively, and connect each bar button item to the corresponding action in the Connections Inspector.
Step 3: Passing a Reference
We also need to make a few changes to the TSPViewController class. Add an import statement for the TSPUpdateToDoViewController class at the top and declare a property named selection of type NSIndexPath to the private class extension in TSPViewController.m.
#import "TSPViewController.h"

#import <CoreData/CoreData.h>

#import "TSPToDoCell.h"
#import "TSPAddToDoViewController.h"
#import "TSPUpdateToDoViewController.h"

@interface TSPViewController () <NSFetchedResultsControllerDelegate>

@property (strong, nonatomic) NSFetchedResultsController *fetchedResultsController;

@property (strong, nonatomic) NSIndexPath *selection;

@end
Next, implement the tableView:didSelectRowAtIndexPath: method of the UITableViewDelegate protocol. In this method, we temporarily store the user's selection in the selection property.
#pragma mark -
#pragma mark Table View Delegate Methods
- (void)tableView:(UITableView *)tableView didSelectRowAtIndexPath:(NSIndexPath *)indexPath {
    [tableView deselectRowAtIndexPath:indexPath animated:YES];

    // Store Selection
    [self setSelection:indexPath];
}
In the class's prepareForSegue:sender:, we fetch the record that corresponds with the user's selection and pass it to the TSPUpdateToDoViewController instance. To prevent any unexpected behavior, we only perform this step if selection isn't nil and reset the selection property after fetching the record from the fetched results controller.
- (void)prepareForSegue:(UIStoryboardSegue *)segue sender:(id)sender {
    if ([segue.identifier isEqualToString:@"addToDoViewController"]) {
        // Obtain Reference to View Controller
        UINavigationController *nc = (UINavigationController *)[segue destinationViewController];
        TSPAddToDoViewController *vc = (TSPAddToDoViewController *)[nc topViewController];

        // Configure View Controller
        [vc setManagedObjectContext:self.managedObjectContext];

    } else if ([segue.identifier isEqualToString:@"updateToDoViewController"]) {
        // Obtain Reference to View Controller
        TSPUpdateToDoViewController *vc = (TSPUpdateToDoViewController *)[segue destinationViewController];

        // Configure View Controller
        [vc setManagedObjectContext:self.managedObjectContext];

        if (self.selection) {
            // Fetch Record
            NSManagedObject *record = [self.fetchedResultsController objectAtIndexPath:self.selection];

            if (record) {
                [vc setRecord:record];
            }

            // Reset Selection
            [self setSelection:nil];
        }
    }
}
Step 4: Populating the Text Field
In the viewDidLoad method of the TSPUpdateToDoViewController class, populate the text field with the name of the record as shown below.
#pragma mark -
#pragma mark View Life Cycle
- (void)viewDidLoad {
    [super viewDidLoad];

    if (self.record) {
        // Update Text Field
        [self.textField setText:[self.record valueForKey:@"name"]];
    }
}
Step 5: Updating the Record
In the cancel: action, we pop the update view controller from the navigation controller's navigation stack.
- (IBAction)cancel:(id)sender {
    // Pop View Controller
    [self.navigationController popViewControllerAnimated:YES];
}
In the save: action, we first check if the text field is empty and show an alert view if it is. If the text field contains a valid value, we update the record's name attribute and pop the view controller from the navigation controller's navigation stack.
- (IBAction)save:(id)sender {
    // Helpers
    NSString *name = self.textField.text;

    if (name && name.length) {
        // Populate Record
        [self.record setValue:name forKey:@"name"];

        // Save Record
        NSError *error = nil;

        if ([self.managedObjectContext save:&error]) {
            // Pop View Controller
            [self.navigationController popViewControllerAnimated:YES];

        } else {
            if (error) {
                NSLog(@"Unable to save record.");
                NSLog(@"%@, %@", error, error.localizedDescription);
            }

            // Show Alert View
            [[[UIAlertView alloc] initWithTitle:@"Warning" message:@"Your to-do could not be saved." delegate:nil cancelButtonTitle:@"OK" otherButtonTitles:nil] show];
        }

    } else {
        // Show Alert View
        [[[UIAlertView alloc] initWithTitle:@"Warning" message:@"Your to-do needs a name." delegate:nil cancelButtonTitle:@"OK" otherButtonTitles:nil] show];
    }
}
This is all it takes to update a record using Core Data. Run the application once more and see if everything is working. The fetched results controller automatically detects the change and notifies its delegate, the TSPViewController instance. The TSPViewController object, on its turn, updates the table view to reflect the change. It's that easy.
2. Updating a Record's State
Step 1: Updating TSPToDoCell
When a user taps the button on the right of a TSPToDoCell, the item's state needs to change. To accomplish this, we first need to update the TSPToDoCell class. Open TSPToDoCell.m and add a typedef for a block named TSPToDoCellDidTapButtonBlock. Next, declare a property of type TSPToDoCellDidTapButtonBlock and make sure the property is copied on assignment.
#import <UIKit/UIKit.h>

typedef void (^TSPToDoCellDidTapButtonBlock)();

@interface TSPToDoCell : UITableViewCell

@property (weak, nonatomic) IBOutlet UILabel *nameLabel;
@property (weak, nonatomic) IBOutlet UIButton *doneButton;

@property (copy, nonatomic) TSPToDoCellDidTapButtonBlock didTapButtonBlock;

@end
Head to the class's implementation file, TSPToDoCell.m, and invoke setupView, a helper method, in awakeFromNib.
#pragma mark -
#pragma mark Initialization
- (void)awakeFromNib {
    [super awakeFromNib];

    // Setup View
    [self setupView];
}
In setupView, we configure the doneButton object by setting images for each state of the button and adding the table view cell as a target. When the user taps the button, the table view cell is sent a message of didTapButton: in which we invoke the didTapButtonBlock block. You'll see in a moment how convenient this pattern is. The images are included in the source files of this tutorial, which you can find on GitHub.
#pragma mark -
#pragma mark View Methods
- (void)setupView {
    UIImage *imageNormal = [UIImage imageNamed:@"button-done-normal"];
    UIImage *imageSelected = [UIImage imageNamed:@"button-done-selected"];

    [self.doneButton setImage:imageNormal forState:UIControlStateNormal];
    [self.doneButton setImage:imageNormal forState:UIControlStateDisabled];
    [self.doneButton setImage:imageSelected forState:UIControlStateSelected];
    [self.doneButton setImage:imageSelected forState:UIControlStateHighlighted];
    [self.doneButton addTarget:self action:@selector(didTapButton:) forControlEvents:UIControlEventTouchUpInside];
}
#pragma mark -
#pragma mark Actions
- (void)didTapButton:(UIButton *)button {
    if (self.didTapButtonBlock) {
        self.didTapButtonBlock();
    }
}
Step 2: Updating TSPViewController
Thanks to the NSFetchedResultsController class and the foundation we've laid, we only need to update the configureCell:atIndexPath: method in the TSPViewController class.
- (void)configureCell:(TSPToDoCell *)cell atIndexPath:(NSIndexPath *)indexPath {
    // Fetch Record
    NSManagedObject *record = [self.fetchedResultsController objectAtIndexPath:indexPath];

    // Update Cell
    [cell.nameLabel setText:[record valueForKey:@"name"]];
    [cell.doneButton setSelected:[[record valueForKey:@"done"] boolValue]];

    [cell setDidTapButtonBlock:^{
        BOOL isDone = [[record valueForKey:@"done"] boolValue];

        // Update Record
        [record setValue:@(!isDone) forKey:@"done"];
    }];
}
Step 3: Saving Changes
You may be wondering why we aren't saving the managed object context. Won't we lose the changes we've made if we don't commit the changes to the persistent store? Yes and no.
It is true that we need to write the changes of the managed object context to the backing store at some point. If we don't, the user will lose some of its data. However, there is no need to save the changes of a managed object context every time we make a change.
A better approach is to save the managed object context the moment the application moves to the background. We can do this in the applicationDidEnterBackground: method of the UIApplicationDelegate protocol. Open TSPAppDelegate.m and implement applicationDidEnterBackground: as shown below.
- (void)applicationDidEnterBackground:(UIApplication *)application {
    NSError *error = nil;

    if (![self.managedObjectContext save:&error]) {
        if (error) {
            NSLog(@"Unable to save changes.");
            NSLog(@"%@, %@", error, error.localizedDescription);
        }
    }
}
However, this doesn't work if the application is force quit by the user. It's therefore a good idea to also save the managed object context when the application is terminated. The applicationWillTerminate: method is another method of the UIApplicationDelegate protocol that notifies the application't delegate when the application is about to be terminated.
- (void)applicationWillTerminate:(UIApplication *)application {
    NSError *error = nil;

    if (![self.managedObjectContext save:&error]) {
        if (error) {
            NSLog(@"Unable to save changes.");
            NSLog(@"%@, %@", error, error.localizedDescription);
        }
    }
}
Note that we have duplicate code in applicationDidEnterBackground: and applicationWillTerminate:. It's therefore a good idea to create a helper method to save the managed object context and call this helper method in both delegate methods.
#pragma mark -
#pragma mark Helper Methods
- (void)saveManagedObjectContext {
    NSError *error = nil;

    if (![self.managedObjectContext save:&error]) {
        if (error) {
            NSLog(@"Unable to save changes.");
            NSLog(@"%@, %@", error, error.localizedDescription);
        }
    }
}
3. Deleting Records
You'll be surprised by how easy it is to delete records using the NSFetchedResultsController class. Start by implementing the tableView:canEditRowAtIndexPath: method of the UITableViewDataSource protocol.
- (BOOL)tableView:(UITableView *)tableView canEditRowAtIndexPath:(NSIndexPath *)indexPath {
    return YES;
}
The second method of the UITableViewDataSource protocol that we need to implement is tableView:commitEditingStyle:forRowAtIndexPath:. In this method we fetch the managed object the user has selected for deletion and pass it to the deleteObject: method of the managed object context of the fetched results controller.
- (void)tableView:(UITableView *)tableView commitEditingStyle:(UITableViewCellEditingStyle)editingStyle forRowAtIndexPath:(NSIndexPath *)indexPath {
    if (editingStyle == UITableViewCellEditingStyleDelete) {
        NSManagedObject *record = [self.fetchedResultsController objectAtIndexPath:indexPath];

        if (record) {
            [self.fetchedResultsController.managedObjectContext deleteObject:record];
        }
    }
}
Because we've already implemented the NSFetchedResultsControllerDelegate protocol, the user interface is automatically updated, animations included.
Conclusion
I hope you agree that the NSFetchedResultsController class is a very convenient member of the Core Data framework. If you understand the basics of the Core Data framework, then it's not difficult to get up to speed with this class. I encourage you to further explore its API to find out what else it can do for you.

Comments