In the previous articles of this series, we've encountered an annoying issue that we need to address. Whenever we modify the data model of a Core Data application, the persistent store becomes incompatible with the data model. The result is a crash on launch, rendering the application unusable, a serious problem if this happens to an application in the App Store.
Our application crashes because we invoke abort in the persistentStoreCoordinator method if adding the persistent store to the persistent store coordinator is unsuccessful. To be clear, the abort function causes the application to terminate immediately.
if (![_persistentStoreCoordinator addPersistentStoreWithType:NSSQLiteStoreType configuration:nil URL:storeURL options:nil error:&error]) {
    NSLog(@"Unresolved error %@, %@", error, [error userInfo]);
    abort();
}
However, there is no need to terminate our application, let alone crash it. If Core Data tells us the data model and persistent store are incompatible, then it's up to us to resolve this.
In this article, we'll discuss two options to recover from such a situation, migrating the persistent store and creating a new persistent store that is compatible with the modified data model.
1. The Problem
Let me first clarify the problem that we're trying to solve. Download the sample project we created in the previous article and run it in the iOS Simulator. The application should run and work just fine.
Open Done.xcdatamodeld and add an attribute updatedAt of type Date to the TSPItem entity. Run the application one more time and notice how the application crashes as soon as it's launched. Luckily, Core Data gives us a clue as to what went wrong. Take a look at the output in Xcode's Console.
Error Domain=NSCocoaErrorDomain Code=134100 "The operation couldn’t be completed. (Cocoa error 134100.)"
UserInfo=0x7c57e980 {
metadata={
    NSPersistenceFrameworkVersion = 513;
    NSStoreModelVersionHashes =     {
        TSPItem = <ce1c6693 4229b043 7cfe7324 4718b0c4 81c9af4d 12e71373 3288b42e 7de7ac62>;
    };
    NSStoreModelVersionHashesVersion = 3;
    NSStoreModelVersionIdentifiers =     (
        ""
    );
    NSStoreType = SQLite;
    NSStoreUUID = "C6212594-143E-4A26-9990-7FE5FD8B7336";
    "_NSAutoVacuumLevel" = 2;
}, reason=The model used to open the store is incompatible with the one used to create the store},
In the last line, Core Data tells us that the data model that was used to open the persistent store is incompatible with the data model that it used to create the persistent store. Wait. What?
When we launched the application for the first time, Core Data created a SQLite database based on the data model. However, because we changed the data model by adding an attribute to the TSPItem entity, updatedAt, Core Data no longer understands how it should store TSPItem records in the SQLite database. In other words, the modified data model is no longer compatible with the persistent store it created earlier.
2. The Solution
Fortunately for us, a few clever engineers at Apple have created a solution to safely modify a data model without running into incompatibility issues. To solve the problem we're facing, we need to find a way to tell Core Data how one version of the data model relates to another version. That's correct, versioning the data model is part of the solution.
With that information, Core Data can understand how the persistent store needs to be updated to be compatible with the modified data model, that is, the new version of the data model. In other words, we need to hand Core Data the necessary information to migrate the persistent store from one version of the data model to another.
3. Migrations
There are two types of migrations, lightweight and heavy migrations. The words lightweight and heavy are pretty descriptive, but it's important that you understand how Core Data handles each type of migration.
Lightweight Migrations
Lightweight migrations require very little work from your part, the developer. I strongly recommend that you choose a lightweight migration over a heavy migration whenever you can. The cost of a lightweight migration is substantially lower than that of a heavy migration.
Of course, the flip side of lightweight migrations is that they are less powerful than heavy migrations. The changes you can make to a data model with lightweight migrations are limited. For example, a lightweight migration lets you add or rename attributes and entities, but you cannot modify the type of an attribute or the relationships between existing entities.
Lightweight migrations are ideal for expanding the data model, adding attributes and entities. If you plan to modify relationships or change attribute types, then you're in for a wild ride with heavy migrations.
Heavy Migrations
Heavy migrations are a bit trickier. Let me rephrase that. Heavy migrations are a pain in the neck and you should try to avoid them if possible. Heavy migrations are powerful, but that power comes at a cost. Heavy migrations require a lot of work and testing to make sure the migration completes successfully and, more importantly, without data loss.
We enter the world of heavy migrations if we make changes that Core Data cannot automatically infer for us by comparing versions of the data model. Core Data will then need a mapping model to understand how the versions of the data model relate to one another. Because heavy migrations are a complex topic, we won't cover it in this series.
4. Versioning
If you've worked with Ruby on Rails, then migrations will make a lot of sense to you. The idea is simple but powerful. Core Data allows us to version the data model and this enables us to safely modify the data model. Core Data inspects the versioned data model to understand how the persistent store relates to the data model. By looking at the versioned data model, it also knows if the persistent store needs to be migrated before it can be used with the current version of the data model.
Versioning and migrations go hand in hand. If you wish to understand how migrations work, you'll first need to understand how to version the Core Data data model. Let's revisit the to-do application we created in the previous article. As we saw earlier, adding an attribute, updatedAt, to the TSPItem entity results in the persistent store being incompatible with the modified data model. We now understand the cause of this.
Let's start with a clean slate by opening Done.xcdatamodeld and removing the updatedAt attribute from the TSPItem entity. It's time to create a new version of the data model.
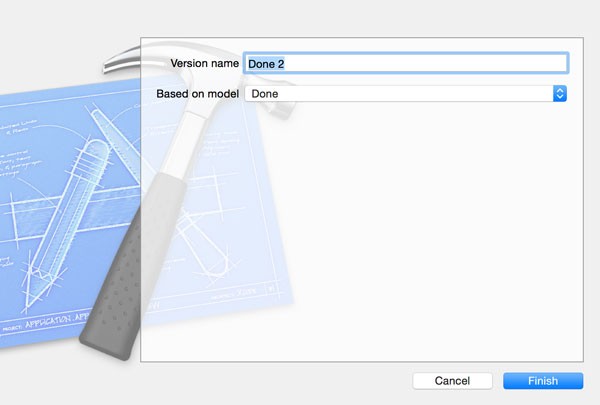
With the data model selected, choose Add Model Version... from the Editor menu. Xcode will ask you to name the new data model version and, more importantly, on which version the new version should be based. To ensure Core Data can migrate the persistent store for us, it's important that you choose the previous version of the data model. In this example, we only have one choice.
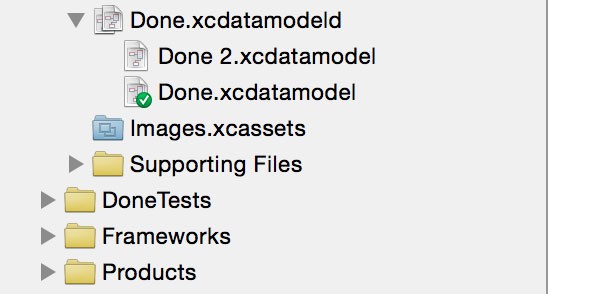
The result of this action is that we can now see three data model files in the Project Navigator. There is one top level data model with a .xcdatamodeld extension and two children with a .xcdatamodel extension.
You can see the .xcdatamodeld file as a package for the versions of the data model, with each version represented by an .xcdatamodel file. You can verify this by right-clicking the .xcdatamodeld file and selecting Show in Finder. This will take you to the data model in the Xcode project. If you right-click that file and select Show Package Contents, you should see the two versions of the data model, Done.xcdatamodel and Done 2.xcdatamodel.
Have you noticed in the Project Navigator that one of the versions has a green checkmark? This checkmark indicates what the current model version is, Done.xcdatamodel in this example. In other words, even though we've created a new version of the data model, it isn't put to use by our application yet. Before we change this, though, we need to tell Core Data what it should do with the versioned data model.
We need to tell Core Data how to migrate the persistent store for the data model. We do this in the persistentStoreCoordinator method in TSPAppDelegate.m. In the persistentStoreCoordinator method, we create the persistent store coordinator and we add a persistent store to it by invoking addPersistentStoreWithType:configuration:URL:options:error:. This is nothing new.
The fourth parameter of this method, a dictionary of options, is currently nil. This dictionary of options includes instructions for Core Data. It gives us the opportunity to tell the persistent store coordinator how it should migrate the persistent store that we add to it.
Take a look at the updated implementation of persistentStoreCoordinator in which we pass a dictionary of options with two key-value pairs.
- (NSPersistentStoreCoordinator *)persistentStoreCoordinator {
    if (_persistentStoreCoordinator) {
        return _persistentStoreCoordinator;
    }

    NSURL *applicationDocumentsDirectory = [[[NSFileManager defaultManager] URLsForDirectory:NSDocumentDirectory inDomains:NSUserDomainMask] lastObject];
    NSURL *storeURL = [applicationDocumentsDirectory URLByAppendingPathComponent:@"Done.sqlite"];

    NSError *error = nil;
    _persistentStoreCoordinator = [[NSPersistentStoreCoordinator alloc] initWithManagedObjectModel:[self managedObjectModel]];

    NSDictionary *options = @{ NSMigratePersistentStoresAutomaticallyOption : @(YES),
                               NSInferMappingModelAutomaticallyOption : @(YES) };

    if (![_persistentStoreCoordinator addPersistentStoreWithType:NSSQLiteStoreType configuration:nil URL:storeURL options:options error:&error]) {
        NSLog(@"Unresolved error %@, %@", error, [error userInfo]);
        abort();
    }

    return _persistentStoreCoordinator;
}
The first key, NSMigratePersistentStoresAutomaticallyOption, tells Core Data that we'd like it to attempt to migrate the persistent store for us. The second key, NSInferMappingModelAutomaticallyOption, instructs Core Data to infer the mapping model for the migration. This is exactly what we want. It should work without issues as long as we're dealing with a lightweight migration.
With this change, we are ready to migrate the data model to the new version we created a few moments ago. Start by selecting the new version, Done 2.xcdatamodel, and add a new attribute updatedAt of type Date to the TSPItem entity.
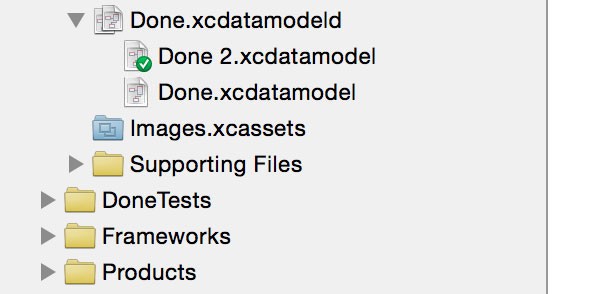
We also need to mark the new data model version as the version to use by Core Data. Select Done.xcdatamodeld in the Project Navigator and open the File Inspector on the right. In the section Model Version, set Current to Done 2.

In the Project Navigator, Done 2.xcdatamodel should now have a green checkmark instead of Done.xcdatamodel.
With this change, you can safely build and run the application. If you've followed the above steps, Core Data should automatically migrate the persistent store for you by inferring the mapping model based on the versioned data model.
Note that there are a few caveats you should be aware of. If you run into a crash, then you've done something wrong. For example, if you've set the data model version to Done 2.xcdatamodel, run the application, and then make changes to Done 2.xcdatamodel, then you'll inevitably run into a crash due to the persistent store being incompatible with the data model. Lightweight migrations are relatively powerful and they are easy to implement, but that doesn't mean you can modify the data model at any time.
The data layer of a software project requires care, attention, and preparation. Migrations are great, but they should be used sparingly. Crashes are no problem during development, but they are catastrophic in production. In the next section, we take a closer look at what this means and how to prevent crashes due to a problematic migration.
5. Avoiding Crashes
I have never come in a situation that warranted calling abort in production and it pains me when I browse a project in which Apple's default implementation for setting up the Core Data stack is used, in which abort is called when adding a persistent store is unsuccessful.
Avoiding abort is not that difficult, but it requires a few lines of code and informing the user about what went wrong in case something does go wrong. Developers are only human and we all make mistakes.
Step 1: Getting Rid of abort
Start by opening TSPAppDelegate.m and remove the line in which we call abort. That's the first step to a happy user.
if (![_persistentStoreCoordinator addPersistentStoreWithType:NSSQLiteStoreType configuration:nil URL:storeURL options:options error:&error]) {
    NSLog(@"Unresolved error %@, %@", error, [error userInfo]);
}
Step 2: Moving the Incompatible Store
If Core Data detects that the persistent store is incompatible with the data model, we first move the incompatible store to a safe location. We do this to make sure the user's data isn't lost. Even if the data model is incompatible with the persistent store, you may be able to recover data form it. Take a look at the updated implementation of the persistentStoreCoordinator method in TSPAppDelegate.m.
- (NSPersistentStoreCoordinator *)persistentStoreCoordinator {
    if (_persistentStoreCoordinator) {
        return _persistentStoreCoordinator;
    }

    NSURL *storeURL = [[self applicationStoresDirectory] URLByAppendingPathComponent:@"Store.sqlite"];

    NSError *error = nil;
    _persistentStoreCoordinator = [[NSPersistentStoreCoordinator alloc] initWithManagedObjectModel:[self managedObjectModel]];

    if (![_persistentStoreCoordinator addPersistentStoreWithType:NSSQLiteStoreType configuration:nil URL:storeURL options:nil error:&error]) {
        NSFileManager *fm = [NSFileManager defaultManager];

        // Move Incompatible Store
        if ([fm fileExistsAtPath:[storeURL path]]) {
            NSURL *corruptURL = [[self applicationIncompatibleStoresDirectory] URLByAppendingPathComponent:[self nameForIncompatibleStore]];

            // Move Corrupt Store
            NSError *errorMoveStore = nil;
            [fm moveItemAtURL:storeURL toURL:corruptURL error:&errorMoveStore];

            if (errorMoveStore) {
                NSLog(@"Unable to move corrupt store.");
            }
        }
    }

    return _persistentStoreCoordinator;
}
Note that I've changed the value of storeURL, the location of the persistent store. It points to a directory in the documents directory in the application's sandbox. The implementation of applicationStoresDirectory, a helper method, is straightforward as you can see below.
- (NSURL *)applicationStoresDirectory {
    NSFileManager *fm = [NSFileManager defaultManager];
    NSURL *applicationApplicationSupportDirectory = [[fm URLsForDirectory:NSApplicationSupportDirectory inDomains:NSUserDomainMask] lastObject];
    NSURL *URL = [applicationApplicationSupportDirectory URLByAppendingPathComponent:@"Stores"];

    if (![fm fileExistsAtPath:[URL path]]) {
        NSError *error = nil;
        [fm createDirectoryAtURL:URL withIntermediateDirectories:YES attributes:nil error:&error];

        if (error) {
            NSLog(@"Unable to create directory for data stores.");

            return nil;
        }
    }

    return URL;
}
If the persistent store coordinator is unable to add the existing persistent store at storeURL, we move the persistent store to a separate directory. Note that we make use of two more helper methods, applicationIncompatibleStoresDirectory and nameForIncompatibleStore. The implementation of applicationIncompatibleStoresDirectory is pretty simple as you can see below.
- (NSURL *)applicationIncompatibleStoresDirectory {
    NSFileManager *fm = [NSFileManager defaultManager];
    NSURL *URL = [[self applicationStoresDirectory] URLByAppendingPathComponent:@"Incompatible"];

    if (![fm fileExistsAtPath:[URL path]]) {
        NSError *error = nil;
        [fm createDirectoryAtURL:URL withIntermediateDirectories:YES attributes:nil error:&error];

        if (error) {
            NSLog(@"Unable to create directory for corrupt data stores.");

            return nil;
        }
    }

    return URL;
}
In nameForIncompatibleStore, we generate a name for the incompatible store based on the current date and time to avoid naming collisions.
- (NSString *)nameForIncompatibleStore {
    // Initialize Date Formatter
    NSDateFormatter *dateFormatter = [[NSDateFormatter alloc] init];

    // Configure Date Formatter
    [dateFormatter setFormatterBehavior:NSDateFormatterBehavior10_4];
    [dateFormatter setDateFormat:@"yyyy-MM-dd-HH-mm-ss"];

    return [NSString stringWithFormat:@"%@.sqlite", [dateFormatter stringFromDate:[NSDate date]]];
}
Step 3: Creating a New Persistent Store
It's time to create a new persistent store to finish the setup of the Core Data stack. The next few lines should look very familiar by now.
NSError *errorAddingStore = nil;
if (![_persistentStoreCoordinator addPersistentStoreWithType:NSSQLiteStoreType configuration:nil URL:storeURL options:nil error:&errorAddingStore]) {
    NSLog(@"Unable to create persistent store after recovery. %@, %@", errorAddingStore, errorAddingStore.localizedDescription);
}
If Core Data is unable to create a new persistent store, then there are more serious problems that are not related to the data model being incompatible with the persistent store. If you do run into this issue, then double-check the value of storeURL.
Step 4: Notify the User
This step is probably the most important one in terms of creating a user friendly application. Losing the user's data is one thing, but pretending that nothing has happened is not nice. How would you feel if an airline lost your luggage, pretending as if nothing happened.
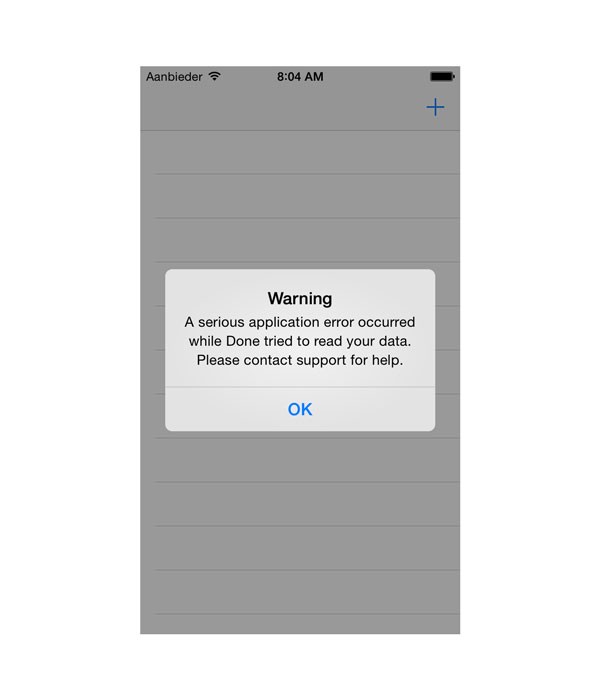
// Show Alert View
NSString *title = @"Warning";
NSString *applicationName = [[NSBundle mainBundle] objectForInfoDictionaryKey:@"CFBundleDisplayName"];
NSString *message = [NSString stringWithFormat:@"A serious application error occurred while %@ tried to read your data. Please contact support for help.", applicationName];
UIAlertView *alertView = [[UIAlertView alloc] initWithTitle:title message:message delegate:nil cancelButtonTitle:@"OK" otherButtonTitles:nil];
[alertView show];
We show an alert view to the user, but it's a good idea to take it a few steps further. For example, you could urge them to contact support and you can even implement a feature that lets them send you the corrupt store. The latter is very useful for debugging the issue.
Step 5: Testing
Persisting data is an important aspect of most applications. It's therefore important to properly test what we've implemented in this article. To test our recovery strategy, run the application in the iOS Simulator and double-check that the persistent store was successfully created in the Application Support directory, in the Stores subdirectory.
Add a new attribute to the TSPItem entity in Done 2.xcdatamodel and run the application one more time. Because the existing persistent store is now incompatible with the data model, the incompatible persistent store is moved to the Incompatible subdirectory and a new persistent store is created. You should also see an alert view, informing the user about the problem.
Conclusion
Migrations are an important topic if you plan to make extensive use of Core Data. Migrations let you safely modify your application's data model and, in the case of lightweight migrations, without much overhead.
In the next article, we focus on subclassing NSManagedObject. If a Core Data project has any kind of complexity, then subclassing NSManagedObject is the way to go.

Comments