The game of Connect 4 brings back yesteryear memories. This classic game has surely left an impression on everyone who has played it. In this article, we're going to make a multiplayer version of Connect 4 using Node.js and Socket.io.
Installing the Dependencies
This tutorial assumes that you have Node.js and npm installed. To manage the frontend dependencies, we'll use Bower to fetch the packages and Grunt to manage tasks. Open a terminal and install Bower and Grunt globally by executing:
$ sudo npm install -g bower grunt-cli
Note: Grunt requires Node.js versions >= 0.8.0. At the time of writing this article, Ubuntu's repositories had an older version of Node. Please make sure you're using Chris Lea's PPA if you're on Ubuntu. For other distributions/operating systems, please refer to the Node.js installation docs for getting the latest version.
With Bower and Grunt-cli installed, let's create a directory for the project and fetch the Twitter Bootstrap and Alertify.js (to manage alert notifications) using Bower.
$ mkdir connect4
$ cd connect4
$ bower install bootstrap alertify.js
Now, let's set up a directory to manage our custom assets. We'll name it assets and store our custom Less and JavaScript files inside it.
$ mkdir -p assets/{javascript,stylesheets}
$ touch assets/javascript/<code>frontend.js</code> assets/stylesheets/<code>styles.less</code> assets/stylesheets/variables.less
To serve the compiled assets, we'll create a directory named static with sub-directories named javascript and stylesheets.
$ mkdir -p static/{javascript,stylesheets}
Open assets/stylesheets/styles.less and import variables.less and the required Less files from bootstrap.
// Core variables and mixins
@import "../../bower_components/bootstrap/less/variables.less";
@import "../../bower_components/bootstrap/less/mixins.less";

// Reset
@import "../../bower_components/bootstrap/less/normalize.less";
@import "../../bower_components/bootstrap/less/print.less";

// Core CSS
@import "../../bower_components/bootstrap/less/scaffolding.less";
@import "../../bower_components/bootstrap/less/type.less";
@import "../../bower_components/bootstrap/less/code.less";
@import "../../bower_components/bootstrap/less/grid.less";
@import "../../bower_components/bootstrap/less/tables.less";
@import "../../bower_components/bootstrap/less/forms.less";
@import "../../bower_components/bootstrap/less/buttons.less";

// Components
@import "../../bower_components/bootstrap/less/component-animations.less";
@import "../../bower_components/bootstrap/less/glyphicons.less";
@import "../../bower_components/bootstrap/less/dropdowns.less";
@import "../../bower_components/bootstrap/less/navbar.less";
@import "../../bower_components/bootstrap/less/jumbotron.less";
@import "../../bower_components/bootstrap/less/alerts.less";
@import "../../bower_components/bootstrap/less/panels.less";
@import "../../bower_components/bootstrap/less/wells.less";

// Utility classes
@import "../../bower_components/bootstrap/less/utilities.less";
@import "../../bower_components/bootstrap/less/responsive-utilities.less";

// Custom variables
@import "variables.less";

// Alertify
@import (less) "../../bower_components/alertify.js/themes/alertify.core.css";
@import (less) "../../bower_components/alertify.js/themes/alertify.default.css";

// Custom Styles
With that done, let's setup the Gruntfile.js to compile the Less files in to CSS and combine all the JavaScript files into one single file. The basic structure of the Gruntfile.js file with some tasks, would look something like this:
//Gruntfile
module.exports = function(grunt) {

//Initializing the configuration object
    grunt.initConfig({
        // Task configuration
        less: {
            //...
        },
        concat: {
            //...
        },
        watch: {
            //...
        }
    });

    // Load plugins

    // Define tasks

};
Asset Tasks
We'll define three tasks to manage the assets. The first one will be to compile all the Less files to CSS. The second one will be to concatenate all JavaScript files into one and finally, the last task will be to watch files for changes. The watch task would be the default task and can be run by typing grunt in the project root, once we're done configuring the gruntfile.
Let's setup a task to compile all Less files to CSS files in the static/stylesheets directory.
less: {
    development: {
        options: {
            compress: true,
        },
        files: {
            "./static/stylesheets/styles.css": "./assets/stylesheets/<code>styles.less</code>",
        }
    }
},
Moving on, we'll setup another task to concat all the JS files into one.
concat: {
    options: {
        separator: ';',
    },
    js: {
        src: [
          './bower_components/jquery/jquery.js',
          './bower_components/bootstrap/dist/js/bootstrap.js',
          './bower_components/alertify.js/lib/alertify.js',
          './assets/javascript/<code>frontend.js</code>'
        ],
        dest: './static/javascript/<code>frontend.js</code>',
    },
},
Finally, let's set the watch task to watch our files for changes and execute the required tasks on save.
watch: {
    js: {
        files: [
            './bower_components/jquery/jquery.js',
            './bower_components/bootstrap/dist/js/bootstrap.js',
            './bower_components/alertify.js/lib/alertify.js',
            './assets/javascript/<code>frontend.js</code>'
        ],
        tasks: ['concat:js']
    },
    less: {
        files: ['./assets/stylesheets/*.less'],
        tasks: ['less']
    },
}
With that done, we'll load the required npm plugins and register the default task.
// Load plugins
grunt.loadNpmTasks('grunt-contrib-concat');
grunt.loadNpmTasks('grunt-contrib-less');
grunt.loadNpmTasks('grunt-contrib-watch');

// Define tasks
grunt.registerTask('default', ['watch']);
Let's move on to managing backend dependencies using npm. For this project, we'll be using the Express framework with the Jade templating engine and Socket.io. Install the dependencies locally by executing the following command:
$ npm install express jade socket.io async grunt grunt-contrib-concat grunt-contrib-less grunt-contrib-watch
The directory structure should now be similar to this:
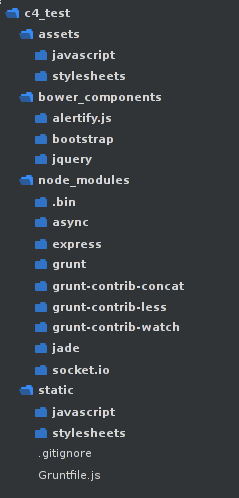
Now that we've got our dependencies set up, it's time to move on to making the frontend of our game.
The Frontend
Let's continue by creating a file named server.js and serve content using Express.
var express = require('express');
var async = require('async');
var app = express()
var io = require('socket.io').listen(app.listen(8000));

app.use('/static', express.static(__dirname + '/static'));

app.get('/', function(req, res) {
    res.render('index.jade');
});

app.get('/landingPage', function(req, res) {
    res.render('landing.jade');
});

console.log('Listening on port 8000');
The Templates
We're using the Jade Templating Engine to manage the templates. By default, Express looks for views inside the views directory. Let's make the views directory and create Jade files for the layout, index and the thanks page.
$ mkdir -p views
$ touch views/{layout.jade,index.jade,landing.jade}
Next, let's edit the layout of our project, index page and landing page(landing.jade).
doctype html
html(lang="en")
    head
        title Connect 4
        link(rel='stylesheet', href='static/stylesheets/styles.css')
    body
        #wrap
            nav.navbar.navbar-default(role='navigation')
                .container-fluid
                    .navbar-header
                        a.navbar-brand(href='#') Connect 4
            block content
        #footer
            .container
                p.text-muted
                    | Developed by
                    | <a href="http://github.com/gnarula">Gaurav Narula</a> for Nettuts
        block javascript
            script(src='/socket.io/socket.io.js')
            script(src='static/javascript/<code>frontend.js</code>')
extends layout

block content
    .container
        .row
            .col-xs-3
                .p1-score
                    p 0
            #board.col-xs-6
                table.center-table
                .form-group
                    label(for="shareUrl").col-sm-3.control-label.share-label Share URL:
                    .col-sm-9
                        input(type='text' ReadOnly).form-control
            .col-xs-3
                .p2-score
                    p 0
extends layout

block content
    .jumbotron
        .container
            <h1>Thank You!</h1>
            <p>Thank you for playing! We hope you enjoyed the game!</p>

block javascript
Notice that we're serving socket.io.js, although it's not defined anywhere in the static directory. This is because the socket.io module automatically manages the serving of thesocket.io.js client file.
The Styling
Now that we've got the HTML setup, let's move on to defining the styles. We'll begin with overwriting some bootstrap variables with the values of our choice inside assets/stylesheets/variables.less.
@body-bg: #F1F1F1;

@text-color: #717171;
@headings-color: #333;

@brand-primary: #468847;
@brand-success: #3A87AD;
@brand-warning: #FFC333;
@brand-danger: #FB6B5B;

@navbar-default-bg: #25313E;
@navbar-default-color: #ADBECE;
@navbar-default-link-color: @navbar-default-color;
@navbar-default-link-hover-color: #333;
Then we'll append some custom styles to styles.less.
// Custom Styles

/* Sticky Footer */
html,
body {
  height: 100%;
}

/* Wrapper for page content to push down footer */
#wrap {
  min-height: 100%;
  height: auto;
  margin: 0 auto -60px;
  padding: 0 0 60px;
}

#footer {
  height: 60px;
  background-color: #65BD77;
  > .container {
      padding-left: 15px;
      padding-right: 15px;
  }
}

.container .text-muted {
    margin: 20px 0;
    color: #fff;
}

// Grid
table {
    border-collapse: separate;
    border-spacing: 10px 10px;
}

table tr {
    margin: 10px;
}

table tr td {
    width: 50px;
    height: 50px;
    border: 1px solid #3A87AD;
}

.center-table {
  margin: 0 auto !important;
  float: none !important;
}

.p1-score, .p2-score {
    padding: 185px 0;
    width: 50px;
    height: 50px;
    font-size: 25px;
    line-height: 50px;
    color: #fff;
    text-align: center;
}

.p1-score {
    float: right;
    p {
        background: #FFC333;
        .current {
            border: 5px solid darken(#FFC333, 10%);
        }
    }
}

.p2-score p {
    background: #FB6B5B;
    .current {
        border: 5px solid darken(#FB6B5B, 10%);
    }
}

.share-label {
    line-height: 34px;
    text-align: right;
}
The JavaScript
With that done, let's add some JavaScript code in assets/javascript/ to create the grid and add frontend.jsdata-row and data-column attributes with proper values dynamically.
$(document).ready(function() {
    for(var i = 0; i < 6; i++){
        $('#board table').append('');
        for(var j = 0; j < 7; j++) {
            $('#board tr').last().append('');
            $('#board td').last().addClass('box').attr('data-row', i).attr('data-column', j);
        }
    }
});
That covers the frontend setup. Let's compile the assets and launch the server.
$ grunt less concat:js
$ node <code>server.js</code>
If you've been following along, the index page should look similar to this:
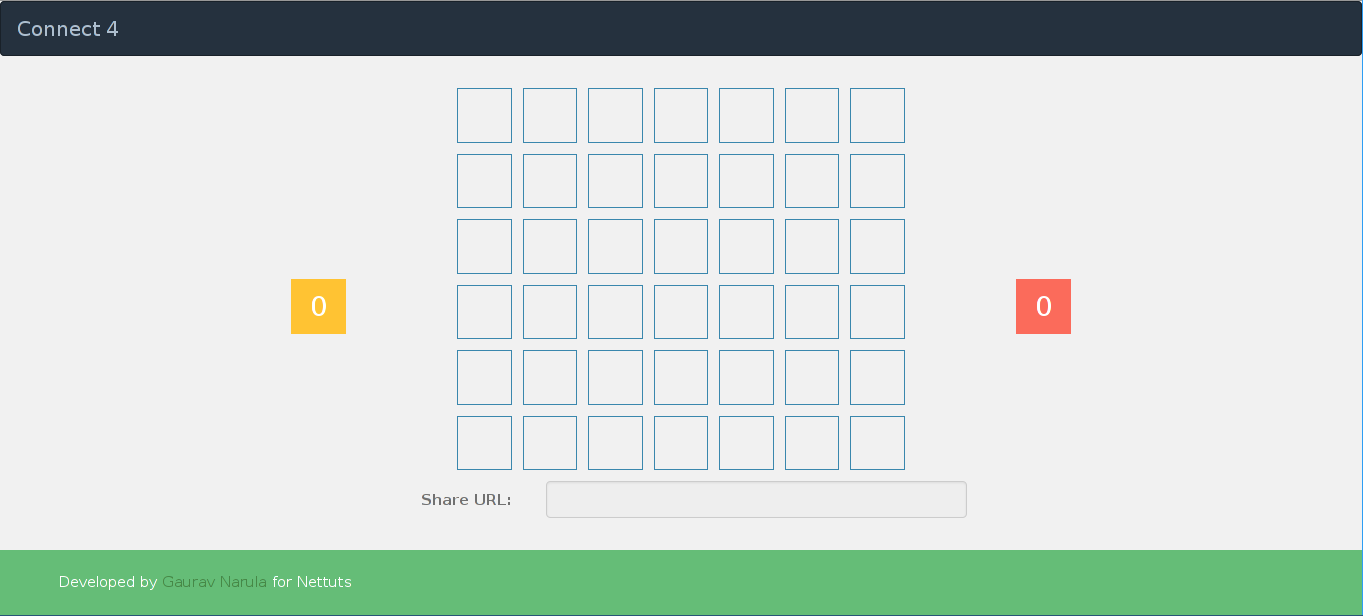
Tip: Run the grunt command on the project root on a separate terminal. That would call the default task which happens to be watch. This would concat all JS files or compile all Less files on every save.
The Backend
The objective in Connect 4 is to connect four consecutive "blocks" either horizontally, vertically or diagonally. Socket.io allows us to create rooms that clients can join. Think of them as IRC channels.
The Game Rooms
We'll use this feature in the game, so that only two players may be in a room and the room is destroyed when either of them quits. We'll create an object that will keep track of all rooms and in turn, all game-states. Let's begin with creating a function in server.js to create random room names.
function generateRoom(length) {
    var haystack = 'abcdefghijklmnopqrstuvwxyzABCDEFGHIJKLMNOPQRSTUVWXYZ0123456789';
    var room = '';

    for(var i = 0; i < length; i++) {
        room += haystack.charAt(Math.floor(Math.random() * 62));
    }

    return room;
};
The function expects the length of the random room name we wish to generate. The room name is generated by concatenating random characters from the haystack string. Let's modify our route for the index page to include the share URL and create a new route to serve the content if a particular room is accessed.
app.get('/', function(req, res) {
    share = generateRoom(6);
    res.render('index.jade', {shareURL: req.protocol + '://' + req.get('host') + req.path + share, share: share});
});

app.get('/:room([A-Za-z0-9]{6})', function(req, res) {
    share = req.params.room;
    res.render('index.jade', {shareURL: req.protocol + '://' + req.get('host') + '/' + share, share: share});
});
In the above code, we generate the share ID using the generateRoom() function we defined previously and pass in the share ID and URL as parameters to the template. The second route expects a parameter named room which is restricted by a regular expression. The regex allows a string containing only alphanumeric characters, of length six. Again, we pass on the shareURL and id as parameters to the template. Let's add some attributes to the input element of our index so that we may access them in frontend.js later.
input(type='text', data-room=share, name='shareUrl', value=shareURL ReadOnly).form-control
Next, let's edit frontend.js to connect to the Socket.io server, join the room and assign some properties to the current player.
var socket = io.connect('localhost');

function Player(room, pid) {
    this.room = room;
    this.pid = pid;
}

var room = $('input').data('room');
var player = new Player(room, '', '');

socket.on('connect', function() {
    socket.emit('join', {room: room});
});

socket.on('assign', function(data) {
    player.color = data.color;
    player.pid = data.pid;
    if(player.pid == 1) {
        $('.p1-score p').addClass('current');
    }
    else {
        $('.p2-score p').addClass('current');
    }
});
Note that we created an object called player to refer to the player on the client side. On connection, the join event is called on the backend which inturn emits the assign emit on the frontend to assign some properties to the player. We may now proceed to define the code in the backend to handle the join event.
// an object to hold all gamestates. Key denotes room id
var games = {};

io.sockets.on('connection', function(socket) {
    socket.on('join', function(data) {
        if(data.room in games) {
            if(typeof games[data.room].player2 != "undefined") {
                socket.emit('leave');
                return;
            }
            socket.join(data.room);
            socket.set('room', data.room);
            socket.set('color', '#FB6B5B');
            socket.set('pid', -1);
            games[data.room].player2 = socket
            // Set opponents
            socket.set('opponent', games[data.room].player1);
            games[data.room].player1.set('opponent', games[data.room].player2);

            // Set turn
            socket.set('turn', false);
            socket.get('opponent', function(err, opponent) {
                opponent.set('turn', true);
            });

            socket.emit('assign', {pid: 2});

        }
        else {
            socket.join(data.room);
            socket.set('room', data.room);
            socket.set('color', '#FFC333');
            socket.set('pid', 1);
            socket.set('turn', false);
            games[data.room] = {
                player1: socket,
                board: [[0,0,0,0,0,0,0], [0,0,0,0,0,0,0], [0,0,0,0,0,0,0], [0,0,0,0,0,0,0], [0,0,0,0,0,0,0], [0,0,0,0,0,0,0]],
            };
            socket.emit('assign', {pid: 1});
        }
    });
});
Note: The Socket.io event handlers on the backend should be added inside the io.sockets.on('connection', function(socket) { } code block. Similarly, the event handlers and frontend JavaScript code should be inside the $(document).ready(function() { } code block.
In the code above, we defined the event handler for the join event that is emitted by the frontend. It checks whether the given room already exists and whether player two hasn't already been assigned and if so, assigns the current client as player two. Otherwise, it assigns the current client as player one and initializes the board. We emit the leave event on the frontend for clients who attempt to join a game in progress. We also set some properties on the socket using socket.set(). These include room id, color, pid and the turn variable. The properties set this way may be retrieved from the callback of socket.get(). Next, let's add the leave event handler on the frontend.
socket.on('leave', function() {
    window.location = '/landingPage';
});
The leave event handler simply redirects the client to the landing page. We now proceed to emit an event that alerts both the players if the game is ready to begin. Let's append some code to the if condition of our join event on the server side.
if(data.room in games) {
    // ... append to the code that exists
    // Notify
    games[data.room].player1.emit('notify', {connected: 1, turn: true});
    socket.emit('notify', {connected: 1, turn: false});
}
We must define a notify event in the frontend that deals with the notification. Alert.js provides a neat way to handle all the notifications. Let's add the notify event handler in frontend.js.
socket.on('notify', function(data) {
    if(data.connected == 1) {
        if(data.turn)
            alertify.success('Players Connected! Your turn');
        else
            alertify.success('Players Connected! Opponent\'s turn');
    }
});
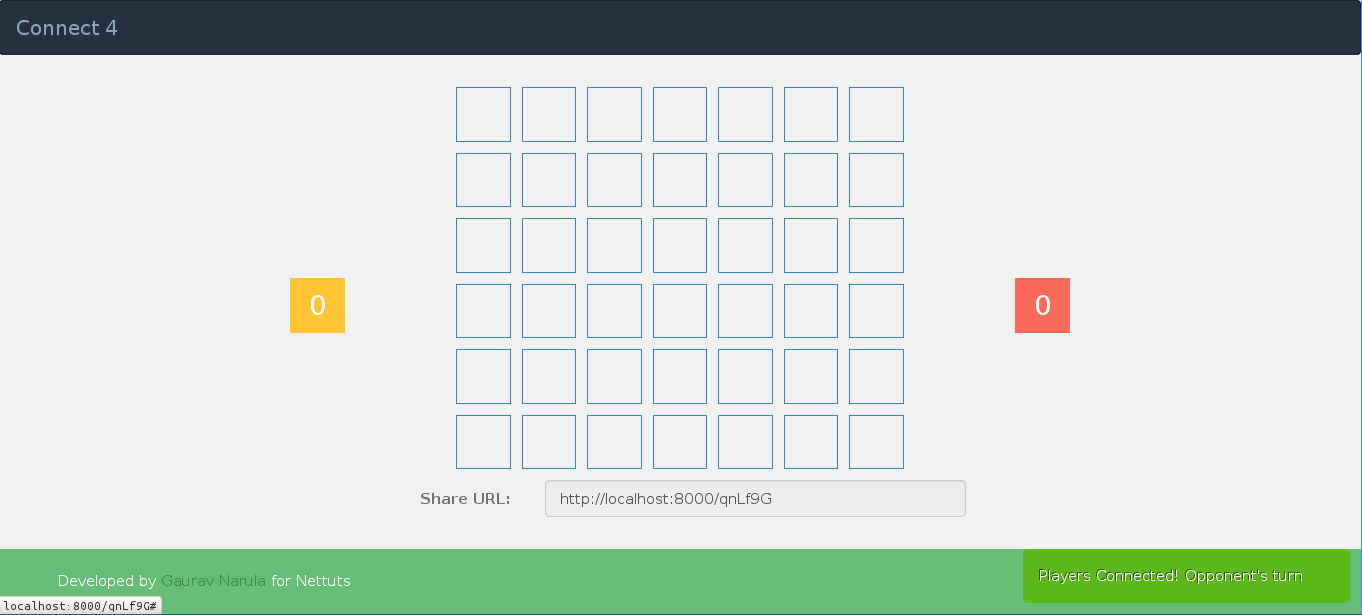
Time to try out our progress so far. Launch the server locally and access localhost and the share URL in two separate windows. If you've been following along, you should be greeted with an alert on the bottom right corner, as shown in the image below:
Adding Interactivity
Now let's proceed to add code that emits an event when the blocks are clicked. For this part, we need to ascertain whether the click was made by the correct player. This is where the turn property we set on the socket would come into play. Append the following code to frontend.js.
$('.box').click(function() {
    // find the box to drop the disc to
    var click = {
        row: $(this).data('row'),
        column: $(this).data('column')
    };
    socket.emit('click', click);
});
The above code sets an event handler on all the table cells. One thing to note is that the grid in Connect 4 is similar to adding bricks in a wall, that is, one may not fill a particular (row, column) pair if (row-1, column) pair isn't filled. Therefore, we must first get the (row, column) pair of the cell that was clicked and then work out a way to determine the actual cell to be filled. This is done in the backend, in the event handler for click.
socket.on('click', function(data) {
    async.parallel([
        socket.get.bind(this, 'turn'),
        socket.get.bind(this, 'opponent'),
        socket.get.bind(this, 'room'),
        socket.get.bind(this, 'pid')
    ], function(err, results) {
        if(results[0]) {
            socket.set('turn', false);
            results[1].set('turn', true);

            var i = 5;
            while(i >= 0) {
                if(games[results[2]].board[i][data.column] == 0) {
                    break;
                }
                i--;
            }
            if(i >= 0 && data.column >= 0) {
                games[results[2]].board[i][data.column] = results[3];
                socket.get('color', function(err, color) {
                    socket.emit('drop', {row: i, column: data.column, color: color});
                    results[1].emit('drop', {row: i, column: data.column, color: color});
                });
            }
        }
        else {
            console.log('Opponent\'s turn');
        }
    });
});
The above event handler uses the async module to fetch the socket properties simultaneously. This avoids nesting callbacks in successive uses of socket.get(). The results variable is an array with elements in the same order as the socket.get() calls. results[0], therefore refers to turn and so on.
Once the properties have been fetched, we swap the turns and figure out the (row, column) pair to fill. We do this in the while loop by starting from the bottom row (row five) and moving our way upwards until the value of the board at (row, column) is zero (which implies it has not been played on). We then assign the pid (either one or negative one) to the element on the board and emit the drop event on both players. Let's add the drop event handler on frontend.js and introduce an animation that gives us a falling effect.
socket.on('drop', function(data) {
    var row = 0;
    stopVal = setInterval(function() {
        if(row == data.row)
            clearInterval(stopVal);
        fillBox(row, data.column, data.color);
        row++;
    }, 25);
});

function fillBox(row, column, color) {
    $('[data-row="'+(row-1)+'"][data-column="'+column+'"]').css('background', '');
    $('[data-row="'+row+'"][data-column="'+column+'"]').css('background', color);
}
We implement the drop animation using JavaScript's setInterval() method. Starting from the topmost row (row zero), we continue calling fillBox() in intervals of 25 seconds until the value of row equals the value of data.row. The fillBox function clears the background of the previous element, in the same column and assigns a background to the current element. Next, we come to the crux of the game, implementing the winning and draw conditions. We'll cover this in the backend.
// Helper function
function getPair(row, column, step) {
    l = [];
    for(var i = 0; i < 4; i++) {
        l.push([row, column]);
        row += step[0];
        column += step[1];
    }
    return l;
}

// a list to hold win cases
var check = [];
We begin by defining a helper function that returns four (row, column) pairs either horizontally, vertically or diagonally. The function expects the current row and column and an array that determines the increment in row and column values. For instance, a call to getPair(1,1, [1,1]) would return [[1,1], [2,2], [3,3], [4,4]] which happens to be the right diagonal. This way we can get respective pairs by selecting suitable values for the step array. We've also declared a list to hold all the functions that check for wins. Let's begin by going through the function that checks for wins horizontally and vertically.
check.push(function check_horizontal(room, row, startColumn, callback) {
    for(var i = 1; i < 5; i++) {
        var count = 0;
        var column = startColumn + 1 - i;
        var columnEnd = startColumn + 4 - i;
        if(columnEnd > 6 || column < 0) {
            continue;
        }
        var pairs = getPair(row, column, [0,1]);
        for(var j = column; j < columnEnd + 1; j++) {
            count += games[room]['board'][row][j];
        }
        if(count == 4)
            callback(1, pairs);
        else if(count == -4)
            callback(2, pairs);
    }
});

check.push(function check_vertical(room, startRow, column, callback) {
    for(var i = 1; i < 5; i++) {
        var count = 0;
        var row = startRow + 1 - i;
        var rowEnd = startRow + 4 - i;
        if(rowEnd > 5 || row < 0) {
            continue;
        }
        var pairs = getPair(row, column, [1,0]);
        for(var j = row; j < rowEnd + 1; j++) {
            count += games[room]['board'][j][column];
        }
        if(count == 4)
            callback(1, pairs);
        else if(count == -4)
            callback(2, pairs);
    }
});
Let's go through the above function step by step. The function expects four parameters for room, row, column and the success callback. To check for a win horizontally, the cell that was clicked on might contribute to a winning condition in a maximum of four ways. For instance, the cell at (5, 3) may result in a win in any of the following four combinations: [[5,3], [5,4], [5,5], [5,6]], [[5,2], [5,3], [5,4], [5,5]], [[5,1], [5,2], [5,3], [5,4]], [[5,0], [5,1], [5,2], [5,3], [5,4]]. The number of combinations might be less for border conditions. The algorithm above deals with the problem in hand by calculating the left most column (variable column) and right most column (variable columnEnd) in each of the four possible combinations.
If the right most column is greater than six, it's off the grid and that pass can be skipped. The same will be done if the left most column is less than zero. However, if the edge cases fall in the grid, we compute the (row, column) pairs using the getPair() helper function we defined previously and then proceed to add the values of the elements on the board. Recall that we assigned a value plus one on the board for player one and negative one for player two. Therefore, four consecutive cells by one player should result in a count of either four or negative four respectively. The callback is called in case of a win and is passed two parameters, one for the player (either one or two) and the other for the winning pairs. The function that deals with the vertical check is quite similar to the horizontal one, except that it checks the edge cases in rows rather than columns.
Left and Right Diagonals
Let's move on to defining checks for the left and right diagonals.
check.push(function check_leftDiagonal(room, startRow, startColumn, callback) {
    for(var i = 1; i < 5; i++) {
        var count = 0;
        var row = startRow + 1 - i;
        var rowEnd = startRow + 4 - i;
        var column = startColumn + 1 - i;
        var columnEnd = startColumn + 4 - i;
        if(column < 0 || columnEnd > 6 || rowEnd > 5 || row < 0) {
            continue;
        }
        var pairs = getPair(row, column, [1,1]);
        for(var j = 0; j < pairs.length; j++) {
            count += games[room]['board'][pairs[j][0]][pairs[j][1]];
        }
        if(count == 4)
            callback(1, pairs);
        else if(count == -4)
            callback(2, pairs);
    }
});


check.push(function check_rightDiagonal(room, startRow, startColumn, callback) {
    for(var i = 1; i < 5; i++) {
        var count = 0;
        var row = startRow + 1 - i;
        var rowEnd = startRow + 4 - i;
        var column = startColumn -1 + i;
        var columnEnd = startColumn - 4 + i;
        if(column < 0 || columnEnd > 6 || rowEnd > 5 || row < 0) {
            continue;
        }
        var pairs = getPair(row, column, [1,-1]);
        for(var j = 0; j < pairs.length; j++) {
            count += games[room]['board'][pairs[j][0]][pairs[j][1]];
        }
        if(count == 4)
            callback(1, pairs);
        else if(count == -4)
            callback(2, pairs);
    }
});
The checks for diagonals are quite similar to the ones for horizontal and vertical checking. The only difference is that in the case of diagonals, we check edge cases for both rows and columns. Finally, we define a function to check for draws.
// Function to check for draw
function check_draw(room, callback) {
    for(var val in games[room]['board'][0]) {
        if(val == 0)
            return;
    }
    callback();
}
Checking for draws is rather trivial. A draw is obvious if all the cells in the top row have been filled and nobody has won. Thus, we rule out a draw if any of the cells in the top row has not been played on and call the callback otherwise.
With the winning and draw conditions sorted out, we must now use these functions in the click event and emit a reset event on the frontend for denoting the clients the end of the game. Let's edit the click event to handle these conditions.
if(i >= 0 && data.column >= 0) {
    /*
        Previous code skipped
    */
    var win = false;
    check.forEach(function(method) {
        method(results[2], i, data.column, function(player, pairs) {
            win = true;
            if(player == 1) {
                games[results[2]].player1.emit('reset', {text: 'You Won!', 'inc': [1,0], highlight: pairs });
                games[results[2]].player2.emit('reset', {text: 'You Lost!', 'inc': [1,0], highlight: pairs });
            }
            else {
                games[results[2]].player1.emit('reset', {text: 'You Lost!', 'inc': [0,1], highlight: pairs });
                games[results[2]].player2.emit('reset', {text: 'You Won!', 'inc': [0,1], highlight: pairs });
            }
            games[results[2]].board = [[0,0,0,0,0,0,0], [0,0,0,0,0,0,0], [0,0,0,0,0,0,0], [0,0,0,0,0,0,0], [0,0,0,0,0,0,0], [0,0,0,0,0,0,0]];
        });
    });
    if(win) {
        return;
    }
    check_draw(results[2], function() {
        games[results[2]].board = [[0,0,0,0,0,0,0], [0,0,0,0,0,0,0], [0,0,0,0,0,0,0], [0,0,0,0,0,0,0], [0,0,0,0,0,0,0], [0,0,0,0,0,0,0]];
        io.sockets.in(results[2]).emit('reset', {'text': 'Game Drawn', 'inc': [0,0]});
    });
}
In the code above, we check for a win horizontally, vertically and diagonally. In case of a win, we emit the reset event on the frontend with an appropriate message for both players. The highlight property contains the winning pairs and the inc property denotes the increment score for both of the players. For instance, [1,0] would denote increasing player one's score by one and player two's score by zero.
Let's proceed by handling the reset event on the frontend.
socket.on('reset', function(data) {
    if(data.highlight) {
        setTimeout(function() {
            data.highlight.forEach(function(pair) {
                $('[data-row="'+pair[0]+'"][data-column="'+pair[1]+'"]').css('background-color', '#65BD77');
            });
        }, 500);
    }

    setTimeout(function() {
        $('td').css('background-color', '')
        alertify.confirm(data.text, function(e) {
            if(e) {
                socket.emit('continue');
            }
            else {
                window.location = '/landingPage';
            }
        });
    }, 1200)

    // Set Scores
    p1 = parseInt($('.p1-score p').html())+data['inc'][0];
    $('.p1-score p').html(p1);
    p2 = parseInt($('.p2-score p').html())+data['inc'][1];
    $('.p2-score p').html(p2);
});
In the reset event handler, we highlight the winning pairs after 500ms. The reason for the time delay is to allow the drop animation to finish. Next, we reset the board in the background and popup an alertify confirmation dialog with the text sent from the backend. In case the user decides to continue, we emit the continue event on the server side or else redirect the client to the landing page. We then proceed to increase the player scores by incrementing the current score by the values received from the server.
Next, let's define the continue event handler in the backend.
socket.on('continue', function() {
    socket.get('turn', function(err, turn) {
        socket.emit('notify', {connected: 1, turn: turn});
    });
});
The continue event handler is quite straightforward. We emit the notify event again and the game resumes in the frontend.
Next, let's decide on what happens when either of the players gets disconnected. In this scenario, we should redirect the other player to the landing page and remove the room from the gamestate. Let's add this feature in the backend.
socket.on('disconnect', function() {
    console.log('Disconnected');
    socket.get('room', function(err, room) {
        io.sockets.in(room).emit('leave');
        if(room in games) {
            delete games.room;
        }
    });
});
The above event handler would broadcast the leave event to the other players and remove the room from the game's object, if it still exists.
Conclusion
We've covered quite a lot of ground in this tutorial, starting with getting the dependencies, creating some tasks, building the front and back-end and ending with a finished game. With that said, I guess it's time for you guys to have some rounds with your friends! I'd be glad to answer your questions in the comments. Feel free to fork my repo on GitHub and improvise on the code. That's all folks!

Comments