
This tutorial is part of the Building Your Startup With PHP series on Tuts+. In this series, I'm guiding you through launching a startup from concept to reality using my Meeting Planner app as a real life example. Every step along the way, we'll release the Meeting Planner code as open source examples you can learn from. We'll also address startup-related business issues as they arise.
In this tutorial, we're going to build out key areas around the user's own data for broader use through the application:
- Contact Details: the user's phone number and video conferencing addresses for virtual meetings
- User Settings: to track the user's preferences within the application
- Profile Images: to allow the user to upload a photo which we can use on meeting pages
All of the code for Meeting Planner is written in the Yii2 Framework for PHP, which has built-in support for I18n. If you'd like to learn more about Yii2, check out our parallel series Programming With Yii2 at Tuts+.
Just a reminder, I do participate in the comment threads below. I'm especially interested if you have different approaches, additional ideas, or want to suggest topics for future tutorials.
Contact Details
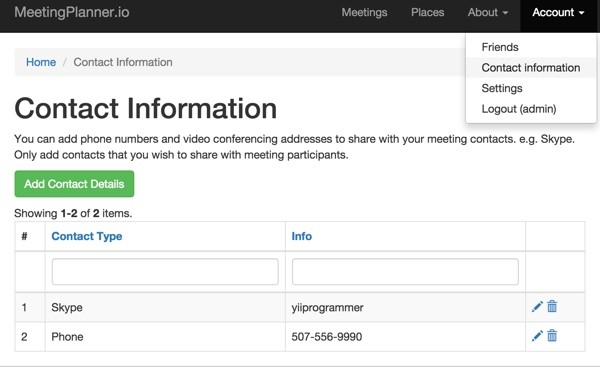
The purpose of contact details is to allow users to provide phone numbers and video conference addresses for virtual meetings. The phone number is also useful pre- and post- meeting.
Building this feature is relatively straightforward. As we did in earlier tutorials, we used Yii's code generator, Gii, to build the model for UserContact and CRUD files.
We also updated the navigation bar to include a link to the User Contact feature. In frontend/views/layouts/main.php:
$menuItems[] = [
    'label' => 'Account',
    'items' => [
       [
          'label' => Yii::t('frontend','Friends'),
          'url' => ['/friend'],
      ],
         [
            'label' => Yii::t('frontend','Contact information'),
            'url' => ['/user-contact'],
        ],
         [
            'label' => Yii::t('frontend','Settings'),
            'url' => ['/user-setting'],
        ],
         [
            'label' => Yii::t('frontend','Logout').' (' . Yii::$app->user->identity->username . ')',
            'url' => ['/site/logout'],
            'linkOptions' => ['data-method' => 'post']
        ],
    ],
];
echo Nav::widget([
    'options' => ['class' => 'navbar-nav navbar-right'],
    'items' => $menuItems,
]);
You can also see a link above to the User Settings feature which will be described further below.
Adding a selection dropdown for types is a common model extension we use to make forms friendlier. See the Type of Contact dropdown below:
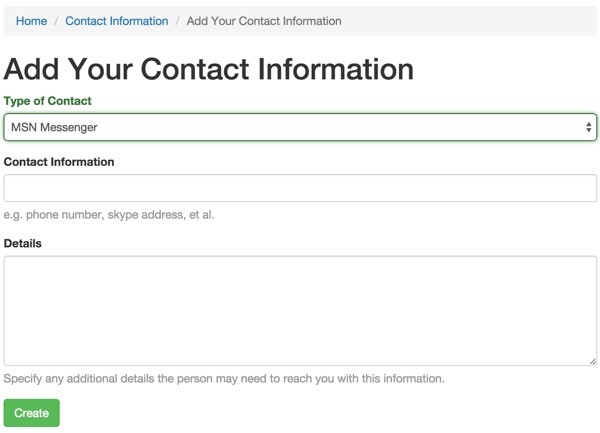
Here are the model type definitions and helper methods to allow friendly dropdowns for contact type services:
class UserContact extends \yii\db\ActiveRecord
{
    const TYPE_OTHER = 0;
    const TYPE_PHONE = 10;
    const TYPE_SKYPE = 20;
    const TYPE_FACEBOOK = 30;
    const TYPE_GOOGLE = 40;
    const TYPE_MSN = 50;
    const TYPE_AIM = 60;
    const TYPE_YAHOO = 70;
    const TYPE_ICQ = 80;
    const TYPE_JABBER = 90;
    const TYPE_QQ = 100;
    const TYPE_GADU = 110;

    ...

    public function getUserContactType($data) {
      $options = $this->getUserContactTypeOptions();
      return $options[$data];
    }

    public function getUserContactTypeOptions()
    {
      return array(
          self::TYPE_PHONE => 'Phone',
          self::TYPE_SKYPE => 'Skype',
          self::TYPE_OTHER => 'Other',
          self::TYPE_FACEBOOK => 'Facebook Messenger',
          self::TYPE_GOOGLE => 'Google Talk',
          self::TYPE_MSN => 'MSN Messenger',
          self::TYPE_AIM => 'AIM',
          self::TYPE_YAHOO => 'Yahoo! Messenger',
          self::TYPE_ICQ => 'ICQ',
          self::TYPE_JABBER => 'Jabber',
          self::TYPE_QQ => 'QQ',
          self::TYPE_GADU => 'Gadu-Gadu',
         );
     }
Here is the dropdown implemented in the form:
<div class="user-contact-form">

    <?php $form = ActiveForm::begin(); ?>

    <?= $form->field($model, 'contact_type')
            ->dropDownList(
                $model->getUserContactTypeOptions(),
                    ['prompt'=>Yii::t('frontend','What type of contact is this?')]
	            )->label(Yii::t('frontend','Type of Contact')) ?>
These type helpers are common constructs throughout Meeting Planner.
Now, let's move on to user settings.
User Settings
As Meeting Planner grows in functionality it will be important to allow users to customize functionality with a set of preferences. We build a user settings sub-system to manage these preferences within the application.
The UserSetting table is a bit different than other models in that each user has only one record, and each record has many fields which represent a particular user's settings. This is different from when users add contact entries, where each user has many records which each represent a contact entry.
When users modify their settings, we update their individual settings record. We can also extend the table's fields over time to support additional options.
We will need to create helper functions that load a user's settings and create a default record for them if they don't exist.
We also need to create a form to make configuring the settings an easy process. We can make use of Bootstrap's layouts and Yii2 widget extensions.
Choosing Our First User Settings
While the number of settings will increase over time, let's review a few of the ones we want to start with:
- User profile photo (path to a file they'll upload)
- Receiving reminders the day before a meeting
- Receiving reminders in the days leading up to a meeting
- Share contact details with meeting participants
- Block all email from the system
We can create the User Setting table with an Active Record Migration and extend it with updated migrations later.
./yii migrate/create create_user_setting_table
Here's the migration with fields for our settings—note the relation to the User table:
<?php

use yii\db\Schema;
use yii\db\Migration;

class m150124_003721_create_user_setting_table extends Migration
{
  public function up()
  {
      $tableOptions = null;
      if ($this->db->driverName === 'mysql') {
          $tableOptions = 'CHARACTER SET utf8 COLLATE utf8_unicode_ci ENGINE=InnoDB';
      }

      $this->createTable('{{%user_setting}}', [
          'id' => Schema::TYPE_PK,
          'user_id' => Schema::TYPE_BIGINT.' NOT NULL',
          'filename' => Schema::TYPE_STRING.' NOT NULL',
          'avatar' => Schema::TYPE_STRING.' NOT NULL',
          'reminder_eve' => Schema::TYPE_SMALLINT.' NOT NULL',
          'reminder_hours' => Schema::TYPE_INTEGER.' NOT NULL',
          'contact_share' => Schema::TYPE_SMALLINT.' NOT NULL',
          'no_email' => Schema::TYPE_SMALLINT.' NOT NULL',
          'created_at' => Schema::TYPE_INTEGER . ' NOT NULL',
          'updated_at' => Schema::TYPE_INTEGER . ' NOT NULL',
      ], $tableOptions);
      $this->addForeignKey('fk_user_setting_user_id', '{{%user_setting}}', 'user_id', '{{%user}}', 'id', 'CASCADE', 'CASCADE');
  }

  public function down()
  {
      $this->dropForeignKey('fk_user_setting_user_id', '{{%user_setting}}');
      $this->dropTable('{{%user_setting}}');
  }
}
Run the migration:
./yii migrate/up
Yii Migration Tool (based on Yii v2.0.2)

Total 1 new migration to be applied:
    m150124_003721_create_user_setting_table

Apply the above migration? (yes|no) [no]:yes
*** applying m150124_003721_create_user_setting_table
    > create table {{%user_setting}} ... done (time: 0.017s)
    > add foreign key fk_user_setting_user_id: {{%user_setting}} (user_id) references {{%user}} (id) ... done (time: 0.009s)
*** applied m150124_003721_create_user_setting_table (time: 0.031s)


Migrated up successfully.
Writing The Code
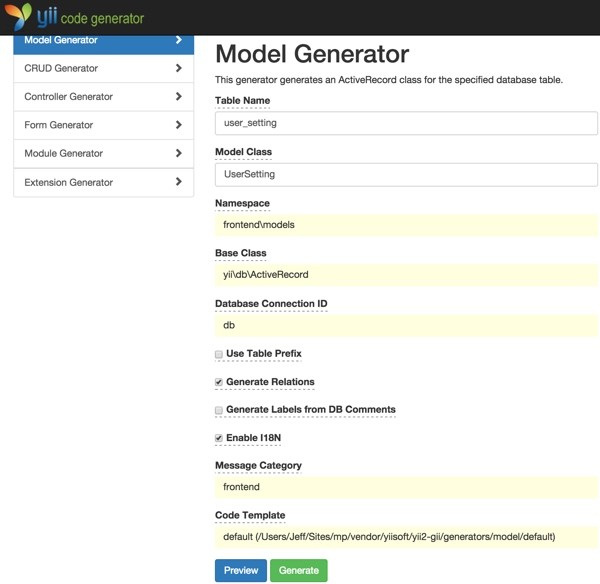
We can use Gii to generate the model and CRUD files for us. Of course, we'll have to modify the CRUD to display only the current user's record.
Here are the settings for the Model Generator:
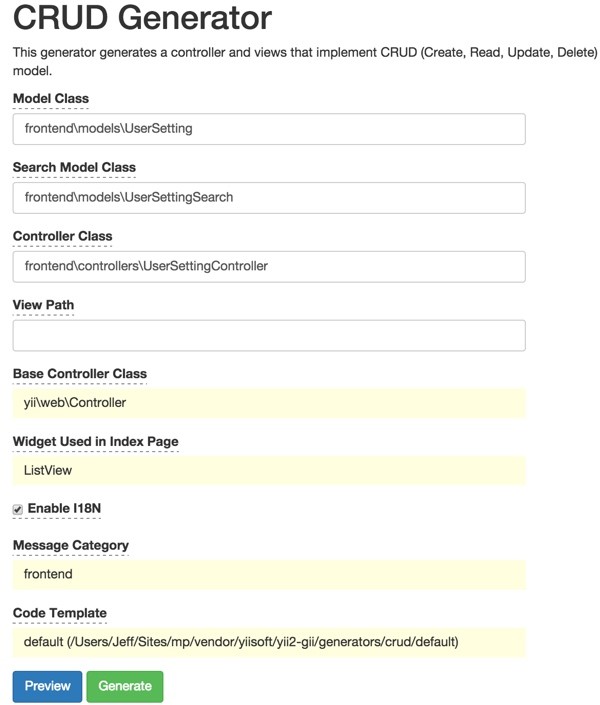
Here are the settings for the CRUD controller:
When the user clicks on Settings in the navigation bar, we want to actually display the update settings page. Let's build some helpers for checking for the user's settings record and creating it if it doesn't exist.
Here's the index redirect to the update action:
/**
     * Default path - redirect to update
     * @return mixed
     */
    public function actionIndex()
    {
      // returns record id not user_id
      $id = UserSetting::initialize(Yii::$app->user->getId());
      return $this->redirect(['update', 'id' => $id]);
    }
The Initialize method creates a record for the active user and sets all of the default settings:
 public static function initialize($user_id) {
      $us = UserSetting::find()->where(['user_id'=>$user_id])->one();
      if (is_null($us)) {
        $us=new UserSetting;
        $us->user_id = $user_id;
        $us->filename='';
        $us->avatar='';
        $us->reminder_eve = self::SETTING_YES;
        $us->no_email = self::SETTING_NO;
        $us->contact_share = self::SETTING_YES;
        $us->reminder_hours = 48;
        $us->save();
      }
      return $us->id;
    }
Customizing the Settings Form
We have to replace some of the auto-generated form code to include checkboxes and another dropdown list (as we did with the UserContact Type above). I like that Yii's checkbox functionality includes the ability to specify set and unset values. Typically, web form checkboxes return an empty element (exists) for true or don't return (doesn't exist) for false.
<?= $form->field($model, 'reminder_eve')->checkBox(['label' => Yii::t('frontend','Send final reminder the day before a meeting'), 'uncheck' =>  $model::SETTING_NO, 'checked' => $model::SETTING_YES]); ?>

         <?= $form->field($model, 'reminder_hours')
                 ->dropDownList(
                     $model->getEarlyReminderOptions(),
                         ['prompt'=>Yii::t('frontend','When would you like your early reminder?')]
     	            )->label(Yii::t('frontend','Early reminders')) ?>

            <?= $form->field($model, 'contact_share')->checkbox(['label' =>Yii::t('frontend','Share my contact information with meeting participants'),'uncheck' =>  $model::SETTING_NO, 'checked' => $model::SETTING_YES]); ?>

            <?= $form->field($model, 'no_email')->checkbox(['label' =>Yii::t('frontend','Turn off all email'),'uncheck' =>  $model::SETTING_NO, 'checked' => $model::SETTING_YES]); ?>
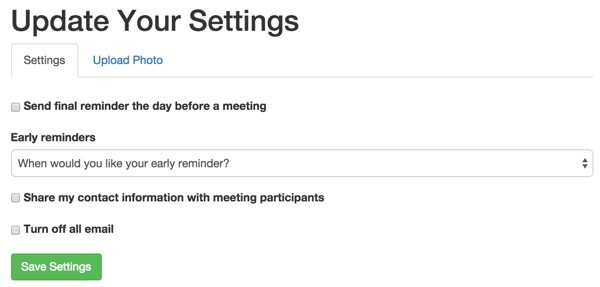
Here's the end result:

Let's go ahead and extend UserSetting to support profile photos.
Profile Images
In order to show show user photos on meeting pages, we need to support users uploading a photo (in most cases). Alternatively, at least for default, we can use the Gravatar service which associates a profile photo by the user's email address. Uploading and saving files on a server is always a detailed and delicate web development task which we'll walk through shortly.
Configuring Bootstrap Tabs
First, let's begin by adding tabs to the user settings form which will separate general settings from profile images. Using the Bootstrap nav-tab style definitions, we come up with this:
<!-- Nav tabs -->
<ul class="nav nav-tabs" role="tablist">
  <li class="active"><a href="#general" role="tab" data-toggle="tab">Settings</a></li>
  <li><a href="#photo" role="tab" data-toggle="tab">Upload Photo</a></li>
</ul>
<!-- Tab panes -->
<div class="tab-content">
  <div class="tab-pane active vertical-pad" id="general">
      <?= $form->field($model, 'reminder_eve')->checkBox(['label' => Yii::t('frontend','Send final reminder the day before a meeting'), 'uncheck' =>  $model::SETTING_NO, 'checked' => $model::SETTING_YES]); ?>

      <?= $form->field($model, 'reminder_hours')
              ->dropDownList(
                  $model->getEarlyReminderOptions(),
                      ['prompt'=>Yii::t('frontend','When would you like your early reminder?')]
  	            )->label(Yii::t('frontend','Early reminders')) ?>

         <?= $form->field($model, 'contact_share')->checkbox(['label' =>Yii::t('frontend','Share my contact information with meeting participants'),'uncheck' =>  $model::SETTING_NO, 'checked' => $model::SETTING_YES]); ?>

         <?= $form->field($model, 'no_email')->checkbox(['label' =>Yii::t('frontend','Turn off all email'),'uncheck' =>  $model::SETTING_NO, 'checked' => $model::SETTING_YES]); ?>
       </div>
  <div class="tab-pane vertical-pad" id="photo">

    <?= $form->field($model, 'image')->widget(FileInput::classname(), [
        'options' => ['accept' => 'image/*'],
         'pluginOptions'=>['allowedFileExtensions'=>['jpg','gif','png']],
    ]);   ?>
  </div> <!-- end of upload photo tab -->
</div>
It looks like this:
By default, if there is no uploaded image, we'll try to display the user's Gravatar.
Helpful Yii2 Extensions for Profile Images
There are four Yii2 extensions I want to include for profile image support:
- Carsten Brandt's Gravatar to display gravatars
-
Kartik Visweswaran File Input to support image file uploads
- Yii Imagine to scale images to different sizes
- 2Amigos Resource Manager for later support for Amazon S3 storage
Visweswaran and the 2Amigos have produced a number of Yii2 extensions that are super useful and they generally provide solid documentation as well.
So, add these extensions to your composer.json file:
        "cebe/yii2-gravatar": "*",
        "kartik-v/yii2-widget-fileinput": "*",
        "yiisoft/yii2-imagine": "*",
        "2amigos/yii2-switch-widget": "0.1.*",
        "2amigos/yii2-resource-manager-component": "0.1.*"
And update composer:
composer update
Using Gravatar Images
If there is no profile image configured, we'll display the user's gravatar. The Gravatar service references the registered user's email address. Here's the code to display the Gravatar:
echo \cebe\gravatar\Gravatar::widget([
     'email' => common\models\User::find()->where(['id'=>Yii::$app->user->getId()])->one()->email,
     'options' => [
         'class'=>'profile-image',
         'alt' => common\models\User::find()->where(['id'=>Yii::$app->user->getId()])->one()->username,
     ],
     'size' => 128,
 ]);
It will look something like this. If the user has configured a Gravatar, you'll see their chosen image.
Uploading a Profile Image
For uploading images, we'll use Kartik's excellent file input widget. He also offers a very nice explainer on how to use it.
Here's the code for our update form which displays the widget in the Upload Photo pane:
<div class="tab-pane vertical-pad" id="photo">
   <?= $form->field($model, 'image')->widget(FileInput::classname(), [
       'options' => ['accept' => 'image/*'],
        'pluginOptions'=>['allowedFileExtensions'=>['jpg','gif','png']],
   ]);   ?>
 </div> <!-- end of upload photo tab -->
The top of the form includes enctype for multi-part form data:
<div class="user-setting-form">
    <?php
    $form = ActiveForm::begin([
        'options'=>['enctype'=>'multipart/form-data']]); // important
         ?>
The form looks like this:
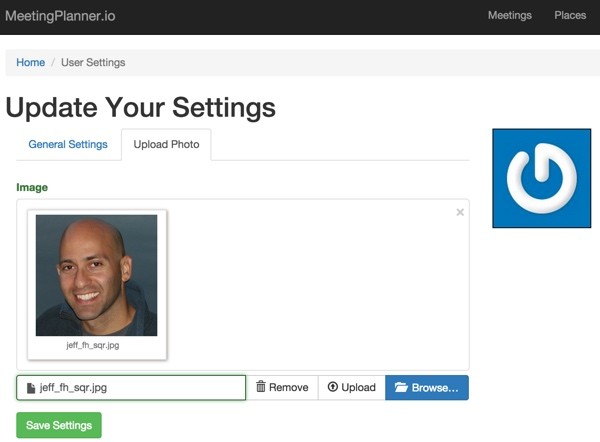
We also add rules to the UserSetting model to restrict uploads to jpg, gif and png, and to limit the upload size to 100kb.
public function rules()
    {
        return [
            [['user_id', ], 'required'],
            [['user_id', ], 'unique'],
            [['image'], 'safe'],
            [['image'], 'file', 'extensions'=>'jpg, gif, png'],
            [['image'], 'file', 'maxSize'=>'100000'],
             [['filename', 'avatar'], 'string', 'max' => 255],
            [['user_id', 'reminder_eve', 'reminder_hours', 'contact_share', 'no_email', 'created_at', 'updated_at'], 'integer'],
        ];
    }
By the way, the Yii2 validators have an amazing breadth of capabilities for many common operations web developers might normally build by hand. I'll try to explore this in a future Programming With Yii2 tutorial.
Here's the code that handles the post from the update form. In general, it's probably a good idea to rework more of this code into model methods and reduce the amount of complexity in the controllers.
if ($model->load(Yii::$app->request->post())) {
           $image = UploadedFile::getInstance($model, 'image');
           if (!is_null($image)) {
             // save with image
              // store the source file name
             $model->filename = $image->name;
             $ext = end((explode(".", $image->name)));
             // generate a unique file name to prevent duplicate filenames
             $model->avatar = Yii::$app->security->generateRandomString().".{$ext}";
             // the path to save file, you can set an uploadPath
             // in Yii::$app->params (as used in example below)
             Yii::$app->params['uploadPath'] = Yii::$app->basePath . '/web/uploads/avatar/';
             $path = Yii::$app->params['uploadPath'] . $model->avatar;
             $model->user_id = Yii::$app->user->getId();
             if($model->update()){
               $image->saveAs($path);
The images need to be stored where they can be viewed by the web server. I've created an uploads/avatar directory in the /frontend/web tree.
Scaling Images With Imagine
We actually want to store the image in three sizes: full size, one small square for displaying in the navigation bar or list views, and one medium-sized square for meeting pages.
We'll use the Yii2 Imagine extension to scale images; it extends the Imagine image manipulation library for PHP.
Here's the code that scales and saves the additional image sizes:
$image->saveAs($path);
Image::thumbnail(Yii::$app->params['uploadPath'].$model->avatar, 120, 120)
    ->save(Yii::$app->params['uploadPath'].'sqr_'.$model->avatar, ['quality' => 50]);
Image::thumbnail(Yii::$app->params['uploadPath'].$model->avatar, 30, 30)
        ->save(Yii::$app->params['uploadPath'].'sm_'.$model->avatar, ['quality' => 50]);
Here's the finished form displaying the square image on the user profile page:
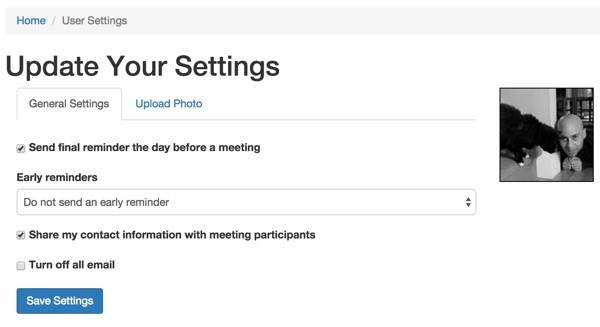
Cleaning Up Unused Images
When users upload a new photo, we need to delete the old image and its accompanying scaled copies. We'll expand the controller to call a new delete method:
$image = UploadedFile::getInstance($model, 'image');
           if (!is_null($image)) {
             // path to existing image for post-delete
             $image_delete = $model->avatar;

             ...

             $model->deleteImage(Yii::$app->params['uploadPath'],$image_delete);
Here's the deleteImage method in UserSetting:
public function deleteImage($path,$filename) {
           $file =array();
           $file[] = $path.$filename;
           $file[] = $path.'sqr_'.$filename;
           $file[] = $path.'sm_'.$filename;
           foreach ($file as $f) {
             // check if file exists on server
             if (!empty($f) && file_exists($f)) {
               // delete file
               unlink($f);
             }
           }
       }
Using Amazon S3 to Store Images
Storing user uploaded images on our web server can create complexities. It means that in addition to backing up MySQL we need to always back up a portion of the file system as well. It can complicate server restore operations and migrations. It also puts a load on our LAMP stack whenever images are loaded.
Using Amazon S3 separates this task from your primary web server and can improve performance and simplify server management over time, especially around portability, scalability and upgrades. I'll review uploading and accessing files from Amazon S3 in a future tutorial.
What's Next?
I hope you've learned some applied aspects of Yii, ActiveRecord, Bootstrap, forms, file upload and image manipulation. I enjoyed working with some of the new JQuery widgets available as Yii extensions. Watch for upcoming tutorials in our Building Your Startup With PHP series—there are lots of fun features coming up. In fact, we're getting closer to being able to schedule our first meeting!
Please feel free add your questions and comments below; I generally participate in the discussions. You can also reach me on Twitter @reifman or email me directly.
Related Links
- Programming with Yii2: Getting Started
- Introduction to the Yii Framework
- The Yii2 Developer Exchange, the author's tips site for Yii2

Comments