This is a continuation of the Twitter clone series with building Ribbit from scratch, this time using Meteor.
For this tutorial, please do not expect an in depth explanation of the Meteor framework. You should already have some Meteor experience so that you'll understand some of the important concepts that will be presented. In order to get a basic understanding of Meteor I recommend Andrew Burgesses course on Tutsplus Premium.
So, let's get started.
Step 0: Creating and Configuring the Meteor Application
We begin by generating a new Meteor application. Open a command line prompt and navigate to the folder where you want the application to be stored. Then run:
meteor create ribbit
Meteor will create a folder named ribbit containing some files and will ask you to change directory into ribbit and run meteor commands in that folder.
If you step into the ribbit folder and issue a ls -la command in order to see what was generated by Meteor, you will find a hidden folder named .meteor and three files named ribbit.html, ribbit.css and ribbit.js. The .meteor folder contains only one file named packages. The content of the .meteor/packages file informs Meteor about what smart packages are used by the application.
Since we will start developing Ribbit from scratch we will keep only the .meteor folder and delete all the rest.
Let's see what packages Meteor uses by default: at the command prompt enter
cat .meteor/packages
The output of this command should list the autopublish, insecure, and preserve-inputs packages.
We will discuss the concept of publishing data from the server later, for the moment let's note that the autopublish package is used on the server side to automatically make data available to the client. Usually this packet is not used in a production environment, so we can remove it by issuing the following command:
meteor remove autopublish
Next, the insecure package allows database writes by default, which can be dangerous, since this allows any user to do any database operations, including deleting data. We will remove this package before deploying the app and add all the necessary code to protect writing to the database.
And lastly, the preserve-inputs package keeps data from all of the form fields with a unique id.
After all of that, we should now have a folder containing just a .meteor sub-folder and this should be the base of our app.
Step 1: Creating the Necessary Folder Structure
There are several rules Meteor uses to serve files and data which we will not being covering in detail here (see Andrew's course for details). What is important to note, is that Meteor considers all files present in a server folder as being server code. All files in the client and public folders as being client code, which should be served to the client. And lastly, the files outside of these folders are served to both the client and the server. So let's create the following folders:
- client - to store all the client side code.
- server - to store all the server side code.
-
public - containing all the assets such as graphic files, robots.txt
files, favicons etc.
Also, it's important to know that Meteor considers JavaScript and CSS files as part of the client/server code and not as assets, which should be served from the public folder.
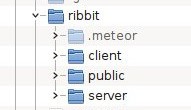
So, we end up with the following folder structure:
Step 2: The Static Version of the Login Page
Now it's time to download the static version of the Ribbit app.
After unpacking the files, copy the gfx folder into the public folder of our Ribbit app.
Also, copy the home.html and style.less files into the client folder of our app. Now if you would try to start the server by issuing meteor from the command line, in the root of our application, you will see the server crashing and complaining about setting the DOCTYPE in our file.
Meteor expects our HTML files to be composed from only three base elements: the head, the body and the template tags.
So in order to fix the error, we should edit the home.html file and remove the DOCTYPE and html tags, which will be added by Meteor when serving the files.
Now if you refresh the page, you should see its content, but it won't have any styling since the package we downloaded uses LESS for styling the page.
This is easy to fix by installing Meteor's LESS smart package. So issue:
meteor add less
then restart the server and reload the page and things should look a little bit better now.
We still have to do some adjustments in the LESS file since not everything looks as it should. Search for all occurrences of gfx in the style.less file and change them by adding a trailing slash before each. This should be done in order to allow files to be loaded from the root of the project.
The next step is to adjust the home.html and style.less files to add in a login button and have everything on one line in the header. The files should look like following:
// client/style.less
input {
  width: 236px;
  height: 26px;
  border: 1px solid @border-color;
  padding: 0 10px;
  outline: none;
  font-size: 17px;
  &:focus {
    background: #FFFDF2;
  }
}

input[type="submit"] {
  height: 26px;
  width: auto;
  border: 1px solid #7BC574;
  border-radius: 2px;
  color: white;
  font-size: 12px;
  font-weight: bold;
  padding: 0 20px;
  cursor: pointer;
  .gradient4f(0%, #8CD585, 23%, #82CD7A, 86%, #55AD4C, 100%, #4FA945);
}

header {
  background: url(/gfx/bg-header.png);
  height: 85px;
  width: 100%;
  div.wrapper {
    padding: 11px 0;
    img {
      position: relative;
      top: 10px;
      margin: 0 15px 0 0;
    }
    span {
      font-size: 18px;
      margin: 0 42px 0 0;
    }
    p {
      display: inline;
      input {
        margin: 0 0 0 14px;
        width: 180px;
        height: 28px;
      }
    }
    #btnLogOut {
      float: right;
      width: auto;
      height: 28px;
      margin: 19px 0 0 0;
    }
  }
}
And here's what the home.html file should look like:
<!-- client/home.html -->
<head>
</head>
<body>
  <header>
    <div class="wrapper">
      <img src="gfx/logo.png">
      <span>Twitter Clone</span>
      <p>
        <input name="username" placeholder="username" type="text">
        <input name="password" placeholder="password"  type="password">
        <input type="submit" id="btnLogOut" value="Log In">
      </p>
    </div>
  </header>
  <div id="content">
    <div class="wrapper">
      <img src="gfx/frog.jpg">
      <div class="panel right">
        <h1>New to Ribbit?</h1>
        <p>
          <input name="email" placeholder="email" type="text">
          <input name="username" placeholder="username" type="text">
          <input name="fullname" placeholder="fullname" type="text">
          <input name="password" placeholder="password" type="text">
          <input name="password2" placeholder="retype password" type="password">
          <input type="submit" value="Create Account">
        </p>
      </div>
    </div>
  </div>
  <footer>
    <div class="wrapper">
      Ribbit - A Twitter Clone Tutorial<img src="gfx/logo-nettuts.png">
    </div>
  </footer>
</body>
Now take a look at the page in the browser. It should look like the image below:
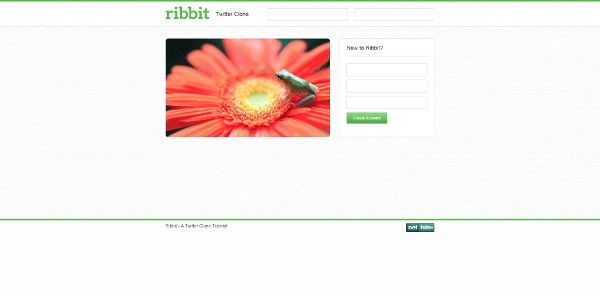
Well that was pretty easy, wasn't it? But, what we've done up to now is not what we really desired and it's definitely far from following the Meteor style of doing things. Let's fix this up!
Step 3: Meteor-ize the Home Page
Meteor constructs the HTML page that is sent to the browser based on three elements, it expects the following to be found: the head element, the body element, and the template element. Since the head and the body are already well known, special attention should be given to the template element.
A template is declared with <template name="foo">...</template> and its content is rendered in the HTML content that is sent to the browser. On the other hand, in the JavaScript file, the template can be accessed using Template.foo, which returns a string of HTML when called.
Now Meteor uses Handlebars as the template framework, but others can be used if needed, such as Jade.
So, let's see what should be done in order to transform the home.html file into a Meteor compatible page. Let's take a look at the modified code:
<!-- client/home.html -->
<head>

</head>

<body>
  <header>
    {{> header}}
  </header>
  {{> content}}
  <footer>
    {{> footer}}
  </footer>
</body>

<template name="header">
  <div class="wrapper">
    <img src="gfx/logo.png">
    <span>Twitter Clone</span>
    <p>
      <input id="username" name="username" placeholder="username" type="text">
      <input id="password" name="password" placeholder="password"  type="password">
      <input id="btnLogOut" type="submit" value="Log In">
    </p>
  </div>
</template>

<template name="content">
  <div id="content">
    <div class="wrapper">
      <img src="gfx/frog.jpg">
      <div class="panel right">
        <h1>New to Ribbit?</h1>
        <p>
          <input id="email" name="email" placeholder="email" type="text">
          <input id="newusername" name="username" placeholder="username" type="text">
          <input id="fullname" name="fullname" placeholder="fullname" type="text">
          <input id="newpassword" name="password" placeholder="password" type="text">
          <input id="password2" name="password2" placeholder="retype password" type="password">
          <input id= "btnCreateAccount" type="submit" value="Create Account">
        </p>
      </div>
    </div>
  </div>
</template>

<template name="footer">
  <div class="wrapper">
    Ribbit - A Twitter Clone Tutorial<img src="gfx/logo-nettuts.png">
  </div>
</template>
As you can see, we start with an empty head element. Since Meteor loads all the necessary files for us, we can use the head element to establish the page's title, but for the moment, it's blank.
Inside the body element, we render three templates: the header template, which we place in the header tag, the content template, which is placed right after the header, and finally the footer template, inside a footer tag.
What I've done for these templates, was to simply copy the old code and place it into the appropriate template. So what was in the header tag, is now in the header template and so on.
I've also added some ids to the edit boxes and the buttons, so that later, I'm able to access these from the JavaScript code.
And that's it. Now our page is finished and works well with the Meteor framework.
The next step will be to create the buddies page which should be displayed when a user logs into the system. We also need to allow the user to sign up and log in to our application.
Step 4: Log Into the Buddies Page
If we follow the same steps from in the previous section, to transform the buddies.html page into a Meteor one, we end with the following code:
<!-- client/buddies.html -->
<head>

</head>
<body>
  <header>
    {{> header}}
  </header>
  {{> content}}
  <footer>
    {{> footer}}
  </footer>
</body>

<template name="header">
  <div class="wrapper">
    <img src="gfx/logo.png">
    <span>Twitter Clone</span>
    <p>
      <input type="submit" id="btnLogOut" value="Log Out">
    </p>
  </div>
</template>

<template name="content">
  <div id="content">
    <div class="wrapper">
      <div id="createRibbit" class="panel right">
        <h1>Create a Ribbit</h1>
        <p>
          <textarea name="text" class="ribbitText"></textarea>
          <input type="submit" value="Ribbit!">
        </p>
      </div>
      <div id="ribbits" class="panel left">
        <h1>Your Ribbit Profile</h1>
        <div class="ribbitWrapper">
          <img class="avatar" src="gfx/user1.png">
          <span class="name">Frogger</span> @username
          <p>
            567 Ribbits<span class="spacing">45 Followers</span><span class="spacing">32 Following</span><br>
            Cras justo odio, dapibus ac facilisis in, egestas Vivamus sagittis lacus vel augue laoreet rutrum faucibus dolor auctor. <a href="#">http://net.tutsplus.com/tutorials/php/ ...</a>
          </p>
        </div>
      </div>
      <div class="panel left">
        <h1>Your Ribbit Buddies</h1>
        <div class="ribbitWrapper">
          <img class="avatar" src="gfx/user2.png">
          <span class="name">Kermit</span> @username <span class="time">15m</span>
          <p>
            Cras justo odio, dapibus ac facilisis in, egestas Vivamus sagittis lacus vel augue laoreet rutrum faucibus dolor auctor. <a href="#">http://net.tutsplus.com/tutorials/php/ ...</a>
          </p>
        </div>
      </div>
    </div>
  </div>
</template>

<template name="footer">
  <div class="wrapper">
    Ribbit - A Twitter Clone Tutorial<img src="gfx/logo-nettuts.png">
  </div>
</template>
As you can see, I took out the long list of ribbits, but other than that, there's nothing else too impressive about the above code.
However, there are two problems with it:
- If you try viewing it in the browser, you will find it's being displayed twice. There are two reasons for this: Meteor sends files to the browser in alphabetical order, so
buddies.htmlis sent first. We also have a lot of duplication in the code, even the name of the templates are duplicated. So when Meteor wants to display the content template, it displays the first defined one, which is the one in thebuddies.htmlfile. - The second problem is also code duplication, which needs to be fixed.
The issues above can be resolved by doing the following: we will create an index.html file containing only the code that will trigger the needed templates: one for the header, one for the footer, one for the home page, and one for the buddies page.
Let's take a look of each of them:
<!-- client/index.html -->
<head>

</head>

<body>
  <header>
    {{> header}}
  </header>
  {{#if currentUser}}
    {{> buddiescontent}}
  {{else}}
    {{> homecontent}}
  {{/if}}
  <footer>
    {{> footer}}
  </footer>
</body>
This is the main file in which all of the templates are loaded. A very interesting thing can be found when the content template is displayed. We check with a Handlebars if clause whether a user is logged in or not. The Meteor currentUser variable contains the logged in user's data, if a user is logged in (so we display the buddies template) and is null if no user is logged in (so we display the home template).
<!-- client/header.html -->
<template name="header">
  <div class="wrapper">
    <img src="gfx/logo.png">
    <span>Twitter Clone</span>
    {{#if currentUser}}
      <nav>
        <a id="buddies" href="#">Your Buddies</a>
        <a href="#">Public Ribbits</a>
        <a id='profiles' href="#">Profiles</a>
      </nav>
      <input type="submit" id="btnLogOut" value="Log Out" />
    {{else}}
      <p>
        <input id="username" name="username" placeholder="username" type="text">
        <input id="password" name="password" placeholder="password"  type="password">
        <input id="btnLogOut" type="submit" value="Log In">
      </p>
    {{/if}}
  </div>
</template>
Here we render the header for our pages, and as above, if a user is logged in, we display a navigation bar, otherwise we display a log in form.
<!-- client/footer.html -->
<template name="footer">
  <div class="wrapper">
    Ribbit - A Twitter Clone Tutorial<img src="gfx/logo-nettuts.png">
  </div>
</template>
Then we create the footer template, which only renders the content in the footer.
<!-- client/home.html -->
<template name="homecontent">
  <div id="content">
    <div class="wrapper">
      <img src="gfx/frog.jpg">
      <div class="panel right">
        <h1>New to Ribbit?</h1>
        <p>
          <input id="email" name="email" placeholder="email" type="text">
          <input id="newusername" name="username" placeholder="username" type="text">
          <input id="fullname" name="fullname" placeholder="fullname" type="text">
          <input id="newpassword" name="password" placeholder="password" type="password">
          <input id="password2" name="password2" placeholder="retype password" type="password">
          <input id= "btnCreateAccount" type="submit" value="Create Account">
        </p>
      </div>
    </div>
  </div>
</template>
Now we've already saw this template before, it just contains a form to allow the users to register for the application.
<!-- client/buddies.html -->
<template name="buddiescontent">
  <div id="content">
    <div class="wrapper">
      <div id="createRibbit" class="panel right">
        <h1>Create a Ribbit</h1>
        <p>
          <textarea name="text" class="ribbitText"></textarea>
          <input type="submit" value="Ribbit!">
        </p>
      </div>
      <div id="ribbits" class="panel left">
        <h1>Your Ribbit Profile</h1>
        <div class="ribbitWrapper">
          <img class="avatar" src="gfx/user1.png">
          <span class="name">Frogger</span> @username
          <p>
            567 Ribbits<span class="spacing">45 Followers</span><span class="spacing">32 Following</span><br>
            Cras justo odio, dapibus ac facilisis in, egestas Vivamus sagittis lacus vel augue laoreet rutrum faucibus dolor auctor. <a href="#">http://net.tutsplus.com/tutorials/php/ ...</a>
          </p>
        </div>
      </div>
      <div class="panel left">
        <h1>Your Ribbit Buddies</h1>
        <div class="ribbitWrapper">
          <img class="avatar" src="gfx/user2.png">
          <span class="name">Kermit</span> @username <span class="time">15m</span>
          <p>
            Cras justo odio, dapibus ac facilisis in, egestas Vivamus sagittis lacus vel augue laoreet rutrum faucibus dolor auctor. <a href="#">http://net.tutsplus.com/tutorials/php/ ...</a>
          </p>
        </div>
      </div>
    </div>
  </div>
</template>
And then the last template, containing information about the current user, that user's ribbits, and the people the current user is following.
Up until now, we have two pages of our application which can be displayed, but both are static and we can display only one at a time. So next, let's add some JavaScript to our application to make it more dynamic.
Registering and Logging In
Meteor gives us several smart packages to handle the process of registering and logging in to an application. For our Ribbit app, we will use following packages: accounts-base for basic support for accounting and accounts-password for getting password support for accounting. To install these packages, run the following commands:
meteor add accounts-base
meteor add accounts-password
Now, let's create a client.js file in the client folder to hold our client side code. For the home page, we need to handle events for clicking on the Log In button and Create Account button.
Events in Meteor are associated with a specific template, so in order to handle clicking on the Log In button we will add an event handler for the header template. To handle the click event for the Create Account button, we have to add an event handler associated with the homecontent template.
Let's take a look at the code:
Clicking on the Log In Button
// client/client.js
// handling click event on the Log In button
Template.header.events({
  'click #btnLogOut': function (event, template) {
    if (Meteor.userId()) {
      Meteor.logout();
    } else {
      var userName     = template.find('#username').value,
        userPassword = template.find('#password').value;
      Meteor.loginWithPassword(userName, userPassword, function (error) {
        if (error) {
          console.log(error);
        }
      });
    }
  }
});
On the first line, we attach an events object to the header template. Then we handle the click event on the button with an id of btnLogOut (which we've created in our HTML template). Then if a user is logged in, simply log the user out. If Meteor.userId returns null, that means no user is logged in, so we perform a log in with the supplied username and password. Also, notice the values that are inserted in the edit boxes: the template object has a find function which takes as a parameter, the ID of the edit box for which we want to get the value of. If there is an error during logging in, we just display it in the console. For now, this is a temporary approach since we will implement displaying information to the user a little bit later.
Clicking on the Create Account Button
// client/client.js
// hnadling click event on the Create Accounts button
Template.homecontent.events({
  'click #btnCreateAccount': function (event, template) {
    var userEmail = template.find('#email').value,
      userName  = template.find('#newusername').value,
      password  = template.find('#newpassword').value,
      password2 = template.find('#password2').value,
      name      = template.find('#fullname').value;

    Accounts.createUser({
      username: userName,
      email:    userEmail,
      password: password,
      profile: {
        name: name
      }
    }, function (error) {
      if (error) {
        console.log("Cannot create user");
      }
    });
  }
});
Just like before, we attach an events object to the homecontent template, then we get the values submitted by the user from the form fields. To create an account we simply use the Accounts.createUser function, which takes as a parameter an object with the username, password, email and profile components. In case of an error while adding the user, the error is displayed in the console.
Step 5: Making the Buddies Page Dynamic
The next step in developing our application is to make the buddies page dynamic. At the moment, everything displayed on our page is statically taken from the template files. We want to take the information from a database and also to allow the user to create ribbits and store them in a database on the server side.
Changing the Your Ribbit Profile Section
This section displays the full name of the user, their username, the number of ribbits the current logged in user has, the number of followers and following people, and the last ribbit posted by the user.
We will store the code for this part in a main.js file. Note that Meteor loads files with the word main in their name, after the page is loaded.
Let's see how to display them in the template:
<!-- client/buddies.html -->
...
  <div id="ribbits" class="panel left">
<h1>Your Ribbit Profile</h1>
<div class="ribbitWrapper">
<img class="avatar" src="gfx/user1.png">
<span class="name">{{fullName}}</span> @{{userName}}
<p>
{{noOfRibbits}}<span class="spacing">45 Followers</span><span class="spacing">32 Following</span><br>
{{lastRibbit}}
</p>
    </div>
  </div>
...
What we want to do in this template is to use Handlebars' variables for the items we'd like to pull from the database. The fullname and the username are taken from the users collection and the noOfRibbits and lastRibbit should be taken from the ribbit collection.
The above variables are returned to the template by the following JavaScript code in the main.js file:
// client/main.js
Ribbits = new Meteor.Collection('ribbits');

Template.buddiescontent.helpers({
  fullName: function () {
    return Meteor.user().profile.name;
  },

  userName: function () {
    return Meteor.user().username;
  },

  noOfRibbits: function () {
    var ribbits = Ribbits.find({user_id: Meteor.userId()}),
      retVal;
    if (ribbits.count() === 1) {
      retVal = "1 Ribbit";
    } else {
      retVal = ribbits.count() + " Ribbits";
    }
    return retVal;
  },

  lastRibbit: function () {
    var lastRibbit = Ribbits.findOne({user_id: Meteor.userId()}, {sort: {created_at: -1}}),
      retVal;

    if (lastRibbit) {
      retVal = lastRibbit.ribbit;
    } else {
      retVal = 'This user has no Ribbits';
    }

    return retVal;
  }
});
Two of Meteor's principles state that access to the database is done using the same API on both the server and the client and on the client side there is a model simulation, which should look like a zero-latency connection to the database (latency compensation). These principles can be seen in the above code, on line one. We create a Ribbits instance of a Meteor collection, which is the client side database. Since on the server side, we don't have a ribbits collection, the one defined in our code will be empty.
Next, a helpers function is defined, which takes as a parameter, an object with a function for each Handlebars variable in the template. As you can see, for each one, the appropriate data is returned.
The fullName and userName are both taken from the users database profile object.
The noOfRibbits and the lastRibbit should be taken from the Ribbits collection. Since this is empty at the moment, we expect the functions above to return zero as the number of ribbits and the message, 'This user has no Ribbits', instead of the last ribbit.
Changing the Your Ribbit Buddies Section
Let's take a look at the code. First the template:
<!-- client/buddies.html -->
<div class="panel left">
<h1>Your Ribbit Buddies</h1>
{{#each ribbits}}
<div class="ribbitWrapper">
  <img class="avatar" src="gfx/user2.png">
  <span class="name">{{buddyFullName}}</span> @{{buddyUserName}} <span class="time">15m</span>
  <p>
  {{ribbit}}
  </p>
</div>
{{/each}}
The new thing here is that we use Handlebars' each to loop through all the ribbits returned from the JavaScript function. The rest is pretty similar to the code inside of the profile section.
Now for the JavaScript code:
// client/main.js
...
buddyFullName: function () {
  Ribbits.find().forEach(function (ribbit) {
    var theUser = Meteor.users.findOne({_id: ribbit.user_id});

    return theUser.profile.name;
  });
},

buddyUserName: function () {
  Ribbits.find().forEach(function (ribbit) {
    var theUser = Meteor.users.findOne({_id: ribbit.user_id});

    return theUser.username;
  });
},

ribbits: function () {
  return Ribbits.find();
}
In this area we want to display all of the ribbits belonging to the current logged in user and all of the users which are followed by the current logged in user. We will implement on the server, a mechanism for returning only the ribbits to the client, that fulfill the above condition. In the client, the Ribbits collection is scanned and for each, a user with the same id as the one stored in the ribbit collection is searched. Then the full name and the username are returned to the template. As for the ribbits, since we already have the ones we are interested in, they can just be returned entirely to the template.
Creating a Ribbit
When adding a ribbit, there are two main tasks that should be completed:
- First we should insert a record into the ribbits collection.
- Next, update the buddies page with the following information: number of
ribbits, the last ribbit in the "Your Ribbit Profile" section, and the last
ribbit, which could have been posted by any user, along with its author and the time elapsed since it was posted.
It's now time to write a little bit of server code. Let's start with the following:
// server/server.js
Ribbits = new Meteor.Collection('ribbits');
Meteor.publish('ribbits', function () {
  return Ribbits.find({});
});
For the above code, we create a Meteor collection instance for the ribbits collection and we publish all the ribbits data to the client.
Now for the client side code:
// client/client.js
Ribbits = new Meteor.Collection('ribbits');
Meteor.subscribe('ribbits');

...

// handling the click event on the Ribbit button
Template.buddiescontent.events({
  'click #createTheRibbit': function (event, template) {
    var ribbitContent= template.find('.ribbitText').value;

    Ribbits.insert({
      user_id: Meteor.user()._id,
      ribbit: ribbitContent,
      created_at: new Date()
    });
    template.find('.ribbitText').value = "";
  }
});
Just like the server side, the client also holds a Ribbits instance of the ribbits collection, in order to support the concept of "Data everywhere". Additionally, it must also subscribe to the data published by the server in order to make sure that modifications done on one instance of the application are replicated everywhere.
After that, the click event for the Ribbit! button is handled like so: the data inserted into the text field is read and inserted into the ribbits collection. Afterwards, the content of the text field is set to an empty string.
// client/main.js
ribbits: function () {
  return Ribbits.find({}, {sort: {created_at: -1}});
},

buddyFullName: function (ribbitUserId) {
  var theUser = Meteor.users.findOne({_id: ribbitUserId});
  return theUser.profile.name;
},

buddyUserName: function (ribbitUserId) {
  var theUser = Meteor.users.findOne({_id: ribbitUserId});
  return theUser.username;
},

elapsedTime: function (text) {
  var currentDate = new Date(),
    ribbitDate,
    minutes_elapsed,
    hours_elapsed,
    days_elapsed,
    retVal,
    record = Ribbits.findOne({ribbit: text});

  ribbitDate = new Date(record.created_at);
  minutes_elapsed = (currentDate - ribbitDate) / 60000;
  if (minutes_elapsed > 60) {
    hours_elapsed = minutes_elapsed / 60;
    if (hours_elapsed > 24) {
      days_elapsed = hours_elapsed / 24;
      retVal = parseInt(days_elapsed, 10) + "d";
    } else {
      retVal = parseInt(hours_elapsed, 10) + "h";
    }
  } else {
    retVal = parseInt(minutes_elapsed, 10) + "m";
  }
  return retVal;
}
Now the above code injects dynamic data into the Handlebars' template variables. Allow me to explain:
- The
ribbitsvalue is replaced by a collection instance with all of the values stored in the database, in the reverse order of creation. - The
buddyFullNameis returned by searching the users collection for a user with the same id as the current ribbit's user. Notice that the ribbitUserId is a parameter received by the function from the template. - The
buddyUserNameis obtained in a similar manner as the buddyFullName. - The
elapsedTimeis calculated based on the current time and the time of when a ribbit was originally created.
The buddies template now looks like the following:
<!-- client/buddies.html -->
<div class="panel left">
  <h1>Your Ribbit Buddies</h1>
  {{#each ribbits}}
  <div class="ribbitWrapper">
    <img class="avatar" src="gfx/user2.png">
    <span class="name">{{buddyFullName user_id}}</span> @{{buddyUserName user_id}} <span class="time">{{elapsedTime ribbit}}</span>
    <p>
    {{ribbit}}
    </p>
  </div>
  {{/each}}
</div>
What is interesting to notice here, is that the buddyFullName is followed by the user_id variable taken from the ribbits collection. This is the parameter from the function we described above.
Step 6: Creating the Public Ribbits Page
This task shouldn't be a show stopper since we already did something similar with the buddies page. What needs to be done here is to take the public.html file from the downloaded assets and turn it into a template. We'll then hook the data that we want displayed on the page, to some JavaScript functions, that will take that data from the database and return it to the template.
First, let's see the template file:
<!-- client/public.html -->
<template name="public">
  <div id="content">
    <div class="wrapper">
      <div class="panel right">
        <h1>Create a Ribbit</h1>
        <p>
          <textarea name="text" class="ribbitText"></textarea>
          <input type="submit" value="Ribbit!">
        </p>
      </div><!-- panel right -->
      <div id="ribbits" class="panel left">
        <h1>Public Ribbits</h1>
        {{#each ribbits}}
          <div class="ribbitWrapper">
            <img class="avatar" src="gfx/user2.png">
            <span class="name">{{publicUserFull user_id}}</span> @{{publicUserName user_id}} <span class="time">{{elapsedTime ribbit}}</span>
            <p>
              {{ribbit}}
            </p>
          </div><!-- ribbitWrapper -->
        {{/each}}
      </div><!-- panel left -->
    </div><!-- wrapper -->
  </div><!-- content -->
</template>
Nothing spectacular here: in the Public Ribbits section there is the publicUserFull and publicUserName displayed as well as the ribbit user_id is sent to the function connected to these.
The JavaScript code looks like following:
// client/client.js
...
Template.public.helpers({
  ribbits: function () {
    return Ribbits.find({}, {sort: {created_at: -1}});
  },

  publicUserFull: function (currentRibbitId) {
    var theUser = Meteor.users.findOne({_id: currentRibbitId});

    return theUser.profile.name;
  },

  publicUserName: function (currentRibbitId) {
    var theUser = Meteor.users.findOne({_id: currentRibbitId});

    return theUser.username;
  },

  elapsedTime: function (text) {
    var currentDate = new Date(),
      ribbitDate,
      minutes_elapsed,
      hours_elapsed,
      days_elapsed,
      retVal,
      record = Ribbits.findOne({ribbit: text});

    ribbitDate = new Date(record.created_at);
    minutes_elapsed = (currentDate - ribbitDate) / 60000;
    if (minutes_elapsed > 60) {
      hours_elapsed = minutes_elapsed / 60;
      if (hours_elapsed > 24) {
        days_elapsed = hours_elapsed / 24;
        retVal = parseInt(days_elapsed, 10) + "d";
      } else {
        retVal = parseInt(hours_elapsed, 10) + "h";
      }
    } else {
      retVal = parseInt(minutes_elapsed, 10) + "m";
    }
    return retVal;
  }
});
...
Notice that all of the functions in this code fragment are similar to the ones defined in the buddies part of the file. You should see that we have massive code repetition going on here, which is not so good. But for the moment, let's leave it as is, in order to see that it works and we'll figure out how we can refactor this in a later step.
Step 7: Display the Public Ribbits Page
So we have a functional public Ribbits page, but there's no way to display it. This is what we'll fix in this step.
In order to perform this task, we will use Meteor's reactive data concept. We already saw this in action on the buddies page; when a new ribbit is added, it is automatically displayed on the page.
What we want to achieve is that whenever a user clicks on the Public Ribbits link in the header, to change from the current page that is being displayed, to the Public Ribbits page. So we need a currentPage variable, that we can change periodically, so it points to the desired page.
We will use the Meteor's Session global object, which contains an arbitrary set of key-value pairs. We will store a string in a currentPage variable, which points to the name of the page that we want to display. Then when clicking on a link, we change the currentPage variable as appropriate to display the new page.
Let's get started on the code. First, the main template file, index.html:
<!-- client/index.html -->
<head>

</head>

<body>
  <header>
    {{> header}}
  </header>
  {{> content}}
  <footer>
    {{> footer}}
  </footer>
</body>

<template name="content">
  {{#if currentUser}}
    {{#if currentPage "buddies"}}
      {{> buddiescontent}}
    {{/if}}

    {{#if currentPage "public"}}
      {{> public}}
    {{/if}}

    {{#if currentPage "profile"}}
      {{> profile}}
    {{/if}}
  {{else}}
    {{> homecontent}}
  {{/if}}
</template>
The changes in this file are small. A new template named content was added and in this template the value of the currentPage variable is checked and the appropriate sub-template is rendered.
Let's see how this reflects in the JavaScript code:
// client/main.js
Template.content.helpers({
  currentPage: function (type) {
    var thePage = Session.get("currentPage");
    return thePage === type;
  }
});
A helper for the content template was added, containing a currentPage function, which returns a boolean by checking the parameter sent to this function against the value of the currentPage, stored in the Meteor's Session. The function returns true if they are the same or false if they are not. This way its value can be checked in the template to decide which sub-template is rendered.
// client/client.js
Session.set("currentPage", "buddies");
Now for the client.js file, the value of currentPage is initialized at the beginning of the application by storing it in buddies, so by default, if a user is logged in, the buddies page is displayed.
// client/client.js
...
'click #public': function (event, template) {
  Session.set("currentPage", "public");
},

'click #buddies': function (event, template) {
  Session.set("currentPage", "buddies");
},
...
Then, the header events object is updated by adding two click handlers, one for the Public Ribbits link and one for the Your Buddies link, so that the user can navigate to these pages:
As you can see in this function, the only thing we do is set the Session value of currentPage to the desired value.
And that's it. Now it's possible to switch between buddies and the public page using the links in the page's header.
Step 8: Creating the Profiles Page
As you might have noticed, there is a pattern we've followed throughout this tutorial while creating each new page: we started with the implementation of the page template, then we added the necessary JavaScript code for making the page dynamic. Lastly, we add in some event handlers for the actions that the user may take on the page. Let's follow this same pattern now for creating the profiles page.
The Profile Template
The profile template code should look like this:
<template name="profile">
  <div id="content">
    <div class="wrapper">
      <div class="panel right">
        <h1>Search for profiles</h1>
        <p>
          <input name="query" type="text">
          <input type="submit" value="Search!">
        </p>
      </div>
      <div id="ribbits" class="panel left">
        <h1>Public Profiles</h1>
        {{#each users}}
          <div class="ribbitWrapper">
            <img class="avatar" src="{{gravatarLink _id}}">
            <span class="name">{{profile.name}}</span> @{{username}} <span class="time">{{noOfFollowers _id}}<a href="#" id='{{_id}}' class='follow'>{{followText _id}}</a></span>
            <p id='last-ribbit'>
              {{lastRibbit _id}}
            </p>
          </div>
        {{/each}}
      </div>
    </div>
  </div>
</template>
For this template, our page is split into two panels: the right panel allows searching for a specific user profile and on the left panel we have a list of registered users. Also on the left panel, the logged in user has the possibility to follow or unfollow another user by clicking the follow/unfollow link.
Since the left panel's code looks more interesting, let's start analyzing it first: after the header part, we iterate over the Meteor users collection using a Handlebars #each construction.
For each user we display the following information:
- The user's gravatar (retrieved just as we did on the buddies page).
- The user's name, taken from the mongoDb database.
- The user's username.
- The user's number of follows.
- The follow/unfollow link.
- The user's last ribbit.
As for the right panel, this code contains a form that allows the user to search for a specific profile.
Now, let's move on to the second step of our pattern by adding in the JavaScript.
Getting the Profile Data
The first thing the template needs is the users collection. Let's take a look at the code that returns this collection:
users: function () {
  if (Session.get('searchedName') !== undefined) {
    return Meteor.users.find({
      $and: [
        {_id: {$ne: Meteor.userId()}},
        {username: Session.get('searchedName')}
      ]
    });
  } else {
    return Meteor.users.find({_id: {$ne: Meteor.userId()}});
  }
},
The above code takes care of the profile search functionality for our app. In short, the collection returned to the template is filtered to contain only the searched user and if no search was performed, all of the users are returned, except the current logged in user.
Let me explain this in more detail: When a search for a specific user profile is performed, as we will see later, we set a profile variable named searchedName, which hold the name that the user is searching for. We then filter the users collection using the $and Mongo construction to meet the following criteria: It should only return users that are not the current logged in user and inside of username we'll store the searchedName. I have to admit, that I am simplifying things a bit here, since I could implement a like clause instead to return all users with a username similar to the searchedName. But since this is not a Mongo tutorial, I'm going to leave this as an additional exercise for you to try out on your own.
By default, this should display all of the users except the current
logged in user, which is done in the else clause.
As for obtaining the gravatar image, the code is similar to what we used in the buddies template, so I won't describe it again here.
The same also applies for the name, username, and noOfFollowers.
Now for the followText part, we are going to do things a little differently. The behavior we intend to have here is to display the 'follow' text if the current logged in user is not already following the displayed user. Otherwise, we want to allow the user to stop following the user by displaying the text 'unfollow'.
The code looks like following:
followText: function (userId) {
  var followee = Follows.findOne({
    $and: [
      {followee_id: Meteor.userId()},
      {user_id: userId}
    ]
  });
  if (followee) {
    return 'unfollow';
  } else {
    return 'follow';
  }
},
This function receives the userId parameter from the template and performs a search in the Follows table for a user that has a followee_id which matches the current user's id and which also has a user_id, which matches the id of the user who was clicked on. If this criteria is met, that means the user is being followed by the current logged in user, so return the 'unfollow' string, otherwise return the 'follow' string.
Actions on the Profile Page
There are really only two actions users can make on the Profile page: clicking on the Search! button, to search for other user profiles. And the second action is to follow or unfollow another user by clicking the appropriate link.
Let's tackle them one by one:
Searching a User
'click input[type="submit"]': function(event, template) {
  var searchedUser = template.find('input[type="text"]').value;
  if (searchedUser !== "") {
    Session.set('searchedName', searchedUser);
  } else {
    Session.set('searchedName', undefined);
  }
  Template.profile();
}
When the user clicks on our Search! button (the input field with a type of submit), we read the name entered into the text field and set a session variable named searchedName to hold this value. We've already saw from the previous step how this variable is used to perform a search in the database and return a subset of the users collection containing only users with that username.
Following a User
'click .follow': function(event, template) {
  var isFollowed, theClickedUserId = event.currentTarget.id,
    theFollowees = Follows.find({user_id: theClickedUserId});

  theFollowees.forEach(function (theFollowee) {
    if (theFollowee.followee_id === Meteor.userId()) {
      isFollowed = true;
    } else {
      isFollowed = false;
    }
  });

  if (!isFollowed) {
    Follows.insert({
      user_id: theClickedUserId,
      followee_id: Meteor.userId()
    });
  } else {
    Follows.remove({
     $and: [
       {user_id: theClickedUserId},
       {followee_id: Meteor.user()._id}
      ]
    });
  }
},
We start off with the theClickedUserId variable, which will store the id of the user who was clicked on. Then we search in the Follows collection for all of the users with that id and store the result in the theFollowees variable.
The next step is to loop through the theFollowees collection and check if the current followee has the same followee_id as the current logged in user's id. If so, the logged in user is following the clicked on user.
Finally, if the user is not followed, just add it to the Follows collection, which will result in following that user, otherwise, remove it from the Follows collection, to unfollow that user.
Conclusion
This concludes the Profile page implementation and also this tutorial. I hope you will find it interesting and discover that working with Meteor indeed changes the way JavaScript applications are being developed. If you have any questions feel free to ask away in the comments below!

Comments