Ever wondered how you can build a library that's as flexible as the content you're publishing? Today I'll walk you through how I setup dynamic taxonomy pages for the musicians that on my music blog, but you can apply these same techniques in a variety of different ways. This tutorial shows you how you can build a dynamic record for anything you write about.
I run a large music website. In order to keep track of all the times that different artists were mentioned and in what context, I wanted to create a page for each of them. By creating new taxonomies in WordPress, I was able to do this by just tagging a band/artist in a WordPress post. As well as this, I could also dynamically create affiliate links and draw in biographical content from a site like Last.FM.
This tutorial will show you how to setup your taxonomy, build a template for it and then implement a dynamic generation of content and links to the artist in your taxonomy elsewhere on the web
Step 1 Setting Up Your Custom Taxonomies
To get started, you'll need to add the custom taxonomies function to your WordPress install. To do this, just open up your functions.php file from your theme folder, scroll all the way to the bottom and then turn the function on like this:
/*
*Adds the custom taxonomy function to our functions.php file.
*/
add_action( 'init', 'build_taxonomies', 0 );
Once you've done that, you can start adding the taxonomies that you want. For this tutorial, we'll be adding an artist taxonomy which will allow us to tag bands in posts that we write and have WordPress pull out a load of information about that band or singer without us ever needing to do anything else. That being said, let's go ahead and throw in the 'Artist' taxonomy just beneath the taxonomy function that we just added.
function build_taxonomies() {
	register_taxonomy(	'artist', 'post',	//Let WordPress know that the artist taxonomy has posts
		array(
			'hierarchical' => false,
			'label' => 'Artists', // This tells WordPress how to label the various user interface outlets for the artist taxonomy
			'query_var' => true,
			'rewrite' => array( 'slug' => 'artist', 'with_front' => false ))
			);
}
You don't have to add an artist taxonomy, you could add any taxonomy you wanted to. We're just doing it for the purposes of this tutorial. For a full list of arguments and options that you can use in the array, check out the Codex and add or take away whatever you want. Just as long as you leave in the parts that are commented here, you'll be fine.
Now let's open up our WordPress admin panel and write a post. Notice that a new 'Artist' box has been added to both your admin menu and your 'write post' views. This means WordPress has recognised your new function. Brilliant!
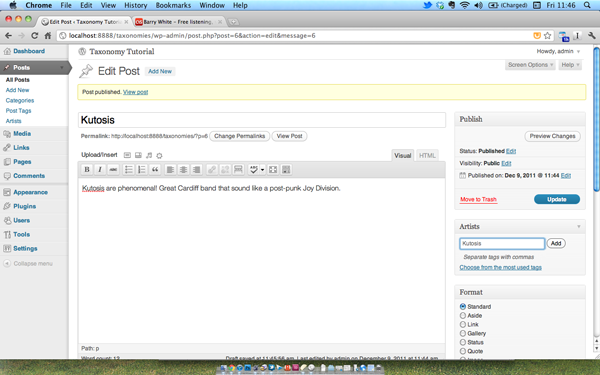
Once you click 'Add' on on the artist tag box and press publish, WordPress will automatically create a new artist called 'Whatever you named your band' - for this tutorial I've chosen to use a local band called Kutosis.
Some people will say that you could just have a category page to do the same thing. They're kind of right but we're about to bump into two problems if we do that:
- If we write about a good number of bands, our WordPress install will get really messy soon if we create one category for each band
- If we want to include dynamically created content for each artist, we'll be swimming in unnecessary code
Using custom taxonomies helps us avoid these problems and allows really scalability in our website. It also means that by providing an artist tag, we can do a lot of cool stuff with API calls to music websites.
But before we get excited about all of the possibilities, we need to work out how to display the information on our page
Step 2 Setting Up Our single.php Template
Now that we've specified our post contains references to a certain band/artist, we need a way to indicate that to readers of the post. The way to do that is to add a simple couple lines of code to show links to all of the artists who we've talked about to the single.php file which WordPress uses to display individual posts.
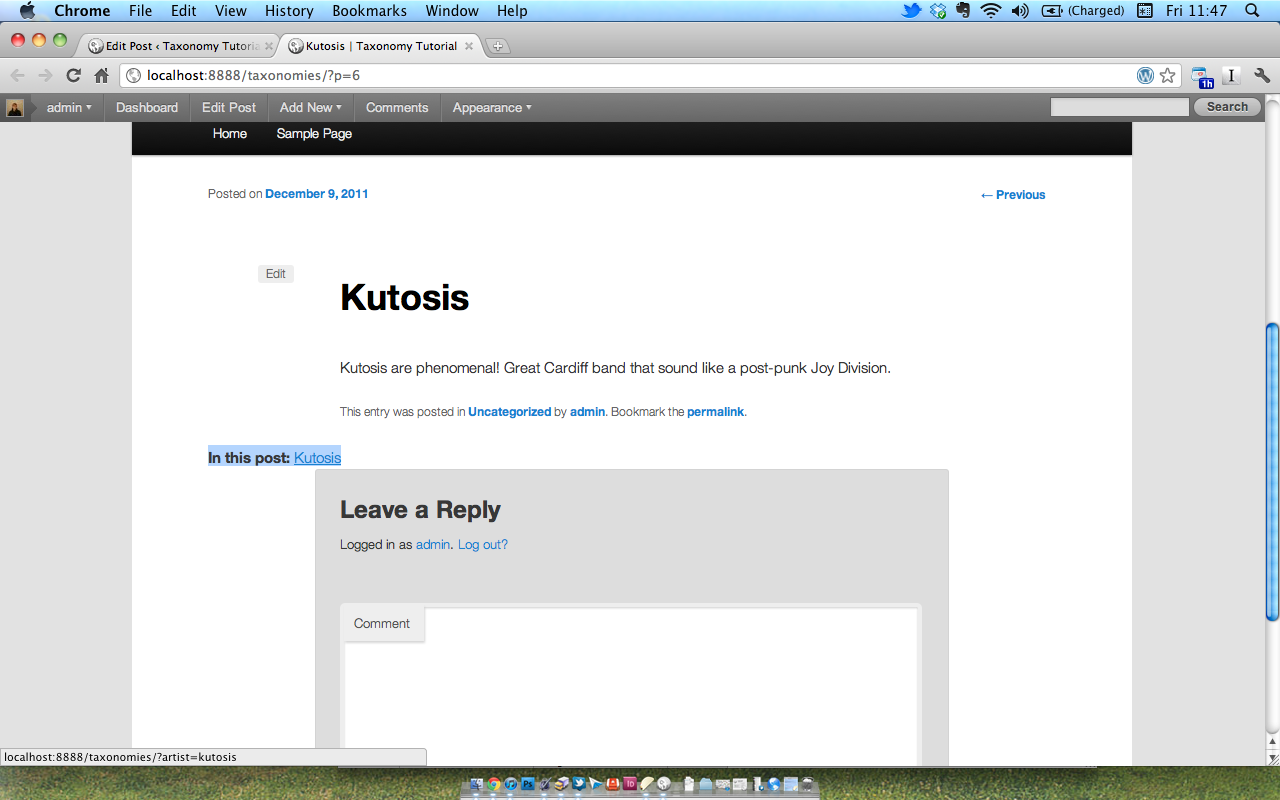
See the link? Just where it says 'In this post' - that link is accomplished by adding the following code to our single.php file. I've chosen to add it just above the part of my template that calls the comment template:
					<?php
					// We need to tell WordPress to look for our custom taxonomy lists

					$taxo_text = "";

					// Then we need to tell it which one we want in particular and store it for use in our code.

					$artist_list = get_the_term_list( $post->ID, 'artist', '<strong>In this post:</strong> ', ', ', '' );
					if ( '' != $artist_list ) {
  					  $taxo_text .= "$artist_list<br />\n";
					}

					// Now we need to tell Wordpress exactly how we want to display the tag

					if ( '' != $taxo_text ) {
					?>
					<div class="entry-utility">
					<?php
					echo $taxo_text;
					?>
					</div>
					// This just let's WordPress know that there's an else argument. It will remove the 'In this post' if no artists have been tagged.
					<?
						}
					?>

					// You don't need the following line. I have left it here to show you where I placed my code.
					<?php comments_template( '', true ); ?>
This section of code tells WordPress to do a few things:
- It tells WordPress to look for any tags that are associated with the post
- Then it specifies that we are interested in the Artist tag
- After that it tells Wordpress how we want to display it if it's there and how to not show anything if there isn't a tag associated with the post
Step 3 Creating a Taxonomy Template
So now we've got a way to link to an archive page which displays all the posts associated with the artist tagged in the post - we could stop there but there's so much more that we can get out of these powerful little taxonomies. For example, what if we want to monetize our blog and set up affiliate links to buy the artist's music on iTunes or simply let our readers enjoy our writing with some Spotify tunes from the artist in question? Or even better - if we've got curious readers, we could allow them to read a little bit about the artist tagged in the post and never have to write a word ourselves. Exciting right?!
Instead of adding load and loads of conditional code to our archive template and making it ridiculously long, let's take full advantage of the template hierarchy of WordPress. We're going to add a file called taxonomy-artist.php which is almost the first file name that WordPress will look for in order to format our information. To learn more about WordPress template hierarchies, head over to the WordPress Codex.
Duplicate the archive/category.php file from your theme and rename it to taxonomy-artist.php (or if you've decided to create a different taxonomy, then change artist out for whatever your taxonomy is called) so that you can easily maintain your template structure. Once you've duplicated the template/category.php files, you should now strip your new taxonomy-artist.php file of all code other than the bare necessities of your structure. Don't worry, we'll add it all back in as we go along.
Once you save, you'll be left with a bare bones structure like this one:
Having stripped out all of the code that we didn't need, let's put in all the code that we do need. Starting right at the top, just below the header of our page, we'll add what it perhaps the most vital and shortest code and it looks like this:
<?php
	// This sets out a variable called $term - we'll use it ALOT for what we're about to do.
	 $term = get_term_by( 'slug', get_query_var( 'term' ), get_query_var( 'taxonomy' ) ); ?>
What that little beauty does is to give us a variable called $term for everything we're about to do. $term will be the name of our taxonomy. For our example, WordPress will be using the band Kutosis because that's the act I tagged in my post.
Then we can use it in our template to add in a taxonomy title
<!-- See how we used the variable to let Wordpress know we want to display the title of the taxonomy? -->
	<h2><?php echo $term->name; ?></h2>
We can also use it to pop in a list of posts which have made reference to the artist throughout our site. Note: You'll have to tag the post yourself because WordPress won't guess for you.
<!-- Using the same variable, we can use it to display the posts that the artist has been tagged in -->
	<h2><?php echo $term->name; ?> elsewhere on the site</h2>
	<ul class="artistappearances">
	<?php while (have_posts()) : the_post(); ?>
				<li><a href="<?php the_permalink() ?>" rel="bookmark"><?php the_title(); ?></a> -  <?php the_time('d M Y'); ?></li>
	<?php endwhile; ?>
	</ul>
Step 4 It's API Hour!
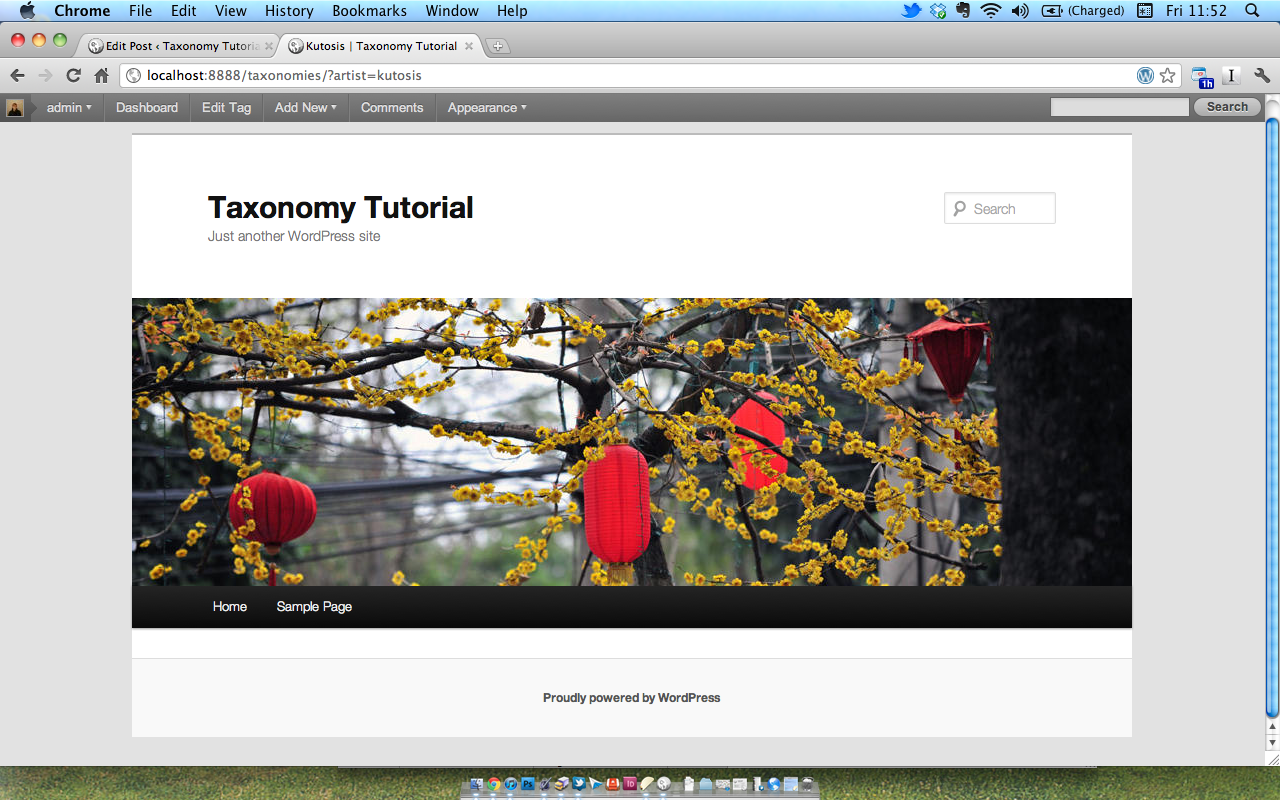
Having done all of that, we've got something kind of like this:
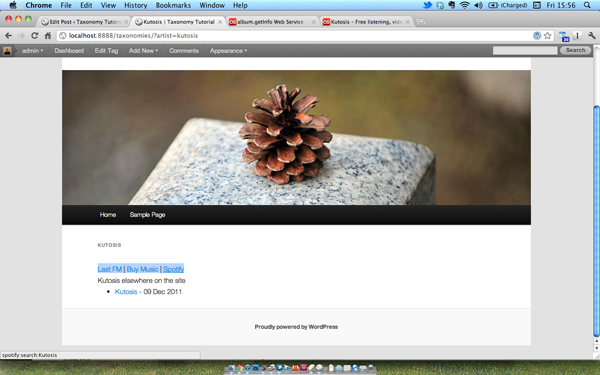
It doesn't look too impressive right? That's because we're about to really turn up the volume on this band's page! Let's start by adding some links to the artist around the web to provide some added value for our readers.
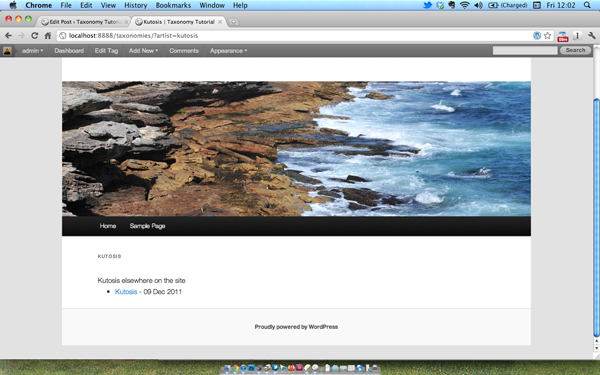
<!-- Let's add some links to show people where else they can find the artist on the web -->
	<a href="http://www.last.fm/music/<?php echo $term->name; ?>" target="_blank">Last FM</a> |
	<a href="http://phobos.apple.com/WebObjects/MZSearch.woa/wa/search?term=<?php echo $term->name; ?>&type=artistName&partnerId=YOUR iTUNES AFFILIATE ID HERE">Buy Music</a> |
	<a href="spotify:search:<?php echo $term->name; ?>">Spotify</a>
These three lines of code are examples of places you might want to link to. I've added a Last.FM, Spotify and iTunes link. With the iTunes link, if you're signed up to the affiliate programme, you can add your partnerID into the URL - if you're not a member, don't worry, just take it out.
As I said, these are just examples of place you could link to. Anywhere you want to add a link to the artist on the web, just work out how the permalinks to that site are structured and where the artist's name comes. Then just put the variable we set up into the URL like I did in the above code.
The other great thing about this is that even if the artist has spaces in their name, most sites will be able to interpret that nicely and make sure that you're directed to the correct place. Just test it out and see what happens. Here's how our page looks.
Now let's actually use an API
So far, we've just made our links dynamic. What if we want to add some more value for our readers and give them a quick overview of the artist that we've been writing about?
The Last.FM API allows us full access to its huge library of music information. This API is probably one of the best out there and so we're in luck! Let's grab the artist's biography from Last.FM's database.
If you do not already have a Last.FM API key, you will need to register for one by clicking here before you go any further in this tutorial.
Once you've got your Last.FM API key, open you taxonomy-artist.php file back up and decide where you want to place the biography. Then take a look at the documentation on the Last.FM website to see that the structure of the API call for artist.getInfo is this: http://ws.audioscrobbler.com/2.0/?method=artist.getinfo&artist=cher&api_key=yourapikeynumber.
Unless you want info about Cher's musical career on every artist page on your website, you'll need to change some stuff in the URL. Delete Cher and replace it with our artist variable so that you've got this:
http://ws.audioscrobbler.com/2.0/?method=artist.getinfo&artist=".$term->name."&api_key=YOUR_API_KEY
That's the API call structure that we'll be using but unfortunately, it's not as straightforward as pasting it in to a template file and letting WordPress work it's magical digits. We'll have to work out a way to tell the page exactly which part of the artist's information we're needing. Before we jump ahead of ourselves though, we should set up a cURL function to get the information from Last.FM.
CURL isn't the only way to do this but most webhosts will be annoyed at you if you turn on the other functions like fopen in your PHP.ini file because it could pose a security risk. To avoid embarrassing error messages when your webhost discovers you using a method non grata, it's best to go for the following:
<!-- Here's where we're going to print information about our artist -->
	<?php
		//Tell our page where we're going to make the call to
			$request_url = "http://ws.audioscrobbler.com/2.0/?method=artist.getinfo&artist=".$term->name."&api_key=YOUR_API_KEY";
		//Begin our curl resource
			$ch = curl_init($request_url);
		//Put all the stuff from the page we called into a string
			curl_setopt($ch, CURLOPT_RETURNTRANSFER, 1);
		// Put that info into a nice output
			$output = curl_exec($ch);
		// Sort out our memory
			curl_close($ch);
?>
This is a standard CURL function. It requests the Last.FM archive for our artist, prints it into a curl resource and then outputs it nicely before closing itself.
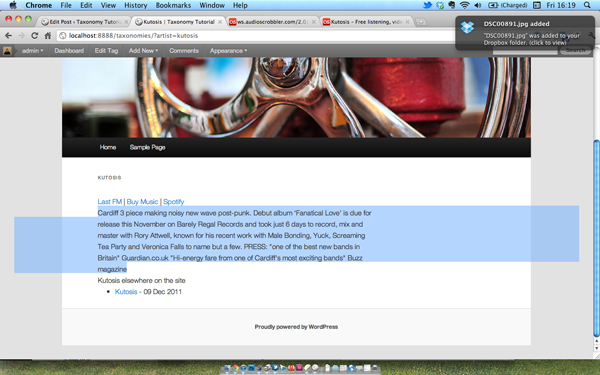
But of course, we still haven't told it where we want the description of the artist to go or exactly how to find the description. Let's do that using SimpleXML.
<!-- Here's where we're going to print information about our artist -->
	<?php
		//Tell our page where we're going to make the call to
			$request_url = "http://ws.audioscrobbler.com/2.0/?method=artist.getinfo&artist=".$term->name."&api_key=YOUR_API_KEY";
		//Begin our curl resource
			$ch = curl_init($request_url);
		//Put all the stuff from the page we called into a string
			curl_setopt($ch, CURLOPT_RETURNTRANSFER, 1);
		// Put that info into a nice output
			$output = curl_exec($ch);
		// Sort out our memory
			curl_close($ch);

		//IMPORTANT: This is where we begin to tell how we want the output displayed
			$xml = simplexml_load_string($output);
		//Here's where we tell the page the specific place that we want it to print information from
			$info = $xml->artist->bio->summary;
?>
	<!-- Let's tell WordPress that we want to display that information here -->
	<?php echo $info ?>
We don’t want everything in the XML file - we only want to get the artist summary which contains a short version of the bio.
That’s what this bit does: $info = $xml->artist->bio->summary;
Then, the summary is assigned to a variable called $info which we can echo anywhere on our template page leaving us with something that looks like this:
Conclusion
Congratulations! You've made a dynamically generated artist page for your favorite band!
You can do all kinds of great stuff with the Last.FM API including pulling in links to the top 5 listened to tracks by an artist, bio pictures etc. The best thing to do is have a play around with the API calls that you can make.
If you would prefer to handle bio images yourself, there are some great plugins. Most notable is the Taxonomy Images plugin by Michael Fields which has a simple way to add custom images to your taxonomy without any coding. If you choose to use that plugin, check out Michael's FAQ for some really good documentation on how to use it to your needs.

Comments