In this Nettuts+ mini-series, we'll build a web application from scratch, while diving into a great new PHP framework that's rapidly picking up steam, called Laravel.
In this lesson, we'll be learning about some very useful Laravel features: filters, and both the validation and files libraries.
Review
Welcome back to our Web Applications from Scratch with Laravel series! In the second tutorial of our mini-series, we learned a lot about Laravel's ORM implementation:
- Some background on “Models”
- What the Eloquent ORM is
- How to setup Laravel's database configuration
- How to create your first Laravel Model
- The basic functions of the Auth and Input libraries
- Making use of the Eloquent ORM in a view
If you haven't seen it yet, I urge you to check out the first and second part of the mini-series — it will make it significantly easier to follow along, as we build our test application, Instapics, through each part.
So let's get started!
1 - Laravel Filters
In a nutshell, filters are functions that we can run on routes before or after the request cycle. It's especially useful for things like authentication and logging. To register a filter, we need to add something like the following to the application/routes.php file:
Route::filter('myfilter', function()
{
    //What you want the filter to do
});
After we register the filter, we need to attach it to a route, like so:
Route::any('/', array('before' => 'filter', function()
{
    //What you want the route to do
}));
In the example above, the myfilter will trigger on all request to the index page (i.e. /). Let's say we wanted to implement an authentication filter for the dashboard route:
Route::filter('auth', function()
{
    if(Auth::guest()) {
        return Redirect::to('home');
    }
});

Route::any('dashboard', array('before' => 'auth, function()
{
    return View::make('dashboard');
});
The code above will redirect all unauthenticated requests to the dashboard route to the home route.
Global Filters
By default, Laravel includes two filters, before and after, which run before and after every request on an application. These are usually where you place things, like request logging, adding global assets or firing global events. For example:
Route::filter('after', function($response)
{
    Log::write('request', 'Request finished on ' . date('d M, Y - h:i:sA') . '.\n\nRequest Information:\n '. var_export(Input::get(), true));
});
This writes a request type log message to the application's log, and lists any input from the request.
Route Groups
If you find yourself applying the same filter to multiple routes, you can make use of Route Groups to group them all together and lessen code repetition:
Route::filter('admin_auth', function()
{
    if(Auth::guest() || !Auth::user()->isAdmin()) {
        return Redirect::to('home');
    }
});

Route::group(array('before' => 'admin_auth'), function()
{
    Route::get('admin', function()
    {
        return View::make('admin');
    });

    Route::get('useradmin', function()
    {
        return View::make('useradmin');
    });
});
Controller Filters
For applications (like our very own Instapics) that make use of controllers, we can apply filters by using the $this->filter() function in the controller's constructor:
public function __construct()
{
    $this->filter('before', 'auth');
}
These filters, like routes, can also be customized to apply only to certain HTTP verbs and specific controller actions:
public function __construct()
{
    //call 'log_download' filter for all download/file GET requests
    $this->filter('after', 'log_download')->only(array('file'))->on('get');

    //call the 'auth_download' filter for all download/* requests, except for the 'queue' action
    $this->filter('before', 'auth_download')->except(array('queue'));
}
2 - Laravel Validation
Laravel's built-in validation makes it easy to apply validation to any array of values, more specifically, form input. To do so, you simply need to build two arrays:
- $input - this is an associative array of the values you want to validate.
- $rules - this is an associative array (with keys which are the same as the $input array) that lists down the validation rules.
//Getting our input from the Input library
$input = Input::all();
//Create our validation rules
$rules = array(
    'email' => 'required|email|unique:users',
    'password' => 'required'
);

//Getting a $validation instance for our error checking
$validation = Validator::make($input, $rules);

//Check if the validation succeeded
if( $validation->fails() ) {
    //do something with the error messages from the $validation instance
    $validation->errors;
}
Validation Rules
Below is a list of validation rules which can be used with the Laravel validation library. Like in the example above, you are free to mix and match these by separating them with a pipe ("|"):
-
required- the value should be present in the input array'email' => 'required'
-
alpha- the value should only consist of alphabet characters'full_name' => 'alpha'
-
alpha_num- the value should only consist of alphanumeric characters'username' => 'alpha_num'
-
alpha_dash- the value should only consist of alphanumeric, dashes and/or underscores'user_name' => 'alpha_dash'
-
size- the value should only be of a given length, or should be equal to if numeric'api_key' => 'size:10'
'order_count' => 'size:10'
-
between- the value is inclusively between a specified range'order_count' => 'between:1,100'
-
min- the value is at least the given'order_count' => 'min:1'
-
max- the value is equal to or less than the given'order_count' => 'max:100'
-
numeric- the value is numeric'order_count' => 'numeric'
-
integer- the value is an integer'order_count' => 'integer'
-
in- the value is contained in the given'tshirt_size' => 'in:xsmall,small,medium,large,xlarge'
-
not_in- the value is not in the given'tshirt_size' => 'not_in:xsmall,xlarge'
-
confirmed- will check if thekey_confirmationexists and is equal to the value'password' => 'confirmed'
This will check if the
password_confirmationvalue exists and is equal topassword -
accepted- this will check if the value is set to 'yes' or 1. Useful for checkboxes'terms_of_service' => 'accepted'
-
same- the value is the same as the given attribute's value'password' => 'same:confirm_password'
-
different- the value should be different from the given attribute's value'password' => 'different:old_password'
-
match- the value should match the given regular expression'user_name' => 'match:/[a-zA-Z0-9]*/'
-
unique- checks for uniqueness of the value in the given table.'user_name' => 'unique:users'
A given column is also accepted if the column name is not the same as the attribute name.
        //if the column in the users table is username,
        //we can provide this in the given like so:
        'user_name' => 'unique:users,username'
There are times when we want to check for uniqueness, but ignore a certain record (usually the record associated with the current user). We can do this by adding a third given, which should be the ID of that record in the table.
//ID 10 is the record ID of the current user 'user_name' => 'unique:users,user_name,10' -
exists- the value should exists in a table'category' => 'exists:categories'
This also accepts a second given if we want to change the column name to check.
'category' => 'exists:categories,category_name'
-
before- the value should be a date before the given date'publish_date' => 'before:2012-07-14'
-
after- the value should be a date after the given date'publish_date' => 'after:2012-07-14'
-
email- the value should be in a valid email format'subscriber_email' => 'email'
-
url- the value is in a valid url format'github_profile' => 'url'
-
active_url- the value is in a valid url format AND is active'github_profile' => 'active_url'
-
mimes- checks for the mime-type of an uploaded file. You can use any mime-type value from the config/mimes.php file'avatar' => 'mimes:jpg,gif,png,bmp'
-
image- the file should be an image'avatar' => 'image'
You can also use the
maxvalidator here to check for a file's size in kilobytes'avatar' => 'image|max:100'
Error Handling
Once you call the Validator->fails() or Validator->passes() method, the library collects all of the errors in a class that's accessible via Validator->errors. You'll then be able to retrieve these errors with some functions in the errors class. Laravel provides some cool functionality to automate error handling that fits in most POST/REDIRECT/GET scenarios:
class Register_Controller extends Base_Controller
{
    public $restful = true;

    public function get_index()
    {
        return View::make('register.index');
    }

    public function post_index()
    {
        $rules = array(
            'email' => 'required|email|unique:users',
            'password' => 'confirmed'
        );

        $validation = Validator::make(Input::get(), $rules);

        if( $validation->fails() ) {
            //Send the $validation object to the redirected page
            return Redirect::to('register')->with_errors($validation);
        }
    }
}
Here, we use the with_errors method for the Redirect library. This automatically binds the $errors variable in the view for wherever we're redirecting - in this case, the register/index page:
<form>
    {{-- $errors variable passed via with_errors --}}
    @if ($errors->has('email'))
    @foreach ($errors->get('email', '<p class="error-message">:message</p>') as $email_error)
    {{ $email_error }}
    @endforeach
    @endif
    <label for="email">Email:</label>
    <input type="email" name="email" placeholder="Enter your email address here" />

    @if ($errors->has('password'))
    @foreach ($errors->get('password', '<p class="error-message">:message</p>') as $password_error)
    {{ $password_error }}
    @endif
    <label for="password">Password:</label>
    <input type="password" name="password" placeholder="Enter your password here" />

    <label for="password_confirmation">Confirm Password:</label>
    <input type="password" name="password_confirmation" placeholder="Re-type your password here" />
</form>
On the view file, we use the $errors->has() method to check if an error exists for that specifc field. If it does, we then use the $errors->get() method to display the error messages. The second parameter in this method can be used to provide a template on how we display the error message.
Custom Error Messages
Since most people would want to change the error messages for Laravel to fit their application's branding or language, the Validation library also allows for customizing the error messages that are generated by simply adding in a $messages array to the Validate::make function call:
$rules = array(
    'email' => 'required|email|unique:users',
    'password' => 'confirmed'
);

$messages = array(
    'email_required' => 'Please provide an email address',
    'email_email' => 'Please provide a valid email address',
    'email_unique' => 'The email address you provided is already being used',
    'password_confirmed' => 'Your password confirmation did not match your password.'
);
$validation = Validator::make(Input::get(), $rules, $messages);
There are two ways to create a $messages array:
-
Rule-based - you can provide a custom message for all the fields validated by a certain rule. For example:
        $messages = array(
            'required' => 'The :attribute field is required.',
            'same'    => 'The :attribute and :other must match.',
            'size'    => 'The :attribute must be exactly :size.',
            'between' => 'The :attribute must be between :min - :max.',
            'in'      => 'The :attribute must be one of the following types: :values',
        );
This will change the default error messages for all fields that have the
required, same, size, between and inrules. In here, we also see that Laravel uses placeholders to replace certain values in the error message.:attributewill change into the field attribute (sans underscores) it's for.:otheris used for thesamerule, which refers to the other attribute it should match.:sizerefers to the defined size in the rule parameters.:minand:maxis the minimum and maximum values, and:valuesis the list of values we specified that the field's value must be in. -
Attribute-based - on the other hand, you can also provide a custom message for a specific attribute on a specific rule. Taking our example from above:
$messages = array( 'email_required' => 'Please provide an email address', 'email_email' => 'Please provide a valid email address', 'email_unique' => 'The email address you provided is already being used', 'password_confirmed' => 'Your password confirmation did not match your password.' );email_requiredis the error message that's used when theemailattribute fails therequiredrule,email_emailis the error message that's used when theemailfails theemailrule, and so on.
If you find yourself consantly recreating the same custom messages though, it would be easier to just specify the custom error messages globally. You can do that by editing the application/langauge/en/validation.php file, and editing the custom array found there:
...
...
'custom' => array(
    'email_required' => 'Please provide an email address',
    'email_email' => 'Please provide a valid email address',
    'email_unique' => 'The email address you provided is already being used',
    'password_confirmed' => 'Your password confirmation did not match your password.'
);
...
...
3 - Laravel Files
Handling File Uploads
Laravel's Files library makes it easy to handle file uploads by using the Input::upload method, which is a simple wrapper to the PHP's move_uploaded_file function:
Input::upload('input_name', 'directory/to/save/file', 'filename.extension');
To validate the file uploads, you can use the Validator library we discussed above like so:
$input = array(
    'upload' => Input::file('upload')
);

$rules = array(
    'upload' => 'mimes:zip,rar|max:500'
);

$validator = Validator::make($input, $rules);
File Manipulation
The Files library also has some file manipulation methods, like:
//Get a file
$data = File::get('path/file.extension');

//Write a file
File::put('path/file.extension', $data);

//Appending to a file
File::append('path/file.extension', $data);
File-related functions
Laravel also provides some general purpose file-related functionalities that can be used throughout your code. For example, the File::extension method returns the extension of a string filename:
//This will return 'zip'
File::extension('data.zip');
The File::is function checks if a file is of a certain type. Take note that this does not simply check the file's extension, but uses the Fileinfo PHP extension to read the actual contents of the file. This is useful for determining that a file is actually of a correct file type:
//Returns true if the file is a zip file, false if otherwise
File::is('zip', 'path/file.zip');
A list of compatible extensions can be seen in application/config/mimes.php.
Speaking of mime types, you can also use the File::mime function to get the mime types of an extension. The mime type returned is based on the same mimes.php file:
//This will return image/png
File::mime('png')
The File::cpdir and the File::rmdir methods can copy and delete a directory, respectively.
File::cpdir('directory/to/copy', 'destination/directory');

//File::rmdir is a recursive delete, so it will delete all files and folders inside the directory.
File::rmdir('directory/to/delete');
Now that we've learned all about Filters, the Validation library and the Files library, let's implement them in our application, Instapics.
Step 1 Create an auth Filter

Add filters to Base_Controller
Let's start off by making sure our users are only able to see authenticated pages by creating an auth filter that runs before all requests. Since we use controller-based routing, we'll have to configure our filters in our controller. Let's put the filters in the __construct method of the Base_Controller to make sure the auth filter runs on all controllers which extends it. While we're at it, let's add a nonauth filter as well to make sure people can only visited certain pages when they're no authenticated:
class Base_Controller extends Controller {

    public function __construct()
    {
        //Assets
        Asset::add('jquery', 'js/jquery-1.7.2.min.js');
        Asset::add('bootstrap-js', 'js/bootstrap.min.js');
        Asset::add('bootstrap-css', 'css/bootstrap.min.css');
        Asset::add('bootstrap-css-responsive', 'css/bootstrap-responsive.min.css', 'bootstrap-css');
        Asset::add('style', 'css/style.css');
        parent::__construct();

        //Filters
        $class = get_called_class();
        switch($class) {
            case 'Home_Controller':
                $this->filter('before', 'nonauth');
                break;

            case 'User_Controller':
                $this->filter('before', 'nonauth')->only(array('authenticate'));
                $this->filter('before', 'auth')->only(array('logout'));
                break;

            default:
                $this->filter('before', 'auth');
                break;
        }
    }
Here we define that any requests to the home route will require non-authenticated user, which is good since this is where the login screen lies. Any other request though will default to requiring an authenticated user. For the User_Controller, we actually have two separate methods that require both non-authenticated users (authenticate) and authenticated users (logout), so we make use of the only method to specify which controller actions the filters apply to.
Create filter definitions in routes.php
Now, open application/routes.php, which is where we'll define the auth and nonauth filters. Take note that you might already have an existing auth filter definition so just replace it with the one we have below:
Route::filter('auth', function()
{
    if (Auth::guest()) return Redirect::to('home');
});

Route::filter('nonauth', function()
{
    if (Auth::guest() == false) return Redirect::to('dashboard');
});
In the auth filter, we check if a user is authenticated with the Auth library. If the user is not authenticated, we redirect them back to the home route where the login screen is, otherwise, they are allowed to continue. The same thing with the nonauth filter - check if the user is authenticated, if he is, then redirect him to the dashboard.
Step 2 Implement User Uploads
Create photo upload form
Now that we know a little more about how to handle file uploads in Laravel, let's start implementing one of Instapics' main features — uploading photos. Begin by creating a folder called application/views/plugins folder, and inside this create a Blade view file named upload_modal.blade.php. Paste the following HTML:
<div class="modal hide" id="upload_modal">
<div class="modal-header">
<button type="button" class="close" data-dismiss="modal">×</button>
<h3>Upload a new Instapic</h3>
</div>
<div class="modal-body">
<form method="POST" action="{{ URL::to('photo/upload') }}" id="upload_modal_form" enctype="multipart/form-data">
<label for="photo">Photo</label>
<input type="file" placeholder="Choose a photo to upload" name="photo" id="photo" />
<label for="description">Description</label>
<textarea placeholder="Describe your photo in a few sentences" name="description" id="description" class="span5"></textarea>
</form>
</div>
<div class="modal-footer">
<a href="#" class="btn" data-dismiss="modal">Cancel</a>
<button type="button" onclick="$('#upload_modal_form').submit();" class="btn btn-primary">Upload Photo</a>
</div>
</div>
Create the button trigger
Let's trigger this modal form with a button - add this into application/views/layouts/main.blade.php, after the .nav-collapse div:
<div class="nav-collapse">
    <ul class="nav">
        @section('navigation')
        <li class="active"><a href="home">Home</a></li>
        @yield_section
    </ul>
</div><!--/.nav-collapse -->
@section('post_navigation')
@if (Auth::check())
    @include('plugins.loggedin_postnav')
@endif
@yield_section
Here, we include a view file called loggedin_postnav if the user is logged in. This is where we'll add the button for the modal upload form. In the same file, append this after the .container div:
<div class="container">
@yield('content')
<hr>
<footer>
<p>© Instapics 2012</p>
</footer>
</div> <!-- /container -->
@section('modals')
@if (Auth::check())
@include('plugins.upload_modal')
@endif
@yield_section
This is where we include the upload_modal HTML. We make sure though that the user isn't logged in before including this HTML file, since like the button trigger, this wouldn't really be needed if the user isn't authenticated.
Now, create application/views/plugins/loggedin_postnav.blade.php
<div class="btn-group pull-right">
    <button type="button" class="btn btn-primary" onclick="$('#upload_modal').modal({backdrop: 'static'});"><i class="icon-plus-sign icon-white"></i> Upload Instapic</button>
</div>
Refresh the page and you should see the new upload button - click it to see that it works!

Hook up the form to the appropriate controller
Now that we have our front-end stuff working, let's start working on the back-end portion of the form. Create application/controllers/photo.php, and put in the following code for the controller:
class Photo_Controller extends Base_Controller
{
    public function action_upload()
    {
        $input = Input::all();
        $extension = File::extension($input['photo']['name']);
        $directory = path('public').'uploads/'.sha1(Auth::user()->id);
        $filename = sha1(Auth::user()->id.time()).".{$extension}";

        $upload_success = Input::upload('photo', $directory, $filename);

        if( $upload_success ) {
            Session::flash('status_success', 'Successfully uploaded new Instapic');
        } else {
            Session::flash('status_error', 'An error occurred while uploading new Instapic - please try again.');
        }

        if( $upload_success ) {
            $photo = new Photo(array(
                'location' => URL::to('uploads/'.sha1(Auth::user()->id).'/'.$filename),
                'description' => $input['description']
            ));
            Auth::user()->photos()->insert($photo);
        }

        return Redirect::to('dashboard');
    }
}
Try it out - you should be able to start uploading new Instapics.
Add validation to the upload form
Let's add some validation rules to this to make sure the user only submits the correct stuff. Update the controller with the following:
class Photo_Controller extends Base_Controller
{
    public function action_upload()
    {
        $input = Input::all();

        if( isset($input['description']) ) {
            $input['description'] = filter_var($input['description'], FILTER_SANITIZE_STRING, FILTER_FLAG_NO_ENCODE_QUOTES);
        }

        $rules = array(
            'photo' => 'required|image|max:500', //photo upload must be an image and must not exceed 500kb
            'description' => 'required' //description is required
        );

        $validation = Validator::make($input, $rules);

        if( $validation->fails() ) {
            return Redirect::to('dashboard')->with_errors($validation);
        }

        $extension = File::extension($input['photo']['name']);
        $directory = path('public').'uploads/'.sha1(Auth::user()->id);
        $filename = sha1(Auth::user()->id.time()).".{$extension}";

        $upload_success = Input::upload('photo', $directory, $filename);

        if( $upload_success ) {
            $photo = new Photo(array(
                'location' => URL::to('uploads/'.sha1(Auth::user()->id).'/'.$filename),
                'description' => $input['description']
            ));
            Auth::user()->photos()->insert($photo);
            Session::flash('status_success', 'Successfully uploaded your new Instapic');
        } else {
            Session::flash('status_error', 'An error occurred while uploading your new Instapic - please try again.');
        }
        return Redirect::to('dashboard');
    }
}
See how we validate the input? We make sure that the photo is present, an image and less than 500kb. We also make sure that the description is present after sanitation. We won't be able to see our error messages yet though, so let's fix that by adding some HTML to render our error messages. Open application/views/layouts/main.blade.php and add the following inside the .container div:
<div class="container">
@include('plugins.status')
@yield('content')
<hr>
<footer>
<p>© Instapics 2012</p>
</footer>
</div> <!-- /container -->
Now, create application/views/plugins/status.blade.php. This is where we'll render the actual error messages. We'll also add support for session-based status messages (like the one we use inside the $upload_success check on the Photos controller code):
@if (isset($errors) && count($errors->all()) > 0)
<div class="alert alert-error">
    <a class="close" data-dismiss="alert" href="#">×</a>
    <h4 class="alert-heading">Oh Snap!</h4>
    <ul>
    @foreach ($errors->all('<li>:message</li>') as $message)
    {{ $message }}
    @endforeach
    </ul>
</div>
@elseif (!is_null(Session::get('status_error')))
<div class="alert alert-error">
    <a class="close" data-dismiss="alert" href="#">×</a>
    <h4 class="alert-heading">Oh Snap!</h4>
    @if (is_array(Session::get('status_error')))
        <ul>
        @foreach (Session::get('status_error') as $error)
            <li>{{ $error }}</li>
        @endforeach
        </ul>
    @else
        {{ Session::get('status_error') }}
    @endif
</div>
@endif

@if (!is_null(Session::get('status_success')))
<div class="alert alert-success">
    <a class="close" data-dismiss="alert" href="#">×</a>
    <h4 class="alert-heading">Success!</h4>
    @if (is_array(Session::get('status_success')))
        <ul>
        @foreach (Session::get('status_success') as $success)
            <li>{{ $success }}</li>
        @endforeach
        </ul>
    @else
        {{ Session::get('status_success') }}
    @endif
</div>
@endif
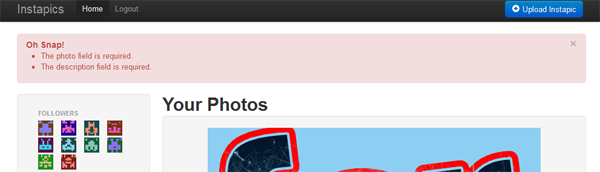
Try causing errors on the upload form now by submitting without any file selected or without a description (since both are required). You should see the error messages being rendered on top:
Step 3 Add Validation to the Registration and Login Form
Now that we know how to use Laravel's Validation library, let's revisit our first form - the login and registration form. At the moment, we just use an echo to see that the login or registration failed — let's replace that with proper validation. Open application/controllers/user.php and update it like so:
class User_Controller extends Base_Controller
{
    public function action_authenticate()
    {
        $email = Input::get('email');
        $password = Input::get('password');
        $new_user = Input::get('new_user', 'off');

        $input = array(
            'email' => $email,
            'password' => $password
        );

        if( $new_user == 'on' ) {

            $rules = array(
                'email' => 'required|email|unique:users',
                'password' => 'required'
            );

            $validation = Validator::make($input, $rules);

            if( $validation->fails() ) {
                return Redirect::to('home')->with_errors($validation);
            }

            try {
                $user = new User();
                $user->email = $email;
                $user->password = Hash::make($password);
                $user->save();
                Auth::login($user);

                return Redirect::to('dashboard');
            }  catch( Exception $e ) {
                Session::flash('status_error', 'An error occurred while creating a new account - please try again.');
                return Redirect::to('home');
            }
        } else {

            $rules = array(
                'email' => 'required|email|exists:users',
                'password' => 'required'
            );

            $validation = Validator::make($input, $rules);

            if( $validation->fails() ) {
                return Redirect::to('home')->with_errors($validation);
            }

            $credentials = array(
                'username' => $email,
                'password' => $password
            );
            if( Auth::attempt($credentials)) {
                return Redirect::to('dashboard');
            } else {
                Session::flash('status_error', 'Your email or password is invalid - please try again.');
                return Redirect::to('home');
            }
        }
    }

    public function action_logout()
    {
        Auth::logout();
        Redirect::to('home/index');
    }
}
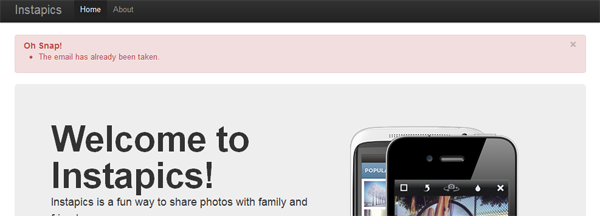
Since we made our status message renderings in a modular fashion, we don't even need to write any additional HTML to see the error messages in action! Just try it out!
Conclusion
In the third tutorial in our Laravel series, we learned:
- How, when and where to use Laravel Filters
- How to use Laravel's Validation library, and how to handle the Validation library's errors.
- How to manage files in Laravel using the Files library
Laravel comes with a lot of these small functions and libraries, that although implementable in other ways, is made easier and simpler (e.g. file uploads in a single line!) by adopting Laravel's expressive nature. It's these little time-saving libraries add up and over time, saves you a ton of wasted productivity rewriting code.
Next in our Web Applications from Scratch with Laravel series, we'll learn more about events, migrations and some advanced usage of the Eloquent ORM!
What do you think of the Laravel libraries discussed in the tutorial? Is it something that you find useful? Let me know in the comments! And, if you're a Tuts+ Premium member, stay tuned for our upcoming Laravel Essentials course!

Comments