In this lesson, we will create a CodeIgniter library that allows us to generate data grids automatically for managing any database table. I'll explain each step required to create this class; so you'll likely learn some new OOP techniques/concepts in the process!
As a bonus, we'll proceed to write some jQuery code that will enable a user to update the data grid's content without having to wait for a page refresh.
Please Note...
This tutorial assumes that you have a modest understanding of the CodeIgniter and jQuery frameworks.
What is a Data Grid?
A datagrid is a table that displays the contents of a database or table along with sorting controls.
A datagrid is a table that displays the contents of a database or table along with sorting controls. In this tutorial, we will be tasked with providing this functionality, but also saving the user from waiting for the page to refresh each time an operation is performed. Thanks to jQuery, this will be a fairly simple task!
What about the users who don't have Javascript enabled? Don't worry, we'll compensate for them as well!
Step 1: Build a Data Grid Generator Class
We want to build a tool that will enable us to create datagrids dynamically for any database table that we have. This means the code is not tied up to any specific table structure, and, thus, is independent on the data itself. All the coder (the developer who uses our class) must know is the name of the table to be transformed into a grid and the primary key for that table. Here is the preface of the class that we will be developing for the most part of this tutorial:
<?php
class Datagrid{
	private $hide_pk_col = true;
	private $hide_cols = array();
	private $tbl_name = '';
	private $pk_col	= '';
	private $headings = array();
	private $tbl_fields = array();
}
?>
The Datagrid Class could well be added to the application/library folder, but we are going to add it as a helper to the CodeIgniter framework. Why? Because loading libraries doesn't allow us to pass arguments to the class' constructor, thus loading it as a helper will solve the problem. This point will make more sense for you when we have finished writing the constructor.
The Class' Constructor Method
public function __construct($tbl_name, $pk_col = 'id'){
	$this->CI =& get_instance();
	$this->CI->load->database();
	$this->tbl_fields = $this->CI->db->list_fields($tbl_name);
	if(!in_array($pk_col,$this->tbl_fields)){
		throw new Exception("Primary key column '$pk_col' not found in table '$tbl_name'");
	}
	$this->tbl_name = $tbl_name;
	$this->pk_col = $pk_col;
	$this->CI->load->library('table');

}
We have much going on already; but don't worry, as I'll explain everything for you in the next paragraph.
The constructor takes two arguments: the first one being the name of the table in your database that you wish to display as a datagrid to the user; the second param is the name of the column serving as the primary key for that table (more on that later). Inside the constructor's body, we instantiate the CodeIgniter Object, the Database Object and the HTML Table class/library. All of these will be needed throughout a Datagrid object's lifetime and are already built into the CI framework. Notice that we also check if the primary key really exists in the given table, and, in case it does not, we throw an exception reporting the error. Now the $this->tbl_fields member variable will be available for later use, so we don't have to fetch the database again.
"We can use the command,
$CI->db->list_fields($tbl_name)to fetch the names of all fields that a table has. However, for better performance, I recommend caching the results."
Method for Customizing Table Headings
public function setHeadings(array $headings){
	$this->headings = array_merge($this->headings, $headings);
}
This permits you to customize the headings of your data grid table - that is, with it, you can overwrite the original column names for certain table fields. It takes an associative array, like this: regdate => "Registration Date". Instead of just the technical "Regdate" as the column heading for that type of data, we have a more human-readable title in its place. The code responsible for applying the headings will be revealed shortly.
Method for Ignoring/Hiding Table Fields
public function ignoreFields(array $fields){
	foreach($fields as $f){
		if($f!=$this->pk_col)
			$this->hide_cols[] = $f;
	}
}
ignoreFields receives an array containing the fields to be ignored when fetching data from the database. This is useful when we have tables with lots of fields, but we only want to hide a couple of them. This method is smart enough to track an attempt to ignore the primary key field and then skip that. This is so because the primary key cannot be ignored for technical reasons (you will see why shortly). Still, if you want to hide the primary key column from appearing in the UI, you can use the hidePkCol method:
public function hidePkCol($bool){
	$this->hide_pk_col = (bool)$bool;
}
This method receives a boolean value to indicate if we want to hide the primary key column so it won't show up in the data grid. Sometimes, it's an ugly idea to display the pkey data, which is usually a numerical code without any meaning to the user.
Next instance method:
private function _selectFields(){
	foreach($this->tbl_fields as $field){
		if(!in_array($field,$this->hide_cols)){
			$this->CI->db->select($field);
			// hide pk column heading?
			if($field==$this->pk_col && $this->hide_pk_col) continue;
				$headings[]= isset($this->headings[$field]) ? $this->headings[$field] : ucfirst($field);
		}
	}
	if(!empty($headings)){
		// prepend a checkbox for toggling
		array_unshift($headings,"<input type='checkbox' class='check_toggler'>");
		$this->CI->table->set_heading($headings);
	}

}
Here we have a helper method; that's why it has the "private" modifier and is prefixed with an underline character (code convention). It will be used by the generate() method - explained shortly - in order to have the appropriate table fields selected and also the appropriate headings set to the table (generator) object. Notice the following line:
$headings[]= isset($this->headings[$field]) ? $this->headings[$field] : ucfirst($field);
This is where we apply the customized headers or resort to the default ones if none is given. If the pk column is supposed to be hidden from display, then it's heading will be skipped. Also notice the following line:
array_unshift($headings,"<input type='checkbox' class='dg_check_toggler'>");
The above command instructs the program to prepend a "Master" checkbox as the first heading of the table. That checkbox is different from other checkboxes in the grid in that it allows a user to check or uncheck all checkboxes in just one go. This toggling functionality will be implemented in a few moments with a simple jQuery code snippet.
Method to Generate/Render the Datagrid
Now comes the thing that does the real work for us:
public function generate(){
	$this->_selectFields();
	$rows = $this->CI->db
			->from($this->tbl_name)
			->get()
			->result_array();
	foreach($rows as &$row){
		$id = $row[$this->pk_col];

		// prepend a checkbox to enable selection of items/rows
		array_unshift($row, "<input class='dg_check_item' type='checkbox' name='dg_item[]' value='$id' />");

		// hide pk column cell?
		if($this->hide_pk_col){
			unset($row[$this->pk_col]);
		}
	}

	return $this->CI->table->generate($rows);
}
The generate method, as its name suggests, is responsible for generating the data grid itself. You should call this method only after you have configured the object according to your needs. The first thing it does is call the $this->_selectFields() method to perform the actions we explained earlier. Now it has to fetch all rows from the database and then loop through them, adding checkboxes to the beginning of each row:
// prepend a checkbox to enable selection of items/rows
array_unshift($row, "<input class='dg_check_item' type='checkbox' name='dg_item[]' value='$id' />");
Inside the foreach loop on the generate method, if the $this->hide_pk_col flag is set to true, then we must unset the primary key entry in the $row array so it won't show up as a column when the $this->CI->table object processes all rows and generates the final html output. At this point, it is okay to remove the primary key, if necessary, because we no longer need that information. A
But what does the user do with the selected/checked rows? To answer this, I have prepared a few more methods. The first one enables us to create "action buttons" without having to know any technical details about how the grid system works internally:
Method for Adding Buttons to a Data Grid Form
public static function createButton($action_name, $label){
	return "<input type='submit' class='$action_name' name='dg_action[$action_name]' value='$label' />";
}
Simply pass the name of the action as the first argument and a second argument to indicate the label for the generated button. A class attribute is automatically generated for that button so we can play around with it more easily when we are working with it in our JavaScript. But, how do we know if a certain action button has been pressed by the user? The answer can be found in the next method:
public static function getPostAction(){
// get name of submitted action (if any)
	if(isset($_POST['dg_action'])){
		return key($_POST['dg_action']);
	}
}
Yep! Another static method that helps us when we are dealing with forms. If any data grid has been submitted, this method will return the name of the action (or "operation") associated with that submit event. In addition, another handy tool for processing our datagrid forms is...
public static function getPostItems(){
	if(!empty($_POST['dg_item'])){
		return $_POST['dg_item'];
	}
	return array();
}
... which returns an array containing the selected ids so you can track which rows have been selected on the grid and then perform some action with them. As an example of what can be done with a selection of row ids, I have prepared another method - this one being an instance method, and not a static one, because it makes use of the object's instance resources in order to do its business:
public function deletePostSelection(){
// remove selected items from the db
	if(!empty($_POST['dg_item']))
		return $this->CI->db
			->from($this->tbl_name)
			->where_in($this->pk_col,$_POST['dg_item'])
			->delete();
}
If at least one checkbox was checked, the deletePostSelection() method will generate and execute an SQL statement like the following (suppose $tbl_name='my_table' and $pk_col='id'):
DELETE FROM my_table WHERE id IN (1,5,7,3,etc...)
...which will effectively remove the selected rows from the persistent layer. There could be more operations you could add to a data grid, but that will depend on the specifics of your project. As a tip, you could extend this class to, say, InboxDatagrid, so, beyond the deletePostSelection method, it could include extra operations, such as moveSelectedMessagesTo($place), etc...
Putting everything together
Now, if you have followed this tutorial step by step, you should have ended up with something similar to the following:
class Datagrid{

	private $hide_pk_col = true;
	private $hide_cols = array();
	private $tbl_name = '';
	private $pk_col	= '';
	private $headings = array();
	private $tbl_fields = array();

	function __construct($tbl_name, $pk_col = 'id'){
		$this->CI =& get_instance();
		$this->CI->load->database();
		$this->tbl_fields = $this->CI->db->list_fields($tbl_name);
		if(!in_array($pk_col,$this->tbl_fields)){
			throw new Exception("Primary key column '$pk_col' not found in table '$tbl_name'");
		}
		$this->tbl_name = $tbl_name;
		$this->pk_col = $pk_col;
		$this->CI->load->library('table');

	}

	public function setHeadings(array $headings){
		$this->headings = array_merge($this->headings, $headings);
	}

	public function hidePkCol($bool){
		$this->hide_pk_col = (bool)$bool;
	}

	public function ignoreFields(array $fields){
		foreach($fields as $f){
			if($f!=$this->pk_col)
				$this->hide_cols[] = $f;
		}
	}

	private function _selectFields(){
		foreach($this->tbl_fields as $field){
			if(!in_array($field,$this->hide_cols)){
				$this->CI->db->select($field);
				// hide pk column heading?
				if($field==$this->pk_col && $this->hide_pk_col) continue;
				$headings[]= isset($this->headings[$field]) ? $this->headings[$field] : ucfirst($field);
			}
		}
		if(!empty($headings)){
			// prepend a checkbox for toggling
			array_unshift($headings,"<input type='checkbox' class='dg_check_toggler'>");
			$this->CI->table->set_heading($headings);
		}

	}

	public function generate(){
		$this->_selectFields();
		$rows = $this->CI->db
				->from($this->tbl_name)
				->get()
				->result_array();
		foreach($rows as &$row){
			$id = $row[$this->pk_col];

			// prepend a checkbox to enable selection of items
			array_unshift($row, "<input class='dg_check_item' type='checkbox' name='dg_item[]' value='$id' />");

			// hide pk column?
			if($this->hide_pk_col){
				unset($row[$this->pk_col]);
			}
		}

		return $this->CI->table->generate($rows);
	}

	public static function createButton($action_name, $label){
		return "<input type='submit' class='$action_name' name='dg_action[$action_name]' value='$label' />";
	}

	public static function getPostAction(){
	// get name of submitted action (if any)
		if(isset($_POST['dg_action'])){
			return key($_POST['dg_action']);
		}
	}

	public static function getPostItems(){
		if(!empty($_POST['dg_item'])){
			return $_POST['dg_item'];
		}
		return array();
	}

	public function deletePostSelection(){
	// remove selected items from the db
		if(!empty($_POST['dg_item']))
			return $this->CI->db
				->from($this->tbl_name)
				->where_in($this->pk_col,$_POST['dg_item'])
				->delete();
	}

}
Notice: Don't forget to save this file as datagrid_helper.php, and place it in "application/helper/"
Step 2: Testing the Datagrid Helper Class with a CodeIgniter Controller
We'll now create a simple test controller and load the Datagrid class as a helper in its constructor. But before that, we should define a dummy database table and populate it with some sample data.
Execute the following SQL to create the database and the user table:
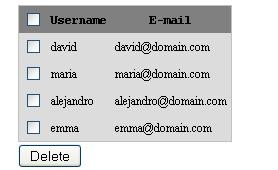
CREATE DATABASE `dg_test`;
CREATE TABLE `users` (
  `id` int(11) NOT NULL AUTO_INCREMENT,
  `username` varchar(80) NOT NULL,
  `password` varchar(32) NOT NULL,
  `email` varchar(255) NOT NULL,
  UNIQUE KEY `id` (`id`)
) ENGINE=MyISAM  DEFAULT CHARSET=latin1 AUTO_INCREMENT=5 ;
Next, let's add some users to it:
INSERT INTO `users` (`id`, `username`, `password`, `email`) VALUES
(1, 'david', '12345', '[email protected]'),
(2, 'maria', '464y3y', '[email protected]'),
(3, 'alejandro', 'a42352fawet', '[email protected]'),
(4, 'emma', 'f22a3455b2', '[email protected]');
Now, save the following code as "test.php," and add it to the "application/controllers" folder:
<?php
class Test extends CI_Controller{

	function __construct(){
		parent::__construct();
		$this->load->helper(array('datagrid','url'));
		$this->Datagrid = new Datagrid('users','id');
	}

	function index(){
		$this->load->helper('form');
		$this->load->library('session');

		$this->Datagrid->hidePkCol(true);
		$this->Datagrid->setHeadings(array('email'=>'E-mail'));
		$this->Datagrid->ignoreFields(array('password'));

		if($error = $this->session->flashdata('form_error')){
			echo "<font color=red>$error</font>";
		}
		echo form_open('test/proc');
		echo $this->Datagrid->generate();
		echo Datagrid::createButton('delete','Delete');
		echo form_close();
	}

	function proc($request_type = ''){
		$this->load->helper('url');
		if($action = Datagrid::getPostAction()){
			$error = "";
			switch($action){
				case 'delete' :
					if(!$this->Datagrid->deletePostSelection()){
						$error = 'Items could not be deleted';
					}
				break;
			}
			if($request_type!='ajax'){
				$this->load->library('session');
				$this->session->set_flashdata('form_error',$error);
				redirect('test/index');
			} else {
				echo json_encode(array('error' => $error));
			}
		} else {
			die("Bad Request");
		}
	}

}
?>
An instance of this class is created and passed as a reference to the $this->Datagrid member. Notice that we will be fetching data from a table called "users" whose primary key is the "id" column; then, on the index method we take the following steps: configure the Datagrid object, render it inside a form with a delete button added to it and see if everything works as expected:
Question: What happens when the form is sent?
Answer: The "Test::proc()" method takes care of processing the form and choosing the right operation to apply against the ids that were selected by the form's sender. It also takes care of AJAX requests, so it will echo a JSON object back to the client. This AJAX-aware feature will come in handy when jQuery comes into action, which is right now!
"It's always a smart idea to create web applications which compensates for when JavaScript/AJAX is unavailable. This way, some users will have a richer and faster experience, while those without JavaScript enabled will still be able to use the application normally."
Step 3: Implementing Ajax (jQuery to the Rescue!)
When the user clicks the button (or any other action button), we would like, perhaps, to prevent the page from reloading and having to generate everything again; this could make the user of our application fall asleep! Circumventing this problem will not be a difficult task if we stick to the jQuery library. Since this is not a "beginners" tutorial, I will not go through all the details related to how to get the library, how to include it on the page, etc. You're expected to know these steps on your own.
Create a folder, named "js", add the jQuery library within, and create a view file, named users.php. Open this new file, and add:
<html>
<head>
	<title>Users Management</title>
	<script src="<?php echo base_url(); ?>js/jquery-1.6.3.min.js"></script>
	<script src="<?php echo base_url(); ?>js/datagrid.js"></script>
</head>
<body>
<?php
		$this->Datagrid->hidePkCol(true);
		if($error = $this->session->flashdata('form_error')){
			echo "<font color=red>$error</font>";
		}
		echo form_open('test/proc',array('class'=>'dg_form'));
		echo $this->Datagrid->generate();
		echo Datagrid::createButton('delete','Delete');
		echo form_close();
?>
</body>
</html>
Did you realize that we have moved the code away from Test::index and into the new view script? This means we must change the Test::index() method accordingly:
function index(){
	$this->load->helper('form');
	$this->load->library('session');
	$this->load->view('users');
}
That's better. If you want to add some styling to the grid, you could use the following CSS (or make a better layout on your own):
	.dg_form table{
		border:1px solid silver;
	}

	.dg_form th{
		background-color:gray;
		font-family:"Courier New", Courier, mono;
		font-size:12px;
	}

	.dg_form td{
		background-color:gainsboro;
		font-size:12px;
	}

	.dg_form input[type=submit]{
		margin-top:2px;
	}
Now, please, create a "datagrid.js" file, put it on the "js" directory, and start with this code:
$(function(){
	// cool stuff here...
})
Inside this closure, we will write code that will be tasked with controlling certain submit events once the page has completely loaded. The first thing we need to do is track when a user clicks a submit button on the data grid form, and then send that data to be processed on the server.
 	$('.dg_form :submit').click(function(e){
		e.preventDefault();
		var $form = $(this).parents('form');
		var action_name = $(this).attr('class').replace("dg_action_","");
		var action_control = $('<input type="hidden" name="dg_action['+action_name+']" value=1 />');

		$form.append(action_control);

		var post_data = $form.serialize();
		action_control.remove();

		var script = $form.attr('action')+'/ajax';
		$.post(script, post_data, function(resp){
			if(resp.error){
				alert(resp.error);
			} else {
				switch(action_name){
					case 'delete' :
						// remove deleted rows from the grid
						$form.find('.dg_check_item:checked').parents('tr').remove();
					break;
					case 'anotherAction' :
						// do something else...
					break;
				}
			}
		}, 'json')
	})
Alternatively, we could have started with something like: $('.dg_form').submit(function(e){...}). However, since I want to track which button has been pressed and extract the name of the chosen action based on it, I prefer binding an event handler to the submit button itself and then go my way up the hierarchy of nodes to find the form that the pressed button belongs to:
// finds the form
var $form = $(this).parents('form');
// extracts the name of the action
var action_name = $(this).attr('class').replace("dg_action_","");
Next, we add a hidden input element inside the form element to indicate which action is being sent:
// create the hidden input
var action_control = $('<input type="hidden" name="dg_action['+action_name+']" value=1 />');
// add to the form
$form.append(action_control);
This is necessary because function doesn't consider the submit button to be a valid form entry. So we must have that hack in place when serializing the form data.
action_control.remove();
"Don't forget: the function ignores the submit button, dismissing it as just another piece of markup junk!"
Sending Form Data to the Server
Next, we proceed to get the action attribute from the form element and append the string "/ajax" to that url, so the method will know that this is, in fact, an AJAX request. Following that, we use the jQuery.post function to send the data to be processed by the appropriate controller, server-side, and then intercept the response event with a registered callback/closure:
...
	var script = $form.attr('action')+'/ajax';
	$.post(script, post_data, function(resp){
		if(resp.error){
			alert(resp.error);
		} else {
			switch(action_name){
				case 'delete' :
					// remove deleted rows from the grid
					$form.find('.dg_check_item:checked').parents('tr').remove();
				break;
				case 'anotherAction' :
					// do something else...
				break;
			}
		}
	},'json')
Notice that we are asking the response to be encoded as "json" since we are passing that string as the fourth argument of the $.post function. The contents of the callback dealing with the server response should be rather simple to grasp; it determines if there is an error, and, if so, alerts it. Otherwise, it will indicate that the action was successfully processed (in this case, if it is a "" action, we remove the rows related to the ids that were selected by the user).
Step 4: Check All or Nothing!
The only thing that is missing now is the toggle functionality that I promised earlier. We must register a callback function for when the "Master" checkbox - which has a class attribute set to "dg_check_toggler" - is clicked. Add the following code snippet after the previous one:
	$('.dg_check_toggler').click(function(){
		var checkboxes = $(this).parents('table').find('.dg_check_item');
		if($(this).is(':checked')){
			checkboxes.attr('checked','true');
		} else {
			checkboxes.removeAttr('checked');
		}
	})
When the "toggler" checkbox is clicked, if it goes to a "checked" state, then all rows from the pertaining data grid will be checked simultaneously; otherwise everything will be unchecked.
Final Thoughts
We haven't reached the tip of the iceberg when it comes to data grids for more complex content management systems. Other features which might prove to be useful are:
- Sorting the data grid by column names
- Pagination links for browsing the data grid
- Edit/Modify links for updating a single row's data
- Search mechanism to filter results
Thanks for reading. If you'd like a follow-up tutorial, let me know in the comments!

Comments