In this multi-part tutorial series, I’ll be teaching you how to build a pizza ordering app with Titanium Mobile from start to finish. In this tutorial, we'll create the "Choose Your Toppings" screen.
Step 1: Listening for Custom Events
At the end of part 1, we had our next button firing a custom event. It is now time to handle that custom event. The custom event is going to reside in our main.js file, so open that up. The custom event listener is looking for a method called openToppings, so let's add that as well:
var win 			= Ti.UI.currentWindow;

//-- Create the sub windows
var crusts 			= Ti.UI.createWindow();
var toppings 		= Ti.UI.createWindow();
var details			= Ti.UI.createWindow();

//-- We set the background here since this wont change
win.backgroundImage = '../images/bg_main.png';

//-- Include our clock
Ti.include('../includes/clock.js');

//-- This method will close the crusts/details window and open the toppings window
function openToppings(e)
{
	crusts.close();

	toppings.url 			= 'toppings.js';
	toppings.crust 			= e.crust;
	toppings.path			= e.path;
	toppings.returnToppings = e.toppings;

	toppings.open();
}

//-- The method will close the toppings window and open the crusts window
function openCrust(e)
{
	crusts.url = 'crusts.js';
	crusts.open();
}

//-- Have our app listen for our custom events
Ti.App.addEventListener('toppings',openToppings);

openCrust({});
So, when you hit the next button in the crusts window, the openToppings() method is going to be called. That will result in:
- Closing the crusts window
- Setting the URL property on the window
- Creating 3 custom properties
- crust
- path
- returnToppings (this property will be used in part 3)
- Opening the toppings window
Step 2: Create the Toppings Window
Let's create a new JS file called toppings.js and save it to the main_windows folder. Rather than reading a long paragraph of me explaining what all this code does, I just commented the code directly:
var win = Ti.UI.currentWindow;

//-- Scrollview for our toppings list, maximum toppings, numToppings for reference
var scrollView	= Ti.UI.createScrollView();
var maxToppings = 6;
var numToppings = 0;

//-- These are our toppings. Title is the label, path is the image path and
//-- container will hold our view when it is selected
var toppings	= [
	{title:'Bacon Bits',path:'../images/toppings/bacon_bits.png',container:null},
	{title:'Beef',path:'../images/toppings/beef.png',container:null},
	{title:'Grilled Chicken',path:'../images/toppings/grilled_chicken.png',container:null},
	{title:'Ham',path:'../images/toppings/ham.png',container:null},
	{title:'Italian Sausage (Crumbled)',path:'../images/toppings/italian_sausage_crumbled.png',container:null},
	{title:'Italian Sausage (Sliced)',path:'../images/toppings/italian_sausage_sliced.png',container:null},
	{title:'Jalapenos',path:'../images/toppings/jalapenos.png',container:null},
	{title:'Mushrooms',path:'../images/toppings/mushrooms.png',container:null},
	{title:'Black Olives',path:'../images/toppings/olives_black.png',container:null},
	{title:'Green Olives',path:'../images/toppings/olives_green.png',container:null},
	{title:'Red Onions',path:'../images/toppings/onions_red.png',container:null},
	{title:'White Onions',path:'../images/toppings/onions_white.png',container:null},
	{title:'Pepperoni',path:'../images/toppings/pepperoni.png',container:null},
	{title:'Banana Peppers',path:'../images/toppings/peppers_banana.png',container:null},
	{title:'Green Peppers',path:'../images/toppings/peppers_green.png',container:null},
	{title:'Red Peppers',path:'../images/toppings/peppers_red.png',container:null},
	{title:'Pineapple',path:'../images/toppings/pineapple.png',container:null},
	{title:'Pork',path:'../images/toppings/pork.png',container:null},
	{title:'Diced Tomatoes',path:'../images/toppings/tomatoes_diced.png',container:null},
	{title:'Marinated Tomatoes',path:'../images/toppings/tomatoes_marinated.png',container:null},
	{title:'Roma Tomatoes',path:'../images/toppings/tomatoes_roma.png',container:null}
];

//-- toppings title
var toppingsTitle = Ti.UI.createLabel({
	text:'2. Choose your toppings',
	font:{
		fontFamily:'Verdana',
		fontWeight:'bold',
		fontSize:22
	},
	color:'#A90329',
	shadowColor:'#333',
	shadowOffset:{x:1,y:1},
	textAlign:'left',
	width:Ti.Platform.displayCaps.platformWidth,
	height:58,
	left:10
});

//-- toppings title background
var toppingsTitleView = Ti.UI.createView({
	width:328,
	height:58,
	backgroundImage:'../images/crustHeaderBg.png',
	top:100,
	left:-6,
	opacity:0
});
toppingsTitleView.add(toppingsTitle);

//-- holds the pizza image
var pizza = Ti.UI.createView({
	top:270,
	width:216,
	height:156,
	backgroundImage:win.path
});

//-- this will hold all the selected toppings
var toppingsHolder = Ti.UI.createView({
	width:216,
	height:156
});
pizza.add(toppingsHolder);
win.add(pizza);
win.add(toppingsTitleView);

//-- Details Button
var details = Ti.UI.createButton({
	width:137,
	height:75,
	backgroundImage:'../images/details.png',
	top:385,
	left:165,
	opacity:0
});

//-- Cancel Button
var cancel = Ti.UI.createButton({
	width:137,
	height:75,
	backgroundImage:'../images/cancel.png',
	top:385,
	left:10,
	opacity:0
});

//-- If android OS, use the image property instead of backgroundImage (Ti SDK bug)
if (Ti.Platform.osname == 'android')
{
	details.image = '../images/details.png';
	cancel.image = '../images/cancel.png';
	pizza.image = win.path;
}
else
{
	pizza.opacity = 0;
}
win.add(details);
win.add(cancel);

//-- Cancel click event goes back to the crust window and passes the current crust so it selects the correct one when returning
cancel.addEventListener('click',function(e){
	Ti.App.fireEvent('cancelToppings',{crust:win.crust});
});

details.addEventListener('click',function(e){

});

//-- Fade the views and buttons in
toppingsTitleView.animate({
	opacity:1,
	duration:500
});

pizza.animate({
	opacity:1,
	duration:500
});

details.animate({
	opacity:1,
	duration:500
});

cancel.animate({
	opacity:1,
	duration:500
});
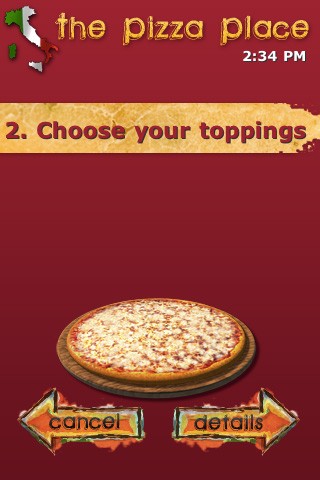
Since we added our three custom properties to the toppings window when it was being opened, we can reference them using win.propertyName. In our case, we set the pizza image to win.path. That is telling the view to use whichever image we selected as the background image. Go ahead and compile. Once you get past the crusts window, you won't be able to go back or forward just yet, but you can see that the toppings window will contain whichever crust you've selected. Your toppings window should look similar to the one below:
Step 3: Adding the Toppings List
We want to now add our scrollable list to the toppings window. I've explained in the code what each step does, but, to reiterate, iOS doesn't really have a checkbox component, so I went ahead and made my own using two PNG files, and I just swap the image based off the selected property on the checkbox view.
Below is the code for generating the list as well as handling the click event for each topping in the list:
//-- This method toggles a topping item by checking the selected property
//-- It will fade a new topping in and also remove a topping when it gets unchecked
function toppingListClick(e)
{
	if (e.source.selected)
	{
		e.source.selected = false;
		e.source.backgroundImage = '../images/checkbox_no.png';

		numToppings -= 1;
		if (toppings[e.source.toppingID].container != null)
		{
			toppingsHolder.remove(toppings[e.source.toppingID].container);
			toppings[e.source.toppingID].container = null;
		}
	}
	else
	{
                //-- If numToppings is less than maxToppings, add the new topping else alert them
		if (numToppings < maxToppings)
		{
			e.source.selected = true;
			e.source.backgroundImage = '../images/checkbox_yes.png';

			var aTopping = Ti.UI.createView({
				backgroundImage:toppings[e.source.toppingID].path
			});

			if (Ti.Platform.osname == 'android')
			{
				aTopping.image = toppings[e.source.toppingID].path;
			}
			else
			{
				aTopping.opacity = 0;
				aTopping.animate({
					opacity:1,
					duration:500
				});
			}
			toppingsHolder.add(aTopping);
			toppings[e.source.toppingID].container = aTopping;
			numToppings += 1;
		}
		else
		{
			alert("Hang on there cowboy! Let's not get carried away with toppings. " + numToppings + " is the max.");
		}
	}
}

/*
This method creates the topping list. Since iOS doesn't have checkbox components,
I made my own using a view, a button and swapping out the background image
*/
function createToppingsList()
{
    scrollView.opacity = 0;
    scrollView.top = 155;
    scrollView.height = 120;
    scrollView.contentWidth = Ti.Platform.displayCaps.platformWidth;
    scrollView.contentHeight = 'auto';
    scrollView.showVerticalScrollIndicator = true;
    win.add(scrollView);

	for (i = 0; i < toppings.length; i++)
	{
		//-- The label
		var toppingLabel = Ti.UI.createLabel({
			text:toppings[i].title,
			font:{
				fontFamily:'Verdana',
				fontWeight:'bold',
				fontSize:14
			},
			color:'#fff',
			shadowColor:'#333',
			shadowOffset:{x:1,y:1},
			textAlign:'left',
			width:Ti.Platform.displayCaps.platformWidth - 10,
			left:10
		});

		//-- We add a custom property 'selected' to our checkbox view
		var checkbox = Ti.UI.createView({
			width:340,
			height:16,
			backgroundImage:'../images/checkbox_no.png',
			selected:false,
			toppingID:i
		});

		var toggler = Ti.UI.createView({
			width:Ti.Platform.displayCaps.platformWidth,
			height:20,
			top: i * 20
		});

		//-- We use the singletap event rather than the click since its in a scroll view
		checkbox.addEventListener('singletap',toppingListClick);
		toggler.add(toppingLabel);
		toggler.add(checkbox);

		scrollView.add(toggler);
	}
	scrollView.animate({
		opacity:1,
		duration:500
	});
}
createToppingsList();
Finally, we call the createToppingsList method which gets called every time the window opens. In part three of this tutorial series, we will modify that method so if the user hits cancel in the submit order window, the app will remember what toppings the user had previously selected. For now, compile and your app should look like this:
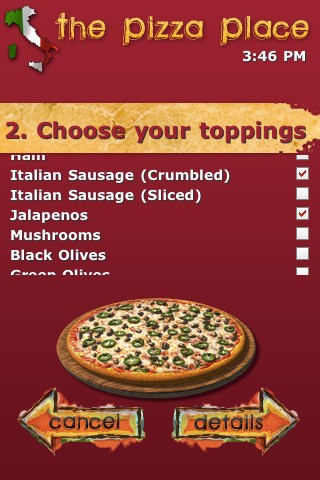
You can go ahead and check the boxes on and off to see their functionality.
Step 4: Coding the Cancel Button
So when ordering a pizza, you may decide you want to get a different crust. Since that is a good possiblity, let's add that functionality. The cancel button click event is already taken care of. We are firing a custom event called cancelToppings and we are passing the currently selected crust.
In order to handle this event, we must go back to our main.js file and add and event listener for it.
//-- The method will close the toppings window and open the crusts window
function openCrust(e)
{
	toppings.close();
        //-- If the event has a crust property, that means the user hit cancel once
       //--  in the toppings window
	if (e.crust)
	{
		crusts.crust = e.crust;
	}
	crusts.url = 'crusts.js';
	crusts.open();
}

//-- Have our app listen for our custom events
Ti.App.addEventListener('toppings',openToppings);
Ti.App.addEventListener('cancelToppings',openCrust);
So you can see we added another event listener. When it receives the event after the user hits "cancel" in toppings, it will fire the openCrust method. Remember in part one how I said we will be passing data to it eventually? Well, that time has come. In the click event for the cancel button we passed the current crust. We have modified the openCrust method by closing the toppings window and if the crusts property is in the event, that means they hit cancel, so I want to add the crust type as a property to the crusts window. What this will do is allow us to automatically select the previously selected crust. We will cover that in the next step.
Step 5: Persisting Crust Selection
Open up crusts.js. We need to add a conditional to check if the crusts property exists on the window. You will want to place this code directly under our scrollView variable:
//-- If the window has the crust property, that means we are coming from the
//-- toppings window, so choose the last known selected crust
if (win.crust)
{
	for (i = 0; i < crusts.length; i++)
	{
		if (win.crust == crusts[i].title)
		{
			returnCrust = i;
			break;
		}
	}
	scrollView.scrollToView(returnCrust);
}
If the crust property isn't null, what this snippet will do is loop through our existing crusts array and break once the crust property matches the title in the array. Once it finds a match, we use the scrollToView method on our scrollView. This will preselect our crust from our last section.
We have one more part to this step. If you compiled, you will notice the title of the crust is wrong so we need to fix that. Insert this small snippet under our crustType variable.
//-- if returnCrust isn't null, set the crust type label
if (returnCrust != null)
{
    crustType.text = crusts[returnCrust].title;
}
Problem solved! When hitting cancel on the toppings window, we go back to the crusts window and preselect the crust we had selected before as well as match the crust title. Go ahead and test it out. Select a crust, go to toppings, and hit cancel. You should be able to go back and forth as much as you want!
Conclusion
In part two, we handled some custom events that allowed us to navigate between some windows with the help of our openToppings and openCrust methods in main.js. We learned about passing data between windows. We essentially created a new component that doesn't exist in iOS which is the checkbox. Sure, the iOS SDK does have the toggle switch, but that is ugly and wouldn't look good in our application. In part three of this tutorial, we will cover going to the submit order window. Once in the window, we will fill out some text fields and, on submit, we will send all our pizza info to a PHP script. The PHP script will then e-mail the address of your choice, simulating how an order would come in if this were a real-world, working application.

Comments