Welcome to the fourth and final installment in our series demonstrating how to build a pizza ordering application with Titanium Mobile. In this tutorial, we’ll be creating the processing customer orders and e-mail the results to the pizza chef!
Step 1: Client-Side Validation
Before we make a call to our PHP file, we want to do a little bit of form validation. We just want to check if the fields are empty and, if they are, alert the user to fill them in.
Open your details.js file and add this snippet under our cancel button click-event:
//-- Submit order. Check if the text fields are blank
order.addEventListener('click',function() {
	if (names.value == '' || address1.value == '' || address2.value == '')
	{
		alert('All fields are required');
	}
	else
	{
		//-- Disable fields and buttons before making our HTTP request
		names.enabled    = false;
		address1.enabled = false;
		address2.enabled = false;
		order.enabled    = false;
		cancel.enabled   = false;

		//-- Change this URL to where ever yours exists
		orderReq.open('POST','http://yourserver.com/submit_order.php');
		var params = {
			names: names.value,
			address1: address1.value,
			address2: address2.value,
			crust: win.crust,
			toppings: win.toppings
		};
		orderReq.send(params);
	}
});
In the previous tutorial we made the details.js file in which the above code should be placed. We defined the openReq variable at the top of the script in the last tutorial, and this variable will be used to communicate between the client-side code and the server-side PHP file.
If all the fields are filled out, we will disable all the text fields so the user can't change them once they've been sent out. We then call the open() method on our orderReq variable. This will setup the file we are going to open. We also make a new object called params. We give it some keys and values that we will access in the PHP script. Finally, we call the send() method.
It is important to note that if this script was destined for a live application, we would need to perform significant server-side validation in addition to the client-side validation provided above. We will skip this step in this tutorial and instead just focus on building the mobile code.
Step 2: Order Processing
Make a new file called submit_order.php and insert the following:
<?php
//-- POST are variables from details.js
$names    = $_POST['names'];
$address1 = $_POST['address1'];
$address2 = $_POST['address2'];
$crust    = $_POST['crust'];

//-- clean up the javascript array
$toppings = str_replace('"','',substr(substr(stripslashes($_POST['toppings']),1),0,-1));
$toppings = explode(",\n", $toppings);

//-- Where the order will be sent
$to = "[email protected]";
$subject = "Pizza Order!";
$message = "A new order has been submitted.<br/>";
$message .= $names<br/>";
$message .= $address1 . "<br/>";
$message .= $address2 . "<br/><br/>";
$message .= $crust . " pizza with:<br/>";

$message .= "<ul>";
if (strlen($toppings[0]) == 1)
{
	$message .= "<li>Plain (cheese pizza)</li>";
}
else
{
	for ($i = 0; $i < count($toppings); $i++)
	{
		$message .= "<li>" . $toppings[$i] . "</li>";
	}
}
$message .= "</ul>";

//-- The headers will let us send HTML code as an email
$headers = "From: [email protected]\r\n";
$headers .= "MIME-Version: 1.0\r\n";
$headers .= "Content-Type: text/html; charset=ISO-8859-1\r\n";

//-- if mail gets sent, return true, else return false. This gets handed off the our onload method in details.js
if (mail($to,$subject,$message,$headers))
{
	$response = array('mail' => true);
}
else
{
	$response = array('mail' => false);
}

echo json_encode($response);
?>
Starting from the top, we POST our variables from the param object we made in detais.js. Next, we must convert the Javascript array to a PHP array. The Javascript array was a little tricky because of the line breaks we put in the code (if you guys know of a better method, post it in the comments!). The method I came up with was somewhat clean and simple.
The next part we will output how the message looks. The $to variable is where you should insert the e-mail address where you want the order to be sent. Next, we check the length of the toppings to determine if it was just a cheese pizza or if the orderer specified custom toppings. If it did have toppings, we will make an HTML list to display the toppings.
Next we set the headers. This will allow the e-mail to be HTML formatted when you receive it. Then we call the PHP mail() method. It is formatted like this: mail($to, $subject, $message, $headers). In the code, we test if the mail gets sent, set the $response to true if it does or false if it doesn't. Finally, the json_encode($response) will allow the details.js file to read the object back. Don't forget to upload this file to your server!
Step 3: Handling the onload event
Let's go back to details.js. Under our click event for the order button, we need to make a new onload event and while we are here, let's add our onerror event.
//-- onLoad method for our http request
orderReq.onload = function()
{
	var json = this.responseText;
	var response = JSON.parse(json);

	//-- Mail was sent
	if (response.mail == true)
	{
		var alertDialog = Titanium.UI.createAlertDialog({
			title: 'Success',
			message: 'Your order has been submitted (check the email you used in your submit_order.php file)',
			buttonNames: ['OK']
		});
		alertDialog.show();
		alertDialog.addEventListener('click',function(e)
		{
			Ti.App.fireEvent('resetApp');
		});
	}
	else
	{
		//-- Mail failed
		alert("PHP failed to send the order to the email provided in submit_order.php. Are you sure you have a mail client on your server?");
		names.enabled    = true;
		address1.enabled = true;
		address2.enabled = true;
		order.enabled    = true;
		cancel.enabled   = true;
	}
};

//-- Network error
orderReq.onerror = function(event)
{
	alert('Network error: ' + JSON.stringify(event));
	names.enabled    = true;
	address1.enabled = true;
	address2.enabled = true;
	order.enabled    = true;
	cancel.enabled   = true;
};
We go back to our orderReq var and add an onload and onerror event. We make a new var called json and set it equal to this.responseText. That contains the data sent back from our PHP file. Next, we have to parse the json string by calling JSON.parse(json). We can now text if response.mail is true meaning the mail was sent successfully. If it was successful, alert the user that the order has been submitted. We want to listen for the click event on the OK button this time so we make an alert a little different than we've been using it. We listen for the click event and on click we fire a new custom event called resetApp. We will cover that in the next step.
Our onerror event will hopefully tell you if something goes wrong. If onload returned false, chances are your server doesn't support mail(). Another good possibility is you have a mispelling. Try access the script directly in your web browser and see if it contains any syntax errors.
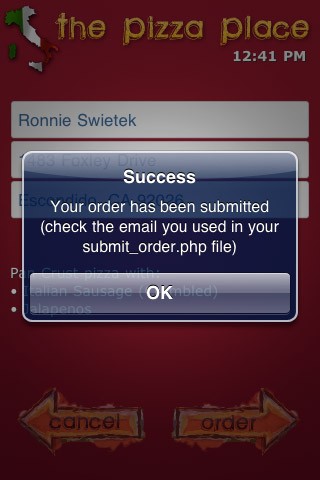
Go ahead and give it a try now. Submit your order. Hopefully you will see something similar to the screen below:
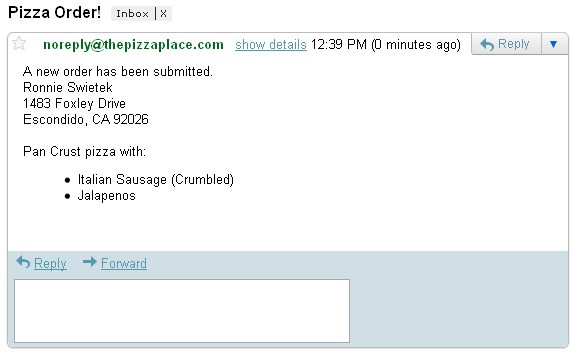
If you got a success message, go and check the e-mail you provided in the PHP script. This is what mine looked like coming through Gmail:
Step 4: Handling the resetApp Event
Let's open up the main.js file again. We are going to add our final custom event:
//-- Have our app listen for our custom events
Ti.App.addEventListener('toppings',openToppings);
Ti.App.addEventListener('cancelToppings',openCrust);
Ti.App.addEventListener('details',openDetails);
Ti.App.addEventListener('cancelDetails',openToppings);
Ti.App.addEventListener('resetApp',resetApp);
Now, to handle the custom event we need to make a new method called resetApp().
//-- This gets called after an order is submitted. It basically starts the app over.
function resetApp()
{
	details.close();
	openCrust({});
}
After a successful order submission, the app will be reset and you will be taken back to the crusts screen.
Conclusion
We used our orderReq var to handle the PHP script. We sent some variables to PHP and parsed them, attempted to send an email and handled the response from the script. Hopefully you all have made it this far with no issues! I hope you all enjoyed this series as much as I enjoyed writing it. It was a fun app to create and hopefully you can use what you learned and apply the principles to your own apps!

Comments