This tutorial will teach you how to use the Cocos2D iOS framework in order to create simple yet advanced 2D games aimed at all iOS devices. It's designed for both novice and advanced users. Along the way, you'll learn about the Cocos2D core concepts, touch interaction, menus and transitions, actions, particles, and collisions. Read on!
Organization of the Series:
This entry is the third and final tutorial in the series Monster Smashing. Make sure that you've completed the previous tutorial before beginning.
In today's tutorial, we'll focus on finishing up the game. We'll add several properties, including particles, labels, sound, and music. We'll use the properties list for monster creation. We'll also learn how to correctly pause and resume the Cocos2D data flow process without too much processing power.
1. Lives
The label system in games is normally used for scores, lives, or other related information. In this tutorial we'll only use player lives. Each life is represented with a heart on the top left side of screen. The heart image is in the resources.
The user will start the game with three lives. To do this, we initialize the heartArray and use the for loop to receive the images for each life. We also set the position of the three lives on the top left of the screen.
The first step is to add two new properties, NSMutableArray *hearthArray and NSInteger lives, to the MonsterRun.h class. With that done we can now add the correct implementation, MonstrRun.m. The following snippet will help us do that.
    lives = 3;
    hearthArray = [[NSMutableArray alloc] init];
    for(NSInteger i = 0; i lives; i++){
    CCSprite *hearth = [CCSprite spriteWithFile:@"hearth.png"];
    [hearthArray insertObject:hearth atIndex:i];
    hearth.position = ccp( ((i+1)*50), winSize.height - 50);
    [self addChild:hearth];
    }
Now if you run the project, you'll see the the lives at the top of the screen. However, we can't interact with them yet. The next step is to interact with them and make the player lose some lives.
In the method addMonster:(ccTime)dt in the Block 4 section inside the CCCallBlockN function, we should add the following snippet.
    lives--;
    [self removeChild:[hearthArray lastObject] cleanup:YES];
    [hearthArray removeLastObject];

    if(lives == 0)
        [[CCDirector sharedDirector] replaceScene:[HelloWorldLayer scene]];
Note that you should add it twice, one for each if statement.
The code will be called every time a sprite (monster) leaves the screen. If a monster leaves the screen, a life will be lost and at the same time the array of hearts (heartArray) will be changed, and the last position will be removed. The image on screen will also be removed.
If we reach zero lives, the game will stop and we're sent back to the initial screen.
2. Particles
Particles are an effect used to achieve, among other things, several effects such as fire, smoke, or waterfalls. In this case, we'll use them to explode the red monster. Every time a red monster is touched, we activate the particle.
In part two, we left that section incomplete. Now is the time to finish it.
Add the following property CCParticleExplosion *particleExplosion to the MonsterRun.h class. In the -(void)ccTouchesBegan:(NSSet *)touches withEvent:(UIEvent *)event method, where we have the if([m killMethod] == 2) condition, we'll add a new piece of code.
    CCCallFuncND *emitter = [CCCallFuncND actionWithTarget:self selector:@selector(startExplosion:data:) data:monster];
    CCSequence *sequencia = [CCSequence actions:emitter, nil];

    if([defaults integerForKey:@"sound"]==1)
        [[SimpleAudioEngine sharedEngine] playEffect:@"SplatEffect.caf"];
    [splashPool runAction:sequencia];
[/sourcecode]

This code will provide the necessary requirements for the particle system. First we use the <code>CCCallFuncND</code> to call a selector <code>startExplosion:data:</code>. Then we create a particle sequence calling the above-mention "<strong>emitter</strong>" object.

The next step is to create the <code>CCParticleExplosion *particleExplosion</code> method. For that you can simply copy and paste the following snippet.

[sourcecode language="objective c"][/sourcecode]
//Positions the explosion emitter and sets it off
- (void)startExplosion:(id)sender data:(CCSprite*)monster {
    particleExplosion = [[CCParticleExplosion alloc] initWithTotalParticles:809];
    particleExplosion.texture = [[CCTextureCache sharedTextureCache] addImage:@"textureRed.png"];
    particleExplosion.life = 0.0f;
    particleExplosion.lifeVar = 0.708f;
    particleExplosion.startSize = 40;
    particleExplosion.startSizeVar = 38;
    particleExplosion.endSize = 14;
    particleExplosion.endSizeVar = 0;
    particleExplosion.angle = 360;
    particleExplosion.angleVar = 360;
    particleExplosion.speed = 243;
    particleExplosion.speedVar = 1;

    CGPoint g = CGPointMake(1.15, 1.58);
    particleExplosion.gravity = g;
    ccColor4F startC =  {0.89f, 0.56f, 0.36f, 1.0f};
    particleExplosion.startColor = startC;
    ccColor4F endC = {1.0f,0.0f,0.0f,1.0f};
    particleExplosion.endColor = endC;

    [self addChild:particleExplosion];
    particleExplosion.position = [monster position];
    [particleExplosion resetSystem];
}
This method will
- Allocate for the particleExplosion property.
- Define the total particles count (809).
- Define the particle texture (CCTextureCache)
- Define several properties, such as start and end size, angle, speed, and color.
After the particle is configured, we can put it in the center of the monster. The particle explosion will always move when the monster is moving, and it will always be centered.
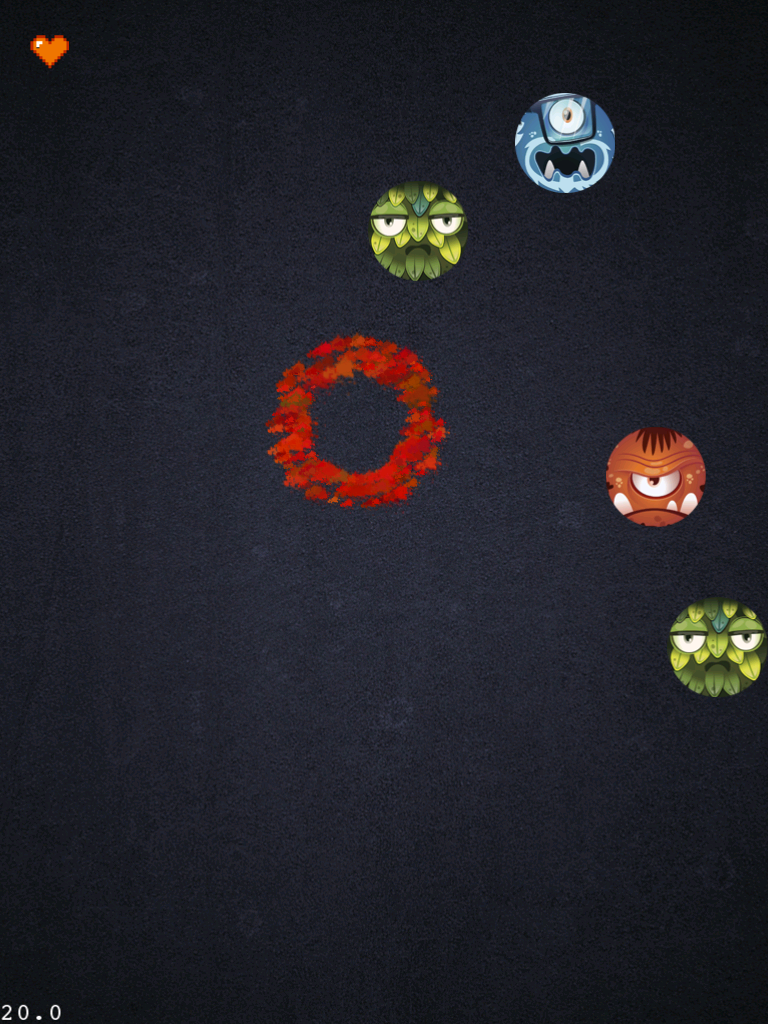
You can now build and run the project. An example of the particle explosion can be seen in the next image.
3. Sound and Music
Sound effects and background music are assets to all games. In this section, we'll explain how to add them into this game. We'll have two types of sounds, a monster click and the background music.
Audio in iOS devices is achieved using the Simple Audio Engine. In order to activate it, import the SimpleAudioEngine.h at the HelloWorldLayer.m and MonsterRun.m classes.
At the HelloWorldLayer.m, we have several steps to do. The first one is to add the CCMenuItem *_soundOn property before the @implementation section.
It should look like this:
#import "HelloWorldLayer.h"
#import "AppDelegate.h"
#import "MonsterRun.h"
#import "SimpleAudioEngine.h"

CCMenuItem *_soundOn;

// HelloWorldLayer implementation
@implementation HelloWorldLayer
...
Now we can move to the -(id) init method. We chose to use the NSUserDefaults class to help us to store the user preferences regarding the sound option. We will first define a number with the 1 value (with sound) and store it using the "sound" key. The next step is to verify the value of the "sound" key, and react accordingly to that value. If the value is 1, the sound system is initialized. Otherwise, it remains paused.
The following snippet shows this implementation.
// Check the sound system
    NSUserDefaults *defaults = [NSUserDefaults standardUserDefaults];
    NSObject * object = [defaults objectForKey:@"sound"];
    if(object == nil){
        NSNumber *soundValue = [[NSNumber alloc ] initWithInt:1];
        [defaults setObject:soundValue forKey:@"sound"];
    }

    int soundDefault = [defaults integerForKey:@"sound"];
    if (soundDefault == 1) {
            [[SimpleAudioEngine sharedEngine] playBackgroundMusic:@"backgroundSound.caf"];
            [[SimpleAudioEngine sharedEngine] setEffectsVolume:0.4f];
        }
        else {
            [[SimpleAudioEngine sharedEngine] pauseBackgroundMusic];
        }
Now you can modify the CCMenuItemToggle *toggleItem.
CCMenuItemToggle *toggleItem;
        if(soundDefault == 1)
            toggleItem = [CCMenuItemToggle itemWithTarget:self selector:@selector(soundButtonTapped:) items:_soundOn, _soundOff, nil];
        else
            toggleItem = [CCMenuItemToggle itemWithTarget:self selector:@selector(soundButtonTapped:) items:_soundOff,_soundOn, nil];
With this change, the menu will change according to the user's sound preferences. Note that the toggleItem calls a selector soundButtonTapped:, so we'll need to write that method and create the right logic to verify the toggle button. If the toggle button is selected to _soundOn, we should start the sound and store 1 in the NSUserDefaults preferences. If the toggle button is selected to _soundOff, we should pause the background music and store 0 in the NSUserDefaults preferences.
Use the following snippet to that effect.
- (void)soundButtonTapped:(id)sender {
    CCMenuItemToggle *toggleItem = (CCMenuItemToggle *)sender;

    if (toggleItem.selectedItem == _soundOn) {
        NSLog(@"Sound Enabled");
        NSUserDefaults *defaults = [NSUserDefaults standardUserDefaults];
        [[SimpleAudioEngine sharedEngine] playBackgroundMusic:@"backgroundSound.caf"];

        [defaults setInteger:1 forKey:@"sound"];
        [defaults synchronize];
    } else {
        NSLog(@"Sound Disabled");
        NSUserDefaults *defaults = [NSUserDefaults standardUserDefaults];

        [defaults setInteger:0 forKey:@"sound"];
        [[SimpleAudioEngine sharedEngine] pauseBackgroundMusic];
        [defaults synchronize];
    }
}
Now we must also change the MonsterRun.m class. We must add the NSUserDefaults *defaults; global property. Next, we'll initialize it and verify the user's sound preferences. The following snippet will help us achieve that.
- (void)soundButtonTapped:(id)sender {
    defaults = [NSUserDefaults standardUserDefaults];

        int soundDefault = [defaults integerForKey:@"sound"];
        if (soundDefault == 1) {
            [[SimpleAudioEngine sharedEngine] playBackgroundMusic:@"backgroundSound.caf"];
            [[SimpleAudioEngine sharedEngine] setEffectsVolume:0.4f];
        }
With this code we can add background sound and a way for the user to control it using the default system preferences. You can now run the project and play with the sound button in order to test the new sound property.
4. Properties List
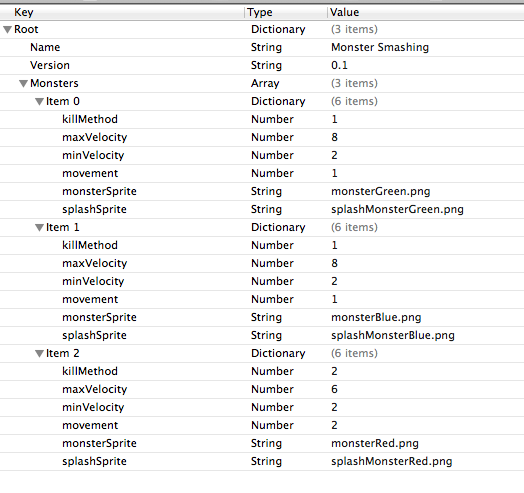
Property lists (plist) are a useful resource for storing information regarding the game's environment and evolution. In our case, we'll store information regarding the monsters. The plist created (Enemy.plist) can be seen in the next image.
We will not discuss the best way to create or parse the plist. We'll focus on this plist and a possible way to parse the data from it.
The first step is to add the plist to the project. Click File -> New -> File and choose from the right side the option resource, and then the property list (on the left). Name it Enemy.plist and add the information from the previous image.
Now we should parse the data and use it to create the monsters with that information. We first create a string with the path to the plist file, and then we create a dictionary that will store the information inside the plist. The final step is to retrieve the monster's options. For each monster, we'll add those same properties to them.
    // plist reading
        NSString * plistPath = [[NSBundle mainBundle] pathForResource:@"Enemy" ofType:@"plist"];
        NSMutableDictionary *dictionary = [[NSMutableDictionary alloc] initWithContentsOfFile:plistPath];

        // load monster information from pList
        if ([dictionary objectForKey:@"Monsters" ] != nil ){
            NSMutableArray *array = [dictionary objectForKey:@"Monsters"];

            for(int i = 0; i < [array count]; i++){
                NSMutableDictionary *m = [array objectAtIndex:i];
                Monster *m1 = [[Monster alloc] init];
                [m1 setTag:(i+1)];
                [m1 setMonsterSprite:[[NSString alloc] initWithString:[m objectForKey:@"monsterSprite"]]];
                [m1 setSplashSprite:[[NSString alloc] initWithString:[m objectForKey:@"splashSprite"]]];
                [m1 setMinVelocity:[[m objectForKey:@"minVelocity"] floatValue]];
                [m1 setMaxVelocity:[[m objectForKey:@"maxVelocity"] floatValue]];
                [m1 setMovement:[[m objectForKey:@"movement"] intValue]];
                [m1 setKillMethod:[[m objectForKey:@"killMethod"] intValue]];
                [_monsters addObject:m1];
            }
        }
The new and final -(id) init method should look like this.
-(id) init {
    if( (self=[super init]) ) {

        self.isTouchEnabled = YES;

        CGSize winSize = [CCDirector sharedDirector].winSize;
        CCSprite *dirt = [CCSprite spriteWithFile:@"WoodRetroApple_iPad_HomeScreen.jpg"];
        dirt.position = ccp(winSize.width/2, winSize.height/2);
        [self addChild:dirt z:-2];
        _monsters = [[NSMutableArray alloc] init];

        // plist reading
        NSString * plistPath = [[NSBundle mainBundle] pathForResource:@"Enemy" ofType:@"plist"];
        NSMutableDictionary *dictionary = [[NSMutableDictionary alloc] initWithContentsOfFile:plistPath];

        // load monster information from pList
        if ([dictionary objectForKey:@"Monsters" ] != nil ){
            NSMutableArray *array = [dictionary objectForKey:@"Monsters"];

            for(int i = 0; i < [array count]; i++){
                NSMutableDictionary *m = [array objectAtIndex:i];
                Monster *m1 = [[Monster alloc] init];
                [m1 setTag:(i+1)];
                [m1 setMonsterSprite:[[NSString alloc] initWithString:[m objectForKey:@"monsterSprite"]]];
                [m1 setSplashSprite:[[NSString alloc] initWithString:[m objectForKey:@"splashSprite"]]];
                [m1 setMinVelocity:[[m objectForKey:@"minVelocity"] floatValue]];
                [m1 setMaxVelocity:[[m objectForKey:@"maxVelocity"] floatValue]];
                [m1 setMovement:[[m objectForKey:@"movement"] intValue]];
                [m1 setKillMethod:[[m objectForKey:@"killMethod"] intValue]];
                [_monsters addObject:m1];
            }
        }

        lives = 3;
        hearthArray = [[NSMutableArray alloc] init];
        for(NSInteger i = 0; i lives; i++){
            CCSprite *hearth = [CCSprite spriteWithFile:@"hearth.png"];
            [hearthArray insertObject:hearth atIndex:i];
            hearth.position = ccp( ((i+1)*50), winSize.height - 50);
            [self addChild:hearth];
        }

        CCMenuItem *pauseButton = [CCMenuItemImage itemFromNormalImage:@"pauseButton.png" selectedImage:@"pauseButton.png" target:self selector:@selector(plusMinusButtonTapped:)];

        pauseButton.position = ccp(winSize.width - 50 , winSize.height - 50 );
        pauseMenu = [CCMenu menuWithItems:pauseButton, nil];
        pauseMenu.position = CGPointZero;

        [self addChild:pauseMenu];
        [self schedule:@selector(addMonster:) interval:0.5];

        _monstersOnScreen = [[NSMutableArray alloc] init];
        defaults = [NSUserDefaults standardUserDefaults];

        int soundDefault = [defaults integerForKey:@"sound"];
        if (soundDefault == 1) {
            [[SimpleAudioEngine sharedEngine] playBackgroundMusic:@"backgroundSound.caf"];
            [[SimpleAudioEngine sharedEngine] setEffectsVolume:0.4f];
        }
    }
    return self;
}
Note that the plists should be used over other storage methods, since iOS is optimized to read, write, and process them.
5. Pause and Resume
The pause and resume options are two very important options, since the game will not always be running. The correct pause and resume will save battery life and make your code performance-oriented.
The first step is to add another class called PausedScene.
The .h should look like:
#import <Foundation/Foundation.h>
#import "cocos2d.h"

@interface PausedScene : CCScene {
}
+(CCScene *) scene;
@end
while the implementation will look like:
#import "PausedScene.h"
#import "MonsterRun.h"
#import "HelloWorldLayer.h"

@implementation PausedScene

+(CCScene *) scene {
    CCScene *scene = [CCScene node];
    PausedScene *layer = [PausedScene node];
    [scene addChild: layer];
    return scene;
}

-(id) init {
    if( (self=[super init]) ) {

        CGSize winSize = [CCDirector sharedDirector].winSize;

        CCSprite *background = [CCSprite spriteWithFile:@"WoodRetroApple_iPad_HomeScreen.jpg"];
        background.position = ccp(winSize.width/2, winSize.height/2);
        [self addChild:background z:-2];

        CCSprite *logo = [CCSprite spriteWithFile:@"MonsterSmashing.png"];
        logo.scale = 1.2;
        logo.position =  ccp(winSize.width /2 , 800 );
        [self addChild: logo];

        CCMenuItem *resumeGameButtonImage = [CCMenuItemImage itemFromNormalImage:@"resume.png" selectedImage:@"resume.png" target:self selector:@selector(onStartGamePressed)];

        CCMenuItem *exitGameButtonImage = [CCMenuItemImage itemFromNormalImage:@"exit.png" selectedImage:@"exit.png" target:self selector:@selector(mainMenuPressed)];

        CCMenu *menu = [CCMenu menuWithItems:resumeGameButtonImage,exitGameButtonImage, nil];
        menu.position = ccp(winSize.width * 0.5f, winSize.height * 0.4f);
        [menu alignItemsVerticallyWithPadding:15];

        [self addChild:menu];

    }
    return self;
}

- (void) mainMenuPressed{
    CCScene *menuScene = [HelloWorldLayer scene];
    [[CCDirector sharedDirector] replaceScene:menuScene];
}

- (void)onStartGamePressed {
    [[CCDirector sharedDirector] popScene];
}

- (void) dealloc {
    [super dealloc];
}

@end
At this point, the code should be self-explanatory with the exception of the - (void)onStartGamePressed method. That method is fairly simple, however. It will "pop" away a screen and make the last screen visible.
In MonsterRun.h, add the CCMenu *pauseMenu; property. The MonsterRun.m code is now complete, so we'll look at the following lines.
    CCMenuItem *pauseButton = [CCMenuItemImage itemFromNormalImage:@"pauseButton.png" selectedImage:@"pauseButton.png" target:self selector:@selector(plusMinusButtonTapped:)];

    pauseButton.position = ccp(winSize.width - 50 , winSize.height - 50 );
    pauseMenu = [CCMenu menuWithItems:pauseButton, nil];
    pauseMenu.position = CGPointZero;
The method codes mean that for a given CCMenuItem, we'll add an image (available in the resources), a selector, and a position.
The - (void)plusMinusButtonTapped method is called every time the pause menu is touched. If the game is not paused, it will "push" a new scene, the PauseScene, onscreen and pause the game. If the game is paused, it'll resume the animation and verify if it can start sound-checking the user defaults.
- (void)plusMinusButtonTapped:(id)sender {
    if(![[CCDirector sharedDirector] isPaused]){
        [self pauseSchedulerAndActions];

        CCScene *menuScene = [PausedScene scene];
        [[CCDirector sharedDirector] pushScene:menuScene];
    }
    else{
        [[CCDirector sharedDirector] stopAnimation];
        [[CCDirector sharedDirector] resume];
        [[CCDirector sharedDirector] startAnimation];

        int soundDefault = [defaults integerForKey:@"sound"];
        if (soundDefault == 1)
            [[SimpleAudioEngine sharedEngine] resumeBackgroundMusic];
    }
}
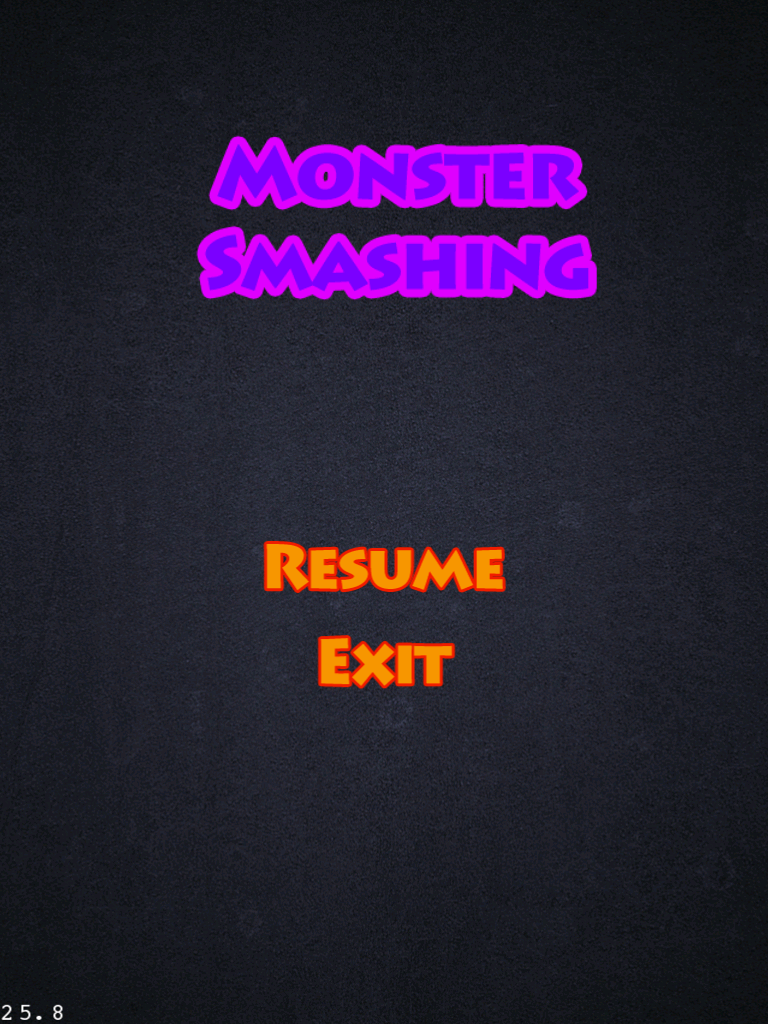
The next image presents the pause menu with two options, resume and exit. Resume will bring the player back to the game board, whilst exit will take the user back to the main menu.
6. Results
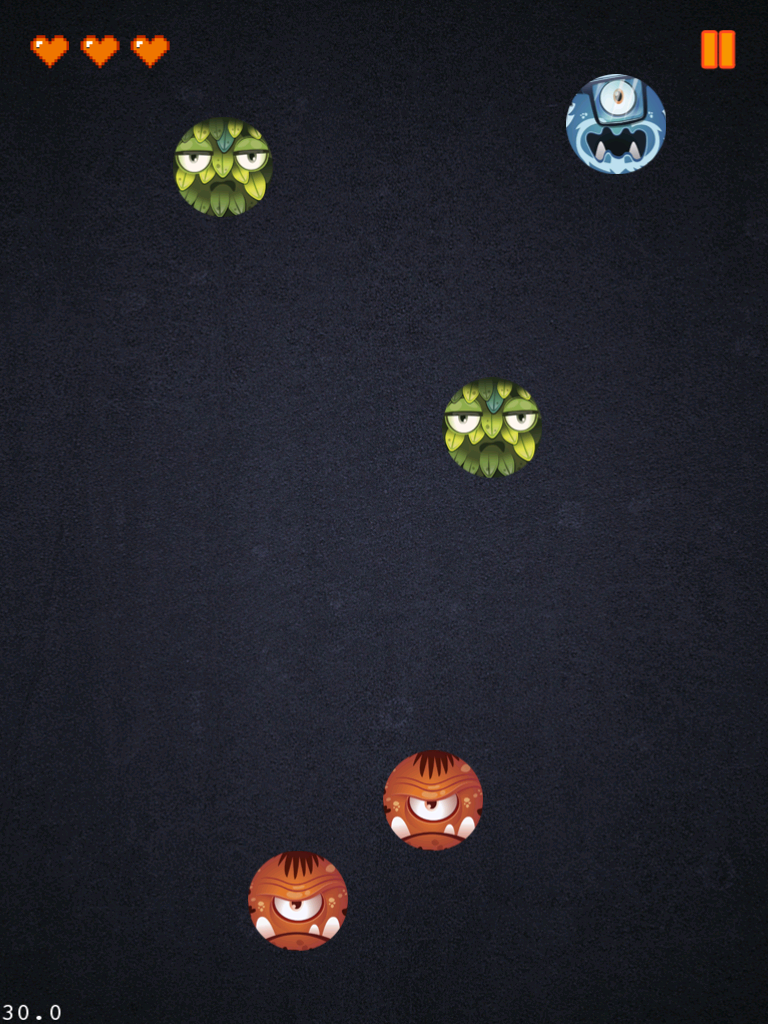
The next image presents the final version of the gameplay interface.
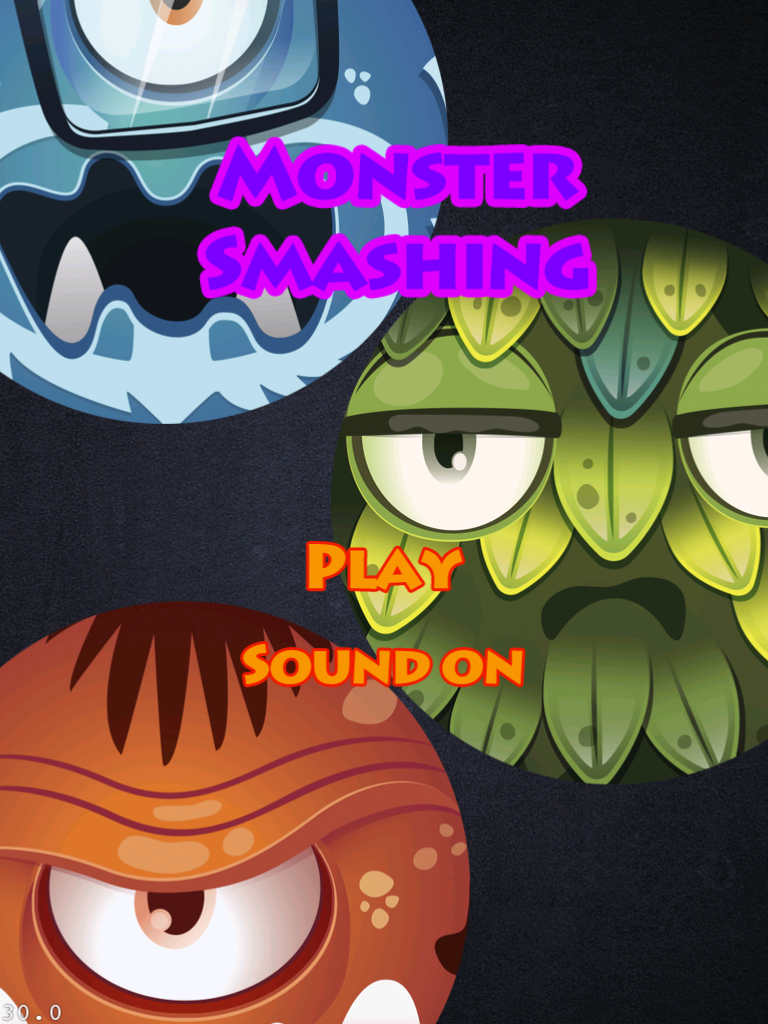
The next image presents the final version of the main menu.
At this point, you should be able to understand and perform the following tasks:
- Add custom labels.
- Use, define and add the particle system.
- Add custom sound and background music.
- NSUserDefaults and SimpleAudioEngine knowledge
- Use simple or advanced plists.
- Pause and resume Cocos2D mechanisms.
- Know how to create a game.
7. Notes
The authors have done additional work, which is summarized below:
- Custom background.
- Customization of application icon (using Apple guidelines).
- Changing the application name that appears on the device or emulator, eliminating the dots in the name if that name is too long.
This concludes the third and final tutorial demonstrating how to create a Monster Smasher game using Cocos2D. By now, you should have enough knowledge to create a simple Cocos2D game using the same game engine. If you have any questions or comments, please feel free to leave them in the comments section here.

Comments