No matter what business you're dealing with, it's always important to have tools which help you analyze the overall statistics of day-to-day happenings. Of course, it also helps you build further strategies for your business just in case things are not on the right track.
Today, we'll discuss reporting tools in the context of OpenCart. You'll find lots of useful reports in the core itself. There are four main categories to be precise—Sales, Products, Customers and Marketing—and each of them further provides more options to view the information in different contexts.
In our example, we'll build a report that displays all the products that are viewed but not purchased yet. Of course, it's a simple use case, but you could go ahead and create a more complex one as per your requirements.
I assume that you're using the latest version of OpenCart and are familiar with the basic module development process in OpenCart, as we'll emphasize report generation rather than the basic module development steps. If you would like to explore basic module development in OpenCart, there's a nice article on the subject.
Back-End File Setup
Let's list the files that need to be implemented for our custom report:
-
admin/controller/report/product_custom.php: It's the main controller file that is used to load model data and set up the variables. -
admin/model/report/product_custom.php: It's a model file that is used to set up SQL queries to fetch the data from the database. -
admin/view/template/report/product_custom.tpl: It's a view file which contains the presentation logic. -
admin/language/english/report/product_custom.php: It's a language file.
The Controller
Go ahead and create a file admin/controller/report/product_custom.php with the following contents.
<?php
class ControllerReportProductCustom extends Controller {
    public function index() {
        $this->load->language('report/product_custom');

        $this->document->setTitle($this->language->get('heading_title'));

        if (isset($this->request->get['page'])) {
            $page = $this->request->get['page'];
        } else {
            $page = 1;
        }

        $url = '';

        if (isset($this->request->get['page'])) {
            $url .= '&page=' . $this->request->get['page'];
        }

        $data['breadcrumbs'] = array();

        $data['breadcrumbs'][] = array(
            'text' => $this->language->get('text_home'),
            'href' => $this->url->link('common/dashboard', 'token=' . $this->session->data['token'], 'SSL')
        );

        $data['breadcrumbs'][] = array(
            'text' => $this->language->get('heading_title'),
            'href' => $this->url->link('report/product_custom', 'token=' . $this->session->data['token'] . $url, 'SSL')
        );

        $this->load->model('report/product_custom');

        $data['products'] = array();

        $filter_data = array(
            'start'                  => ($page - 1) * $this->config->get('config_limit_admin'),
            'limit'                  => $this->config->get('config_limit_admin')
        );

        $product_total = $this->model_report_product_custom->getTotalCustomProducts($filter_data);

        $results = $this->model_report_product_custom->getCustomProducts($filter_data);

        foreach ($results as $result) {
            $data['products'][] = array(
                'name'       => $result['name'],
                'model'      => $result['model'],
                'viewed'      => $result['viewed'],
            );
        }

        $data['heading_title'] = $this->language->get('heading_title');

        $data['text_list'] = $this->language->get('text_list');
        $data['text_no_results'] = $this->language->get('text_no_results');
        $data['text_confirm'] = $this->language->get('text_confirm');

        $data['column_name'] = $this->language->get('column_name');
        $data['column_model'] = $this->language->get('column_model');
        $data['column_viewed'] = $this->language->get('column_viewed');

        $data['entry_date_start'] = $this->language->get('entry_date_start');
        $data['entry_date_end'] = $this->language->get('entry_date_end');

        $data['token'] = $this->session->data['token'];

        $url = '';

        $pagination = new Pagination();
        $pagination->total = $product_total;
        $pagination->page = $page;
        $pagination->limit = $this->config->get('config_limit_admin');
        $pagination->url = $this->url->link('report/product_custom', 'token=' . $this->session->data['token'] . $url . '&page={page}', 'SSL');

        $data['pagination'] = $pagination->render();

        $data['results'] = sprintf($this->language->get('text_pagination'), ($product_total) ? (($page - 1) * $this->config->get('config_limit_admin')) + 1 : 0, ((($page - 1) * $this->config->get('config_limit_admin')) > ($product_total - $this->config->get('config_limit_admin'))) ? $product_total : ((($page - 1) * $this->config->get('config_limit_admin')) + $this->config->get('config_limit_admin')), $product_total, ceil($product_total / $this->config->get('config_limit_admin')));

        $data['header'] = $this->load->controller('common/header');
        $data['column_left'] = $this->load->controller('common/column_left');
        $data['footer'] = $this->load->controller('common/footer');

        $this->response->setOutput($this->load->view('report/product_custom.tpl', $data));
    }
}
The important thing to note here is that we've placed it under the "report" directory, which is the right place for all report-related files.
Apart from that, it's pretty usual controller stuff—we're loading the appropriate language and model in the index method, and then setting up the variables. At the end, we've assigned product_custom.tpl as our main template file that is responsible for the main report output.
The Model
Moving further, let's set up the model file at admin/model/report/product_custom.php.
<?php
class ModelReportProductCustom extends Model {
    public function getCustomProducts($data = array()) {
        $sql = "SELECT pd.name, p.model, p.viewed FROM " . DB_PREFIX . "product p LEFT JOIN " . DB_PREFIX . "product_description pd ON (p.product_id = pd.product_id)
        LEFT JOIN " . DB_PREFIX . "order_product op ON p.product_id = op.product_id
        WHERE pd.language_id = '" . (int)$this->config->get('config_language_id') . "' AND p.viewed > 0
        AND ISNULL(op.product_id) ORDER BY p.viewed DESC";

        if (isset($data['start']) || isset($data['limit'])) {
            if ($data['start'] < 0) {
                $data['start'] = 0;
            }

            if ($data['limit'] < 1) {
                $data['limit'] = 20;
            }

            $sql .= " LIMIT " . (int)$data['start'] . "," . (int)$data['limit'];
        }

        $query = $this->db->query($sql);

        return $query->rows;
    }

    public function getTotalCustomProducts($data) {
        $sql = "SELECT count(*) as total FROM " . DB_PREFIX . "product p LEFT JOIN " . DB_PREFIX . "product_description pd ON (p.product_id = pd.product_id)
        LEFT JOIN " . DB_PREFIX . "order_product op ON p.product_id = op.product_id
        WHERE pd.language_id = '" . (int)$this->config->get('config_language_id') . "' AND p.viewed > 0
        AND ISNULL(op.product_id)";

        $query = $this->db->query($sql);

        return $query->row['total'];
    }
}
There are two methods in our model file—the getCustomProducts fetches appropriate records from the database, while getTotalCustomProducts returns the total record count used by the pagination component in the controller.
The View
Next, the view file should be located at admin/view/template/report/product_custom.tpl.
<?php echo $header; ?><?php echo $column_left; ?>
<div id="content">
  <div class="page-header">
    <div class="container-fluid">
      <h1><?php echo $heading_title; ?></h1>
      <ul class="breadcrumb">
        <?php foreach ($breadcrumbs as $breadcrumb) { ?>
        <li><a href="<?php echo $breadcrumb['href']; ?>"><?php echo $breadcrumb['text']; ?></a></li>
        <?php } ?>
      </ul>
    </div>
  </div>
  <div class="container-fluid">
    <div class="panel panel-default">
      <div class="panel-heading">
        <h3 class="panel-title"><i class="fa fa-bar-chart"></i> <?php echo $text_list; ?></h3>
      </div>
      <div class="panel-body">
        <div class="table-responsive">
          <table class="table table-bordered">
            <thead>
              <tr>
                <td class="text-left"><?php echo $column_name; ?></td>
                <td class="text-left"><?php echo $column_model; ?></td>
                <td class="text-right"><?php echo $column_viewed; ?></td>
              </tr>
            </thead>
            <tbody>
              <?php if ($products) { ?>
              <?php foreach ($products as $product) { ?>
              <tr>
                <td class="text-left"><?php echo $product['name']; ?></td>
                <td class="text-left"><?php echo $product['model']; ?></td>
                <td class="text-right"><?php echo $product['viewed']; ?></td>
              </tr>
              <?php } ?>
              <?php } else { ?>
              <tr>
                <td class="text-center" colspan="4"><?php echo $text_no_results; ?></td>
              </tr>
              <?php } ?>
            </tbody>
          </table>
        </div>
        <div class="row">
          <div class="col-sm-6 text-left"><?php echo $pagination; ?></div>
          <div class="col-sm-6 text-right"><?php echo $results; ?></div>
        </div>
      </div>
    </div>
  </div>
</div>
<?php echo $footer; ?>
It'll display the list of products in a nice tabular way, and of course it's responsive as bootstrap is in the core now!
The Language File
At the end, let's create a language file at admin/language/english/report/product_custom.php.
<?php
// Heading
$_['heading_title']     = 'Products Custom Report (Viewed but not purchased)';

// Text
$_['text_list']         = 'Products Custom List';

// Column
$_['column_date_start'] = 'Date Start';
$_['column_date_end']   = 'Date End';
$_['column_name']       = 'Product Name';
$_['column_model']      = 'Model';
$_['column_viewed']      = 'Viewed';

// Entry
$_['entry_date_start']  = 'Date Start';
$_['entry_date_end']    = 'Date End';
So that's it as far as the file setup is concerned.
Grant Permission for the Custom Report
Although we’ve finished with our custom report module, you won’t be able to access it yet. That's because it’s considered a new resource and the administrator user group should be permitted to access this resource. Hence, let’s go ahead and grant permission for this resource to the administrator user group.
Navigate to System > Users > Users Group and edit the Administrator user group. Under the Access Permission drop-down box, check the report/product_custom resource and save the group.
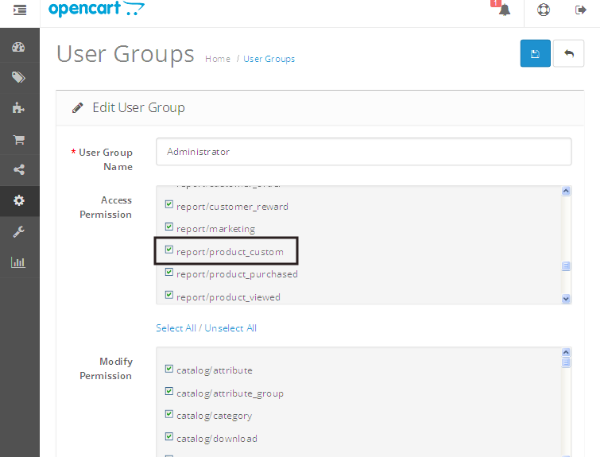
Now, you should be able to access this resource.
How to Access Our Report in the Back-End
We’ll need to modify admin/view/template/common/menu.tpl to include our custom report link. For the sake of simplicity, we’ll modify it directly, but you may like to achieve the same using the OCMOD extension. It allows you to change the core files using an XML-based search/replace system.
Now, open the admin/view/template/common/menu.tpl file and look for the following line.
<li><a href="<?php echo $report_product_purchased; ?>"><?php echo $text_report_product_purchased; ?></a></li>
After that line, add the following line.
<li><a href="/index.php?route=report/product_custom&token=<?php echo $_SESSION['token']; ?>">Custom Report</a></li>
Now you should be able to see our link under Reports > Products. Click on that to see our awesome custom report!
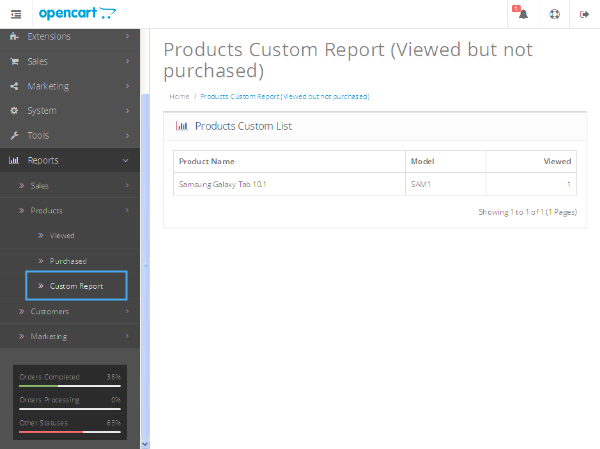
It lists all the products which are viewed and not purchased yet. So, that’s it as far as the custom report creation is concerned; I hope that it wasn’t too much at once. But, anyway, you’ve got the idea, and you could extend it easily as per your requirements.
Conclusion
Today, we’ve discussed how to create a custom report in OpenCart. We went through the complete process of setting up the required files, and in the later part of the article we demonstrated how to access the report from the back-end.
If you're looking for additional OpenCart tools, utilities, extensions, and so on that you can leverage in your own projects or for your own education, don't forget to see what we have available in the marketplace.
I hope that you’ve enjoyed everything so far and stay tuned for more on OpenCart. In case of any queries and suggestions, you could reach me via Twitter or use the comments feed below.

Comments