In the first part of this series, the concept for the game was introduced and described in detail. The cross-platform game development process via Shiva3D Suite was also described in detail. This installment will focus on the underlying geometric aspects of the game and lay the background for code development. It will also introduce the step-by-step instructions for building the game with the ShiVa Editor.
Also Available in This Series:
Game Geometry
In this section, we will focus on geometric aspects of the puzzle such as coordinate systems, dimensions of visual components of the puzzle, and positioning those components on the screen.
Coordinate Systems
The following picture shows the two coordinate systems we will be working with:
- HUD coordinate system, shown with black lines
- Touchscreen coordinate system, shown with red lines

HUD Coordinate System
The HUD coordinate system represents a normalized view of the screen where the screen width and height are always 100 units. Let us call those HUD units. Because this application is developed for deploying into different devices with different screen resolutions, the HUD coordinate system will help us visualize the geometric relationships with respect to a fixed unit system without worrying about actual screen dimensions, which are measured in pixels. Eventually, we will obtain the screen dimensions of the device and perform transformations from the HUD units into pixels, however, that is relatively simple math.
In the above picture, observe the following:
- The lower left corner of the screen corresponds to the origin (0,0) of the HUD coordinate system.
- The lower right corner of the screen corresponds to (100,0) of the HUD coordinate system.
- The upper right corner of the screen corresponds to (100,100) of the HUD coordinate system.
- The upper left corner of the screen corresponds to (0,100) of the HUD coordinate system.
In the HUD coordinate system, points greater than 100 along the X-axis are not allowed. Similarly, points greater than 100 along the Y-axis are not allowed. Hence, the HUD coordinate system is defined by the rectangle (0,0), (100,0), (0,100), and (100,100).
Touchscreen Coordinate System
The touchscreen coordinate system is useful in order to capture the user's interaction with the screen. When the user's finger touches the screen the position of the finger is defined with respect to the touchscreen coordinates. The origin (0,0) of the touchscreen coordinate system coincides with the point (50,50) of the HUD coordinate system. In addition,
- The point (-1,0) of the touchscreen coordinate system coincides with the point (0,50) of the HUD coordinate system.
- The point (0,1) of the touchscreen coordinate system coincides with the point (50,100) of the HUD coordinate system.
- The point (1,0) of the touchscreen coordinate system coincides with the point (100,50) of the HUD coordinate system.
- The point (0,-1) of the touchscreen coordinate system coincides with the point (50,0) of the HUD coordinate system.
In the touchscreen coordinate system, points greater than 1 or less than -1 along the X-axis are not allowed. Similarly, points greater than 1 or less than -1 along the Y-axis are not allowed.
Transformation Between Device Screen And HUD Coordinates
The picture below shows the relationship between the device screen width xd, height yd and the HUD coordinates.

The xd and yd are measured in pixels. For example, for iPad, xd=768 and yd=1024. Because 100 HUD units corresponds to xd pixels along X-axis and 100 HUD units correspond to yd pixels along Y-axis,
-
xpixels along the X-axis corresponds toxh=100*x/xdHUD units -
ypixels along the Y-axis corresponds toyh=100*y/ydHUD units
Puzzle Image
The puzzle image is xp pixels in width and yp pixels in height, as shown below.

The puzzle image needs to be scaled up or down in order to fully fit into the screen. We define a variable called scale as follows:
scale = min (xd/xp,yd/yp)
We will revisit the scale variable in a moment. When broken down into pieces, the puzzle consists of Xp columns and Yp rows. Hence, there are a total of Xp * Yp puzzle pieces. For example, below, Xp=4, Yp=6. Note: In our Puzzle game, Xp=6, Yp=9.

A single puzzle piece is xu HUD units wide and yu HUD units high, as shown below.

Simple math yields that:
xu=(xp*100)/(scale*xd*Xp)
yu=(yp*100)/(scale*yd*Yp)
Centered Image
We define a variable named xOffset as the distance between the Y axis and the puzzle image when the image is horizontally centered on the screen. This is shown below. Note that xOffset is in HUD units.

Fixed Positions
Let us define Pij to be the (i,j)-th puzzle piece, where i=1,...,Xp, j=1,...,Yp. Assuming the puzzle image is horizontally centered in the screen, we use fij to indicate the fixed center position of the (i,j)-th puzzle piece when all pieces are correctly positioned (i.e. the puzzle is solved). In the example below, Xp=4, Yp=6.

Note that because puzzle pieces can be in arbitrary locations during the course of the game, fij does not necessarily represent the center position of the puzzle piece Pij at all times.
Button Positions
The following diagram shows the position of toolbar elements where all distances are given in pixels.
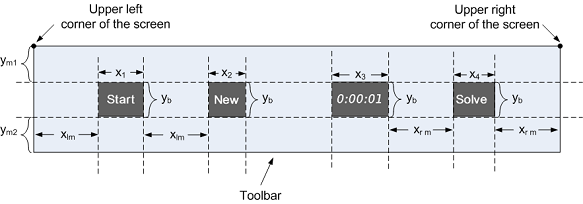
- The toolbar is placed on top the screen, i.e. its upper left and right corners coincide with the upper left and right corners of the screen.
- The toolbar is
xdunits wide, i.e. it is as wide as the screen itself. - The toolbar is
ym1+ym2+ybpixels high. - The distance between Start button and left side of the screen is
xlmpixels. - The distance between the Start and New buttons is
xlmpixels. - The distance between the Solve button and the right side of the screen is
xrmpixels. - The distance between the Timer and Solve buttons is
xrmpixels. - The Start, New, Solve buttons and the Timer are all
ym1pixels below the top edge of the toolbar. - The Start, New, Solve buttons and the Timer are all
ym2pixels above the bottom edge of the toolbar. - Each of the Start, New, Solve buttons and the Timer is
ybpixels high. - The Start button is
x1pixels wide, the New button isx1pixels wide, the Timer isx3pixels wide, and the Solve button isx4pixels wide.
Because our application supports multiple devices with varying screen sizes, we cannot predefine the variables above. In our code, we will define those variables as a function of the screen width of the device. Because the API method calls we will be using are in terms of HUD units, below we will define some variables corresponding to the pixel distances described above.
| Variable in Pixel Units | Corresponding Variable in HUD Units |
x1 |
x1h=100*x1/xd
|
x2 |
x2h=100*x2/xd
|
x3 |
x3h=100*x3/xd
|
x4 |
x4h=100*x4/xd
|
xlm |
xlmh=100*xlm/xd
|
xrm |
xrmh=100*xrm/xd
|
yb |
ybh=100*yb/yd
|
ym1 |
ym1h=100*ym1/yd
|
ym2 |
ym2h=100*ym2/yd
|
We had introduced a variable named scale previously. Because the top section of the screen will be used by the toolbar that is ym1 + ym2 + yb units high, there is less screen height available for the puzzle image to fit. Therefore, we redefine the scale as follows:
scale = min (xd/xp,(yd - (ym1+ym2+yb))/yp)
Developing Puzzle with the ShiVa Editor
In this section, we will describe how to develop the game using the ShiVa Editor.
ShiVa Editor Modules
Let us first give a quick introduction to various modules in the ShiVa Editor. We borrow most of this information from the ShiVa Editor help documentation.
Data Explorer is a resource manager to provide access to various elements of the game, including the game itself, AIModels, HUD etc. Its user interface presents those resources in a hierarchical folder structure.
Game Editor is the main module of the editor letting developers edit the game resource. For example, with game editor, a developer can define the AIModel associated with the game.
AIModel Editor allows developer to edit AIModels. With AIModel editor, you can define variables, functions, states, and handlers for an AIModel.
Script Editor is used to edit scripts of an AIModel.
HUD Editor is used to create and edit a HUD. In particular, the HUD editor can be used to define event handlers to process actions on the UI components in the HUD, such as the handling of a user pressing a button.
Soundbank Editor is used to create and edit a "Soundbank", or a storage area for sounds in the game.
AIModel
In Shiva3D, an AIModel represents the behavior of a model, typically a 3D model. An AIModel can have variables, states, handlers and functions. In Puzzle, we do not have a 3D model. However, in order to define the scripts of the game, we create a single AIModel called PuzzleAI. We will review below the variables, states, handlers, and functions of PuzzleAI.
Variables
-
buttonOrigXSize, buttonOrigYSize: Those variables store the original width and height, respectively, of the currently pressed button. When pressed, the button shrinks. When unpressed, using those variables, it expands to its original size. -
canPlay: This variable is Boolean and indicates if user can interact with the game. During certain states, the variable is set to false as the application needs to process a previously initiated user action. -
cFx, cFy, cPPx, cPPy, cPx, cPy, cTPx, cTPy: Those data structures are of the Luatabletype. See the section named "Table Data Structures" below for a description. -
curMovCompI, curMovCompJ: Those integer variables store the indices of the puzzle piece currently being moved by the user. For example, ifcurMovCompI=3, curMovCompJ=4then the user is movingP34. -
currentX, currentY: Those store the HUD coordinates of a puzzle piece moved by the user at the moment the user ends the touch sequence, i.e., unpresses the currently moved piece. -
currTime: This variable represents the number of seconds passed since the timer started, or since this variable is reset.currTimeis a decimal number and, as such, only its integer part is displayed in the timer. WhencurrTimereaches 60, it is reset and the minute of the timer is incremented. -
disabledBackgroundColor: An integer variable that represents each of the background RGB color values for a button in a disabled state. -
disabledForegroundColor: An integer variable that represents each of the foreground RGB color values for a button in a disabled state. -
enabledBackgroundColor: An integer variable that represents each of the background RGB color values for a button in an enabled state. -
enabledForegroundColor: An integer variable that represents each of the foreground RGB color values for a button in an enabled state. -
isButtonPressed: This is a Boolean variable and is true if and only if one of the buttons is pressed. -
isInitialized: This is a Boolean variable and is set to true when the game enters Initialized state until all the puzzle pieces reach their random locations. -
isMouseDown: This is a Boolean variable that is used when the application is being tested in the development environment via a mouse to emulate user touch actions. -
isMultitouchEnabled: This is a Boolean variable that is true if and only if the device is multitouch enabled (this variable must be true for any device where our game is deployed). -
isPuzzleReplaced: This is a Boolean variable and is set to true when the game enters the Replaced state until the game leaves that state. -
isSolved: This is a Boolean variable and is set to true when the game enters the Solved state until the game leaves that state. -
numHr, numMin, numSec: Those are integer variables that store the hour, minute and second, respectively, of the timer displayed to the user. -
optionValue: This is an integer variable used to represent the current viewport rotation of the device. It assumes one of four values: 0 (no rotation), 1 (-90 degrees), 2 (180 degrees), or 3 (90 degrees). -
pressedButtonName: This is a string variable that stores the name of the currently pressed button. -
PuzzleHUD:This is a string constant that is equal to "PuzzleHUD.p". -
puzzlePieceHeight, puzzlePieceWidth: Those are integer constants that store the height and width of each puzzle piece in pixels. -
puzzlePieceXind, puzzlePieceYind: Those integer variables store the indices of the puzzle piece currently being moved or the puzzle piece that is to be replaced. -
puzzleTempXPos, puzzleTempYPos: Those integer variables store the temporary position in HUD coordinates of the puzzle piece that is currently being replaced. -
puzzleXind, puzzleYind: Those integer variables store the indices of the fixed position a puzzle piece is being moved to in Replaced state. -
puzzleXPos, puzzleYPos: Those integer variables store HUD coordinates of the fixed position a puzzle piece is being moved to in Replaced state. -
randX, randY: Those are data structures of Lua table type and store the randomly ordered column and row indices, respectively of the fixed positions. They are used to randomly place the puzzle pieces in Initialized state. -
scale: Introduced earlier, this variable is a number used to scale up or down the puzzle in order to fully fit into the screen. -
textHeight: This integer variable stores the percentage of text height inside the buttons. -
tLastTouchState: This is a data structure of Lua table type and stores information regarding the touch sequence on the screen. -
tolerance: This number defines a range in terms of HUD dimensions to automatically move a puzzle piece to the closest fixed position on the screen. When the user releases his/her finger from the screen, if the distance between the nearest fixed position and the center of the puzzle piece moved by the user is less than the tolerance, then the piece automatically snaps into the fixed position. Otherwise, the piece moves back to its original position automatically. -
underCursorComponent: This string variable stores the name of the component currently touched by the user's finger. -
x1, x2, x3, x4: Those variables representx1, x2, x3, x4, respectively, introduced previously. -
x1h, x2h, x3h, x4: Those variables representx1h, x2h, x3h, x4h, respectively, introduced earlier. -
xd, xlm, xlmh, xrm, xrmh, Xp, xp, xu, xOffset: Those variables representxd, xlm, xlmh, xrm, xrmh, Xp,xp, xu, xOffset, respectively, introduced earlier. -
yb, ybh, yd, ym1, ym1h, ym2, ym2h, Yp, yp, yu: Those variables representyb, ybh, yd, ym1, ym1h, ym2, ym2h, Yp,yp, yu, respectively, introduced earlier.
Table Data Structures
Some of the important data structures we will be using in our code are of the Lua table type.
- The x and y coordinates of the fixed position
fijare stored incFx[q],cFy[q], respectively, whereq=(j-1)*Xp+i,i=1 ...Xp,j=1 ...Yp. Thex, yare in HUD coordinates. - The x and y coordinates of the current position of
Pijare stored incPPx[q],cPPy[q], respectively, whereq=(j-1)*Xp+i,i=1 ...Xp,j=1 ...Yp. Thex, yare in HUD coordinates. - The tables
cPx[q],cPy[q]store the indicesk,l, respectively, wherePklis the puzzle piece at fixed positionk,landq=(j-1)*Xp+i,i=1 ...Xp, k=1 ... Xp,j=1 ...Yp,l=1 ...Yp. For example, let Xp be 6 and assume that the (1,3)-th puzzle pieceP13is currently at fixed position of 2nd column and 4th row. Theni=2,j=4,q=(j-1)*Xp+i=20 andcPx[20]=1,cPy[20]=3. - We had previously mentioned that when the game is initialized (at application startup or when the user presses the New button) the puzzle pieces fly around and get into random locations. Similarly, when user presses the Solve button, the puzzle pieces fly around to get into their correct locations. During those periods when pieces fly from one location to another, we need to keep track of their current locations. The x and y coordinates of the temporary position of puzzle piece
Pijare stored incTPx[q],cTPy[q], respectively, whereq=(j-1)*Xp+i,i=1 ...Xp,j=1 ...Yp. Thex, yare in HUD coordinates. - Note that the Lua
tabletype allows indices greater than 0. Each of the tablescFx, cFy, cPx, cPy, cPPx, cPPy, cTPx, cTPyis Xp*Yp units long. This is shown below.

States
Shiva3D provides a framework by which a developer can easily implement a state machine. As previously mentioned, the Puzzle has 5 states: Initialized, Started, Solved, Paused, and Replaced. To represent those, we have five states in our code: gameInitialized, gameStarted, gameSolved, gamePaused, and gameReplaced. A state in Shiva3D can have three possible scripts:
-
onEnteris executed once when the state is entered. -
onLoopis executed each time the frame is entered within the current state. In Shiva3D, a game consists of loops and each frame is a loop. -
onLeaveis executed once when the state is exited.
Handlers
In Shiva3D, handlers consume events. Those events may be initiated by the user, system, or other elements in the code, such as functions, states, and handlers. PuzzleAI has the following handlers.
-
onInitis a built-in handler and is called every time the game is started. -
onEnterFrameis a built-in handler. In Shiva3D, a game consists of loops and each frame is a loop. This handler is called in every loop of the game. -
onJoypadMovehandles the event resulting from the user rotating the device. The code of Puzzle is written such that the game toolbar is always positioned at the top of the screen, regardless of if the device is positioned in a vertical or horizontal manner. As we will see below, inonJoypadMovewe detect the device orientation and rotate the viewport to display toolbar always at the top. -
onMouseButtonDown, onMouseButtonUp, onMouseMove: Those handlers are used only during unit testing of the game in Preview or Animation mode in ShiVa Editor where the user touch actions are emulated via mouse clicks. -
onTouchSequenceBegin, onTouchSequenceChange, onTouchSequenceEnd: Those handlers are used together to process user touch events. -
onRequestRestartis called when user presses theRestart(New) button. -
onStartPauseis called when user presses theStartPause(Start or Pause) button. -
onSolveis called when user presses theSolvebutton.
Functions
-
buttonPressedreduces the size of a button 90% when pressed in order to provide visual feedback to the user. -
buttonReleasedrestores the original dimensions of a button when released. -
calculateControlscalculatesx1h ... x4h, xlmh, xrmh, ybh, ym1h, ym2h, the variables in HUD units, fromx1 ... x4, xlm, xrm, yb, ym1, ym2, the variables in pixel units. -
defineComponentSizessets the size of each puzzle component,pij, i=1 ... Xp, j=1 ... Yp. -
defineControlsdefines variablesx1 ... x4, xlm, xrm, ym1, ym2, yb, in pixel units. -
defineFixedPositionscallssetFixedPositionfunction to define the fixed positions in tablescFx, cFY. -
definePuzzlesassociates the (i,j)-th HUD label componentpijwith the corresponding puzzle image. -
getCurrentIndexAtreturns the row and column indices (vi,vj) of the puzzle piece that is in the (i,j)-th fixed position. -
getCurrentPositionOf. Recall that the x and y coordinates of the current position of Pij are stored incPPx[q], cPPy[q], respectively, where x, y are in HUD coordinates. This function accepts i, j as input parameters and returns the x, y coordinates, current position, of the puzzle piece Pij. -
getCurrentTempPositionOf. Recall that x and y coordinates of the temporary position of a puzzle piece Pij are stored incTPx[q], cTPy[q], respectively, where x, y are in HUD coordinates. This function accepts i, j as input parameters and returns the x, y coordinates, temporary position, of the puzzle piece Pij. -
getFixedPositionAt. Recall that x and y coordinates of the fixed position fij are stored incFx[q], cFy[q], respectively, where x, y are in HUD coordinates. This function accepts i, j as input parameters and returns the x, y coordinates of the fixed position fij. -
getIndexOf. This function iterates through all fixed positions to find the particular fixed position that currently has the puzzle piece with indices ih, jh. -
initializePositionTables. This function simply initializes all the table data structures by inserting a dummy 0 into the corresponding entries. -
initializeRandomTables. Recall thatrandX, randYare data structures of Lua table type and store the randomly ordered column and row indices, respectively of the fixed positions. They are used to randomly place the puzzle pieces in Initialized state. This function populatesrandX, randYwith random values. -
positionControls. This function defines the dimensions and screen position of various HUD elements, the buttons StartPause, Restart (New), Solve, the labels Toolbar and Time. -
reset. This function resets several variables. The reset is necessary in puzzleReplaced state and also when the touch sequence begins. -
setBorderColors. This function goes through all puzzle pieces and redefines their border colors. If a puzzle piece is in correct location then its borders are set to green. Otherwise, no border color is defined. -
setButtonActivesets various attributes of a button to indicate it is active or inactive. -
setCurrentPositionputs the (ih,jh)-th puzzle piece inxCoord, yCoord, which corresponds to the fixed screen position at (i,j). -
setCurrentTempPositionputs the (ih,jh)-th puzzle piece inxCoord, yCoordon temporary basis. -
setFixedPositiondefines the fixed position for the (i,j)-th pair stored in tablescFxandcFybased on the input parameters. -
updateRotationPuzzle is written such that the game toolbar is always positioned at the top of the screen, regardless of the device is positioned in a vertical or horizontal manner. InonJoypadMovehandler we detect the device orientation and rotate the viewport to display toolbar always at the top. This function is called byonJoypadMovein order to recalculatexuandyuvariables based on new viewport dimensions. It also recalculates several variables to reset positions and dimensions of screen elements accordingly.
Head-Up Display
The Head-Up Display (HUD) is a basic element of the Puzzle as all visible components of Puzzle belong to the HUD. Please recall that Shiva3D is a 3D game development framework and HUD is normally used to provide UI controls such as buttons, labels etc. for letting user interact with the game. In Puzzle, however, there are no 3D UI elements and the entire game is implemented with two types of UI controls, buttons and labels. In addition, there are 'Actions' that dispatch user events to handlers.
Buttons
-
Restart: This is the button with the label New. Pressing this buttons starts a new puzzle game. -
Solve: This is the button with the label Solve. Pressing this button automatically solves the Puzzle. -
StartPause: This is the button with the Start or Pause labels. In Initialized and Paused states, the Start label is displayed. In Started state, the Pause label is displayed.
Labels
- In our current implementation, Xp=6, Yp=9, and hence there are 54 puzzle pieces. Each of those puzzle pieces is represented as a label with no text where the background is the image of the corresponding puzzle piece. The labels representing the puzzle pieces are named
p11throughp69. -
Backgroundis the name of the label that is used to provide background color. It covers the entire screen and puzzle pieces are laid over it.Backgroundhas no text and is colored black. -
Toolbaris the name of the label that represents the Toolbar. It has no text and its color is RGB=48,48,48 (dark grey). -
Timeis the label that displays the timer. It has 0:00:00 as its display format. Its background color is RGB=48,48,48 (dark grey) and its foreground color is RGB=127,127,127 (light grey).
Actions
In Shiva3D, a HUD action is mainly used to dispatch an event to a handler when the user takes an action such as pressing a button. For each of the three buttons defined above there is a corresponding action.
-
restartActionis called when the user presses theRestart(New) button. This action invokes the customonRequestRestarthandler with no parameters. Note that this is also designated as the initial action and is called when the game starts. -
solveActionis called when the user presses theSolvebutton. This action invokes the customonSolvehandler with no parameters. -
startPauseActionis called when user presses theStartPause(Start or Pause) button. This action invokes the customonStartPausehandler with no parameters.
Pre-requisite Files From Download Archive
In order to follow the step-by-step instructions below you will need PuzzleAI.ste, PuzzleHUD.ste, PuzzleSoundBank.ste, PuzzleTextures.ste that are part of the download archive accompanying this article.
Step-by-Step Instructions for Building Puzzle
Create A Project
From the ShiVa toolbar, select Main > Projects.

Click the Add button and select a project path, e.g. C:\Projects\Puzzle\. Make sure there is a green dot next to the project folder. It should look like below. Press Close to dismiss the dialog.

Create A Game
In the Data Explorer menu, right click on Puzzle - Games and select Create -> Game.

Type Puzzle as name of the game as shown below. Press OK to dismiss the dialog.

Import Textures
Then, we need to import all the textures that contain the puzzle pieces. In the Data Explorer menu, select Import > Archive.

Proceed to your local directory where you have stored the download archive accompanying this article. Select PuzzleTextures.ste and press Import. When the import is completed, in Data Explorer under Puzzle - Resources - Textures, you will see the textures named p11 through p69. A partial list is shown below.

Import AI Model
The next step is to import the AI model. In Data Explorer menu, select Import > Archive. Proceed to your local directory where you have stored the download archive accompanying this article. Select PuzzleAI.ste and press Import.

To verify the import has succeeded, first look at the Data Explorer under Puzzle - Resources - AIModels. You should see PuzzleAI.

Then, bring up the AIModel Editor. You should also have Data Explorer open. In Data Explorer under Puzzle - Resources - AIModels, double click on PuzzleAI. You should see variables, functions, states and handlers associated with the PuzzleAI.


In addition, if you look at the Data Explorer, Puzzle - Resources - Scripts, you will the scripts associated with the functions, states, and handlers (a partial list is shown below).

Import Sound Bank
The next step is to import a sound bank for the game. In the Data Explorer menu, select Import > Archive. Proceed to your local directory where you have stored the download archive accompanying this article. Select PuzzleSoundBank.ste and press Import.

After the import is completed, in Data Explorer you can go to Puzzle - Resources - SoundBanks and see that PuzzleSoundBank has been imported.

In addition, two sounds, st_punch_sound and Boing, must be visible in Data Explorer under Puzzle - Resources - Sounds.

Concluding Remarks For Part 2
Part 2 of this tutorial started with "Game Geometry", which was focused on the underlying geometric aspects of the game and laid the background for code development. In "Developing The Puzzle with ShiVa Editor", we introduced main constructs of the code base that implement the game functionality, including the variables, functions, and event handlers. This section also gave step-by-step instructions on how to develop the game in the ShiVa Editor. Here, we described creating the project and the game, and importing textures, the AI model, and the sound bank from the download archive accompanying the tutorial.
Part 3 will continue the discussion in "Developing The Puzzle In the ShiVa Editor". Here, we will describe importing the HUD components and make the final adjustments to the game developed so far. Then, we will conclude "Developing The Puzzle In ShiVa Editor" via a unit test. In "Authoring Tool", we will show how to use the ShiVa Authoring Tool to convert the Puzzle into two different applications, one for Android OS and one for iPad. We will then wrap up the article with a "Conclusions" section.

Comments