Implementing robust authentication strategies for any application can be a daunting task and Node.js applications are no exception to this.
In this tutorial, we will develop a Node.js application from scratch and use a relatively new but very popular authentication middleware - Passport to take care of our authentication concerns.
Passport's documentation describes it as a "simple, unobtrusive authentication middleware for Node" and rightly so.
By providing itself as a middleware, Passport does an excellent job at separating the other concerns of a web application from its authentication needs. It allows Passport to be easily configured into any Express-based web application, just like we configure other Express middleware such as logging, body-parsing, cookie-parsing, session-handling, etc.
This tutorial assumes a basic understanding of Node.js and Express framework and try to keep focus on authentication, although we do create a sample Express app from scratch and progress via adding routes to it and authenticating some of those routes.
If you need help with anything from debugging to new features, try working with some of the experienced JavaScript developers on Envato Studio.

Authentication Strategies
Passport provides us with 140+ authentication mechanisms to choose from. You can authenticate against a local/remote database instance or use the single sign-on using OAuth providers for Facebook, Twitter, Google, etc. to authenticate with your social media accounts, or you can choose from an extensive list of providers which support authentication with Passport and provide a node module for that.
But worry not: You do not need to include any strategy/mechanism that your application does not need. All these strategies are independent of each other and packaged as separate node modules which are not included by default when you install Passport's middleware: npm install passport
In this tutorial, we will use the Local Authentication Strategy of Passport and authenticate the users against a locally configured Mongo DB instance, storing the user details in the database. For using the Local Authentication Strategy, we need to install the passport-local module: npm install passport-local
But wait: Before you fire up your terminal and start executing these commands, let's start by building a Express app from scratch and add some routes to it (for login, registration and home) and then try to add our authentication middleware to it. Note that we will be using Express 4 for the purposes of this tutorial, but with some minor differences Passport works equally well with Express 3, as well.
Setting Up the Application
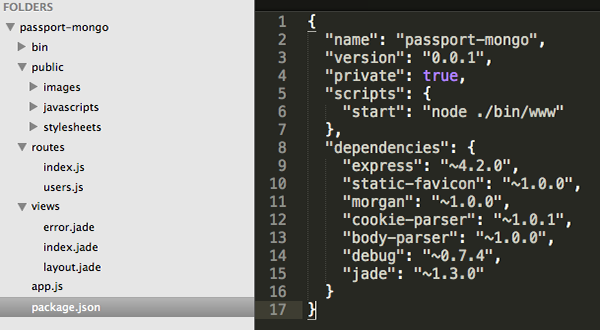
If you haven't already, then go ahead and install Express & express-generator to generate a boilerplate application by simply executing express passport-mongo on the terminal. The generated application structure should look like this:
Let's remove some of the default functionality that we won't be making use of - go ahead and delete the users.js route and remove its references from the app.js file.
Adding Project Dependencies
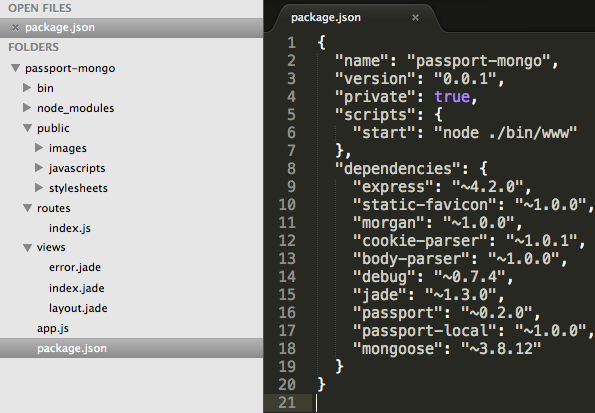
Open up package.json and add the dependencies for passport and passport-local module.
"passport": "~0.2.0",
"passport-local": "~1.0.0"
Since we will be saving the user details in MongoDB, we will use Mongoose as our object data modeling tool. Another way to install and save the dependency to package.json is by entering:
npm install mongoose --save
package.json should look like this:
Now, install all the dependencies and run the boilerplate application by executing npm install && npm start. It will now download and install all of the dependencies and will start the node server. You can check the basic Express app at http://localhost:3000/ but there is nothing much to see.
Very soon, we are going to change that by creating a full-fledged express app that asks for shows a registration page for a new user, the login of a registered user, and authenticates the registered user by using Passport.
Creating Mongoose Model
Since we will be saving the user details in Mongo, let's create a User Model in Mongoose and save that in models/user.js in our app.
var mongoose = require('mongoose');

module.exports = mongoose.model('User',{
        username: String,
	password: String,
	email: String,
	gender: String,
	address: String
});
Basically, we are creating a Mongoose model using which we can perform CRUD operations on the underlying database.
Configuring Mongo
If you do not have Mongo installed locally then we recommend that you use cloud database services such as Modulus or MongoLab. Creating a working MongoDB instance using these is not only free but is just a matter of few clicks.
After you create a database on one of these services, it will give you a database URI likemongodb://<dbuser>:<dbpassword>@novus.modulusmongo.net:27017/<dbName> which can be used to perform CRUD operations on the database. It's a good idea to keep the database configuration in a separate file which can be pull up as and when needed. As such, we create a node module db.js which looks like:
module.exports = {
  'url' : 'mongodb://<dbuser>:<dbpassword>@novus.modulusmongo.net:27017/<dbName>'
}
If you're like me, you are using a local Mongo instance then it's time to start the mongod daemon and the db.js should look like
module.exports = {
  'url' : 'mongodb://localhost/passport'
}
Now we use this configuration in app.js and connect to it using Mongoose APIs:
var dbConfig = require('./db.js');
var mongoose = require('mongoose');
mongoose.connect(dbConfig.url);
Configuring Passport
Passport just provides the mechanism to handle authentication leaving the onus of implementing session-handling ourselves and for that we will be using express-session. Open up app.js and paste the code below before configuring the routes:
// Configuring Passport
var passport = require('passport');
var expressSession = require('express-session');
app.use(expressSession({secret: 'mySecretKey'}));
app.use(passport.initialize());
app.use(passport.session());
This is needed as we want our user sessions to be persistent in nature. Before running the app, we need to install express-session and add it to our dependency list in package.json. To do that type npm install --save express-session
Serializing and Deserializing User Instances
Passport also needs to serialize and deserialize user instance from a session store in order to support login sessions, so that every subsequent request will not contain the user credentials. It provides two methods serializeUser and deserializeUser for this purpose:
passport.serializeUser(function(user, done) {
  done(null, user._id);
});

passport.deserializeUser(function(id, done) {
  User.findById(id, function(err, user) {
    done(err, user);
  });
});
Using Passport Strategies
We will now define Passport's strategies for handling login and signup. Each of them would be an instance of the Local Authentication Strategy of Passport and would be created using the passport.use() function. We use connect-flash to help us with error handling by providing flash messages which can be displayed to user on error.
Login Strategy
The login strategy looks like this:
// passport/login.js
passport.use('login', new LocalStrategy({
    passReqToCallback : true
  },
  function(req, username, password, done) {
    // check in mongo if a user with username exists or not
    User.findOne({ 'username' :  username },
      function(err, user) {
        // In case of any error, return using the done method
        if (err)
          return done(err);
        // Username does not exist, log error & redirect back
        if (!user){
          console.log('User Not Found with username '+username);
          return done(null, false,
                req.flash('message', 'User Not found.'));
        }
        // User exists but wrong password, log the error
        if (!isValidPassword(user, password)){
          console.log('Invalid Password');
          return done(null, false,
              req.flash('message', 'Invalid Password'));
        }
        // User and password both match, return user from
        // done method which will be treated like success
        return done(null, user);
      }
    );
}));
The first parameter to passport.use() is the name of the strategy which will be used to identify this strategy when applied later. The second parameter is the type of strategy that you want to create, here we use the username-password or the LocalStrategy. It is to be noted that by default the LocalStrategy expects to find the user credentials in username & password parameters, but it allows us to use any other named parameters as well. The passReqToCallback config variable allows us to access the request object in the callback, thereby enabling us to use any parameter associated with the request.
Next, we use the Mongoose API to find the User in our underlying collection of Users to check if the user is a valid user or not. The last parameter in our callback : done denotes a useful method using which we could signal success or failure to Passport module. To specify failure either the first parameter should contain the error, or the second parameter should evaluate to false. To signify success the first parameter should be null and the second parameter should evaluate to a truthy value, in which case it will be made available on the request object
Since passwords are inherently weak in nature, we should always encrypt them before saving them to the database. For this, we use bcrypt-nodejs to help us out with encryption and decryption of passwords.
var isValidPassword = function(user, password){
  return bCrypt.compareSync(password, user.password);
}
If you are feeling uneasy with the code snippets and prefer to see the complete code in action, feel free to browse the code here.
Registration Strategy
Now, we define the next strategy which will handle registration of a new user and creates his or her entry in our underlying Mongo DB:
passport.use('signup', new LocalStrategy({
    passReqToCallback : true
  },
  function(req, username, password, done) {
    findOrCreateUser = function(){
      // find a user in Mongo with provided username
      User.findOne({'username':username},function(err, user) {
        // In case of any error return
        if (err){
          console.log('Error in SignUp: '+err);
          return done(err);
        }
        // already exists
        if (user) {
          console.log('User already exists');
          return done(null, false,
             req.flash('message','User Already Exists'));
        } else {
          // if there is no user with that email
          // create the user
          var newUser = new User();
          // set the user's local credentials
          newUser.username = username;
          newUser.password = createHash(password);
          newUser.email = req.param('email');
          newUser.firstName = req.param('firstName');
          newUser.lastName = req.param('lastName');

          // save the user
          newUser.save(function(err) {
            if (err){
              console.log('Error in Saving user: '+err);
              throw err;
            }
            console.log('User Registration succesful');
            return done(null, newUser);
          });
        }
      });
    };

    // Delay the execution of findOrCreateUser and execute
    // the method in the next tick of the event loop
    process.nextTick(findOrCreateUser);
  });
);
Here, we again use the Mongoose API to find if any user with the given username already exists or not. If not, then create a new user and saves the user information in Mongo. Else return the error using the done callback and flash messages. Note that we use bcrypt-nodejs for creating the hash of the password before saving it:
// Generates hash using bCrypt
var createHash = function(password){
 return bCrypt.hashSync(password, bCrypt.genSaltSync(10), null);
}
Creating Routes
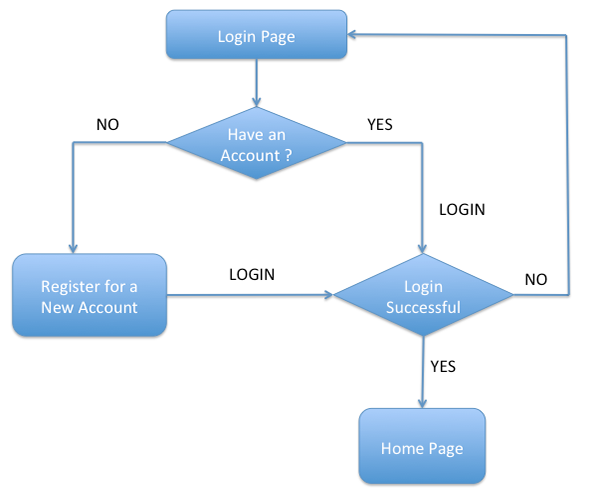
If we were to see a birds eye view of our application, it would look like:
We now define our routes for the application in the following module which takes the instance of Passport created in app.js above. Save this module in routes/index.js
module.exports = function(passport){

  /* GET login page. */
  router.get('/', function(req, res) {
    // Display the Login page with any flash message, if any
    res.render('index', { message: req.flash('message') });
  });

  /* Handle Login POST */
  router.post('/login', passport.authenticate('login', {
	successRedirect: '/home',
	failureRedirect: '/',
	failureFlash : true
  }));

  /* GET Registration Page */
  router.get('/signup', function(req, res){
	res.render('register',{message: req.flash('message')});
  });

  /* Handle Registration POST */
  router.post('/signup', passport.authenticate('signup', {
	successRedirect: '/home',
	failureRedirect: '/signup',
	failureFlash : true
  }));

  return router;
}
The most important part of the above code snippet is the use of passport.authenticate() to delegate the authentication to login and signup strategies when a HTTP POST is made to /login and /signup routes respectively. Note that it is not mandatory to name the strategies on the route path and it can be named anything.
Creating Jade Views
Next, we create the following two views for our application:
-
layout.jadecontains the basic layout & styling information -
index.jadecontains the login page containing the login form and giving option to create a new account
extends layout

block content
  div.container
	div.row
	  div.col-sm-6.col-md-4.col-md-offset-4
		h1.text-center.login-title Sign in to our Passport app
		  div.account-wall
			img(class='profile-img', src='https://lh5.googleusercontent.com/-b0-k99FZlyE/AAAAAAAAAAI/AAAAAAAAAAA/eu7opA4byxI/photo.jpg?sz=120')
			form(class='form-signin', action='/login', method='POST')
			  input(type='text', name='username' class='form-control', placeholder='Email',required, autofocus)
			  input(type='password', name='password' class='form-control', placeholder='Password', required)
			  button(class='btn btn-lg btn-primary btn-block', type='submit') Sign in
			  span.clearfix
		  a(href='/signup', class='text-center new-account') Create an account
		  #message
		  if message
			h1.text-center.error-message #{message}
Thanks to Bootstrap, our Login page now looks like

We need two more views for registration details and for the home page of the application:
-
register.jadecontains the registration form -
home.jadesays hello and shows logged in user's details
If you are unfamiliar with Jade, check out the documentation.
Implementing Logout Functionality
Passport, being a middleware, is permitted to add certain properties and methods on request and response objects and it makes proper use of it by adding a very handy request.logout() method which invalidates the user session apart from other properties.
/* Handle Logout */
router.get('/signout', function(req, res) {
  req.logout();
  res.redirect('/');
});
Protecting Routes
Passport also gives the ability to protect access to a route which is deemed unfit for an anonymous user. This means that if some user tries to access http://localhost:3000/home without authenticating in the application, he will be redirected to home page by doing
/* GET Home Page */
router.get('/home', isAuthenticated, function(req, res){
  res.render('home', { user: req.user });
});

// As with any middleware it is quintessential to call next()
// if the user is authenticated
var isAuthenticated = function (req, res, next) {
  if (req.isAuthenticated())
	return next();
  res.redirect('/');
}
Conclusion
Passport is not the only player in this arena when its comes to authenticating Node.js applications and there exists alternatives like EveryAuth but the modularity, flexibility, community support and the fact that its just a middleware makes Passport definitely a much better choice.
For a detailed comparison between the two, here is an interesting and informative perspective from the developer of Passport himself.
If you want to see what else you can do with Node.js, check out the range of Node.js items on Envato Market, from a responsive AJAX contact form to a URL shortener, or even a database CRUD generator.

Comments