Why always expect users to tap buttons on their touchscreens? By using some of the hardware sensors available on mid-range Android phones today, you can create apps that offer far more engaging user experiences.
The sensor framework, which is a part of the Android SDK, allows you to read raw data from most sensors, be they hardware or software, in an easy and consistent manner. In this tutorial, I'll show you how to use the framework to read data from two very common sensors: proximity and gyroscope. I'll also introduce you to the rotation vector sensor, a composite sensor that can, in most situations, serve as an easier and more accurate alternative to the gyroscope.
You can get an overview of Android's hardware sensors by reading the following tutorial:
Prerequisites
To follow along, you'll need the following:
- An Android device with a proximity sensor and a gyroscope
- The latest version of Android Studio
1. Project Setup
If your app is simply unusable on devices that do not have all the hardware sensors it needs, it should not be installable on such devices. You can let Google Play and other app marketplaces know about your app's hardware requirements by adding one or more <uses-feature> tags to your Android Studio project's manifest file.
The app we'll be creating in this tutorial will not work on devices that lack a proximity sensor and a gyroscope. Therefore, add the following lines to your manifest file:
<uses-feature
    android:name="android.hardware.sensor.proximity"
    android:required="true" />
<uses-feature
    android:name="android.hardware.sensor.gyroscope"
    android:required="true" />
Note, however, that because the <uses-feature> tag doesn't help if a user installs your app manually using its APK file, you must still programmatically check if a sensor is available before using it.
2. Using the Proximity Sensor
In order to avoid accidental touch events, your phone's touchscreen goes black during calls, when it's very close to your ear. Ever wondered how your phone determines whether or not it is close to your ear? Well, it uses the proximity sensor, which is a hardware sensor that can tell if an object is close to it. Some proximity sensors can also tell how far away the object is, though their maximum range is usually only about 5 cm.
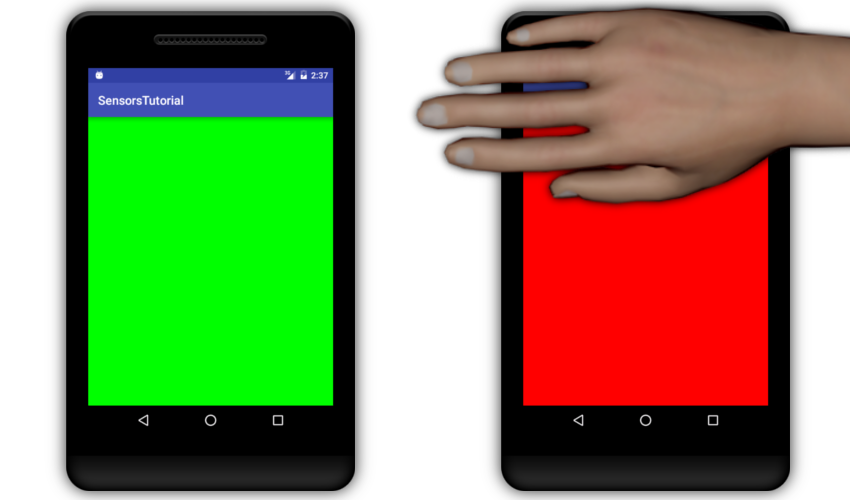
Let us now create an activity whose background color changes to red every time you hover your hand over your device's proximity sensor.
Step 1: Acquire the Proximity Sensor
To get access to any hardware sensor, you need a SensorManager object. To create it, use the getSystemService() method of your Activity class and pass the SENSOR_SERVICE constant to it.
SensorManager sensorManager =
        (SensorManager) getSystemService(SENSOR_SERVICE);
You can now create a Sensor object for the proximity sensor by calling the getDefaultSensor() method and passing the TYPE_PROXIMITY constant to it.
Sensor proximitySensor =
        sensorManager.getDefaultSensor(Sensor.TYPE_PROXIMITY);
Before proceeding, always make sure that the Sensor object is not null. If it is, it means that the proximity sensor is not available.
if(proximitySensor == null) {
    Log.e(TAG, "Proximity sensor not available.");
    finish(); // Close app
}
Step 2: Register a Listener
To be able to read the raw data generated by a sensor, you must associate a SensorEventListener with it by calling the registerListener() method of the SensorManager object. While doing so, you must also specify how frequently the data should be read from the sensor.
The following code registers a listener that allows you to read the proximity sensor's data once every two seconds:
// Create listener
SensorEventListener proximitySensorListener = new SensorEventListener() {
    @Override
    public void onSensorChanged(SensorEvent sensorEvent) {
        // More code goes here
    }

    @Override
    public void onAccuracyChanged(Sensor sensor, int i) {
    }
};

// Register it, specifying the polling interval in
// microseconds
sensorManager.registerListener(proximitySensorListener,
                proximitySensor, 2 * 1000 * 1000);
I suggest you always register the listener inside the onResume() method of your activity and unregister it inside the onPause() method. Here's how you can unregister the listener:
sensorManager.unregisterListener(proximitySensorListener);
Step 3: Use the Raw Data
The SensorEvent object, which is available inside the onSensorChanged() method, has a values array containing all the raw data generated by the associated sensor. In case of the proximity sensor, the array contains a single value specifying the distance between the sensor and a nearby object in centimeters.
If the value is equal to the maximum range of the sensor, it's safe to assume that there's nothing nearby. Conversely, if it is less than the maximum range, it means that there is something nearby. You can determine the maximum range of any hardware sensor using the getMaximumRange() method of the associated Sensor object.
To actually change the background color of the activity based on the proximity sensor's data, you can use the setBackgroundColor() method of the top-level window's decor view.
Accordingly, add the following code inside the onSensorChanged() method you created in the previous step:
if(sensorEvent.values[0] < proximitySensor.getMaximumRange()) {
    // Detected something nearby
    getWindow().getDecorView().setBackgroundColor(Color.RED);
} else {
    // Nothing is nearby
    getWindow().getDecorView().setBackgroundColor(Color.GREEN);
}
If you run the app now and hover your hand close to the top edge of your phone, you should see the screen turn red.
3. Using the Gyroscope
The gyroscope allows you to determine the angular velocity of an Android device at any given instant. In simpler terms, it tells you how fast the device is rotating around its X, Y, and Z axes. Lately, even budget phones are being manufactured with a gyroscope built in, what with augmented reality and virtual reality apps becoming so popular.
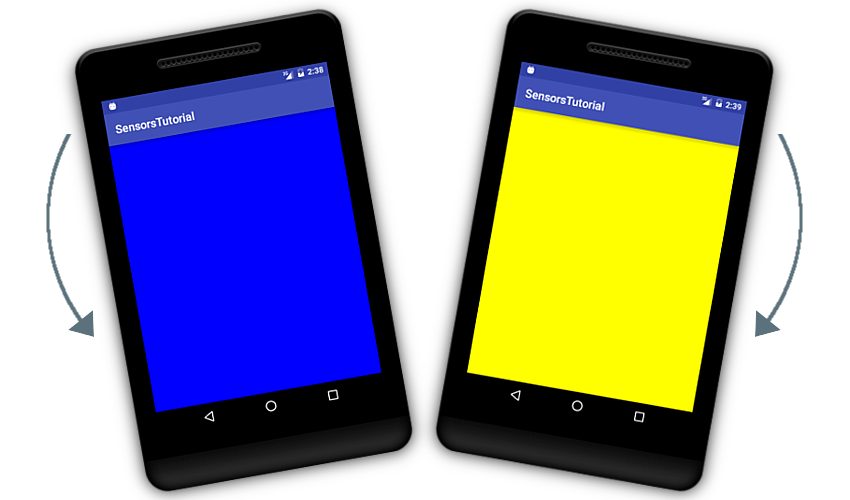
By using the gyroscope, you can develop apps that can respond to minute changes in a device's orientation. To see how, let us now create an activity whose background color changes to blue every time you rotate the phone in the anticlockwise direction along the Z axis, and to yellow otherwise.
Step 1: Acquire the Gyroscope
To create a Sensor object for the gyroscope, all you need to do is pass the TYPE_GYROSCOPE constant to the getDefaultSensor() method of the SensorManager object.
gyroscopeSensor =
        sensorManager.getDefaultSensor(Sensor.TYPE_GYROSCOPE);
Step 2: Register a Listener
Creating a listener for the gyroscope sensor is no different from creating one for the proximity sensor. While registering it, however, you must make sure that its sampling frequency is very high. Therefore, instead of specifying a polling interval in microseconds, I suggest you use the SENSOR_DELAY_NORMAL constant.
// Create a listener
gyroscopeSensorListener = new SensorEventListener() {
    @Override
    public void onSensorChanged(SensorEvent sensorEvent) {
        // More code goes here
    }

    @Override
    public void onAccuracyChanged(Sensor sensor, int i) {
    }
};

// Register the listener
sensorManager.registerListener(gyroscopeSensorListener,
        gyroscopeSensor, SensorManager.SENSOR_DELAY_NORMAL);
Step 3: Use the Raw Data
The gyroscope sensor's raw data consists of three float values, specifying the angular velocity of the device along the X, Y, and Z axes. The unit of each value is radians per second. In case of anticlockwise rotation along any axis, the value associated with that axis will be positive. In case of clockwise rotation, it will be negative.
Because we are currently interested only in rotation along the Z-axis, we'll be working only with the third element in the values array of the SensorEvent object. If it's more than 0.5f, we can, to a large extent, be sure that the rotation is anticlockwise, and set the background color to blue. Similarly, if it's less than -0.5f, we can set the background color to yellow.
if(sensorEvent.values[2] > 0.5f) { // anticlockwise
    getWindow().getDecorView().setBackgroundColor(Color.BLUE);
} else if(sensorEvent.values[2] < -0.5f) { // clockwise
    getWindow().getDecorView().setBackgroundColor(Color.YELLOW);
}
If you run the app now, hold your phone in the portrait mode, and tilt it to the left, you should see the activity turn blue. If you tilt it in the opposite direction, it should turn yellow.
If you turn the phone too much, however, its screen orientation will change to landscape and your activity will restart. To avoid this condition, I suggest you set the screenOrientation of the activity to portrait in the manifest file.
<activity
    android:name=".GyroscopeActivity"
    android:screenOrientation="portrait">
</activity>
4. Using the Rotation Vector Sensor
Most developers today prefer software, composite sensors over hardware sensors. A software sensor combines low-level, raw data from multiple hardware sensors to generate new data that is not only easy to use, but also more accurate. The proximity sensor has no software alternative. The gyroscope, however, has two: game rotation vector sensor and rotation vector sensor. In this tutorial, we'll focus only on the latter.
In the previous step's example, we changed the activity's background color every time the angular velocity along the Z-axis was more than 0.5 rad/s in the clockwise or anticlockwise direction. Working with angular velocities, however, is not intuitive. Furthermore, we had no idea what the actual angle of the device was before or after the rotation.
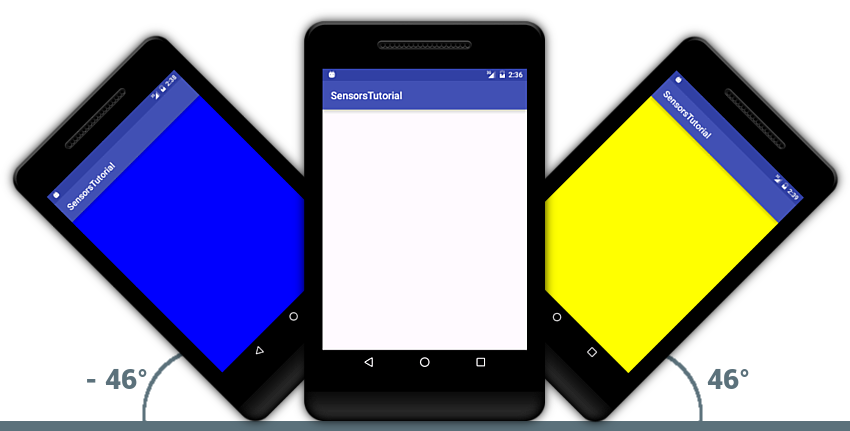
By using the rotation vector sensor, let us now create an activity whose background color changes only when it's rotated by a specific angle. For example, we could turn it yellow every time its rotation—along the Z-axis—is more than 45°, white when its rotation is between -10° and 10°, and blue when its rotation is less than -45°.
Step 1: Set Up the Rotation Vector Sensor
To acquire the rotation vector sensor, you must pass the TYPE_ROTATION_VECTOR constant to the getDefaultSensor() method of the SensorManager object.
rotationVectorSensor =
        sensorManager.getDefaultSensor(Sensor.TYPE_ROTATION_VECTOR);
Working with a software sensor is no different from working with a hardware one. Therefore, you must now associate a listener with the rotation vector sensor to be able to read its data. You can again use the SENSOR_DELAY_NORMAL constant for the polling interval.
// Create a listener
rvListener = new SensorEventListener() {
    @Override
    public void onSensorChanged(SensorEvent sensorEvent) {
        // More code goes here
    }

    @Override
    public void onAccuracyChanged(Sensor sensor, int i) {
    }
};

// Register it
sensorManager.registerListener(rvListener,
            rotationVectorSensor, SensorManager.SENSOR_DELAY_NORMAL);
Step 2: Use the Data
The rotation vector sensor combines raw data generated by the gyroscope, accelerometer, and magnetometer to create a quaternion. Consequently, the values array of its SensorEvent object has the following five elements:
- The X, Y, Z, and W components of the quaternion
- A heading accuracy
You can convert the quaternion into a rotation matrix, a 4x4 matrix, by using the getRotationMatrixFromVector() method of the SensorManager class.
float[] rotationMatrix = new float[16];
SensorManager.getRotationMatrixFromVector(
        rotationMatrix, sensorEvent.values);
If you are developing an OpenGL app, you can use the rotation matrix directly to transform objects in your 3D scene. For now, however, let us convert the rotation matrix into an array of orientations, specifying the rotation of the device along the Z, X, and Y axes. To do so, we can use the getOrientation() method of the SensorManager class.
Before you call the getOrientation() method, you must remap the coordinate system of the rotation matrix. More precisely, you must rotate the rotation matrix such that the Z-axis of the new coordinate system coincides with the Y-axis of the original coordinate system.
// Remap coordinate system
float[] remappedRotationMatrix = new float[16];
SensorManager.remapCoordinateSystem(rotationMatrix,
        SensorManager.AXIS_X,
        SensorManager.AXIS_Z,
        remappedRotationMatrix);

// Convert to orientations
float[] orientations = new float[3];
SensorManager.getOrientation(remappedRotationMatrix, orientations);
By default, the orientations array contains angles in radians instead of degrees. If you are accustomed to radians, feel free to use it directly. Otherwise, use the following code to convert all its angles to degrees:
for(int i = 0; i < 3; i++) {
    orientations[i] = (float)(Math.toDegrees(orientations[i]));
}
You can now change the background color of the activity based on the third element of the orientations array.
if(orientations[2] > 45) {
    getWindow().getDecorView().setBackgroundColor(Color.YELLOW);
} else if(orientations[2] < -45) {
    getWindow().getDecorView().setBackgroundColor(Color.BLUE);
} else if(Math.abs(orientations[2]) < 10) {
    getWindow().getDecorView().setBackgroundColor(Color.WHITE);
}
If you run the app now, hold your phone in portrait mode, and tilt it by more than 45° clockwise or anticlockwise, you should see the background color change.
Conclusion
In this tutorial, you learned how to use Android's sensor framework to create apps that can respond to data generated by the proximity sensor and the gyroscope. You also learned how to work with the rotation vector sensor, a more popular alternative to the gyroscope. Feel free to use the sensors in creative ways. Be aware, though, that apps that use sensors inefficiently can drain a device's battery very quickly.
To learn more about hardware sensors and the data they generate, you can refer to the official sensors API guide. And check out some of our other hardware and sensor content here on Envato Tuts+!
 Android SDKAndroid From Scratch: Hardware Sensors
 AndroidIntroduction to Android Things
 AndroidGoogle Fit for Android: Reading Sensor Data
 Android SDKTake Pictures With Your Android App

Comments