Azure Mobile Services let you authenticate users from your universal Windows apps. In this tutorial, you will learn how to:
- add authentication to a Windows Phone 8.1 WinRT app using different identity providers supported by Azure Mobile Services
- store cached authentication tokens on the client
- retrieve and store user profile details in an Azure database using server scripts
- add additional authentication scopes to retrieve more user information from the server
- edit the insert script of the UsersTable to insert a record if a user with the same
userIddoesn't exist, and otherwise update the existing user
The following steps are required to enable authentication in your app:
- register your app for authentication
- configure Azure Mobile Services
- restrict table permissions to authenticated users
- configure your app to use Azure Mobile Services
- add authentication to the app
- cache authentication tokens on the client
- retrieve user information from the server
You must register your app with an identity provider and add the provider generated credentials to Azure Mobile Services. Let us first see how to register your app for Microsoft account login.
1. App Registration
To use Live Connect as an authentication provider for Azure Mobile Services, follow these steps.
Step 1: Create a New App in the Dev Center
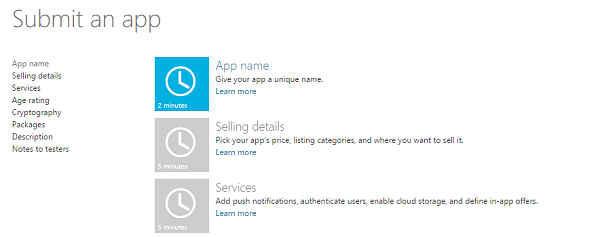
Open a browser and head over to the Dev Center for Windows Store apps. Navigate to the Submit an app page and click App Name.
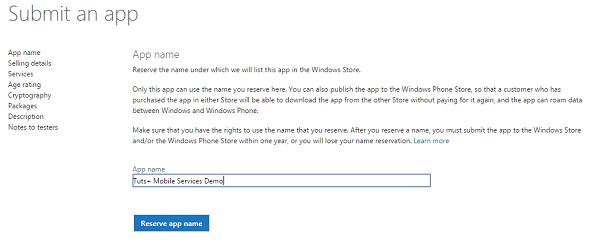
Step 2: Reserve an App Name
Reserve an App name and click Save. The app will be listed in the Windows Store under this name.
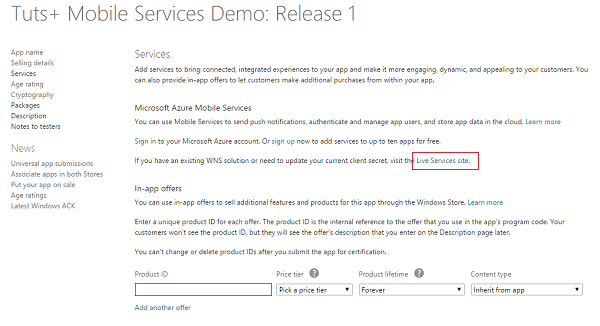
Step 3: Configure Live Services for the App
On the Services page, click Live Services under Windows Azure Mobile Services.
Step 4: Note the App Settings Values
Note the values of Client ID, Client secret, and Package security identifier (SID). You will need these values later.

Step 5: Set the Redirect URI for the App
Under API Settings, supply the following value as Redirect URl and click Save.
https://<mobile_service>.azure-mobile.net/login/microsoftaccount
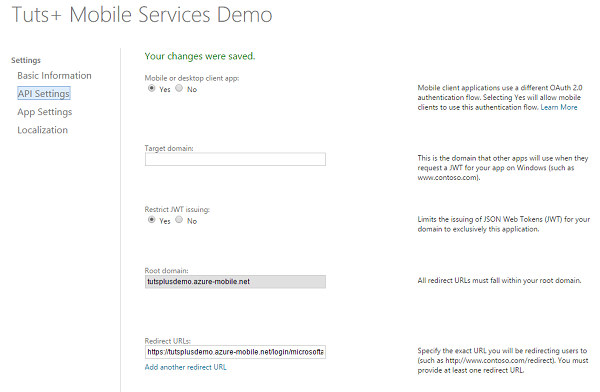
This enables Microsoft account authentication for your app.
2. Configure Azure Mobile Services
Once you have registered your app with the identity provider, you need to configure Azure Mobile Services using the Azure Management Portal.
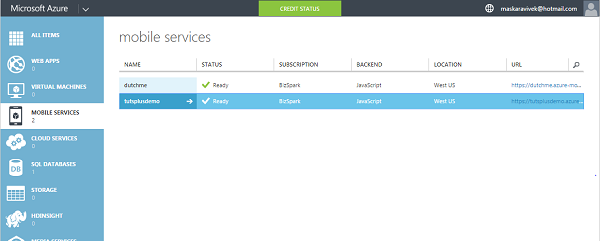
Step 1: Select the Mobile Service for the App
Log in to the Azure Management Portal, click Mobile Services, and select your app.
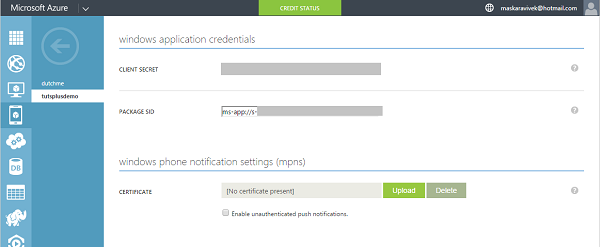
Step 2: Configure Push Settings
Under the Push tab, enter the Client Secret and Package SID values, and click Save.
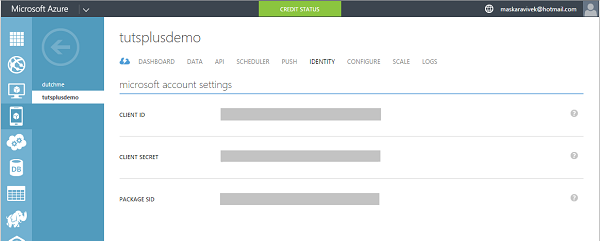
Step 3: Configure Identity Settings
Under the Identity tab, set the Client ID. Also set the Client Secret and Package SID values if they are not already set.
You are now ready to use a Microsoft account for authentication in your app using Azure Mobile Services.
3. Restrict Table Permissions
Using the Azure Management Portal, we can set the table permissions to restrict access only to logged in users.
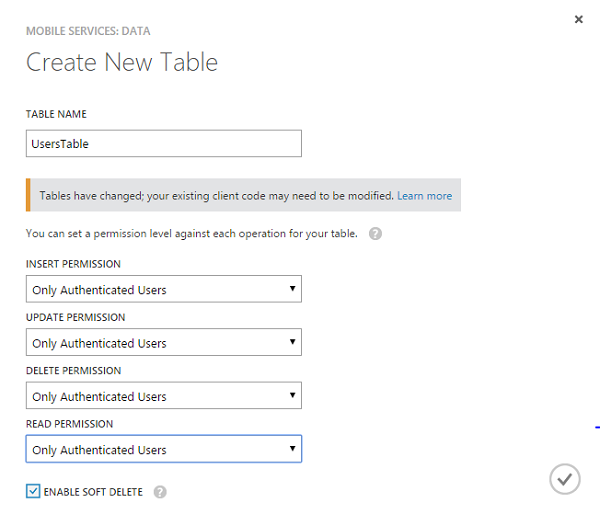
Step 1: Select the UsersTable
Under the Data tab in the Azure Management Portal, choose the table for which you'd like to change the permissions. In this tutorial, we are modifying permissions for UsersTable.
Step 2: Set Table Permissions
Under the Permissions tab, set all permissions to Only authenticated users and click Save.
When your Windows Store app tries to access this table, an unhandled exception with a status code of 401 (Unauthorized) is raised. This happens because the app attempts to access Azure Mobile Services as an unauthenticated user.
4. Configure the App to Use Mobile Services
Next, we need to configure the Windows Phone 8.1 WinRT app to use Azure Mobile Services.
Step 1: (Optional) Associate Your App With the Store
This step applies only to the Microsoft account login provider. On registering the Windows Store app package information with Mobile Services, the client is able to reuse Microsoft login details for a single sign-on experience.
Right-click the project in the Solution Explorer, select Store and click Associate App with the Store. In the Associate Your App with the Windows Store wizard, click Sign in and log in with your Microsoft account. Select the app that you registered earlier and Associate it with the store.
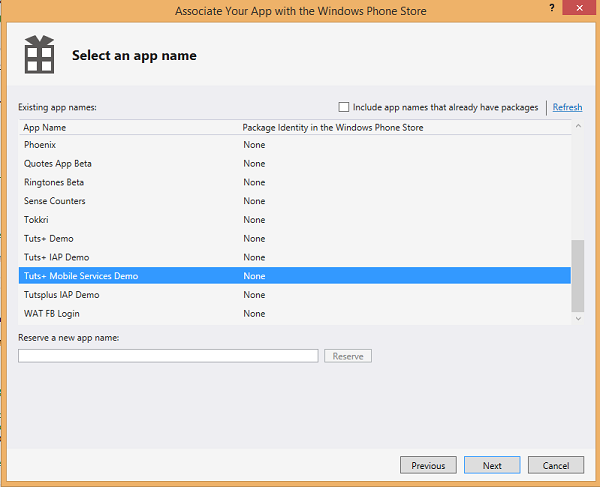
The required Windows Store registration information is then added to the application manifest.
Step 2: Add Windows Azure Mobile Services SDK
Next, add the Windows Azure Mobile Services SDK using the NuGet package manager.

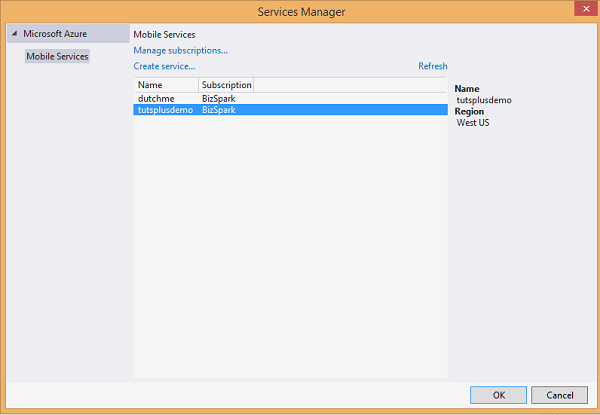
Step 3: Add Azure Mobile Services as a Connected Service
The mobile service you created in the Azure Management Portal needs to be linked with the app. Right-click the project in the Solution Explorer and select Connected Services under Add.
In the Service Manager dialog box that appears, choose the mobile service that you created earlier and click OK. This adds an instance of mobile service in App.xaml.cs.
Step 4: Add a Class for UsersTable
Define a class UsersTable whose data members represent the columns in the table. You will need to add a reference to the Json.NET library in your app to use the JsonProperty class.
class UsersTable
{
    [JsonProperty(PropertyName = "id")]
    public string Id { get; set; }

    [JsonProperty(PropertyName = "userId")]
    public string UserID { get; set; }

    [JsonProperty(PropertyName = "user_email")]
    public string Email { get; set; }

    [JsonProperty(PropertyName = "profile_picture")]
    public string ProfilePicture { get; set; }

    [JsonProperty(PropertyName = "display_name")]
    public string DisplayName { get; set; }

}
5. Add Authentication to the App
Next, we will add user authentication before we request any resources from the mobile service.
Step 1: Declare Global Variables
Declare a member variable global to the MainPage class for storing the authenticated user.
private MobileServiceUser user;
Step 2: Define the AuthenticateAsync Method
We add a method that performs the authentication process. The LoginAsync method takes the identity provider as a parameter and handles the authentication flow.
private async System.Threading.Tasks.Task AuthenticateAsync()
{
    user = await App.MobileService.LoginAsync(MobileServiceAuthenticationProvider.MicrosoftAccount);
}
Step 3: Handle the Response on App Activation
On Windows Phone 8.1, you need to handle the response from the WebAuthenticationBroker. We add an OnActivated method in App.xaml.cs to handle this response.
protected override void OnActivated(IActivatedEventArgs args)
{
    #if WINDOWS_PHONE_APP
    if (args.Kind == ActivationKind.WebAuthenticationBrokerContinuation)
    {
        App.MobileService.LoginComplete(args as WebAuthenticationBrokerContinuationEventArgs);
    }
    #endif

    base.OnActivated(args);
}
If the OnActivated method already exists, just add the above #if...#endif code block. Note that the LoginAsync method must be called after the OnNavigated method has been called and after the page's Loaded event has been triggered.
Step 4: Add a Login Button
Add a login button to your app's MainPage.xaml and call a method to authenticate the user when the button is clicked.
<Button Name="ButtonLogin" Click="ButtonLogin_Click" Visibility="Visible">Sign in</Button>
On button click, call the AuthenticateAsync method and hide the login button if the authentication is successful.
private async void ButtonLogin_Click(object sender, RoutedEventArgs e)
{
    // Login the user and then load data from the mobile service.
    await AuthenticateAsync();

    // Hide the login button and load items from the mobile service.
    this.ButtonLogin.Visibility = Windows.UI.Xaml.Visibility.Collapsed;
}
Step 5: Handle Exceptions in the AuthenticateAsync Method
Our AuthenticateAsync method handles authentication of users, but we can add code to handle exceptions and alternate flows. We update the function to iteratively call the LoginAsync method until the user is not null. On successful authentication, we display the UserId of the authenticated user. Once the user is successfully logged in, the app should run without errors.
private async System.Threading.Tasks.Task AuthenticateAsync()
{
    while (user == null)
    {
        string message;
        try
        {
            user = await App.MobileService.LoginAsync(MobileServiceAuthenticationProvider.MicrosoftAccount);
            message = string.Format("You are now signed in - {0}", user.UserId);
        }
        catch (InvalidOperationException)
        {
            message = "Login Required";
        }

        var dialog = new MessageDialog(message);
        dialog.Commands.Add(new UICommand("OK"));
        await dialog.ShowAsync();
    }
}
6. Cache Authentication Tokens on the Client
The AuthenticateAsync function requires the client to contact both the identity provider and the mobile service every time the app starts. That is not very efficient. Also, if many users use the app at the same time, you may run into load issues.
To remedy this issue, we can cache the authentication token. We can try to use the cached authentication token, falling back to the default authentication flow if the authentication token is no longer valid.
private async System.Threading.Tasks.Task AuthenticateAsync(String provider)
{
    string message;

    // Use the PasswordVault to securely store and access credentials.
    PasswordVault vault = new PasswordVault();
    PasswordCredential credential = null;

    while (credential == null)
    {
        try
        {
            // Try to get an existing credential from the vault.
            credential = vault.FindAllByResource(provider).FirstOrDefault();
        }
        catch (Exception)
        {
            // When there is no matching resource an error occurs, which we ignore.
        }

        if (credential != null)
        {
            // Create a user from the stored credentials.
            user = new MobileServiceUser(credential.UserName);
            credential.RetrievePassword();
            user.MobileServiceAuthenticationToken = credential.Password;

            // Set the user from the stored credentials.
            App.MobileService.CurrentUser = user;

            try
            {
                // Try to return an item now to determine if the cached credential has expired.
                await App.MobileService.GetTable<TodoItem>().Take(1).ToListAsync();
            }
            catch (MobileServiceInvalidOperationException ex)
            {
                if (ex.Response.StatusCode == System.Net.HttpStatusCode.Unauthorized)
                {
                    // Remove the credential with the expired token.
                    vault.Remove(credential);
                    credential = null;
                    continue;
                }
            }
        }
        else
        {
            try
            {
                // Login with the identity provider.
                user = await App.MobileService.LoginAsync(provider);

                // Create and store the user credentials.
                credential = new PasswordCredential(provider, user.UserId, user.MobileServiceAuthenticationToken);
                vault.Add(credential);
            }
            catch (MobileServiceInvalidOperationException ex)
            {
                message = "You must log in. Login Required";
            }
        }
        message = string.Format("You are now logged in - {0}", user.UserId);
        var dialog = new MessageDialog(message);
        dialog.Commands.Add(new UICommand("OK"));
        await dialog.ShowAsync();
    }
}
The modified AuthenticateAsync function tries to use the credentials stored in the PasswordVault to access the mobile service. The following sequence of events occurs:
- If credentials are present, they are fetched from the
PasswordVault. - A simple query is sent to verify that the token hasn't expired.
- If the server responds with a 401 status code, then we fall back to the default authentication flow.
- If the
PasswordVaultdoesn't contain a credentials, we fall back to the default authentication flow.
Note that the app tests for expired authentication tokens during login. However, authentication tokens can expire after authentication, when the user is using the app. An MSDN blog post explains how to handle such a situation.
7. Fetch User Information
The client objects don't expose all the user information, but on the server we can get all the information we need. The User object, which is passed to all scripts, has a getIdentities function that returns an object with provider-specific data. It can be used to query the user information. For a user authenticated with a Microsoft account, the object is returned by calling user.getIdentities.
{
    "microsoft":{
        "userId":"MicrosoftAccount:my-actual-user-id",
        "accessToken":"the-actual-access-token"
    }
}
To get the user information, we send a request to https://apis.live.net/v5.0/me/, passing the access token as a parameter. The amount of information available from the providers to the user scripts is limited. This is the result of the request to the /me endpoint:
{
  "id": "my-live-id",
  "name": "Vivek Maskara",
  "first_name": "Vivek",
  "last_name": "Maskara",
  "link": "https://profile.live.com/",
  "gender": null,
  "locale": "en_US",
  "updated_time": "2015-03-10T16:03:43-08:00"
}
Additional authentication scopes need to be requested for more information. Azure Mobile Services allow us to specify custom scopes that are passed to the authentication providers when performing server-side authentication.
By default, the login only requests the wl.basic scope. We can get more information about the user if we set some additional scopes. Let's now request an additional scope from the Microsoft login.
Under the Configure tab of the mobile service, set the MS_MicrosoftScope in app settings.
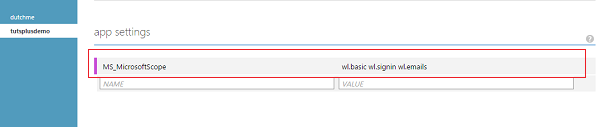
As a result of this change, I will get the additional information I requested after logging in again.
{
  "id": "my-live-id",
  "name": "Vivek Maskara",
  "first_name": "Vivek",
  "last_name": "Maskara",
  "link": "https://profile.live.com/",
  "gender": null,
  "emails": {
    "preferred": "[email protected]",
    "account": "[email protected]",
    "personal": null,
    "business": null
  },
  "locale": "en_US",
  "updated_time": "2015-03-10T16:03:43-08:00"
}
If the user is logged in via a Microsoft account, it will send a request to Live Connect APIs, passing the stored token in the user identities object. Finally, it will parse the JSON object that is returned and retrieve user profile details.
user.getIdentities({
	success: function (identities) {
		var url;
		var oauth = null;
		if (identities.microsoft) {
			var liveAccessToken = identities.microsoft.accessToken;
			url = 'https://apis.live.net/v5.0/me/?method=GET&access_token=' + liveAccessToken;
		}

		if (url) {
			var requestCallback = function (err, resp, body) {
				if (err || resp.statusCode !== 200) {
					console.error('Error sending data to the provider: ', err);
					request.respond(statusCodes.INTERNAL_SERVER_ERROR, body);
				} else {
					try {
						var userData = JSON.parse(body);
						item.userId = user.userId;
						item.display_name = userData.name;
						item.user_email= userData.emails['account'];
						request.execute();
					} catch (ex) {
						console.error('Error parsing response from the provider API: ', ex);
						request.respond(statusCodes.INTERNAL_SERVER_ERROR, ex);
					}
				}
			}
			var req = require('request');
			var reqOptions = {
				uri: url,
				headers: { Accept: "application/json" }
			};
			req(reqOptions, requestCallback);
		} else {
			// Insert with default user name
			request.execute();
		}
	}
});
We now need to modify the insert script to insert a new record if a user with the userId doesn't exist. If a user exists, we update that user. You can use a server-side table script to check if a record exists before completing the insert operation.
Here is an example script that checks if any of the items in the table has a matching userId value and, if that is the case, it doesn’t perform an insert.
function insert(item, user, request) {
    var table = tables.getTable('UsersTable');
    table.where({
       userId: user.userId
    }).read({
       success: upsertItem
    });

    function upsertItem(existingItems) {
        if (existingItems.length === 0) {
            request.execute();
        } else {
        item.id = existingItems[0].id;
          table.update(item, {
            success: function(updatedItem) {
                request.respond(200, updatedItem)
            }
          });
        }
     }
 }
We can now combine both scripts to construct our final insert script for UsersTable. Under the Script tab of UsersTable, replace the insert script with the following script:
function insert(item, user, request) {
    item.display_name = "<unknown>"; // default
    var table = tables.getTable('UsersTable');
    table.where({
       userId: user.userId
    }).read({
       success: upsertItem
    });

    function upsertItem(existingItems) {
        if (existingItems.length === 0) {
            user.getIdentities({
			success: function (identities) {
				var url;
				var oauth = null;
				if (identities.microsoft) {
					var liveAccessToken = identities.microsoft.accessToken;
					url = 'https://apis.live.net/v5.0/me/?method=GET&access_token=' + liveAccessToken;
				}

				if (url) {
					var requestCallback = function (err, resp, body) {
						if (err || resp.statusCode !== 200) {
							console.error('Error sending data to the provider: ', err);
							request.respond(statusCodes.INTERNAL_SERVER_ERROR, body);
						} else {
							try {
								var userData = JSON.parse(body);
								item.userId = user.userId;
								item.display_name = userData.name;
								item.user_email= userData.emails['account'];
								request.execute();
							} catch (ex) {
								console.error('Error parsing response from the provider API: ', ex);
								request.respond(statusCodes.INTERNAL_SERVER_ERROR, ex);
							}
						}
					}
					var req = require('request');
					var reqOptions = {
						uri: url,
						headers: { Accept: "application/json" }
					};
					req(reqOptions, requestCallback);
				} else {
					// Insert with default user name
					request.execute();
				}
			}
		});
        } else {
        // we have updated the user with existing values but you could put new values here.
        item.id = existingItems[0].id;
        item.userId= existingItems[0].userId;
        item.display_name= existingItems[0].display_name;
        item.user_email= existingItems[0].user_email;
        item.profile_picture= existingItems[0].profile_picture;
          table.update(item, {
            success: function(updatedItem) {
                request.respond(200, updatedItem)
            }
          });
        }
     }
}
Now that we have updated the insert script, any call for an insert operation will add a new record if a user with a specific userId doesn't exist. Also, the insert item is updated with user information userId, name, and email.
I have added a method InsertUser, which takes a parameter user of type UsersTable and inserts it into the table.
private async Task InsertUser(UsersTable user)
{
    await peopleTable.InsertAsync(user);
}
After the call to the AuthenticateAsync method on button click, I call the InsertUser method to add the user to UsersTable.
await InsertUser(new UsersTable
{
    ProfilePicture= string.Empty
});
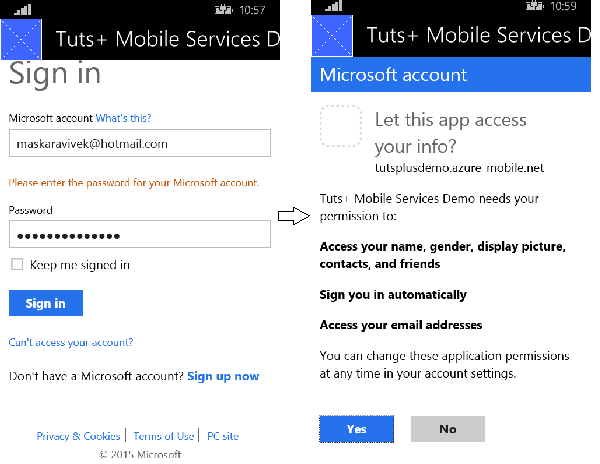
You can run the app in the emulator to see if it works. When you log in for the second time, the app uses the cached authentication token instead of presenting the login screen.
Conclusion
Authenticating users for different identity providers using Azure Mobile Services is quite simple. In this tutorial, I showed how a Microsoft account can be used for authentication. The procedure to use other identity providers is the same. Only the provider parameter needs to be changed in the AuthenticateAsync call. It's recommended to cache the authentication token so that the user can experience single sign-on.
Additional authentication scopes can be requested to fetch more user information. This MSDN article discusses how it can be done for various identity providers. Feel free to download the tutorial's source files for reference. Remember to configure the app to use Azure Mobile Services before deploying it.

Comments