More and more mobile applications offer the ability to send messages to other users using the application. In many games, for example, you can chat with fellow gamers while chat applications allow you to talk to whomever you like. The possibilities are endless. Adding user chat to an application can be an important feature of your application.
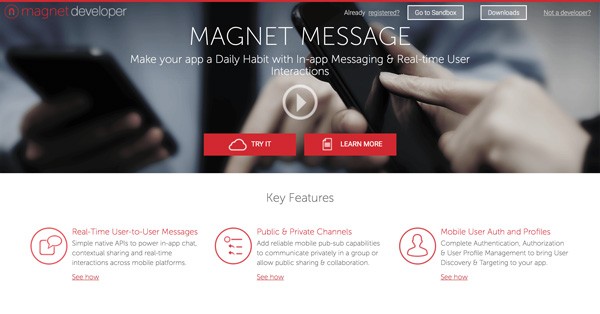
Building a solution to enable users to chat with one another is a daunting task many developers prefer to sidestep. Fortunately, there's no need to reinvent the wheel. Magnet Message is an open source mobile messaging framework that is ideal for this use case. They offer iOS and Android support as well as a REST API. Getting started with Magnet Message is quick and easy thanks to their sandbox environment.
In this tutorial, you will learn how to integrate Magnet Message in an iOS application using Swift 2. You will learn how easy it is to set up Magnet Message in a project and send messages to other users of your application. Let's start by creating an account and setting up the sandbox.
Prerequisites
Even though the Magnet library for iOS is written in Objective-C, in this tutorial I'll be working with Xcode 7.1 and Swift 2.1. You can download Xcode 7.1 from Apple's developer website or from the App Store.
1. Creating a Magnet Account
Before we can start integrating Magnet into a mobile application, we need a Magnet account. A Magnet account gives you access to a sandbox environment for development as well as a number of sample applications to learn from. To follow along, navigate to Magnet's Developer website, click Try It at the top, and sign up with an email address.
2. Creating a Sandbox Application
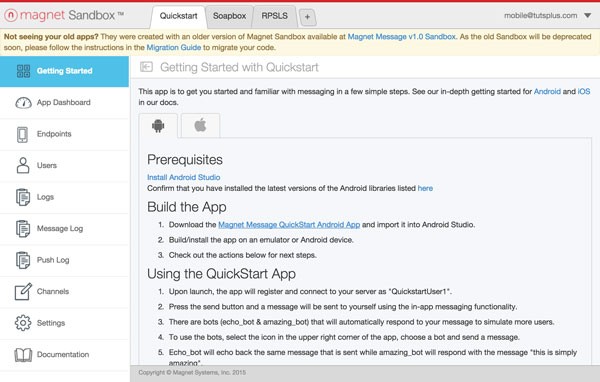
Your free Magnet account gives you access to a range of resources, including a sandbox you can use for development. Go to developer.magnet.com and go to the sandbox. You immediately notice that the sandbox already contains three applications. Each of these applications corresponds with one of the sample applications.
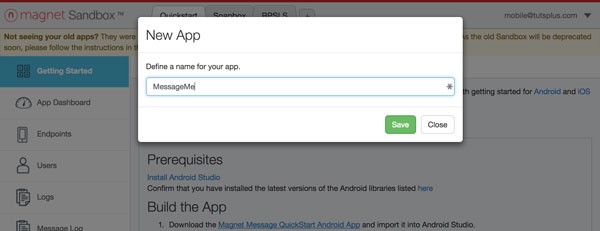
For this tutorial, we'll create a new application. Click the green plus button in the top right to create a new application and name it MessageMe.
When you click Save, the sandbox automatically opens the application and shows you a Getting Started guide. Click the Apple logo at the top to show the instructions for iOS.
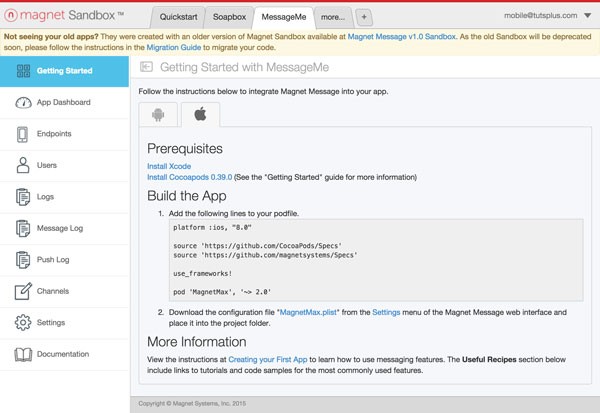
You can skip the instructions, because I'll be guiding you through the setup process. There is one resource we need to get started, a property containing the configuration for the Magnet application. In the second step of the Build the App section, you can see a link to download MagnetMax.plist. Click the link to download the property list to your machine. We'll be needing it in a few moments.
If you open MagnetMax.plist, you'll see that it contains three key-value pairs, BaseURL, ClientID, ClientSecret. This information will be used by Magnet's library to talk to the Magnet Message backend.
3. Setting Up the Project
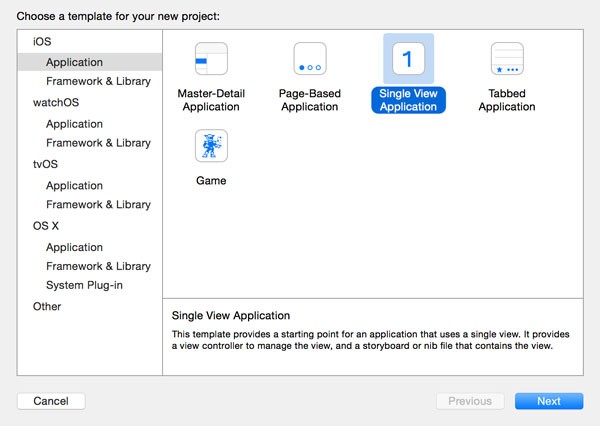
Launch Xcode 7.1 and choose the Single View Application template from the list of iOS > Application templates.
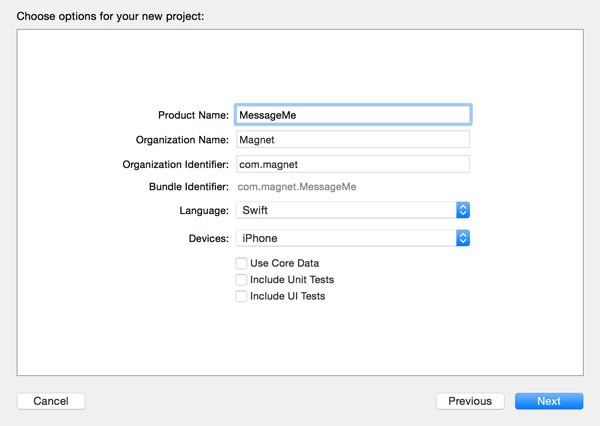
Name the application MessageMe, set Language to Swift, Devices to iPhone, and leave the checkboxes at the bottom unchecked. Tell Xcode where you'd like to save the project and click Create.
4. Setting Up CocoaPods
As I mentioned earlier, Magnet has developed an open source library for interacting with the Magnet Message backend. The easiest way to integrate the library in an Xcode project is through CocoaPods. Close the project you just created, open a Terminal window, and navigate to the root of the project. Create a Podfile for your project by executing the pod init command from the command line.
The Podfile lives at the root of your project. Open it in a text editor and replace its contents with the following.
source 'https://github.com/CocoaPods/Specs'
source 'https://github.com/magnetsystems/Specs'

platform :ios, '9.0'
use_frameworks!

target 'MessageMe' do
  pod 'MagnetMax', '~> 2.0'
end
From the command line, execute the pod install command to install the dependencies specified in the Podfile. This will install the MagnetMax library that Magnet provides for interacting with the Magnet Message API. It will also create a workspace that we'll use from now on. After completing the installation process, open MessageMe.xcworkspace at the root of your project.
5. Setting Up Magnet
Step 1: Adding MagnetMax.plist
Setting up and configuring Magnet is very easy to do. Earlier in this tutorial, you downloaded MagnetMax.plist from Magnet's sandbox. Add this property list to the MessageMe project in the MessageMe workspace. Because MagnetMax.plist contains sensitive data, I have excluded it from source control so you won't find it in the source files of this tutorial.
Step 2: Import MagnetMax Framework
Open AppDelegate.swift and add an import statement for the MagnetMax framework we installed through CocoaPods.
import UIKit
import MagnetMax

@UIApplicationMain
class AppDelegate: UIResponder, UIApplicationDelegate {

    var window: UIWindow?

    ...

}
Step 3: Setting Up Magnet
In application(_:didFinishLaunchingWithOptions:), call setupWithConfiguration(_:) on the MagnetMax class, passing in the name of the configuration in MagnetMax.plist that we want to work with.
func application(application: UIApplication, didFinishLaunchingWithOptions launchOptions: [NSObject: AnyObject]?) -> Bool {
    // Setting Up Magnet
    let configurationFile = NSBundle.mainBundle().pathForResource("MagnetMax", ofType: "plist")
    let configuration = MMPropertyListConfiguration(contentsOfFile: configurationFile!)
    MagnetMax.configure(configuration!)

    return true
}
Step 4: Build and Run
Build and run the target on a physical device or in the simulator to make sure everything is set up correctly. Make sure you've correctly followed the above steps if you run into problems.
6. Registering a User
Before a user can send messages to another user, she needs to create an account in our application. Magnet's account system is simple and transparent, and registering a user is straightforward to implement. In this section, we'll create a simple form to enable users to create an account or, if they already have an account, sign in to their account.
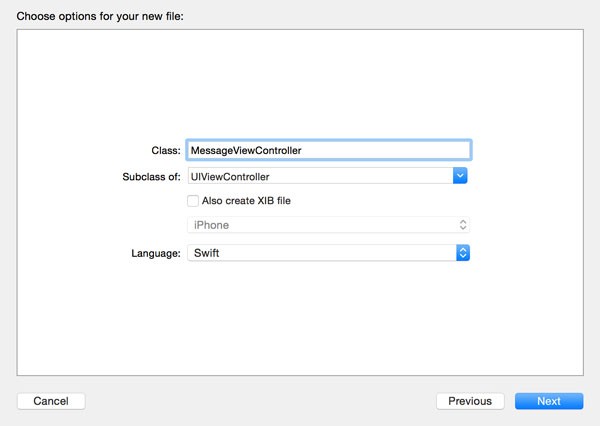
Step 1: Creating Classes
Before we create the user interface, we need to create two UIViewController subclasses, MessageViewController and SignInViewController. The first view controller will be in charge of sending messages. The second view controller will manage user registration as well as the sign in process.
Step 2: Creating User Interface
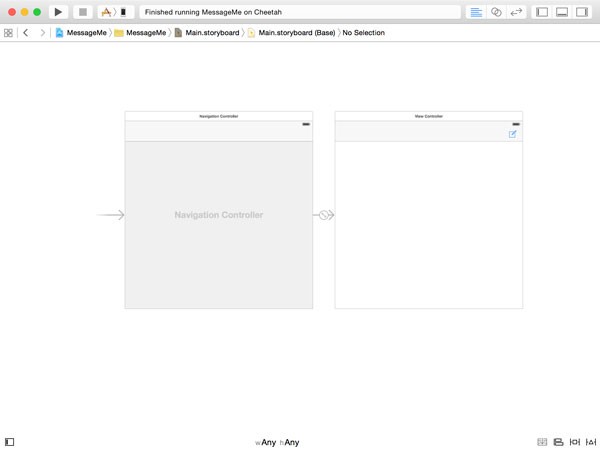
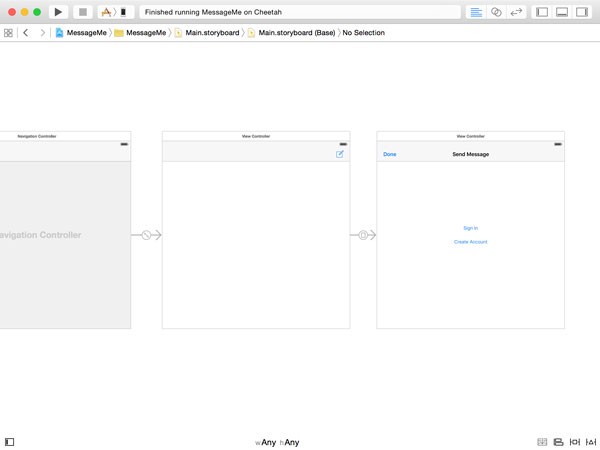
Open Main.storyboard, select the view controller that's already present, and choose Embed In > Navigation Controller from Xcode's Editor menu. Open the Object Library on the right and add a bar button item to the view controller's navigation bar. With the bar button item selected, set System Item to Compose in the Attributes Inspector.
Drag a view controller from the Object Library and set its class to MessageViewController in the Identity Inspector. Create a segue from the compose bar button item to the message view controller, setting Kind to Present Modally. Add a navigation bar at the top of the message view controller and add a bar button item on the left. In the Attributes Inspector, set System Item to Done.
Add two regular buttons to the message view controller and place them in a view. This makes it easier to hide both buttons when necessary. Set the titles of the button to Sign In and Create Account respectively.
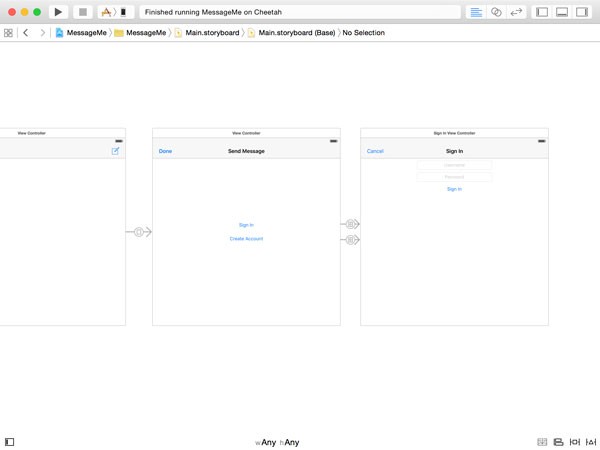
Finally, add another view controller and set its class to SignInViewController in the Identity Inspector. Add a navigation bar at the top and add a bar button item on the left. Set System Item to Cancel in the Attributes Inspector. Add two text fields to the view controller, one for the user's username and one for the user's password. Don't forget to check Secure Text Entry in the Attributes Inspector for the password text field. Last but not least, add a button below the text fields and set its title to Sign In.
Create a segue from the Sign In button of the message view controller to the sign in view controller and set the segue's identifier to SegueSignIn. Repeat this step for the Create Account button and set the segue's identifier to SegueCreateAccount. Both segues should be of kind Show.
Step 3: Creating Outlets
Open MessageViewController.swift and declare an outlet for the view in which the Sign In and Create Account buttons are located. Note that I've also created an action for the Done button in the navigation bar. Don't forget to connect the outlet and the action in the storyboard. For ease of use, I've also declared two constants for the segue identifiers.
import UIKit

class MessageViewController: UIViewController {

    let SegueSignIn = "SegueSignIn"
    let SegueCreateAccount = "SegueCreateAccount"

    @IBOutlet weak var buttonsView: UIView!

    // MARK: -
    // MARK: Actions
    @IBAction func done(sender: UIBarButtonItem) {
        dismissViewControllerAnimated(true, completion: nil)
    }

}
Open SignInViewController.swift and declare three outlets and a helper variable as shown below. The helper variable will help us determine whether the user tapped the Sign In or the Create Account button. I've also created actions for the Sign In and Cancel buttons. Wire everything up in the storyboard before continuing.
import UIKit

class SignInViewController: UIViewController {

    @IBOutlet weak var signInButton: UIButton!
    @IBOutlet weak var usernameTextField: UITextField!
    @IBOutlet weak var passwordTextField: UITextField!

    var hasAccount = true

    // MARK: -
    // MARK: Actions
    @IBAction func signIn(sender: UIButton) {

    }

    @IBAction func cancel(sender: UIBarButtonItem) {

    }


}
Step 4: Delegate Protocol
When the user is successfully signed in, the message view controller needs to be notified. We can do this by creating a delegate protocol. At the top of SignInViewController.swift, I've added an import statement for the MagnetMax library and declared the SignInViewControllerDelegate protocol. The protocol contains one method, controller(_:didSignInWithUser:), which we'll invoke when the user is successfully signed in. We also need to declare a delegate property of type SignInViewControllerDelegate? to keep a reference to the delegate of the sign in view controller.
import UIKit
import MagnetMax

protocol SignInViewControllerDelegate {

    func controller(controller: SignInViewController, didSignInWithUser user: MMUser)

}

class SignInViewController: UIViewController {

    @IBOutlet weak var signInButton: UIButton!
    @IBOutlet weak var usernameTextField: UITextField!
    @IBOutlet weak var passwordTextField: UITextField!

    var delegate: SignInViewControllerDelegate?

    var hasAccount = true

    ...

}
Step 5: Signing In
The first thing we need to do is implement prepareForSegue(_:sender:) in the MessageViewController class. In this method, we check which button the user tapped and configure the SignInViewController instance accordingly by setting its hasAccount property.
// MARK: -
// MARK: Prepare for Segue
override func prepareForSegue(segue: UIStoryboardSegue, sender: AnyObject?) {
    if segue.identifier == SegueSignIn {
        let signInViewController = segue.destinationViewController as! SignInViewController

        // Configure Sign In View Controller
        signInViewController.hasAccount = true
        signInViewController.delegate = self

    } else if segue.identifier == SegueCreateAccount {
        let signInViewController = segue.destinationViewController as! SignInViewController

        // Configure Sign In View Controller
        signInViewController.hasAccount = false
        signInViewController.delegate = self

    }
}
Note that we also set the delegate property of the sign in view controller. This means that the MessageViewController class needs to conform to the SignInViewControllerDelegate protocol as shown below. The implementation of the controller(_:didSignInWithUser:) method is empty for now. Don't forget to add an import statement for the MagnetMax library to avoid compiler warnings.
import UIKit
import MagnetMax

class MessageViewController: UIViewController, SignInViewControllerDelegate {

    ...

    // MARK: -
    // MARK: Sign In View Controller Delegate Methods
    func controller(controller: SignInViewController, didSignInWithUser user: MMUser) {

    }

    ...

}
Let's focus now on the interesting part, the actions of the SignInViewController class. Before we implement the signIn(_:) and cancel(_:) actions, I'd like to implement the viewDidLoad() method to update the title of the Sign In button based on the value of the hasAccount property.
// MARK: -
// MARK: View Life Cycle
override func viewDidLoad() {
    if hasAccount {
        signInButton.setTitle("Sign In", forState: UIControlState.Normal)
    } else {
        signInButton.setTitle("Create Account", forState: UIControlState.Normal)
    }
}
The implementation of the cancel(_:) action is easy enough as you can see below.
@IBAction func cancel(sender: UIBarButtonItem) {
    dismissViewControllerAnimated(true, completion: nil)
}
The signIn(_:) action is more interesting. In this action, we make sure the user has entered valid data, a username and a password, and then invoke a helper method based on the value of the hasAccount property.
@IBAction func signIn(sender: UIButton) {
    guard let username = usernameTextField.text else {
        showAlertWithTitle("Username Required", message: "Enter a valid username.")
        return
    }

    guard let password = passwordTextField.text else {
        showAlertWithTitle("Password Required", message: "Enter a valid password.")
        return
    }

    guard !username.isEmpty && !password.isEmpty else {
        showAlertWithTitle("Error", message: "Enter a valid username and password.")
        return;
    }

    // Create Credential
    let credential = NSURLCredential(user: username, password: password, persistence: .None)

    if hasAccount {
        signInWithCredential(credential)
    } else {
        createAccountWithCredential(credential)
    }
}
The showAlertWithTitle(_:message:) method is a private convenience method for displaying an alert to the user.
// MARK: -
// MARK: Helper Methods
private func showAlertWithTitle(title: String, message: String) {
    // Initialize Alert Controller
    let alertController = UIAlertController(title: title, message: message, preferredStyle: .Alert)

    // Configure Alert Controller
    alertController.addAction(UIAlertAction(title: "OK", style: .Cancel, handler: nil))

    // Present Alert Controller
    presentViewController(alertController, animated: true, completion: nil)
}
The createAccountWithCredential(_:) method is another private helper method for registering the user. We start by creating an instance of the MMUser class. This class represents a user for the Magnet Message backend. We register the user by invoking registerWithCredential(_:success:failure:), passing in an NSURLCredential object and two closures.
private func createAccountWithCredential(credential: NSURLCredential) {
    // Create User
    let user = MMUser()

    // Configure User
    user.userName = credential.user
    user.password = credential.password

    // Register User
    user.register({ (user) -> Void in
        // Sign User In
        self.signInWithCredential(credential)

        }) { (error) -> Void in
            print(error)

            if error.code == 409 {
                // Account Already Exists
                self.signInWithCredential(credential)

            } else {
                // Notify User
                self.showAlertWithTitle("Error", message: "We were unable to create an account. Please try again.")
            }
    }
}
If registration is successful, we immediately sign the user in by invoking signInWithCredential(_:). If something went wrong, we inspect the error that was passed to us. If the error's code is equal to 409, we know the user accidentally created an account with existing credentials. It's then acceptable to sign the user in instead of showing them an alert. If registrations fails, we show the user an alert.
The signInWithCredential(_:) method isn't too complicated. If logging in is successful, we initialize the message module by invoking initModule(_:success:failure:) on MagnetMax. We store the username in the user defaults database and notify the delegate, passing it the MMUser instance. We also dismiss the sign in view controller. If signing the user in is unsuccessful, we show the user an alert.
private func signInWithCredential(credential: NSURLCredential) {
MMUser.login(credential, success: { () -> Void in
    MagnetMax.initModule(MMX.sharedInstance(), success: { () -> Void in
        // Store Username in User Defaults
        NSUserDefaults.standardUserDefaults().setObject(credential.user, forKey: "username")

        // Notify Delegate
        self.delegate?.controller(self, didSignInWithUser: MMUser.currentUser()!)

        // Pop View Controller
        self.dismissViewControllerAnimated(true, completion: nil)

        }, failure: { (error) -> Void in
            print(error)

            // Notify User
            self.showAlertWithTitle("Error", message: "We were unable to sign you in. Please make sure that the credentials you entered are correct.")
    })

    }) { (error) -> Void in
        print(error)

        // Notify User
        self.showAlertWithTitle("Error", message: "We were unable to sign you in. Please make sure that the credentials you entered are correct.")
}
Run the application on a physical device or in the simulator to test what we've got so far. Note that the username cannot contain spaces. You should now be able to register as a user.
7. Creating the Form
Step 1: Creating User Interface
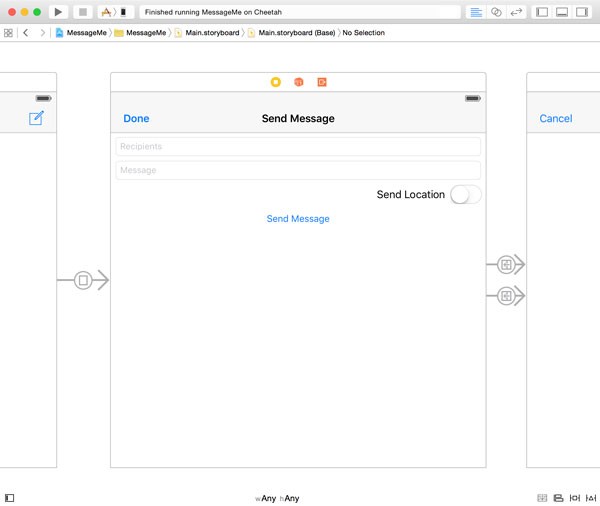
When the user is signed in, she should be able to send messages to other people using the application. Let's start by creating a form for composing the message. Before we revisit Main.storyboard, we're going to declare a few outlets and an action.
We start by declaring an outlet named messageView. We show this view when the user is signed in. At the same time, we hide buttonsView, which contains the Sign In and Create Account buttons.
The message view will contain a text field to enter recipients, a text field for the message itself, a switch to include the location of the user in the message, and a button to send the message. Also note that the MessageViewController class conforms to the UITextFieldDelegate protocol. I'll explain why that is later in this tutorial.
I've also added two actions. The sendMessage(_:) action will be triggered by tapping the Send Message button. The locationSwitchDidChange(_:) action will be invoked when the user flips the switch on.
import UIKit
import MagnetMax

class MessageViewController: UIViewController, UITextFieldDelegate, SignInViewControllerDelegate {

    let SegueSignIn = "SegueSignIn"
    let SegueCreateAccount = "SegueCreateAccount"

    @IBOutlet weak var messageView: UIView!
    @IBOutlet weak var buttonsView: UIView!

    @IBOutlet weak var sendButton: UIButton!
    @IBOutlet weak var locationSwitch: UISwitch!
    @IBOutlet weak var messageTextField: UITextField!
    @IBOutlet weak var recipientsTextField: UITextField!

    ...

    @IBAction func sendMessage(sender: UIButton) {

    }

    @IBAction func locationSwitchDidChange(sender: UISwitch) {

    }

    ...

}
The user interface of the message view controller changes quite a bit as you can see below. There are a few things to point out.
- The message view controller should be set as the delegate of the recipients text field, the top text field.
- The location switch should be set to off in the Attributes Inspector and the
locationSwitchDidChange(_:)action needs to be wired up to the Value Changed event. - Wire the Touch Up Inside event to the
sendMessage(_:)action we declared a moment ago in theMessageViewControllerclass.
Step 2: Showing the Form
We only show the form when the user is signed in. We can easily do this through property observers. Start by creating a property, user, of type MMXUser? in the message view controller and add a didSet property observer to it. In the didSet property observer we invoke a helper method, updateView().
var user: MMUser? {
    didSet {
        updateView()
    }
}
The implementation of the updateView() method is simple. We also implement a setupView() method, which we invoke in the viewDidLoad() method of the MessageViewController class.
// MARK: -
// MARK: View Methods
func setupView() {
    updateView()
}

func updateView() {
    let signedIn = (user != nil)
    buttonsView.hidden = signedIn
    messageView.hidden = !signedIn
}
// MARK: -
// MARK: View Life Cycle
override func viewDidLoad() {
    super.viewDidLoad()

    setupView()
}
The only thing left to make this work is update the user property of the message view controller in the controller(_:didSignInWithUser:) delegate method.
// MARK: -
// MARK: Sign In View Controller Delegate Methods
func controller(controller: SignInViewController, didSignInWithUser user: MMUser) {
    self.user = user
}
Run the application, sign in to your account, and make sure the form is shown in the message view controller.
8. Fetching the User's Location
Fetching the user's location is pretty simple, especially in iOS 9. Since iOS 9, the CLLocationManager class declares a method, requestLocation(), to ask the operating system for the location of the device. Let's see how this works.
Step 1: Updating Info.plist
To make this work, we first need to add an entry to the target's Info.plist. What we need to add is a message informing the user why we need access to their location. Open the target's Info.plist in Xcode and add a new row with key NSLocationWhenInUseUsageDescription and value MessageMe would like to use your current location.
Step 2: Declaring Properties
We also need to declare two properties in the MessageViewController class, a property for the location manager and a property for the current location. Both are optionals.
import UIKit
import MagnetMax
import CoreLocation

class MessageViewController: UIViewController, UITextFieldDelegate, CLLocationManagerDelegate, SignInViewControllerDelegate {

    let SegueSignIn = "SegueSignIn"
    let SegueCreateAccount = "SegueCreateAccount"

    @IBOutlet weak var messageView: UIView!
    @IBOutlet weak var buttonsView: UIView!

    @IBOutlet weak var sendButton: UIButton!
    @IBOutlet weak var locationSwitch: UISwitch!
    @IBOutlet weak var messageTextField: UITextField!
    @IBOutlet weak var recipientsTextField: UITextField!

    var locationManager: CLLocationManager?
    var currentLocation: CLLocation?

    ...

}
Note that we also add an import statement for the CoreLocation framework and we conform the MessageViewController class to the CLLocationManagerDelegate protocol.
Step 3: Requesting Permission
We then update the locationSwitchDidChange(_:) method, which is triggered when the value of the location switch changes. We invoke requestLocation() when the switch is on.
@IBAction func locationSwitchDidChange(sender: UISwitch) {
    if sender.on {
        requestLocation()
    }
}
The requestLocation() method is a private helper method in which we set up the location manager. Before we ask the operating system for the location of the device, we verify that we have permission to do so. If we don't, we first ask for the user's permission by invoking requestWhenInUseAuthorization().
// MARK: -
// MARK: Helper Methods
private func requestLocation() {
    if locationManager == nil {
        // Initialize Location Manager
        let locationManager = CLLocationManager()

        // Configure Location Manager
        locationManager.delegate = self

        // Set Location Manager
        self.locationManager = locationManager
    }

    if CLLocationManager.authorizationStatus() == .AuthorizedWhenInUse {
        // Request Location
        locationManager?.requestLocation()
    } else {
        // Ask User for Permission
        locationManager?.requestWhenInUseAuthorization()
    }
}
By requesting the user's permission, the user will be prompted for permission. After the user makes its decision, allowing or denying permission, a delegate method is invoked, locationManager(_:didChangeAuthorizationStatus:). In this method, we request the location if we are allowed to do so.
// MARK: -
// MARK: Location Manager Delegate Methods
func locationManager(manager: CLLocationManager, didChangeAuthorizationStatus status: CLAuthorizationStatus) {
    if status == .AuthorizedWhenInUse {
        locationManager?.requestLocation()
    }
}
When requesting the location of the device, one of two delegate methods of the CLLocationManagerDelegate protocol is invoked:
-
locationManager(_:didUpdateLocations:)is invoked if the operating system has located the device. -
locationManager(_:didFailWithError:)is invoked if locating the device failed for some reason.
func locationManager(manager: CLLocationManager, didUpdateLocations locations: [CLLocation]) {
    if let location = locations.first {
        // Update Current Location
        currentLocation = location
    }
}

func locationManager(manager: CLLocationManager, didFailWithError error: NSError) {
    locationSwitch.setOn(false, animated: true)
}
In locationManager(_:didUpdateLocations:), we store the location in the currentLocation property.
9. Selecting Recipients
Step 1: Creating RecipientsViewController Class
The final piece of the puzzle is selecting recipients to send the message to. Create a new class, RecipientsViewController, and add an import statement for the MagnetMax library. At the top, declare a protocol, RecipientsViewControllerDelegate, to inform the delegate which recipients the user selected. The delegate will be the message view controller. We also need a property to keep a reference to the delegate.
import UIKit
import MagnetMax

protocol RecipientsViewControllerDelegate {

    func controller(controller: RecipientsViewController, didSelectRecipients recipients: [MMUser])

}

class RecipientsViewController: UIViewController {

    var delegate: RecipientsViewControllerDelegate?

    ...

}
Before we create the user interface of the view controller, declare an outlet for a table view and implement two actions as shown below.
class RecipientsViewController: UIViewController {

    @IBOutlet weak var tableView: UITableView!

    ...

    // MARK: -
    // MARK: Actions
    @IBAction func cancel(sender: UIBarButtonItem) {
        dismissViewControllerAnimated(true, completion: nil)
    }

    @IBAction func done(sender: UIBarButtonItem) {

    }

}
Step 2: Creating User Interface
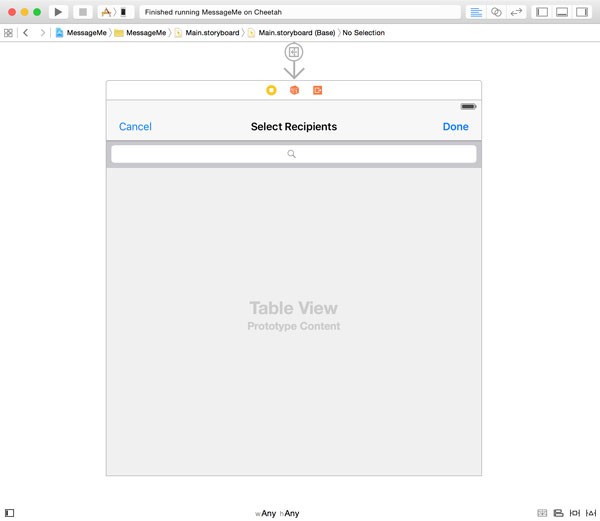
The user interface is pretty straightforward. Add a navigation bar at the top and add two bar button items to it, Cancel on the left and Done on the right. Add a table view to the view controller, set its dataSource and delegate outlets, and add a search bar at the top of the table view. It's important that the view controller is the delegate of the search bar.
Finally, create a manual segue from the message view controller to the recipients view controller. Set the segue's identifier to SegueRecipients and Kind to Show in the Attributes Inspector.
Step 3: Implementing Delegate Protocols
Open RecipientsViewController.swift and conform the RecipientsViewController controller to the UITableViewDataSource, UITableViewDelegate, and UISearchBarDelegate protocols.
Declare a constant for the reuse identifier of the table view cells and a property, users, that will act as the data source of the table view. The users property is of type [MMUser].
class RecipientsViewController: UIViewController, UITableViewDataSource, UITableViewDelegate, UISearchBarDelegate {

    let SearchCell = "SearchCell"

    @IBOutlet weak var tableView: UITableView!

    var delegate: RecipientsViewControllerDelegate?

    var users: [MMUser] = []

    ...

}
In the viewDidLoad() method, register the UITableViewCell class for cell reuse.
// MARK: -
// MARK: View Life Cycle
override func viewDidLoad() {
    super.viewDidLoad()

    tableView.registerClass(UITableViewCell.classForCoder(), forCellReuseIdentifier: SearchCell)
}
The implementation of the UITableViewDataSource protocol is also straightforward. We display the username of each user that we're going to fetch from the Magnet Message backend.
// MARK: -
// MARK: Table View Data Source Methods
func numberOfSectionsInTableView(tableView: UITableView) -> Int {
    return users.count > 0 ? 1 : 0
}

func tableView(tableView: UITableView, numberOfRowsInSection section: Int) -> Int {
    return users.count
}

func tableView(tableView: UITableView, cellForRowAtIndexPath indexPath: NSIndexPath) -> UITableViewCell {
    let cell = tableView.dequeueReusableCellWithIdentifier(SearchCell, forIndexPath: indexPath)

    // Fetch User
    let user = users[indexPath.row]

    // Configure Cell
    cell.textLabel?.text = user.userName

    return cell
}

func tableView(tableView: UITableView, canEditRowAtIndexPath indexPath: NSIndexPath) -> Bool {
    return false
}
More interesting is the implementation of the searchBar(_:textDidChange:) method. In this method, we invoke searchUsers(_:limit:offset:sort:success:failure:) on the MMUser class. We pass in the query, how many results we'd like to receive, an offset, a key to sort the results by, and two closures, one for success and one for failure.
// MARK: -
// MARK: Search Bar Delegate Methods
func searchBar(searchBar: UISearchBar, textDidChange searchText: String) {
    guard searchText.characters.count > 3 else { return }

    MMUser.searchUsers("userName:\(searchText)*", limit: 50, offset: 0, sort: "userName:asc", success: { (users) -> Void in
        self.users = users
        self.tableView.reloadData()

        }) { (error) -> Void in
            print(error)
    }
}
Step 4: Notifying the Delegate
When the user has made its selection and taps the Done button, we forward the selection of recipients to the delegate, the message view controller.
@IBAction func done(sender: UIBarButtonItem) {
    // Fetch Selection
    var selection: [MMUser] = []

    if let indexPaths = tableView.indexPathsForSelectedRows {
        for indexPath in indexPaths {
            selection.append(users[indexPath.row])
        }
    }

    // Notify Delegate
    delegate?.controller(self, didSelectRecipients: selection)

    // Dismiss View Controller
    dismissViewControllerAnimated(true, completion: nil)
}
The only thing left to do is configuring the recipients view controller when the SegueRecipients segue is performed. We do this in the MessageViewController class. Update the prepareForSegue(_:sender:) as shown below.
// MARK: -
// MARK: Prepare for Segue
override func prepareForSegue(segue: UIStoryboardSegue, sender: AnyObject?) {

    ...

    } else if segue.identifier == SegueRecipients {
        let recipientsViewController = segue.destinationViewController as! RecipientsViewController

        // Configure Recipients View Controller
        recipientsViewController.delegate = self
    }
}
This also means that we need to declare the SegueRecipients constant and conform the MessageViewController class to the RecipientsViewControllerDelegate protocol.
class MessageViewController: UIViewController, UITextFieldDelegate, CLLocationManagerDelegate, SignInViewControllerDelegate, RecipientsViewControllerDelegate {

    let SegueSignIn = "SegueSignIn"
    let SegueRecipients = "SegueRecipients"
    let SegueCreateAccount = "SegueCreateAccount"

    ...

}
Step 5: Storing the Recipients
In the MessageViewController class, we temporarily store the recipients in a property, recipients, of type [MMUser].
var recipients: [MMUser] = []
In the controller(_:didSelectRecipients:) method of the RecipientsViewControllerDelegate protocol, we update the recipients property and the recipients text field. We could use a property observer to accomplish the same thing.
// MARK: -
// MARK: Recipients View Controller Delegate Methods
func controller(controller: RecipientsViewController, didSelectRecipients recipients: [MMUser]) {
    // Update Recipients
    self.recipients = recipients

    var recipientsAsStrings: [String] = []

    for recipient in recipients {
        recipientsAsStrings.append(recipient.userName)
    }

    // Update Text Field
    recipientsTextField.text = recipientsAsStrings.joinWithSeparator(", ")
}
Finally, we show the recipients view controller when the user taps the recipients text field. That's why the message view controller needs to be the delegate of the recipients text field.
// MARK: -
// MARK: Text Field Delegate Methods
func textFieldDidBeginEditing(textField: UITextField) {
    performSegueWithIdentifier(SegueRecipients, sender: self)
}
10. Sending a Message
It's finally time to send the message. You'll be surprised by how simple this is with the MagnetMax library. We send a message in the sendMessage(_:) action.
@IBAction func sendMessage(sender: UIButton) {
    guard let messageAsString = messageTextField.text else {
        showAlertWithTitle("Message Required", message: "You need to enter a message.")
        return
    }

    guard recipients.count > 0 else {
        showAlertWithTitle("Recipients Required", message: "You need to have at least one recipient.")
        return
    }

    let toRecipients = Set(recipients)
    var contents: [String : String] = ["message" : messageAsString]

    if let location = currentLocation {
        let coordinate = location.coordinate
        contents["location"] = "\(coordinate.latitude),\(coordinate.longitude)"
    }

    let message = MMXMessage(toRecipients: toRecipients, messageContent: contents)
    message.sendWithSuccess({ (invalidUsernames) -> Void in
        self.showAlertWithTitle("Message Sent", message: "Your message was successfully sent.")

        }) { (error) -> Void in
            print(error)
    }
}
We first make sure that the required fields are filled out by the user. Location is optional. We send a message by creating an instance of the MMXMessage class, passing in the recipients and what we'd like to send. Note that Magnet Message supports rich messaging so you can add text as well as media.
To send the message, we invoke sendWithSuccess(_:failure:) on the MMXMessage object, passing in a success and failure closure. This message returns immediately and hands us the identifier of the message. We don't need that for this example. The implementation of showAlertWithTitle(_:message:) is similar to what we've seen before.
private func showAlertWithTitle(title: String, message: String) {
    // Initialize Alert Controller
    let alertController = UIAlertController(title: title, message: message, preferredStyle: .Alert)

    // Configure Alert Controller
    alertController.addAction(UIAlertAction(title: "OK", style: .Cancel, handler: nil))

    // Present Alert Controller
    presentViewController(alertController, animated: true, completion: nil)
}
Note that you can only successfully send a message to another user if they are using the application. To test what we've built so far, you need to sign in on two devices or use the simulator.
11. Receiving Messages
Step 1: Start Observing
To receive messages from other users, we need to take care of two things in the MessageViewController. In the viewDidLoad(), we tell the MagnetMax library that we want to receive messages by invoking the start() class method.
In the viewDidLoad() method, we also add the view controller as an observer of notifications with name MMXDidReceiveMessageNotification. The MagnetMax library posts a notification with this name whenever it receives a message from the Magnet Message backend.
override func viewDidLoad() {
    super.viewDidLoad()

    MMX.start()

    let notificationCenter = NSNotificationCenter.defaultCenter()
    notificationCenter.addObserver(self, selector: "didReceiveMessage:", name: MMXDidReceiveMessageNotification, object: nil)

    setupView()
}
Step 2: Handling Messages
In didReceiveMessage(_:), we perform a number of checks using guard and then send a delivery confirmation to the Magnet Message backend to tell it that we received the message.
// MARK: -
// MARK: Notification Handling
func didReceiveMessage(notification: NSNotification) {
    guard let userInfo = notification.userInfo else { return }
    guard let message = userInfo[MMXMessageKey] as? MMXMessage else { return }

    // Send Delivery Confirmation
    message.sendDeliveryConfirmation()

    print(message)
}
Conclusion
Even though this tutorial was fairly lengthy, I'm sure you agree that integrating Magnet Message didn't take much effort from our part. The heavy lifting is done by the MagnetMax library. Sending and receiving messages is only part of what the Magnet platform can do. Magnet provides support for media, public and private channels, and push notifications. You can read more about these features on Magnet's website.

Comments