In this three part tutorial series, our main goal is to describe how jQuery Mobile can be used to develop a native Android application. First, we will develop a stand-alone, sample web application that will browse articles from Yahoo! News using jQuery Mobile. Then we will convert that web application into a native Android application with minimal effort.
The jQuery Mobile project is a mobile web framework with its alpha 2 version released in November, 2010. The framework can be used to develop cross-platform mobile web applications for Android OS, iOS, Blackberry OS, and similar platforms (For a complete cross-compatibility chart, see http://jquerymobile.com/gbs/). Although the framework was designed to build cross-mobile web applications, it is possible to use jQuery Mobile to develop native Android applications as well. Consequently, the goal of this tutorial series is two-fold:
First, we will illustrate the dynamic construction of basic UI elements in jQuery Mobile. For this purpose, we will implement a sample web application, called News application, to browse news articles from Yahoo! News. The application will send AJAX based HTTP requests to a server and parse the XML response to construct the UI. We will utilize the jquery-dotimeout-plugin to illustrate an animation technique where news headlines are displayed one after another at periodic intervals with a fade in/out effect. This will give the reader insight into content formatting for jQuery Mobile lists, particularly the 'split list'. We will also use the DST.js plugin for storing the user's current news category selections with HTML5 local storage. The web application consists of an HTML file that has the UI code, jQuery Mobile libraries, and jQuery plugins. The HTML file also uses a simple PHP file which forwards HTTP requests to the Yahoo! News URL and sends the response back to the HTML file. This is a method to work around the same-origin restriction of AJAX requests in web browsers. The PHP file does not perform any manipulation of the request or response as the main goal is to utilize jQuery/jQuery Mobile APIs for creating the request, parsing the response, and constructing the UI. We will provide screen images of the web application in Android OS and iOS devices to illustrate the fact that the UI has a consistent look and feel across multiple platforms.
Second, we will demonstrate how to develop a native Android application where the UI is coded via the jQuery Mobile framework. For this purpose, we will utilize the web application developed previously. The main idea is to use the android.webkit.WebView object as a container to run the HTML file in the web application. The only necessary change in the HTML file is to direct the AJAX requests to the Yahoo! News URL instead of the PHP file. We will show how to integrate the HTML file that contains the UI code with an android.app.Activity and an android.webkit.WebViewClient. We will also show how to create the launch icons for our Android application based on the Android Icon Guidelines.
The files needed to run the web and the native Android applications are available for download as part of this tutorial series. For the Android application, we will describe how to import the project files into the Eclipse IDE.
Organization Of This Series
This tutorial, the first in our series, is organized as follows: in the "Page Flow" section, we start introducing the application by giving screen images and describing the page flow. Then we discuss some technical details of the web application in the "Request/Response Model" section. The section "Page Structure" is where we present jQuery Mobile elements to construct our pages.
In the second tutorial in this series, we complete the development of the web application. We continue introducing the jQuery Mobile code, dynamically construct a split list, discuss an animation technique for text in a split list item, and provide transitions between the pages in our application. A special section of the second tutorial is dedicated to explaining how we work around the same-origin restriction of AJAX requests in the web application. Screen images of the final web application on iOS and Android devices are provided for side-by-side comparison.
The third and final tutorial in this series is dedicated to migrating the web application into a native Android application. This tutorial will include a high-level description of the changes necessary to convert our web-application into an Android app, with special attention paid to the custom android.app.Activity and android.webkit.WebViewClient classes and an examination of the configuration files AndroidManifest.xml and strings.xml. The process of setting an application launch icon and the overall file structure of our Android project will also be discussed.
Page Flow
Let us take a look at the individual pages of the final product to get a sense of how the application will work. The page flow discussed here applies to both the web and native Android applications:
The first page is the Categories page where user can have a quick look at all the news headlines in various categories of interest:

As shown above, each news category is displayed in a jQuery Mobile split list item that consists of a section on the left with text and another section on the right with a button. On the text section, the category title is shown above the news headlines for that category. The news headlines for a category are shown one after another in a loop every 2 seconds with a fade in/out animation effect. On that page, the user can:
- Delete a category by pressing the delete button.
- Go to the list of all news under a category by pressing on the text section of the list item for that category.
- Add a new category by pressing the add button.
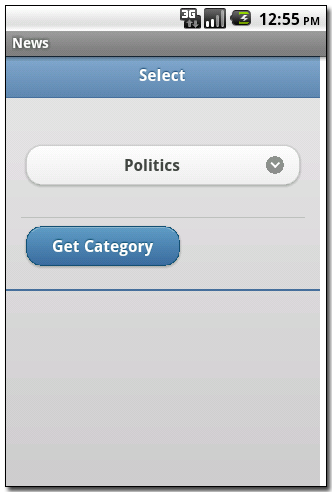
On the Categories page, if user presses the add button, the Category Selection page (Figure 2) is displayed:

On this page, the user selects a news category from a list and presses the Get Category button to add the category to the Categories page.
On the Categories page, pressing on the text section of the list item for a category takes the user to the News page where all news items under that category are shown (Figure 3):

On the News page, a news item may have a picture associated with it, which serves as a link for further detail on the particular news item. Pressing on the picture takes the user to the News Detail page (Figure 4):

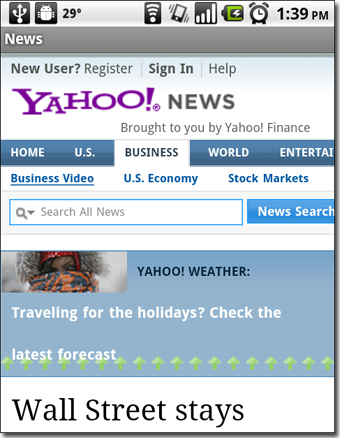
Note that, in the web application, the News Detail page is displayed in the browser outside the HTML page running the application code. In order to go back, the user needs to press the back button on the browser. That action takes the user back to the Categories page. In the native Android application, the News Detail page is displayed in the same android.webkit.WebView instance where the application is launched, outside the HTML page running the application code. Pressing on the back button of the device takes the user back to the Categories page.
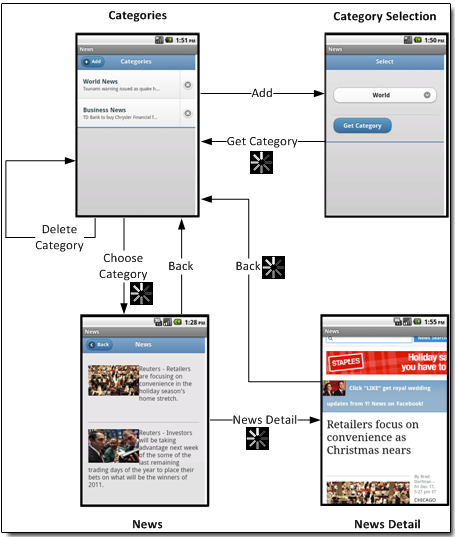
The diagram on Figure 5 summarizes the flow model between the pages in our News application:

Observe the spinning icon  during certain transitions. This indicates that a progress page is shown to the user during the transition. The progress page is useful to give the user feedback that the request is being processed. Note that a progress page during transition from News to News Detail is displayed only in the native Android application, not in the web application. (More discussion on this will be given in Part 3, "Changes In index.html".)
Request/Response Model
Let us talk about how requests and responses are handled in the web application. There is a single HTML page that contains the UI and event handling code for the News application, which is named index.html. That file is downloaded into the user's mobile browser from a web server (for our testing, we used an Apache 2.2 web server). The page actions "Get Category" and "Choose Category" involve AJAX requests to obtain news information from the Yahoo! News server URL, http://rss.news.yahoo.com/. Due to the same-origin restriction of AJAX requests, it is not possible for the browser to send those requests directly to the Yahoo! News server. As a work around, we employ a PHP file in our web server, named bridge.php, that sends those requests to the Yahoo! News server on behalf of the browser and relays the response back. On the other hand, the page action News Detail involves a regular HTTP GET request to the Yahoo! News server. For this reason, bridge.php is not needed.

In terms of the request/response model, the native Android application differs from the web application in two ways. First, it does not need bridge.php. This is because when packaged as part of a native Android application, an HTML page running in android.webkit.WebView is not subjected to same-origin restrictions when making AJAX calls. Second, in the native Android application the page action News Detail is an AJAX call rather than a regular HTTP GET request. We will discuss this further in Part 3, "Changes In index.html".
Page Structure
A "page" in the jQuery Mobile framework can be a single page or a local internal linked page within a page. A container page will include one or more content pages. It is possible to display/hide content pages selectively. As mentioned earlier, our web application consists of a single HTML page named index.html that contains all the UI and event handling code. We define our container page as follows:
<!-- Container page -->
<div data-role="page" data-theme="b" id="containerPage">
   ... <!-- Content pages will go here -->
</div>
The data-theme attribute of the container div tag has the value b. The data-theme attribute allows us to choose from available jQuery Mobile styles:
<div data-role="page" data-theme="b" id="page1">
The default theme has various color swatches named a, b, c, d, e, each providing a consistent set of colors for different elements in the page. For our application we chose the color corresponding to b.
The content pages Categories, Category Selection, and News will be contained inside the container page. A content page will typically have a header, a content area, and a footer with each defined within a div tag. The value of the data-role attribute in the div tag defines the role of the tag.
- To define a header, use
<div ... data-role="header" ... > - To define a content area, use
<div ... data-role="content" ... > - To define a footer, use
<div ... data-role="footer" ... >
Let us now look at the various content pages in our application.
Categories Page

<!-- Categories -->
<div data-role="header" id="hdrCategories" data-nobackbtn="true">
   <h1>Categories</h1>
   <a id="buttonAddCategory" data-icon="plus" class="ui-btn-left" href=""
      data-role="button" data-inline="true">Add</a>
</div>

<div data-role="content" id="contentCategories">
   <ul data-role="listview" data-split-icon="delete" data-split-theme="d"
      id="currentNews"></ul>
</div>

<div data-role="footer" id="ftrCategories"></div>
In the header section, observe the data-nobackbtn="true" attribute. By default, jQuery Mobile framework would include a Back button in the header section. By explicitly setting that attribute as above, we avoid having a Back button. Instead, we include an Add button in the header using <a id="buttonAddCategory" ...>. Since the value of the data-icon attribute is plus, the button will have a plus sign. Also, class="ui-btn-left" ensures the button is placed on the left side of the header. We don't want to include anything in the footer section and therefore the div for footer is empty. As a result, only a thin horizontal line will be displayed in the footer section.
The content area has a so called jQuery Mobile split list. Referring to Figure 1 showing the Categories page, every list item consists of a section on the left with text and another section on the right with a button, hence 'split'. The data-split-icon and data-split-theme attributes define the list as a split list. Note that jQuery Mobile framework has the flexibility to format the split sections in different ways. For example, you can place icons on the text section, meaning that instead of a delete button on the right, you can choose to have a different icon. In our News application, each list item will correspond to a particular news category. The list items will be dynamically constructed based on user selections. Initially, the list is empty.
Category Selection Page

<!-- Category Selection -->
<div data-role="header" id="hdrSelect" data-nobackbtn="true">
  <h1>Select</h1>
</div>

<div data-role="content" id="contentSelect">
  <form id="form1">
    <div id="categoryDiv" data-role="fieldcontain">
      <select id="category" tabindex="2">
        <option value=''>Select a Category</option>
        <option value='topstories'>Top Stories</option>
        <option value='us'>U.S.</option>
        <option value='world'>World</option>
        <option value='politics'>Politics</option>
        ...
      </select>
    </div>
    <a id="buttonGetCategory" href="" data-role="button" data-inline="true">Get Category</a>
  </form>
</div>

<div data-role="footer" id="ftrSelect"></div>
On the Category Selection page, in the content area there is a form that allows the user to select and add a news category. The news categories are a subset of categories in Yahoo! News as listed in http://news.yahoo.com/rss. Category selection is processed when the user presses the button with id="buttonGetCategory".
Observe that there is no back button and the footer section is empty.
News Page

<!-- News -->
<div data-role="header" id="hdrNews" data-nobackbtn="true">
  <h1>News</h1>
  <a id="buttonHdrShowCategories" data-icon="arrow-l" class="ui-btn-left" href="" data-role="button" data-inline="true">Back</a>
</div>

<div data-role="content" id="contentNews"></div>

<div data-role="footer" id="ftrNews">
  <a id="buttonFtrShowCategories" data-icon="arrow-l" class="ui-btn-left" href=""
    data-role="button" data-inline="true">Back to News   Categories</a>
</div>
On that page, the content area will be dynamically populated with all the news items associated with a category based on user selection. Initially, the content area is empty. In the header section there is a back button. However, rather than relying on jQuery Mobile's default back action we will implement that action via an event handler. We therefore explicitly define a button with id="buttonHdrShowCategories" (Event handler code for the button will be reviewed in Part 2, "Going To The Categories Page From News Page"). The attribute data-icon="arrow-l" uses a built-in jQuery Mobile icon designated for back buttons. For available jQuery Mobile button icons, see http://jquerymobile.com/demos/1.0a2/#docs/buttons/buttons-icons.html. On that page we have a back button on the footer as well. This is because the page will be typically long and the user will need to scroll down to go through all the news items. We want the user to be able to go back from the bottom of the page without having to scroll all the way up to the top. Event handlers for the top and bottom back buttons will be identical.
Progress Page
Previously, we mentioned that during various page transitions we display a progress page until the transition is completed. This is necessary only in transitions that require processing time due to constructing a request or parsing the response. The progress page is very simple, with descriptive text and a spinning icon.
<!--  Progress -->
<div data-role="header" id="hdrProgress" data-nobackbtn="true">
	<h1>Processing...</h1>
</div>

<div data-role="content" id="contentProgress">
	<div align="CENTER"><h4>Please wait.</h4></div>
	<div align="CENTER"><img id="spin" src="img/wait.gif"/></div>
</div>

<div data-role="footer" id="ftrProgress"></div>
News Detail Page
The content of the News Detail page is provided by the Yahoo! News URL. How this page is displayed is described in Part 2, "Going To The News Detail Page From The News Page".
Displaying Pages
Simply displaying a page amounts to showing that page and hiding all other pages. Let us discuss how to achieve this behavior. The div elements representing header, content and footer of each page are assigned variables identifying them in the jQuery convention as shown below. Since these are repeatedly used, defining global variables for them provides a performance advantage as each variable is initialized only once but can be used many times.
<script>
  ...
  var hdrCategoriesVar = $('#hdrCategories');
  var contentCategoriesVar = $('#contentCategories');
  var ftrCategoriesVar = $('#ftrCategories');

  var hdrSelectVar = $('#hdrSelect');
  var contentSelectVar = $('#contentSelect');
  var ftrSelectVar = $('#ftrSelect');

  var hdrProgressVar = $('#hdrProgress');
  var contentProgressVar = $('#contentProgress');
  var ftrProgressVar = $('#ftrProgress');

  var hdrNewsVar = $('#hdrNews');
  var contentNewsVar = $('#contentNews');
  var ftrNewsVar = $('#ftrNews');
  ...
</script>
To hide a page, we call the jQuery hide() function on the header, content, and footer variables of that page. For example, to hide the Categories page:
function hideCategories(){
   hdrCategoriesVar.hide();
   contentCategoriesVar.hide();
   ftrCategoriesVar.hide();
}
Similarly, for the Category Selection, News, and Progress pages, we have the following 'hide' functions:
function hideSelect(){
   hdrSelectVar.hide();
   contentSelectVar.hide();
   ftrSelectVar.hide();
}
...
function hideNews(){
   hdrNewsVar.hide();
   contentNewsVar.hide();
   ftrNewsVar.hide();
}
...
function hideProgress(){
   hdrProgressVar.hide();
   contentProgressVar.hide();
   ftrProgressVar.hide();
}
In order to show a page, we hide all other pages and call the jQuery show() function on the header, content, and footer variables of that page. For example, to show the Categories page we have the following function:
function showCategories(){
   hideSelect();
   hideProgress();
   hideNews();
   hdrCategoriesVar.show();
   contentCategoriesVar.show();
   ftrCategoriesVar.show();
}
Similarly, for Category Selection, News, and progress pages, we have the following 'show' functions:
function showSelect(){
   hideCategories();
   hideProgress();
   hideNews();
   hdrSelectVar.show();
   contentSelectVar.show();
   ftrSelectVar.show();
}
...
function showNews(){
   hideCategories();
   hideSelect();
   hideProgress();
   hdrNewsVar.show();
   contentNewsVar.show();
   ftrNewsVar.show();
}
...
function showProgress(){
   hideCategories();
   hideSelect();
   hideNews();
   hdrProgressVar.show();
   contentProgressVar.show();
   ftrProgressVar.show();
}
Instead of having a single HTML page that contains all the UI code, we could have organized the UI into multiple HTML pages. For the purposes of this tutorial, we chose the former approach. For the latter case, see jQuery Mobile's navigation model that explains how jQuery Mobile performs page navigations between different physical files.
Closing Remarks
In this initial part of the tutorial series, we introduced the goals of the tutorial and discussed the sample application that will be implemented. We also started presenting the jQuery Mobile framework with emphasis on page structure. Next week, we will continue introducing the jQuery Mobile code and complete the implementation of our web application in part two of this series.


Comments