If you're trying to speed up your blog, you've probably used techniques such as optimizing your images, getting rid of unnecessary plugins and scripts, and minifying your CSS and JavaScript. However, optimizing the content on your local server can only go so far. The next step in the blog speed game is taking advantage of Content Delivery Networks (CDNs).
What is a CDN? Basically, it's a service that stores certain elements of your site (pictures, JavaScript files, CSS files) and distributes them across a network of geographically dispersed servers. When a visitor hits your site, the CDN will determine the server on their network closest to the visitor and serve your content from there. This can really cut down on your load times!
CloudFlare is a very popular and free CDN that you can use for this purpose. Using CloudFlare alone can result in good loading time decreases on your blog. However, you can decrease these load times even more by combining CloudFlare with a "full" CDN. I've been using it in conjunction with MaxCDN for a few months over at my blog, College Info Geek, and I've had great results.
In this tutorial, I'm going to show you how to combine these two services on your own blog by using W3 Total Cache. Since CloudFlare is free and MaxCDN is not, I'll go through CloudFlare first in case you just need a free option. Here we go!
Step 1 Install W3 Total Cache
Before you start creating your CloudFlare account, you'll want to install and configure the W3 Total Cache plugin on your blog. This is a plugin that takes a little bit to configure. You can follow WPBeginner's excellent setup tutorial to get all your settings correct before proceeding.
Step 2 Create a CloudFlare Account and Add Your Site
Head over to the CloudFlare website and create an account using your email address and the username of your choice.
Once you're signed up, it's time to start getting your website set up with CloudFlare. Note: Some web hosts include an automatic CloudFlare activation option in your cPanel. I strongly suggest you DON'T use this option - I tried it at first and my site ended up going down for three days because of a domain propagation issue. Doing the manual setup is really easy and will help you avoid any downtime or headaches!
Ok, right now you should see a screen that looks like this:
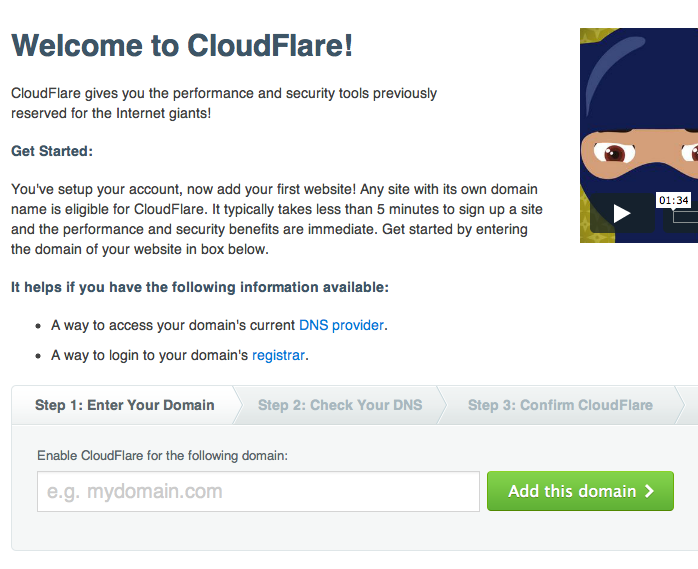
CloudFlare will start scanning your site's DNS setup, and you'll get to watch a nice little commercial while that happens. Fun times. Once it's done (about 45 seconds or so), you can move on to the next step in the process.
Since you're changing nameservers, it could take up to 24 hours for CloudFlare to become active on your site.
You should now see a page displaying what CloudFlare thinks is in your DNS Zone File. You need to access your actual DNS Zone File and make sure all the entries have been transferred over. This file can be accessed via your website's cPanel (or similar admin panel). If you can't find your DNS zone file, contact your host's support and ask them where you can locate it.
Step 3 lets you choose which A and CNAME records you'd like CloudFlare to control. By default, the A record for your domain and the CNAME record labeled "www" should be the only ones highlighted. I recommend keeping this setting and continuing on.
Finally, Step 4 gives you new nameservers that you need to use for your domain. To swap out your old ones and plug in these ones, head over to your domain registrar's website and go to your domain manager. If you're using GoDaddy, you should see a button labeled "Nameservers" right in the domain manager. Other registrars should have a similar tool.
Step 3 Add Your CloudFlare Details to W3 Total Cache
You'll receive an email once your domain has been propagated to the new nameservers you entered. Once this happens, you'll be able to access your CloudFlare options. Now it's time to add your CloudFlare details to W3 Total Cache and start reaping the benefits.
Log in to your CloudFlare account and go to the Account tab. Here you'll be able to see your Account Email, Username, and your unique API Key. Specifically, you'll need your Account Email and unique API Key for this part.
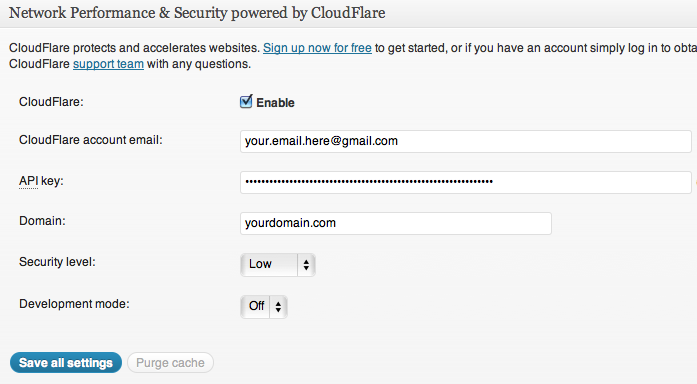
Head over to your WordPress Dashboard and find the option labeled Performance. This is the settings panel for W3 Total Cache. On the default General Settings tab, scroll down to the section titled Network Performance and Security powered by CloudFlare. Execute the following steps:
- Click the checkbox labeled Enable
- Fill in the email address you used for your CloudFlare account
- Paste in your API Key
- Fill in your domain name
- Set your security level to whatever you deem appropriate. Personally I set it to low. I've found that setting it to anything above this seems unnecessary and can actually result in false positive blocks.
- Make sure Development Mode is off unless you're making design changes to your site.
- Click Save all settings.
Awesome! You've got the first part done. If you want to keep this a no-cost ordeal, you can go ahead and stop right here. Just having CloudFlare should result in a good speed boost for your site. If you want to get even more speed for free, check out the WordPress Speed Quickstart Guide for more tips.
If you want to maximize your potential, however, read on. Next we'll be implementing MaxCDN.
Step 4 Sign Up for MaxCDN
Alright, so you want to take the plunge and integrate two CDN solutions on your blog. Sweet. Like I said above, I've been doing this for about four months now. So far, the combination has worked really well and my site is really snappy (especially for being image-heavy).
Ok, so the first thing to know about MaxCDN (or any "full" CDN) is that it costs money. It's not wildly expensive, but it costs more than a coffee. So, should you use it? Here's some guidance:
MaxCDN is generally faster than CloudFlare. As a dedicated CDN, it has more infrastructure set up for serving content as locally as possible. So I think the decision on whether to use it or not should be based on your traffic and your page sizes. Do you have a lot of images and media you're serving up? Do you have a very visual design with lots of elements that have to load? All these things can increase load times. What about your audience? Are you getting 10 visits a day or 10,000? The more traffic you have, the more important it is that your site be optimized for speed. MaxCDN will take some of the bandwidth load off of your server, so that's a consideration as well.
If you've decided that it's worth your money, head on over to MaxCDN.com and click the signup button. Choose the Pay as You Go option (you're probably not big enough for Enterprise, and if you are you should probably talk to MaxCDN themselves about implementation!). The base price for this option is $39.95, but you can get it down to about $30 using coupon codes. For this price, you get one terabyte of CDN bandwidth. This is where CloudFlare integration really comes in handy; by using both, I've managed to use only 92GB in the past four months (and this is with 30,000-40,000 pageviews a month). At this rate, the bandwidth should last 3.5 years (although traffic growth will lower this). $30 for 3.5 years isn't too bad at all.
Once you're signed up and have your account, go ahead and log in. In order to get MaxCDN delivering your site's content, you need to set up a zone. Follow these steps to do just that.
- In your dashboard, go to the Manage Zones tab.
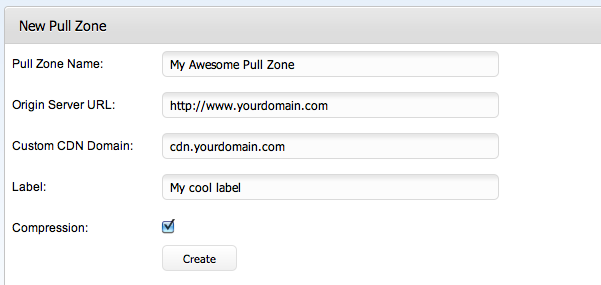
- You should see a box labeled Pull Zones. Click Create Pull Zone.
- Fill in your Pull Zone Name. This can be whatever you want.
- In Origin Server URL, input your entire URL including http://.
- Enter a Custom CDN Domain. I'd suggest cdn.yourdomain.com.
- Your Label can be anything you want.
- Make sure Compression is checked.
- Click Create.
Step 5 Set Up MaxCDN in W3 Total Cache
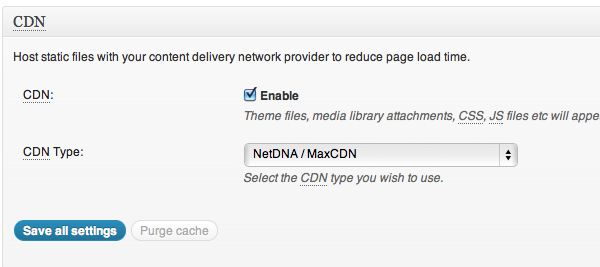
The last step in this tutorial is enabling your CDN in W3 Total Cache and customizing it. To do this, go back to the General Settings tab of W3 Total Cache on your blog and scroll down to the section titled CDN.
- Click Enable.
- Set your CDN type to NetDNA/MaxCDN.
- Click Save all settings.
Next, head over to the CDN tab of W3 Total Cache. Here you'll tweak the CDN settings to get everything working correctly. Everything under the General section should be left as is - just make sure all the boxes are checked except the last one.
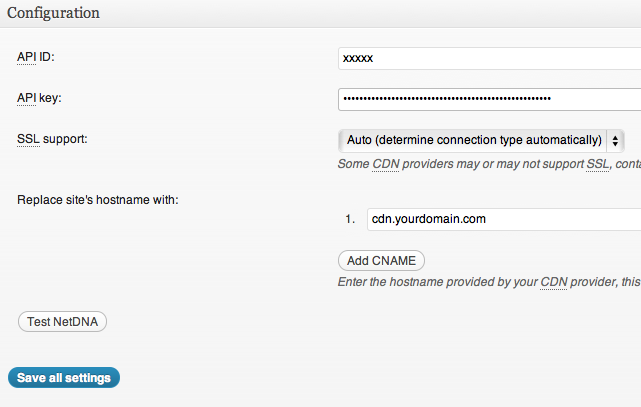
The Configuration section is where you'll do the most work here. Follow these steps to get it set up correctly:
- Fill in your API ID and API Key. You can find these by logging into your MaxCDN account, going to My Settings, and going to the API tab. The ID and key will be listed there.
- Leave the SSL support option as Auto.
- Replace your site's hostname with the CDN domain you created (cnd.yourdomain.com).
- Click Save all settings.
Just one last thing to do! Under the Advanced section, check the box at the bottom labeled Set cookie domain to "yourdomain.com". Everything else can be left alone; if you find that the CDN is having problems with a certain file after you're up and running, you can remove its filetype later. You're done!
Conclusion
Now you have a blog powered by both CloudFlare and MaxCDN. You should notice significant speed improvements, which you can make even better by doing things like minifying your CSS and JavaScript, using WP Smush.it on your photos, and minimizing plugin usage. Enjoy your speedy new blog!
Have you had experience with CloudFlare, MaxCDN, or any other content delivery network? Share your experiences with us in the comments below.

Comments