Titan Framework has really eased the tedious task of creating metaboxes in your web development project. Before Titan Framework, I had to write some very lengthy piece of code to display metaboxes within the post and/or page editing screens. Now it makes the process really easy, and that's what I am going to discuss today. So, let's learn how to create a metabox with Titan Framework.
Creating a Metabox in Titan
Before I dive into this topic, let's assume that you have:
- a working demo website with WordPress installed
- Titan Framework plugin installed and activated or embedded in this demo website
- the
titan-framework-checker.phpfile included in your project
Once again I'm referring to my theme called Neat for the code which I'll be using here. In previous articles, I explained that the theme's template files have been organised in such a way that there is a separate folder for admin-related stuff inside the assets folder. This further contains a file for the code of metaboxes, i.e. metabox-options-init.php, which is located here: assets/admin/titanframework/metabox-options-init.php.
So, here's the code which will add a metabox on the editing screens of all the post types we mentioned, which were:
- page
- post
-
my_custom_post_type, which is meant to be the name of any custom post type
<?php

/**
 * Creating metabox options via Titan Framework.
 *
 * Getting started: http://www.titanframework.net/get-started/
 * Metabox: http://www.titanframework.net/meta-box/
 * Options: http://www.titanframework.net/docs/
 * Getting Option Values: http://www.titanframework.net/getting-option-values/
 */

add_action( 'tf_create_options', 'aa_metabox_options' );

function aa_metabox_options() {

    // Initialize Titan with your theme name.
    $titan = TitanFramework::getInstance( 'neat' );

    /**
     * First metabox.
     */

    $aa_metbox = $titan->createMetaBox( array(
        'name'      => 'Metabox Options', // Name the options menu.
        'post_type' => array( 'page', 'post', 'my_custom_post_type' ) // Can be a string or array.
    ) );

}
Right in the beginning are a few commented lines which provide you with some of the helping links you may go through in relation to the development of metaboxes. Below it is an add_action() function that takes on the tf_create_options hook which registers the aa_metabox_options function for adding options inside the metabox.
Next (line 14) I've defined a function to envelop our metabox code, i.e. aa_metabox_options. This contains the entire functionality needed to create our metabox.
The process starts by getting a unique instance of Titan Framework and registering it in the $titan variable (at line 17). Calling the getInstance() function is an integral part of Titan and is needed in every new routine or file where you make use of Titan Framework. This function carries a unique parameter, ideally your theme name to initialize Titan in your project. That is why I've used 'neat' as my unique name. I have explained it in detail in a previous article too.
Line 23 of this code is where I created the metabox. With Titan Framework, you can use the createMetaBox() function to add metaboxes in your themes/plugins. So, according to this line of code I'm creating a $aa_metbox metabox in Titan Framework.
Note one other thing: the createMetaBox() function gets an array of parameters which can take parameters like name, desc, post_type, etc. So, making use of these I've named this metabox 'Metabox Options' (line 24). Hence, it will appear with this name in my page and post editing screen.
The last line (line 25) of this code attaches this newly created metabox to all the post types I mention. post_type is again a parameter which specifies in which post type(s) this metabox will be displayed. In the case of my code, I am displaying it on all pages and posts, and at my_custom_post_type. Also note that this parameter takes up an array if you need to use the metabox on multiple post types. But it can also be a string for when you need to use the metabox only for one post type, e.g. 'post_type' => 'page'.
Now go to your WordPress dashboard and click Add New menu in Posts. Scroll down and you'll find a metabox named Metabox Options. Here is the screenshot for it:
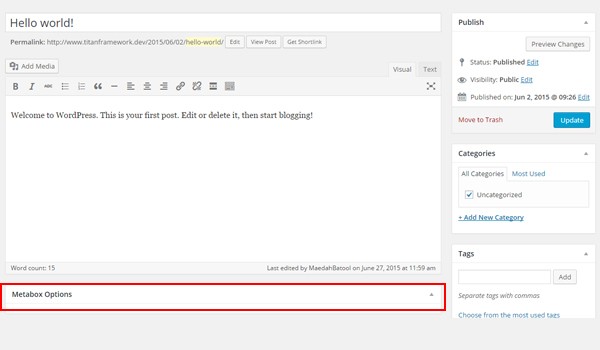
Do the same for any page or custom post type of your website, and you'll find the same metabox there as well.
This metabox is empty at the moment. So, let's add options in it.
Adding Options Inside a Metabox
Just copy and paste these lines right below the code written above.
<?php

/**
 * Create the options for metabox.
 *
 * Now we will create options for our metabox that we just created called `$aa_metbox`.
 */

$aa_metbox->createOption( array(
    'id'   => 'aa_mb_txt', // The id which will be used to get the value of this option.
    'type' => 'text', // Type of option we are creating.
    'name' => 'My Text Option', // Name of the option which will be displayed in the admin panel.
    'desc' => 'This is our option' // Description of the option which will be displayed in the admin panel.
) );
Creating options in Titan is not something new to you. I've once again used the createOption() function to add options. But what you should note is line 9, which also specifies where to create this option, i.e. inside $aa_metbox. So, I've created a text type field inside the metabox named 'My Text Option' whose ID is aa_mb_txt.
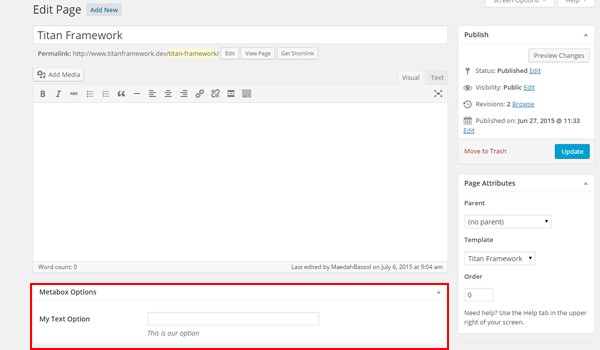
The above screenshot is the result of my development so far. But this time, it is of a page. You can clearly find the Metabox Options box which has a My Text Option field in it.
So, what's left? Printing the output on the front-end after retrieving the value. Let's do that now!
Getting the Saved Values
Now, I will retrieve the saved values at the front-end for the page in the above screenshot. Here you go:
<?php

/* Template Name: Titan Framework */

get_header();

// Initialize Titan with your theme name.
$titan = TitanFramework::getInstance( 'neat' );

$aa_mb_txt_val = $titan->getOption( 'aa_mb_txt', get_the_ID() );

/**
 * First metabox option.
 */

// Let's use this value in HTML.
?>

<p>The value of metabox option txt for this page is: <?php echo $aa_mb_txt_val; ?></p>
Here the getOption() function (line 10) carries two parameters. One is the unique ID of the option, i.e. aa_mb_txt, and the second is the get_the_ID_() function. I've used get_the_ID() because the metabox was created for all the post types which we defined. If you need to get the value of a metabox option for a specific page/post, then you will give the getOptions() function the ID of that specific post/page. The result is saved in $aa_mb_txt_val.
Next a paragraph is created (line 19) within which I've used the echo command to print the output via aa_mb_txt_val.
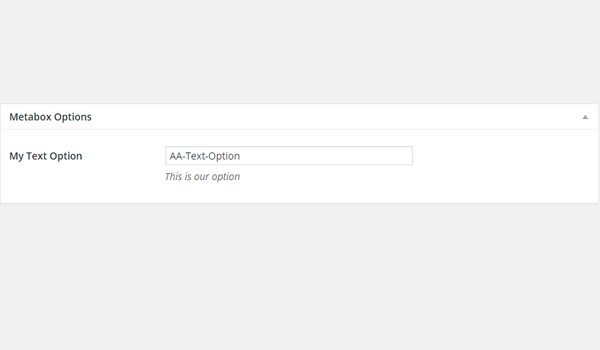
Let's suppose I entered AA-Text-Option in the metabox and published the page.
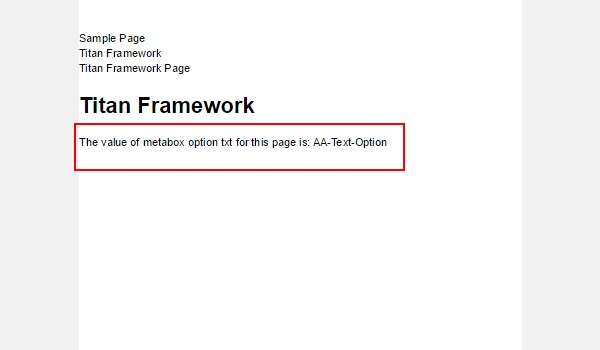
And voila, everything works like a charm.
Conclusion
Now you know how to create meta boxes with Titan Framework. You do realize how simple it is. In the upcoming articles of this series, I will be writing about how to create a particular option type with Titan Framework in a meta box. There I will assume the fact that you already know how to create the meta box itself. So, it is vital for you to try this out.
In the next article, I will create theme customizer sections and panels with options—how cool is that? Until then, if you have any questions let me know via comments or reach out to me at Twitter.

Comments