Adding dynamic color options to a WordPress theme is pretty common. Titan Framework allows you to create color options. Let's see how you can add a color picker inside an admin panel, a meta box or a theme customizer section using Titan Framework.
The Color Type Option in Titan Framework
There is a color type field in Titan Framework which looks like this:

This option loads the entire color palette from which you can choose any color of your choice. To add this option in Titan Framework, you need to learn about the parameters it carries, which are:
- name: It controls display name of the option.
- id: This parameter assigns a unique name which is used throughout to retrieve the saved options values.
- desc: This parameter adds a brief description with the option name.
-
default: It sets the default
colorvalue. - livepreview: (Optional) It helps to show a live preview of changes inside a theme customizer section.
-
css: (Optional) It automatically generates CSS when you add the
coloroption inside an admin page and/or theme customizer section.
One thing which is common to all these parameters is their type which is string.
Available Containers for the Color Type Option
This option can be added in areas like:
- Admin Panel
- Admin Tabs
- Meta Boxes
- Theme Customizer Sections
How Is the Textarea Option Created?
Follow these steps to create a color type option inside these containers:
- Get an instance via the
getInstance()function. - Create options via the
createOption()function. - Get saved values via the
getOption()function.
You can refer to my previous articles to learn about the creation of these containers.
Creating a Color Type Option Inside an Admin Panel
Example Declaration
First I'll create a color type option in an admin panel:
<?php
/**
*
* Create the options
*
*/
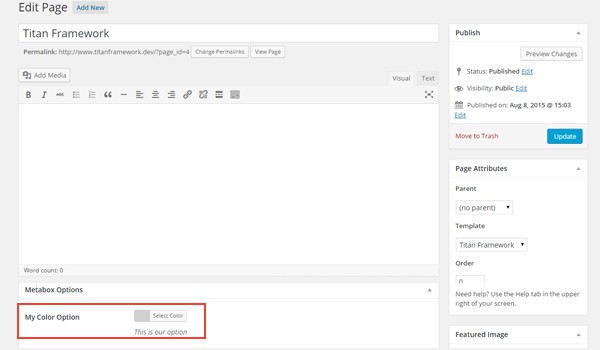
$aa_panel->createOption( array(
'id' => 'aa_color', // The ID which will be used to get the value of this option
'type' => 'color', // Type of option we are creating
'name' => 'My Color Option', // Name of the option which will be displayed in the admin panel
'desc' => 'This is our option', // Description of the option which will be displayed in the admin panel
'default' => '#fffff' // Default value of the option which will be displayed in the admin panel
) );
I created a color type option in an admin panel $aa_panel. Then via the createOption() function I added a color type option which has the ID aa_color. This function takes up an array of parameters which the option type supports. So the id, type, name, desc and default parameters are used accordingly. Note the value of id, i.e. aa_color, should always be unique.
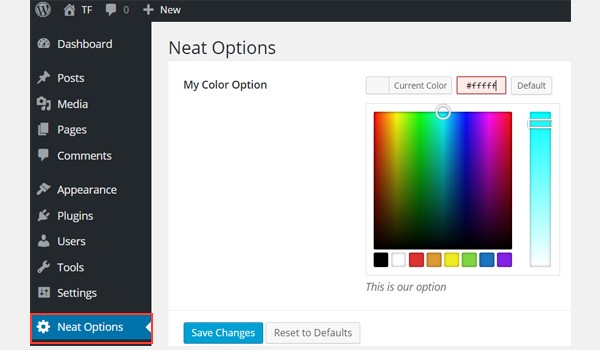
The above screenshot displays a color option named My Color Option inside the Neat Options admin panel.
Example Usage
Let's get the saved options values.
<?php
// 1. Get the titan framework instance and save it to a variable
$titan = TitanFramework::getInstance( 'neat' ); // we will initialize $titan only once for every file where we use it.
// 2. Get the value via ID using getOption function
$aa_color_val = $titan->getOption( 'aa_color' );

/**
 *
 * Print Admin panel options
 *
 */
 <h3> <?php echo $aa_color_val; ?> </h3>
To retrieve the saved options values, get a unique instance via the getInstance() function. Then use the getOption() function and register the ID of the color type option as a parameter. Save its value to a new variable $aa_color_val and then echo this variable at the front-end.
Displaying the Result at the Front-End
Suppose I selected any color, e.g. #cecece, and saved its value.
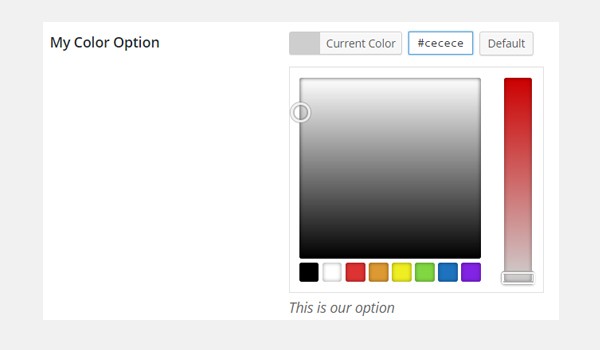
Now, according to the code, the selected color's hex value will be printed as shown below.

Later in this article I'll also show how this option can be used as a styling property.
We won't be printing it like this in a production theme, but will use it as an inline style or will generate the CSS file automatically with Titan Framework, but that will be discussed later in this series and is out of the scope of this article.
Creating a Color Type Option Inside an Admin Tab
Example Declaration
<?php

    // Create options for $aa_panel2 inside the $aa_tab1
    $aa_tab1->createOption( array(

        'id'      => 'aa_color_in_tab1_panel2', // IDs should always be unique. The ID which will be used to get the value of this option
        'type'    => 'color', // Type of option we are creating
        'name'    => 'My Color Option', // Name of the option which will be displayed in the admin panel
        'desc'    => 'This is our option', // Description of the option which will be displayed in the admin panel
        'default' => '#fffff' // Default value of the option which will be displayed in the admin panel

    ) );
This time I created a color type option inside an admin tab $aa_tab1. The ID of this option is aa_color_in_tab1_panel2, which should be unique.
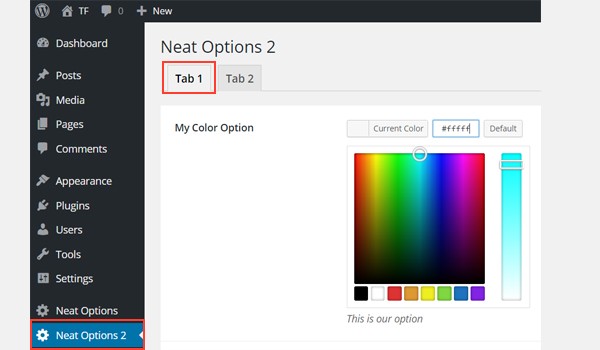
You can find a color option inside Tab 1 of admin panel Neat Options 2.
Example Usage
Now I'll get the saved options values.
<?php
// 1. Get the titan framework instance and save it to a variable
$titan = TitanFramework::getInstance( 'neat' ); // we will initialize $titan only once for every file where we use it.
// Value of tab.
$aa_color_in_tab1_panel2_val = $titan->getOption( 'aa_color_in_tab1_panel2' );

/**
 *
 * Print Admin tab options
 *
 */
 <div>
    Value of my color is : <?php echo $aa_color_in_tab1_panel2_val; ?>
 </div>
I'll get an instance via the getInstance() function and then use the getOption() function. Inside this function (line #5), I entered the ID aa_color_in_tab1_panel2 as its parameter. In the end, I created a div and printed the saved value in text form.
Displaying the Result at the Front-End
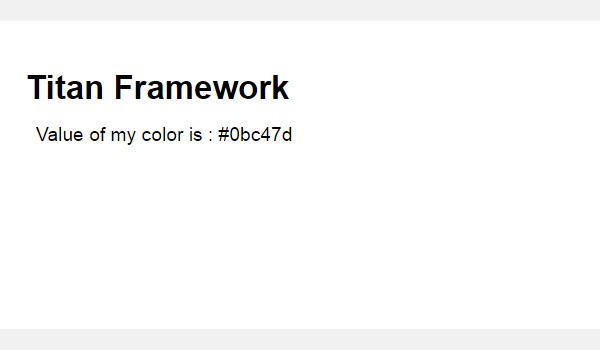
This time I chose #0bc47d as my color value. So, the output will be printed like this:
Creating a Color Type Option Inside a Metabox
Example Declaration
<?php
    /**
     *
     * Create the options for metabox
     *
     */
    $aa_metbox->createOption( array(

        'id'      => 'aa_mb_color', // The ID which will be used to get the value of this option
        'type'    => 'color', // Type of option we are creating
        'name'    => 'My Color Option', // Name of the option which will be displayed in the admin panel
        'desc'    => 'This is our option', // Description of the option which will be displayed
        'default' => '#fffff' // Default value of the option which will be displayed

    ) );
Now I'll create a color type option inside a metabox $aa_metbox via the createOption() function. The ID of this option is aa_mb_color, which is used to retrieve the saved options values. The metabox appears on all post/page editing screens.
You can find a color type option inside a metabox displayed at the end of a page editing screen.
Example Usage
Next I'll get the options values.
<?php
// 1. Get the titan framework instance and save it to a variable
$titan = TitanFramework::getInstance( 'neat' ); // we will initialize $titan only once for every file where we use it.
/**
 *
 * Getting Values.
 *
 * Notice the use of get_the_ID(). It is because metabox is created for all
 * the post types we defined. TO get the value of a metabox option for a specific page/post
 * we need to give getOptions() function the ID of our post/page. Which is done like this.
 *
 */
$aa_mb_color_val = $titan->getOption( 'aa_mb_color', get_the_ID() );

/**
 *
 * Print metabox options
 *
 */

<div class="aa_content" style= "background: <?php echo $aa_mb_color_val; ?>;"></div>
Now this code is somewhat different as compared to the one written for an admin panel and tab. However, the use of the getInstance() and getOption() functions is the same. The difference lies in line #13 where the getOption() function carries two parameters:
-
aa_mb_color, which is the ID of color type option
-
get_the_ID()function, which returns the ID of the current post/page/post_type
Next look at line #19 where I used the inline CSS styles within a div. This means that the value of the color type option gets displayed like a color at the front-end.
Displaying the Result at the Front-End
I chose #ffff00 as my hex color value and published the page. Here is what I got:

Now you can see in the above screenshot that the saved value is displayed as a color and the entire div changes its background color.
Creating a Color Type Option Inside a Theme Customizer
Example Declaration
<?php

    /**
     *
     * Create the options for $aa_section1
     *
     */

    // Body bg color
    $aa_section1->createOption( array(

        'id'      => 'aa_sec_body_bg_clr', // The ID which will be used to get the value of this option
        'type'    => 'color', // Type of option we are creating
        'name'    => 'Site Background Color',// Name of the option which will be displayed in the admin panel
        'default' => '#fff' // Default value of our option

    ) );
The createOption() function adds a color type option inside a theme customizer section $aa_section1. The ID of this option is aa_sec_body_bg_clr, which sets the body background color.
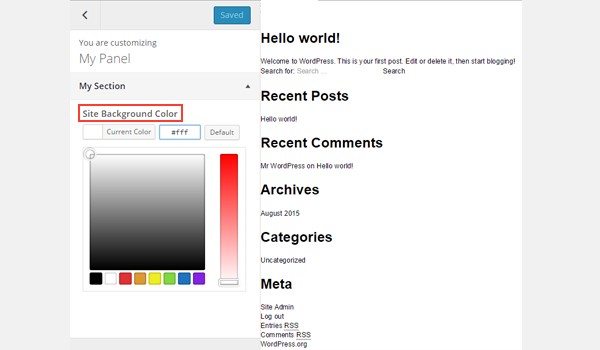
The screenshot shows a color option named Site Background Color inside a customizer panel My Section.
Example Usage
In the end, I'll get the saved options values.
<?php
// 1. Get the titan framework instance and save it to a variable
$titan = TitanFramework::getInstance( 'neat' ); // we will initialize $titan only once for every file where we use it.

// Body bg color
$aa_sec_body_bg_clr_val = $titan->getOption( 'aa_sec_body_bg_clr' );

/**
 *
 * Print customizer options
 *
 */

<style>
/* ----------------------------------------------------------------------------
 * CSS values from customizer
 * ------------------------------------------------------------------------- */
    body{
        background: <?php echo $aa_sec_body_bg_clr_val; ?> !important;

    }
    h1,
    h2,
    h3,
    h4,
    h5,
    h6,
    a,

</style>
Everything is pretty much the same except for the fact that I'm getting the saved values via internal CSS styles inside the <style> tag (lines 12 to 28). Line #16 shows an echo command, which prints the value of the variable $aa_sec_body_bg_clr_val.
Displaying the Result at the Front-End
This time I chose #eeee22 as my hex value for color. So, here is the live preview:
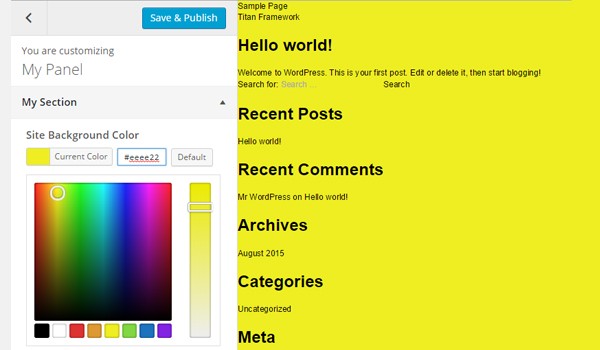
My site background color changed from #ffffff to #eeee22. Cool!
Uploading Files
Images play a vital role in making your web content engaging and eye-catching. The WordPress architecture offers a CPT (Custom Post Type) for adding images via the media library. But what if you want to add an image uploader in some other place?
There are several ways of creating such an option, while Titan Framework also offers an image uploader as one of its option types. So, let's see how to add a media upload option in an admin panel, a meta box or inside a theme customizer section with a few lines of code.
The Upload Type Option in Titan Framework
There is an upload type option in Titan Framework which adds different formats of image files, e.g. jpg, jpeg, gif, png, etc. It looks like this:

This option has the following set of parameters:
-
name: This parameter displays the name of the
uploadoption. - id: It specifies a unique name which gets the saved options values.
- desc: It adds a one-line description with the option name.
-
size: (Optional) This parameter defines the size of an image which can be used inside the
cssparameter (to be explained later). It only takes those values which are defined in the$sizeargument ofwp_get_attachment_image_src()function (learn more on this). - default: (Optional) It sets a default image.
- livepreview: (Optional) You can find a live preview of changes inside a theme customizer section using this parameter.
-
css: (Optional) It generates CSS when you add an
uploadtype option inside an admin page and/or theme customizer section. - placeholder: (Optional) This parameter displays dummy text when this option type is empty.
Available Containers for the Upload Type Option
The upload type option can be added inside:
- Admin Panel
- Admin Tabs
- Meta Boxes
- Theme Customizer Sections
If you want to learn more about the creation of these containers then skim through the previous articles of this series.
However, this option is added by following these steps:
- Call the
getInstance()function. - Create an option type via the
createOption()function. - Get the saved options values via the
getOption()function.
Creating an Upload Type Option Inside an Admin Panel
Example Declaration
Let's write its code.
<?php
    /**
     * Create the options
     *
     * Now we will create options for our panel that we just created called $aa_panel
     *
     */
    $aa_panel->createOption( array(
        'id'   => 'aa_img_id', // The ID which will be used to get the value of this option
        'type' => 'upload', // Type of option we are creating
        'name' => 'My Upload Option', // Name of the option which will be displayed in the admin panel
        'desc' => 'This is our option' // Description of the option which will be displayed in the admin panel
    ) );
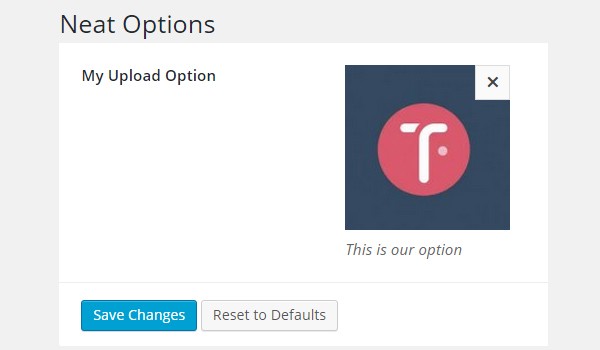
I'll add an upload type option inside an admin panel $aa_panel via the createOption() function. This function takes up an array of parameters like id, type, name and desc. Keep your IDs unique as these will be used throughout to retrieve the saved values. So, the ID here is aa_img_id.
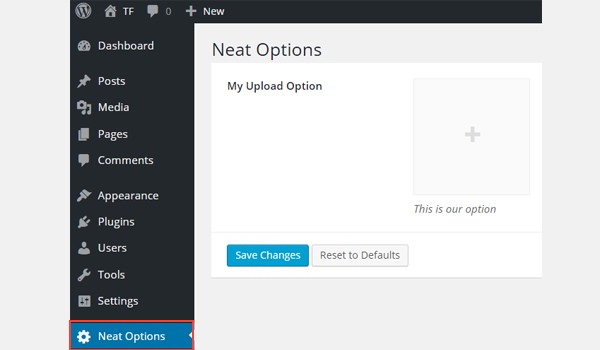
In the above screenshot, you can find an image uploader named My Upload Option inside the Neat Options admin panel.
Example Usage
Now I'll get to the important part: retrieving the saved options values.
<?php
// 1. Get the titan framework instance and save it to a variable
$titan = TitanFramework::getInstance( 'neat' ); // we will initialize $titan only once for every file where we use it.

// 2. Get the value via ID using getOption function
$aa_img_id_val = $titan->getOption( 'aa_img_id' );


/**
 *  Print the value saved in aa_img_id option
 */
$aa_img_URL_val= 'http://placehold.it/500x500';
if ( is_numeric( $aa_img_id_val ) ) {
    $aa_img_attachment = wp_get_attachment_image_src( $aa_img_id_val );
    $aa_img_URL_val = $aa_img_attachment[0];
}
?>

    <h2>The image is shown below:</h2>
    <img src='<?php echo $aa_img_URL_val; ?>' />
The process of getting values for the upload type option is somewhat different compared to the options which I've discussed previously. So, let me explain its code.
Lines 3 and 6 are pretty similar, where I've called the getInstance() function to call a unique instance, which is preferably your theme name (that's why neat in my case). Then I used the getOption() function, within which I wrote the ID of my upload option as the parameter. I saved its value inside a variable $aa_img_id_val.
Next, I've used an if statement which calls the is_numeric() function to check whether or not the value of $aa_img_id_val is a number. If it's true, then it processes the code further.
To get the source URL of our uploaded image value via an attachment ID, I created a new variable $aa_img_URL_val (line #12) to which I assigned a placeholder image (avoid any garbage value and give it a demo placeholder image).
An attachment ID can be used to get the URL of the uploaded image; I've used WordPress's wp_get_attachment_image_src() function in this respect (at line #14). This function returns an image object array, which contains the value of an image src url at position '0' (learn more about it in the Codex).
The parameter $aa_img_id_val has the ID of aa_img_id saved in it. The overall output of this function is saved inside a new variable $aa_img_attachment.
Now, as we know, the wp_get_attachment_image_sr() function returns src url at position '0' of the array, so I defined its exact position inside the array, i.e. $aa_img_attachment[0] (line #15). Then I assigned the value to $aa_img_URL_val, which initially carried a placeholder image. Now $aa_img_URL_val has the source URL of the selected image.
At the end (line #19), I simply printed the image via an echo command. I recommend using the esc_url() function here, which escapes your image URL. I am not going into detail because it is beyond the scope of this article. But this is how you can modify line #19:
<img src='<?php echo esc_url( $aa_img_URL_val ); ?>' />
Displaying the Result at the Front-End
Let's suppose I uploaded this image and saved the settings.
So, this is how it appears at the front-end.

Creating an Upload Type Option Inside an Admin Tab
Example Declaration
Now I'll create this option inside an admin tab.
<?php
    // Create options for $aa_panel2 inside the $aa_tab1
    $aa_tab1->createOption( array(

        'id'   => 'aa_img_in_tab1_panel2', // IDs should always be unique. The ID which will be used to get the value of this option
        'type' => 'upload', // Type of option we are creating
        'name' => 'My Upload Option', // Name of the option which will be displayed in the admin panel
        'desc' => 'This is our option' // Description of the option which will be displayed in the admin panel

    ) );
An upload option with ID aa_img_in_tab1_panel2 is created inside an admin tab $aa_tab1.
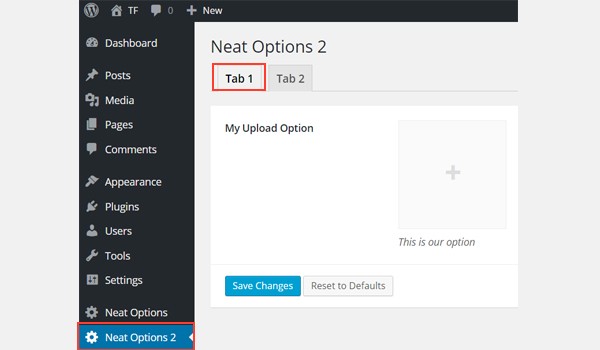
You can find this option inside Tab 1 of admin panel Neat Options 2.
Example Usage
Let's get the saved values.
<?php
// 1. Get the titan framework instance and save it to a variable
$titan = TitanFramework::getInstance( 'neat' ); // we will initialize $titan only once for every file where we use it.

// 2. Get the value via ID using getOption function
$aa_img_in_tab1_panel2_val = $titan->getOption( 'aa_img_in_tab1_panel2' );


/**
 * Print the value saved in option
 */
$aa_img_in_tab1_panel2_URL_val= 'http://placehold.it/500x500';
if ( is_numeric( $aa_img_in_tab1_panel2_val ) ) {
    $aa_img_in_tab1_panel2_attachment = wp_get_attachment_image_src($aa_img_in_tab1_panel2_val );
    $aa_img_in_tab1_panel2_URL_val = $aa_img_in_tab1_panel2_attachment[0];
}
?>
    <h2>The image in Tab 1 is shown below:</h2>
    <img src='<?php echo $aa_img_in_tab1_panel2_URL_val; ?>' />
Displaying the Result at the Front-End
I again uploaded the same image and saved it. It appears like this at the front-end:

Creating an Upload Type Option Inside a Metabox
Example Declaration
Now I'll create this option in a metabox.
<?php
    /**
     * Create the options for metabox
     *
     */
    $aa_metbox->createOption( array(

            'id'   => 'aa_mb_img', // The ID which will be used to get the value of this option
            'type' => 'upload', // Type of option we are creating
            'name' => 'My Upload Option', // Name of the option which will be displayed in the admin panel
            'desc' => 'This is our option' // Description of the option which will be displayed in the admin panel

        ) );
An upload type option is created inside a metabox $aa_metbox via the createOption() function. It appears on all page/post editing screens.
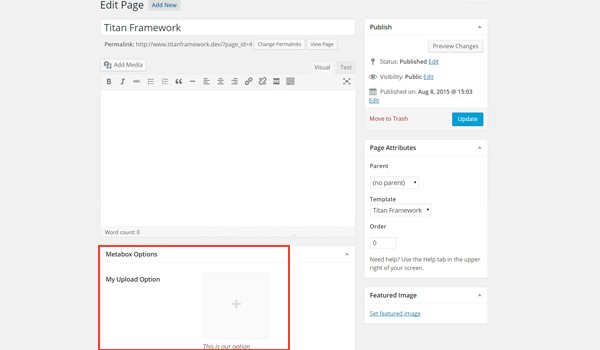
In the above screenshot, you can find an image uploader named My Upload Option inside a metabox at the end of a page editing screen.
Example Usage
Use the following code.
<?php
// 1. Get the titan framework instance and save it to a variable
$titan = TitanFramework::getInstance( 'neat' ); // we will initialize $titan only once for every file where we use it.
/**
Getting values for metabox
*/
/**
*
*
* Notice the use of get_the_ID(). It is because metabox is created for all
* the post types we defined. TO get the value of a metabox option for a specific page/post
* we need to give getOptions() function the ID of our post/page. Which is done like this.
*
*/
$aa_mb_img_val = $titan->getOption( 'aa_mb_img', get_the_ID() );
/**
* Print the value saved in option
*/
$aa_mb_img_URL_val= 'http://placehold.it/500x500';
if ( is_numeric( $aa_mb_img_val ) ) {
$aa_mb_img_attachment = wp_get_attachment_image_src($aa_mb_img_val );
$aa_mb_img_URL_val = $aa_mb_img_attachment[0];
}
?>
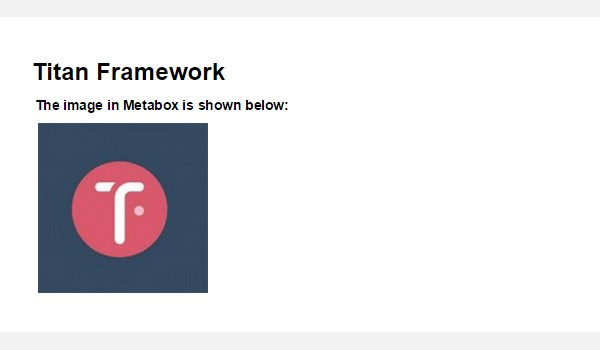
<h2>The image in Metabox is shown below:</h2>
<img src='<?php echo $aa_mb_img_URL_val; ?>' />
Displaying the Result at the Front-End
Let's view the result at the front-end:
Creating an Upload Type Option Inside a Theme Customizer Section
Example Declaration
In the end, I'll create an image uploader field inside the customizer.
<?php
    /**
     *
     * Create the options for $aa_section1
     *
     */

    $aa_section1->createOption( array(

        'id'   => 'aa_sec_img', // The ID which will be used to get the value of this option
        'type' => 'upload', // Type of option we are creating
        'name' => 'My Upload Option',// Name of the option which will be displayed in the admin panel
        'desc' => 'This is our option' // Description of our option

    ) );
An upload type option is displayed inside a theme customizer section $aa_section1. Its ID is aa_sec_img.
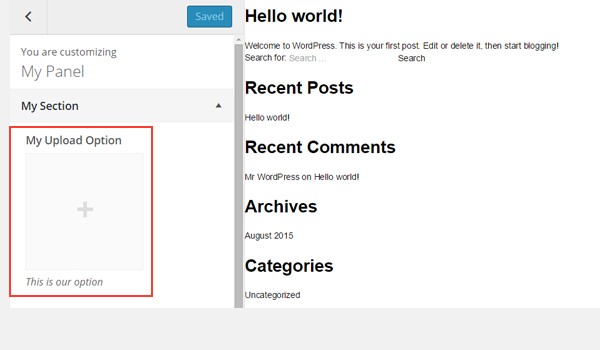
You can find an uploader field inside the My Section customizer panel in the above figure.
Example Usage
Use the following code to get the values:
<?php
// 1. Get the titan framework instance and save it to a variable
$titan = TitanFramework::getInstance( 'neat' ); // we will initialize $titan only once for every file where we use it.

// Sec Img
$aa_sec_img_val = $titan->getOption( 'aa_sec_img' );

/**
 * Print the value saved in option
 */

$aa_sec_img_URL_val= 0;
if ( is_numeric( $aa_sec_img_val ) ) {
    $aa_sec_img_attachment = wp_get_attachment_image_src($aa_sec_img_val );
    $aa_sec_img_URL_val =  $aa_sec_img_attachment[0];
}

?>
    <h1>The image in Customizer Section is shown below:</h1>
    <img src='<?php echo $aa_sec_img_URL_val; ?>' />
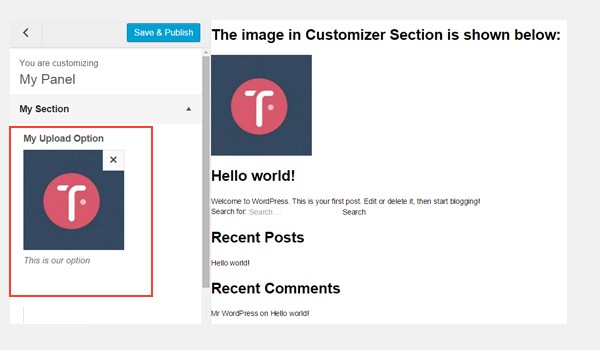
Displaying the Result at the Front-End
Let's upload the live preview screenshot:
Conclusion
That's about it!
The color option is pretty easy to implement option with Titan Framework. In upcoming articles, I'll show you how to auto-generate a CSS file through this option or use it to create live preview work.
We also covered how to introduce an upload option with Titan Framework. There are a number of ways in which you can use this option in your WordPress plugins or themes. For example, you can allow users to choose a logo or a custom background image.
Go through it, and if you have any queries then leave them in the comment box below, or you can catch me on Twitter.

Comments