Curious about 3D game development? Now is the time to learn! This five-part tutorial series will demonstrate how to build a simple game with ShiVa3D Suite, a cross-platform 3D game engine and authoring tool. This is the final installment of the series, where you will learn how to setup the game as a project in Eclipse and deploy to the Android platform. Because ShiVA 3D is a cross-platform tool, we will also discuss how to port the game to iOS.
Customizing the Game in Eclipse
In part 4 of this series, we finished the coding for the remaining AIModels, the EggAI, and the MainAI. We also performed unit testing by animating the game. We then exported the game from the ShiVa Editor for importing into the Shiva Authoring Tool. Finally, we discussed two different authoring options in the Shiva Authoring Tool, one for generating an Android executable and another one for generating an Eclipse project. In part 5, we will firstly talk about customizing the game in Eclipse. This will include the Eclipse project setup, code changes, and building the Java code and native libraries. At that point we will have completed the tutorial in terms of development and deployment. In the remainder of part 5 we will review the code, discuss how to port the game to iOS devices, and give some concluding remarks.
In the instructions below, we assume that the output file Duck_Android.zip from Shiva Authoring Tool is located in D:\temp (see the section called 'Authoring For Project' in the previous tutorial). If you had chosen another location, change those instructions accordingly. Also, you must have completed the steps described in part 4 under the section 'Prepare The Android Device For Installation'.
Eclipse Project Setup
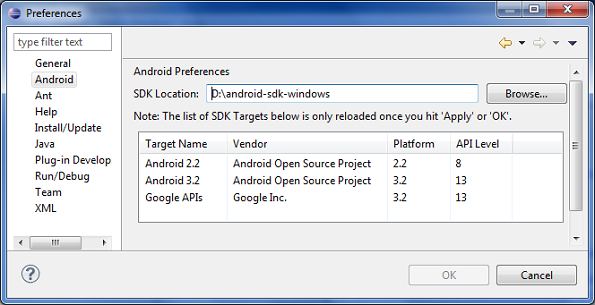
Before importing the project into your Eclipse environment, make sure that the Eclipse ADT plugin points to the correct location of the Android SDK in your local system. To check this, in the Eclipse menu go to Window -> Preferences -> Android. The SDK Location window must be set to the location of the Android SDK. Once set up correctly, you should see something similar to the example below.
Import and Build the Project
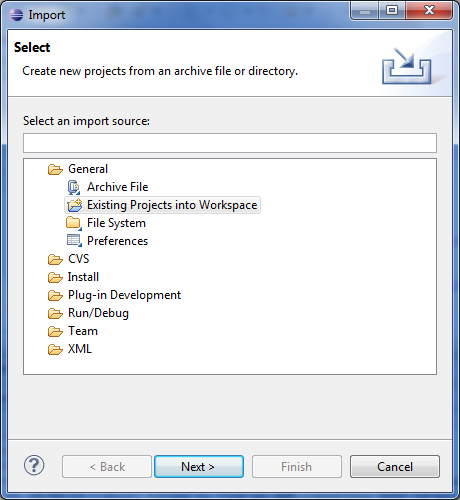
To import the project from the Eclipse menu, go to File -> Import. Then, in the file import wizard, select General -> Existing Projects into Workspace as shown below.
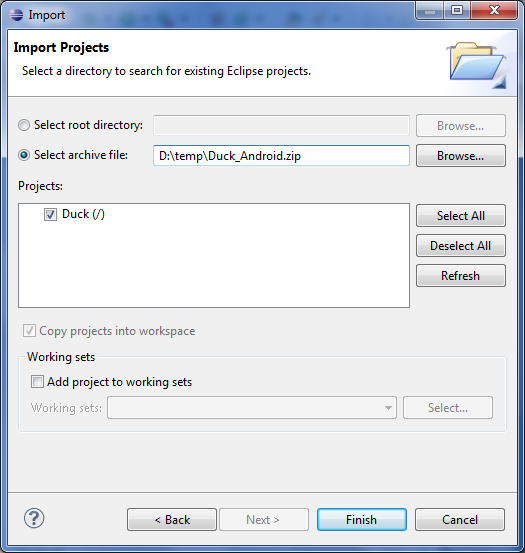
On the next page of the wizard, choose Select archive file: and browse to where Duck_Android.zip is located in your file system. The Projects window will be automatically populated where the Duck project is already selected. This is shown below. Press the Finish button to complete the import.
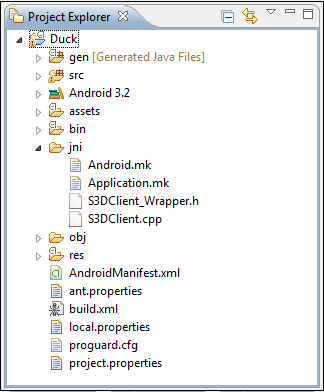
Eclipse will build the application automatically after the import. Now you should see the Duck project in project explorer.
Please note that at this point you may get an error that says: "Android requires compiler compliance level 5.0 or 6.0. Found '1.4' instead. Please use Android Tools > Fix Project Properties." This is a result of having the incorrect version of the Java compiler assigned to your project. To fix the problem, highlight the project in the Project Explorer, and from the right-click menu, select Properties. You will see the properties for Duck. Highlight the Java Compiler and check the box that says Enable project specific settings. Under the Compiler compliance level you should have 1.6 selected as you see below. Click OK.

At this point Duck project must successfully compile. If necessary, from the Eclipse menu select 'Project -> Clean...' to force Eclipse to compile the project.
Building the Native Libraries
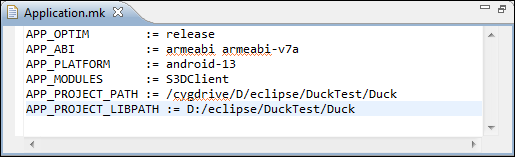
After the initial compilation of the project, we need to build the native libraries. You need to edit Application.mk for the correct build settings. In the Project Explorer, double-click on the Application.mk under jni folder, as shown below, to bring it up in editor.
You need to set the following configuration parameters:
- APP_PROJECT_PATH := /cygdrive/<Project_Unix_Path>
- APP_PROJECT_LIBPATH := <Project_Windows_Path>
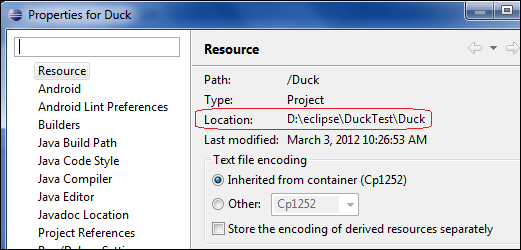
Firstly, <Project_Windows_Path> is the path to your Duck project in Eclipse where backslash (\) is replaced with forward slash (/). In the Eclipse Project Explorer, highlight Duck (the top level root folder for the project) and from the right-click menu select Properties. In the Properties dialog, highlight Resource on the left. In the Location attribute you will see the Windows path to your Duck project. Type it as the value of APP_PROJECT_LIBPATH by replacing the backsplash with the forward slash, i.e. APP_PROJECT_LIBPATH := D:/eclipse/DuckTest/Duck
The <Project_Unix_Path> is identical to <Project_Windows_Path> except that the colon (:) is removed, i.e., D/eclipse/DuckTest/Duck. As a result, APP_PROJECT_PATH := /cygdrive/D/eclipse/DuckTest/Duck
The final version of Application.mk is shown below. Do not forget to save it.
Now, open up the Cygwin console. Change the directory to the value of APP_PROJECT_PATH, e.g. cd /cygdrive/D/eclipse/DuckTest/Duck.
If you type 'ls' you should see the files and folders right under the project root Duck, like so:
$ ls
AndroidManifest.xml  build.xml  lint.xml          project.properties
ant.properties       gen        local.properties  res
assets               jni        obj               src
bin                  libs       proguard.cfg
Now we will invoke the Android NDK ndk-build utility to build the libraries. For example, if the Android NDK is installed in D:\android-ndk-r7-windows then, in the Cygwin console, type the full path to the ndk-build utility: $ /cygdrive/d/android-ndk-r7-windows/ndk-build. This should build the libraries without error.
The last several lines of the console output from the build process are shown below.

Now, go back to Eclipse, select the top level project folder Duck and from right-click menu select Refresh. We need to do this because the build was performed outside Eclipse, and therefore Eclipse should be notified of the changes in the project's folders.
Next, we need to copy two files:
- In the Project Explorer, open these folders:
- Duck -> obj -> local -> armeabi
- Duck -> obj -> local -> armeabi-v7a
- Duck -> libs -> armeabi
- Duck -> libs -> armeabi-v7a
- Copy libopenal.so from Duck -> obj -> local -> armeabi into Duck -> libs -> armeabi.
- Copy libopenal.so from Duck -> obj -> local -> armeabi-v7a into Duck -> libs -> armeabi-v7a.
Eclipse will build the Duck project automatically after copy/paste.
Finally, we need to copy two more files. One drawback of using the ShiVa Authoring Tool for Android OS is that it limits the launch icon size to 48x48 pixels and the splash screen image to 480x800 pixels. When you customize the project via Eclipse, you can replace the launch icon and splash screen image with files that have a larger pixel size more suitable for a tablet. For this reason, we provided app_icon_72x72.png and app_splash_800x1280.png in set2 of the download archive. Rename those files as app_icon.png and app_splash.png, respectively, and in the Project Explorer, copy them over to Duck -> res -> drawable folder. This overwrites the original app_icon.png and app_splash.png.
Eclipse will build the Duck project automatically after the copy/paste (in the Duck_Android_final.zip file, which is part of the download archive, the Duck -> res -> drawable folder already has the 72x72 pixel sized launch icon and the 800x1280 pixel sized splash image).
Code Changes
We need to edit Duck.java to hook up the system call openURL with the vibrate function in the Android device. In the Project Explorer, double-click on Duck -> src -> com.shiva3d.demo -> Duck.java to bring it up in the editor. Make the following two changes. In the Duck_Android_final.zip file, which is part of the download archive, those changes have already been made.
1.Change the onVibrate function to set the duration to 100 miliseconds:
private static void onVibrate ( boolean b )
{
  if ( b )
  {
    oVibrator.vibrate ( 100 ) ;
  }
  else
  {
    oVibrator.cancel ( ) ;
  }
}
2. Change onOpenURL to call onVibrate.
public static void onOpenURL ( String sURL, String sTarget )
{
  onVibrate(true);
}
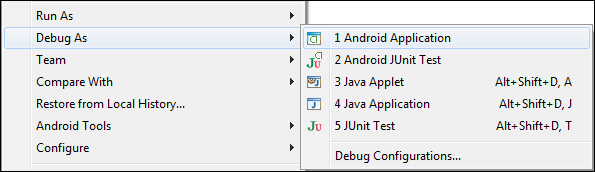
Save Duck.java and wait until Eclipse completes the compilation and build. Now, the game is ready to be deployed in your device via Eclipse. Connect the device to your PC via the USB cable. In the Project Explorer, select the Duck project and from the right-click menu Debug As -> Android Application, as shown below. This will install the game in your device.
Code Review
In this section, we will review the Lua code used in the ShiVa Editor and changes in the Java code made via Eclipse.
ShiVa Editor - MainAI
The first code set we will inspect is the one associated with the MainAI.
onInit
function MainAI.onInit (  )
--------------------------------------------------------------------------------
    application.setCurrentUserScene ( "MyScene" )
    application.setOption ( application.kOptionViewportRotation,3 )

    local lCamera = application.getCurrentUserActiveCamera ( )
    object.setTranslation ( lCamera, 6, 7, 5, object.kGlobalSpace )
    object.lookAt ( lCamera, 0, 1.9, -1, object.kGlobalSpace, 1 )

    this.egg (scene.getTaggedObject (application.getCurrentUserScene ( ),"egg"  ) )

    input.enableMultiTouch ( this.getUser ( ), true )
    this.reset()
--------------------------------------------------------------------------------
end
--------------------------------------------------------------------------------
Comments: This handler is where various steps are performed to initialize the application.
- application.setCurrentUserScene ( "MyScene" ) defines the scenes of the game with MyScene created earlier.
- application.setOption ( application.kOptionViewportRotation,3 ) rotates the display 90 degrees. You need to rotate the device to stand on its left side to play the game. Held between hands, the user's left thumb will be near the device's top and the right thumb will be near the device's bottom (the default value for kOptionViewportRotation is 0. To rotate the viewport -90 degrees, set kOptionViewportRotation = 1, to rotate 180 degrees, set kOptionViewportRotation = 1).
- We then get a handle to the default camera of the game via application.getCurrentUserActiveCamera( ). The position of the camera is set via setTranslation(), at (x=6,y=7,z=5). Then, the camera is pointed to (x=0,y=1.9,z=-1) via lookAt(). Those values have been found via trial and error. We wanted to place the camera as close to the action as possible to the point that, when in the forefront, a small portion of the duck goes out of the region that can be seen by the camera.
- As part of the touch event handling, we send events to EggAI.onCaptureInput from the MainAI. For this reason, there is a local variable of object type, named 'egg.' We get a handle of the Egg model using the tag when it was added to the scene, and initialize the egg variable:
this.egg (scene.getTaggedObject (application.getCurrentUserScene ( ),"egg" ) ) - We then enable multi-touch via enableMultiTouch ( this.getUser ( ), true ) and call reset(). The reset() function initializes the variables used in multi-touch handling, as we will see later.
reset
function MainAI.reset ( )
--------------------------------------------------------------------------------
    this.prevTouchCount (0)
    this.prevY0 (0)
--------------------------------------------------------------------------------
end
--------------------------------------------------------------------------------
Comments: This function sets the values of prevTouchCount and prevY0 to 0.
requestRestart
function MainAI.requestRestart ( )
--------------------------------------------------------------------------------
    application.restart ( )
--------------------------------------------------------------------------------
end
--------------------------------------------------------------------------------
Comments: This function invokes application.restart() to restart the game. This function will be invoked when the user wants to restart the game with the multitouch action, to be reviewed later.
displayRestart
function MainAI.displayRestart ( )
--------------------------------------------------------------------------------
    local lUser = application.getCurrentUser ( )
    local lComp = hud.newComponent (lUser, hud.kComponentTypeLabel)
    if ( lComp ~= nil )
    then
        hud.setComponentPosition (lComp, 50, 50 )
        hud.setComponentSize (lComp, 100, 10 )
        hud.setComponentBackgroundColor (lComp, 0, 0, 0, 0 )
        hud.setComponentBorderColor (lComp, 0, 0, 0, 0 )
        hud.setComponentVisible (lComp, true )
        hud.setComponentZOrder (lComp, 255 )
        hud.setLabelText (lComp, "Game Restarting" )
        hud.setDefaultFont (lUser, "DefaultFont" )
        hud.setLabelTextHeight (lComp, 100 )
        hud.setLabelTextAlignment (lComp, hud.kAlignCenter, hud.kAlignCenter )
    end
--------------------------------------------------------------------------------
end
--------------------------------------------------------------------------------
Comments: This function displays an informational text, 'Game Restarting', before the game restarts.
- We create a label via hud.newComponent (lUser, hud.kComponentTypeLabel).
- We then set the position and size of the label via setComponentPosition & setComponentSize, respectively.
- Then, we call setComponentBackgroundColor & setComponentBorderColor to define the background and border colors of the label. In each case, the last parameter is passed as 0, which defines the respective element (background or border color) to be completely transparent.
- We then call setComponentVisible() to make sure the label is visible.
- The setComponentZOrder() function defines how the label is situated in the front. The parameter should be between 0 and 255. The larger the integer supplied, the closer in the foreground the componenet will appear.
- We then set the label text, 'Game Restarting'.
- The setLabelTextHeight() function call defines the height of the label text as a percentage of the height of the label itself. We set this to be 100%.
- Finally, via setLabelTextAlignment() function call, we align the text in the center of the label.
User Handlers For Touch Events
In this game, we are interested in two types of touch events:
- one thumb is moving, where user wants to move the egg from one side of the screen to the other (see Figure 5)
- two thumbs are moving, where user wants to restart the game (see Figure 7)
Regardless of a single thumb or two thumbs are moving, we need to deal with a sequence touch events. In MainAI, we implement the touch events to determine if user is moving a single thumb or two thumbs. If single thumb, it is responsibility of EggAI to respond to user's action. As a result, from the event handler in MainAI, we call EggAI.onCaptureInput to send the information on single thumb movement. (The handler EggAI.onCaptureInput will be reviewed later.) If two thumbs are moving, the MainAI restarts the application.
We will now start reviewing the user handlers for touch events. There are three handlers to be implemented, onTouchSequenceBegin, onTouchSequenceEnd and onTouchSequenceChange. The onTouchSequenceBegin notifies your application that the touch events have started. The onTouchSequenceChange provides detailed information on the number of 'taps' (touches) and the coordinates of each tap. Finally, onTouchSequenceEnd notifies when the touch event ends.
Note that those handlers are useful only if device is multitouch enabled and you have enabled multitouch in your application (see onInit above).
Let us first look at onTouchSequenceBegin and onTouchSequenceEnd. As seen from the code listings below, both handlers call the reset function reviewed above to set the values of variables prevTouchCount and prevY0 to 0.
function MainAI.onTouchSequenceBegin (  )
--------------------------------------------------------------------------------
    this.reset ( )
--------------------------------------------------------------------------------
end
--------------------------------------------------------------------------------
For onTouchSequenceEnd:
function MainAI.onTouchSequenceEnd (  )
--------------------------------------------------------------------------------
    this.reset ( )
--------------------------------------------------------------------------------
end
--------------------------------------------------------------------------------
The listing for onTouchSequenceChange is given below.
function MainAI.onTouchSequenceChange ( nTaps0, nX0, nY0, nTaps1, nX1, nY1, nTaps2, nX2, nY2, nTaps3, nX3, nY3, nTaps4, nX4, nY4 )
--------------------------------------------------------------------------------
    local touchCount = 0
    if(nTaps0 > 0) then touchCount = 1 end
    if(nTaps1 > 0) then touchCount = 2 end
    if(nTaps2 > 0) then touchCount = 3 end
    if(nTaps3 > 0) then touchCount = 4 end
    if(nTaps4 > 0) then touchCount = 5 end

    if ( touchCount == this.prevTouchCount())
    then
        if ( touchCount == 1 )
        then
            if(nY0 > this.prevY0())
            then
                local d = -1
                object.sendEvent ( this.egg ( ), "EggAI", "onCaptureInput", d )
            elseif(nY0 < this.prevY0())
            then
                local d = 1
                object.sendEvent ( this.egg ( ), "EggAI", "onCaptureInput", d )
            end
        elseif(touchCount == 2)
        then
        if(math.abs (nY0 - nY1) > 0.2)
            then
                this.displayRestart (  )
                this.postEvent (1,"requestRestart" )
            end
        end
    end

    -- store this event's variables for the next event
    this.prevTouchCount (touchCount)
    this.prevY0 (nY0)
--------------------------------------------------------------------------------
end
--------------------------------------------------------------------------------
Let us first explain the parameters in the event handler.
- If there is only one tap on the screen, nTaps0 is 1 and nTapsi = -1, i = 1,...,4
- If there are only two taps on the screen, nTaps0, nTaps1 are 1 and nTapsi = -1, i = 2,...,4
- If there are only three taps on the screen, nTaps0, nTaps1 and nTaps2 are 1 and nTapsi = -1, i = 3, 4
- ...
Depending on number of taps, nXi, nYi give the coordinates of the corresponding tap. For example, if there are two taps, (nX0, nY0) and (nX1, nY1) are the coordinates of the first and second taps. Note that, the framework ensures the coordinates are in sequence with the previous call to the onTouchSequenceChange. In other words, let us assume there is a double touch sequence, i.e., nTaps0, nTaps1 are 1 and nTapsi = -1, i = 2,...,4. You are moving both your thumbs on the screen. Between onTouchSequenceBegin and onTouchSequenceEnd, every call to onTouchSequenceChange will provide (nX0, nY0) for the unique motion of one of your thumbs and similarly for (nX1, nY1).
In our use of onTouchSequenceChange, we only need a subset of the information passed. If there is a single touch event, this will be interpreted as user is moving one thumb on the screen to move the egg from one side of the screen to another (back and forth). If there is a double touch event, then user wants to restart the application.
With this information, let us try to understand the code.
- The variable touchCount stores number of taps. After the statement 'if(nTaps4 > 0) then touchCount = 5 end' is executed, we have determined the number of taps.
- The variable prevTouchCount stores number of taps we had received in the previous call to onTouchSequenceChange. If the previous and current numbers of taps are equal then we continue processing the information.
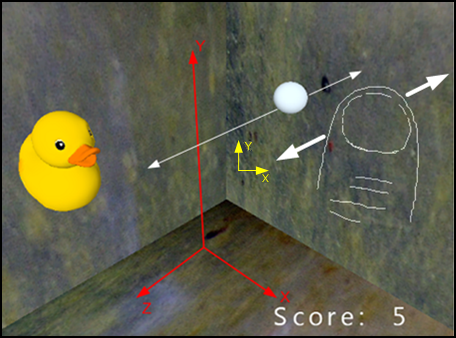
- If the numbers of taps (touchCount) is 1 then user must be moving the egg. The coordinate information (nX0,nY0) is relative to the 2-dimensional screen space. If the current y-axis coordinate of the touch is greater than the previous one then the touch motion is in positive y-axis in the 2-dimensional screen space. This implies that the direction of the touch motion is towards the negative z-axis in the 3-dimensional space (see the Figure below). As a result, we need to call EggAI.onCaptureInput by passing -1 as the input parameter.
- The function call is made via:
object.sendEvent ( this.egg ( ), "EggAI", "onCaptureInput", d ). Here, this.egg() returns a handle to the Egg model instance. The EggAI references the AIModel attached to the Egg model and onCaptureInput references the custom handler we want to call. - If the current y-axis coordinate of the touch is less than the previous one then the touch motion is in negative y-axis in the 2-dimensional screen space. We execute similar steps as above, to call EggAI.onCaptureInput by passing 1 as the input parameter. This moves the egg in the positive direction along the z-axis in the 3-dimensional space.
- If the numbers of taps is 2 then user must intend to restart the application. However, sometimes even when user is moving a single thumb on the screen we may receive a double touch event. To filter out such erroneous conditions, we check the difference between the y-coordinates of the two tap events. Note that it is always true that -1 <= nYi <= 1, i=0,1. We execute game restart only if absolute value of the difference between nY0 and nY1 is 0.2, i.e. 10% of the entire length of the 2-dimensional Y coordinate. (By experiment, if the double touch event is fired by a single thumb then the touch points on the y-axis will be less apart.)
- To restart the game, we first call
displayRestart()reviewed previously. That function displays the message, 'Game Restarting', on the screen to notify the user that game is restarting. - Next, the statement
this.postEvent(1,"requestRestart")is executed. The first argument to postEvent indicates the delay in seconds and the second parameter is name of the function to be executed after the specified delay. In other words, we request that the requestRestart function, which was reviewed above, be executed after a one second delay. This results in the informational message to be displayed on the screen for a duration of one second before the game restarts. - Finally, we store the touchCount and nY0 in prevTouchCount and prevY0, respectively, to be used in the next call to onTouchSequenceChange. (This step is not important if the game is restarting.)
ShiVa Editor - DuckAI
We will now inspect the code for DuckAI.
onInit
function DuckAI.onInit (  )
--------------------------------------------------------------------------------
    object.setTranslation ( this.getObject ( ), 2, 3, 2, object.kGlobalSpace )
    local lUser = application.getCurrentUser ( )
	local lComp = hud.newComponent (lUser, hud.kComponentTypeLabel, "HUD.disp" )
    if ( lComp ~= nil )
    then
        hud.setComponentPosition ( lComp, 75, 7 )
        hud.setComponentSize ( lComp, 30, 10 )
        hud.setComponentBackgroundColor ( lComp, 0, 0, 0, 0 )
        hud.setComponentBorderColor ( lComp, 0, 0, 0, 0 )
        hud.setComponentVisible ( lComp, true )
        hud.setComponentZOrder ( lComp, 255 )
        hud.setLabelText ( lComp, string.format ("Score: %2i",this.score ( )  ) )
        hud.setDefaultFont ( lUser, "DefaultFont" )
        hud.setLabelTextHeight ( lComp, 100 )
        hud.setLabelTextAlignment ( lComp, hud.kAlignCenter, hud.kAlignCenter )
    end
--------------------------------------------------------------------------------
end
--------------------------------------------------------------------------------
Comments: This handler is where we initialize variables for the Duck model.
- The object.setTranslation function call places Duck in (x=2,y=3,z=2) in the global space.
- Rest of the code sets up the hud to display user's score. Here we are creating a text label visible in the screen.
- The statement 'hud.newComponent (lUser, hud.kComponentTypeLabel, "HUD.disp" )' creates an object handle to the label. Note that we give the component a name, 'HUD.disp'. We will access the component in onSensorCollisionBegin() handler later on using that name.
- If the label is successfully created we then set various properties of the label.
We specify the position to be (x=75,y=7). Note that setComponentPosition() requires 0 <= x <= 100, 0 <= y <= 100.
The size of the label is set as 30 along the x axis and 10 along the y axis. The setComponentSize() requires 0 <= x <= 100, 0 <= y <= 100. - We then set the background and border color of the label. In both functions setComponentBackgroundColor() and setComponentBorderColor(), the last parameter is passed as 0, which defines the respective element (background or border color) to be completely transparent.
- We then call setComponentVisible() to make sure the label visible.
- The setComponentZOrder() function defines how the label is situated in the front. The parameter should be between 0 and 255, and larger the parameter is the component is placed further in the foreground.
- We then set the label text. Here we append the value of score variable to constant text 'Score:' and format it to be a 2-digit number.
- The setLabelTextHeight() function call defines height of the label text as a percentage of the height of the label itself. We set this to be 100%.
- We finally align the text in the center of the label.
onEnterFrame
function DuckAI.onEnterFrame (  )
--------------------------------------------------------------------------------
    local lObject = this.getObject ( )
    if(this.isPositive ( ))
    then
        object.rotateAroundTo( lObject, 0,0,0,0,0.75,0, object.kGlobalSpace,0.5)
    else
        object.rotateAroundTo( lObject, 0,0,0,0,-0.75,0, object.kGlobalSpace,0.5)
    end

    local x,y,z = object.getRotation(lObject,object.kLocalSpace)
    object.setRotation (lObject,x+0.3,y+0.5,z+1, object.kLocalSpace  )
--------------------------------------------------------------------------------
end
--------------------------------------------------------------------------------
Comments: This handler rotates the duck in both global and local spaces. In the global space, the duck rotates around the y-axis only, on a fixed plane defined by y=3 (initial value for the y coordinate of the duck) in either clockwise or counter-clockwise direction. If the boolean variable isPositive is true (initially the case), the rotation is clockwise and vice versa.
- The handler first gets an object handle to the duck via this.getObject ( ).
- The function call rotateAroundTo defines the global rotation:
- For clockwise rotation, object.rotateAroundTo( lObject, 0,0,0,0,0.75,0, object.kGlobalSpace,0.5) specifies that the rotation is around the origin (x=0,y=0,z=0, the first three parameters following the object handle) and the rotation amount is (x=0,y=0.75,z=0).
- The final parameter, a smoothness factor, is always between 0 and 1, and is set to 0.5.
- For counter clockwise rotation, the function call is the same except that rotation amount around the y-axis is -0.75.
- For rotation around the local space, we first get the current values of the rotation via object.getRotation(lObject,object.kLocalSpace).
- Then, we increment those values by (0.3,0.5,1) around the local (x,y,z) axes and set the new rotation via object.setRotation (lObject,x+0.3,y+0.5,z+1, object.kLocalSpace). This corresponds to the rotation described in Figure 3.
onSensorCollisionBegin
function DuckAI.onSensorCollisionBegin ( nSensorID, hTargetObject, nTargetSensorID )
--------------------------------------------------------------------------------
    this.score ( this.score ( )+1)
    local lComp = hud.getComponent (application.getCurrentUser ( ) , "HUD.disp" )
    if(lComp)
    then
        hud.setLabelText (lComp,  string.format ("Score: %2i",this.score ( )  ) )
    end
	if(this.isPositive ( ))
    then
        this.isPositive (false )
    else
        this.isPositive (true )
    end

    system.openURL ("http://www.stonetrip.com","")
--------------------------------------------------------------------------------
end
--------------------------------------------------------------------------------
Comments: This handler is executed every time the duck and egg collide. It mainly performs three tasks, increment the score, change rotational direction of the duck and make a system call to vibrate the Android device.
- The statement 'this.score ( this.score ( )+1)' increments the variable named score.
- We then get a handle to the hud component named 'HUD.disp' and display the new score.
- Then, the rotational direction, stored in variable isPositive is toggled.
- Finally, there is a system call system.openURL ("http://www.stonetrip.com",""). Default implementation of that function call is to open a web browser in the device to visit the URL passed as the parameter. During customization in Eclipse, the default handler will be overwritten to vibrate the device. Note: If you do not want to vibrate the device simply remove that line. Then, you can build and install the game in Android device directly via Shiva Authoring tool without having to customize in Eclipse.
Egg AI
We will now inspect the code for EggAI.
onInit
function EggAI.onInit (  )
--------------------------------------------------------------------------------
	object.setTranslation ( this.getObject ( ), 0, 3, 0, object.kGlobalSpace )
--------------------------------------------------------------------------------
end
--------------------------------------------------------------------------------
Comments: Here, we set the initial position of the egg in global space via object.setTranslation ( this.getObject ( ), 0, 3, 0, object.kGlobalSpace ). This corresponds to (x=0,y=3,z=0).
onEnterFrame
function EggAI.onEnterFrame (  )
--------------------------------------------------------------------------------
    local lObject = this.getObject ( )

    local x,y,z = object.getRotation(lObject,object.kLocalSpace)
    object.setRotation (lObject,x+1,y,z, object.kLocalSpace  )

    local xp, yp, zp = object.getTranslation ( this.getObject ( ) , object.kGlobalSpace )
    if(zp < -5)
    then
        this.isBack (false )
    elseif(zp > 5)
    then
        this.isBack (true )
    end

    if(this.isBack ( ))
    then
        object.setTranslation ( this.getObject ( ) , 0, 3, zp-0.005-math.abs ( this.jump ( ) ), object.kGlobalSpace )
    else
        object.setTranslation ( this.getObject ( ) , 0, 3, zp+0.005+math.abs ( this.jump ( ) ), object.kGlobalSpace )
    end
    this.jump (0 )
--------------------------------------------------------------------------------
end
--------------------------------------------------------------------------------
Comments: This handler is where the motion of egg is defined. There are two possible movements for the egg:
- Rotation around the local x-axis.
- Motion on a straight line defined by (x=0,y=3) parallel to the z-axis. This motion is restricted to be between the two points (x=0,y=3,z=5), in the front, and (x=0,y=3,z=-5), in the back.
The code can be interpreted as follows.
- We first get a handle of the duck via local lObject = this.getObject ( ).
- Next, we define the rotation of the egg in its local space:
- local x,y,z = object.getRotation(lObject,object.kLocalSpace) gives us the current rotation in the local space
- object.setRotation (lObject,x+1,y,z, object.kLocalSpace) sets the new rotation in the local space changing only the value for x-axis. (This corresponds to the rotation in Figure 4.)
- Then, the motion on the straight line is defined. Two different factors are in play here: egg's automatic motion and the motion contributed by the user's touch event.
- The egg will automatically move along the line, back and forth, regardless of user's touch event. Amount of the motion contributed by the automatic movement is fixed and set to 0.005 in magnitude. The boolean variable isBack defines direction of the motion. If isBack is true the motion is towards the negative z-axis and vice versa.
- To make sure the egg stays between the two boundary points (x=0,y=3,z=5) and (x=0,y=3,z=-5), the direction of the motion is toggled when egg reaches one of those boundary points.
- The numeric variable jump represents the amount of motion contributed by the user's touch event. In addition to value of jump, user's touch event influences the value of isBack as well. The manipulation of variables jump and isBack based on user's touch event is made in onCaptureInput, which is reviewed below.
- Finally, the value of jump is set to zero once the contribution of the touch event is factored into the movement.
onCaptureInput
function EggAI.onCaptureInput ( d )
--------------------------------------------------------------------------------
    if(d==1)
    then
        this.jump ( 0.1)
        this.isBack ( false)
    elseif(d==-1)
    then
        this.jump ( -0.1)
        this.isBack ( true)
    end
--------------------------------------------------------------------------------
end
--------------------------------------------------------------------------------
Comments:
This is a custom handler where the values of variables jump and isBack are manipulated based on user's touch event.
- The handler accepts a numeric parameter d which should be 1 or -1, according to the direction of the touch event. If d is 1, it is assumed that direction of the touch event is towards the positive z-axis; if d is -1, it is assumed that direction of the touch event is towards the negative z-axis.
- The value of isBack is set according to value of d.
- For simplicity, the value of jump is always set to a fixed value, 0.1. Compare 0.1 to 0.005, which is value of the automatic movement (see onEnterFrame). Observe that user's touch event provides an instant stimulus 20 times greater than automatic motion of the egg. We determined those values via trial and error finding a trade-off between speed and smoothness of motion. If the target device can support high frame rates you can increment those values to improve faster motion of the egg. In a device that cannot support high frame rates, increasing those values too much may sacrifice the smoothness as the egg will move discontinuously, albeit fast.
Eclipse - Duck.java
In this section, we will review the customization made in Duck.java
onVibrate
private static void onVibrate ( boolean b )
{
  if ( b )
  {
    oVibrator.vibrate ( 100 ) ;
  }
  else
  {
    oVibrator.cancel ( ) ;
  }
}
Comments: The variable oVibrator is an instance of android.os.Vibrator class and is initialized in Duck.onCreate() method. It is used to operate the vibrator on device. If the boolean input parameter is true, the vibrator is activated for 100 milliseconds.
onOpenURL
public static void onOpenURL ( String sURL, String sTarget )
{
  onVibrate(true);
}
This is a system call to open a URL in device's browser. The default behavior is to start a new activity based on an intent of type Intent.ACTION_VIEW. We overwrite the default implementation to call onVibrate instead.
Porting the Game into iOS
This tutorial covers 3D game development for Android OS using ShiVa3D Suite. However, with slight changes you could author the game for iOS devices, iPhone/iPod Touch or iPad/iPad2 as well. At a high level, one would need to follow the steps below to port the game into iOS.
- The ShiVa Editor:
- For simplicity, let us assume the device will not be vibrated when the duck and the egg collide. For this reason, remove system.openURL ("http://www.stonetrip.com","") in onSensorCollisionBegin function.
- When exporting the game, select iOS for the Runtime Package.
- Shiva Authoring Tool:
- Shiva Authoring Tool needs to be run in a Mac OS environment.
- In the Shiva Authoring Tool start page, select iPhone tab for iPhone/iPod Touch or iPad tab for iPad/iPad2.
- Supply launch icon and splash screen images with dimensions suitable for the iOS device. For example, for iPhone/iPod Touch, the launch icon and splash screen images will be 114x114 pixels and 640x960 pixels, respectively. For iPad/iPad2, the launch icon and splash screen images will be 72x72 pixels and 768x1024 pixels, respectively.
- The Shiva Authoring Tool screens are slightly different for iOS devices. Some of the options available for Android OS authoring are not available for iOS authoring and vice versa. In particular, you cannot directly install the game into a connected iOS device. Instead, in Step 3, select Build type as Development to generate an xCode project. Then, build the xCode project in your Mac OS computer as you would do with other xCode projects and install the game to your device via xCode.
- Also, you need to have a valid provisioning profile when installing an application to an iOS device via xCode. The provisioning profile and the signing identity will be supplied to the Shiva Authoring Tool in Step 2. (In that step, also choose the Authoring type as project.)
- The Eclipse tool is never used for iOS development. For any code customization, use the xCode environment before deploying the final product into an iOS device.
A comprehensive study of using ShiVa3D Suite for iOS game development is given in another mobile tuts+ tutorial (http://mobile.tutsplus.com/tutorials/android/create-a-3d-flight-simulator-app-for-ios-and-android-premium). For details, see that reference.
Conclusions
In this tutorial, we discussed 3D game development for Android using ShiVa3D Suite. Two of the main elements in that suite are the ShiVa Editor and ShiVa Authoring Tool. The ShiVa Editor is a core component to develop and test a 3D game from scratch. A game developed with ShiVa Editor can be deployed in different devices with different operating systems after authored via ShiVa Authoring Tool.
ShiVa Authoring Tool is used to convert a game created via the ShiVa Editor into the target operating system. For Android OS, we discussed two possible authoring options, Project and APK Package. With the Project authoring type, ShiVa Authoring Tool generates an Eclipse project with Java and C/C++ code letting developer further customize the application before it is deployed into target devices. As part of this tutorial, we showed how to vibrate the device via an event handler, overriding the default behavior of the openURL system call. The other authoring type, APK Package, generates an Android apk file which can be readily deployed into the target device. The APK Package is the proper authoring type if you do not need any customization of the game.
For those who are interested in further reading, here are some links to ShiVa3D knowledge base.
- Tutorials: http://www.stonetrip.com/developer/category/tutorials
- Reference documentation: http://www.stonetrip.com/developer/doc/
- A great tutorial on ShiVa and 3D programming: Introduction to 3D Programming with ShiVaÆ
Some final comments are as follows.
- Animating a sophisticated 3D model may require substantial CPU capabilities. Therefore you should define your models and animations carefully with the target devices in mind.
- Target device should be able to render the game at acceptable frame rates. In that regard, complex details in a 3D model may sacrifice the performance. In addition, some of the details may not actually be visible in devices with small screen dimensions, e.g. phones. Try to use a model that has the correct balance between visual details and performance. You do not need more granularity in a 3D model than what the mobile device can support in terms of its resolution and screen dimensions.
- Some features such as physical keyboard may not be available in every device. If you design a game based on keyboard inputs, provide a fallback option for devices that do not have keyboards. For example, handle touch events in addition to key events so that the game could be played in larger variety of devices.

Comments