This is a four-part tutorial series covering the topic of WordPress users, roles and capabilities. The series will cover the architecture and design of user roles in WordPress; highlight the most important functions for interacting with users and managing roles and capabilities; and in the last tutorial, we are going to build a real-life example that demonstrates the usefulness of this API.
Introduction
In this first part, we'll walk through the basics and inner workings of the WordPress users, roles and capabilities system. No functions or code will be covered in this part. So you can jump to the next one if you are interested only in writing code that interacts with this system. However, I'd strongly recommend that you first go through this to get a basic idea about users and roles in WordPress.
Following version 2.0, WordPress introduced a new Roles and Capabilities system that replaced the older user level system. The older system won't be discussed; it's now fully deprecated (since version 3.0) and should no longer be used.
The new system is more advanced and flexible. It's now possible to create custom permissions, and assign them per user. This update came to address the deficiencies in the old model and to enable developers to build more powerful and customized plugins and themes.
Database Architecture for Users
-
Users' Tables Schema
WordPress keeps the users' data in two tables:
wp_usersandwp_usermeta(I'll take the assumption during this whole series that your WordPress setup uses the defaultwp_prefix). The second table is created to extend the first one and enables developers to attach additional data to each user.If there was only one table, you'll be either unable to attach more data to users, or have to keep all this data serialized in one column row which is not quite good for performance and scalability. (Imagine the case of having 50 plugins where each one adds 2 or 3 more fields per user.)
Below is a diagram of the two tables' schema. The tables are linked together with a "one to many" relationship. In fact, you can have as many rows as you want in the
wp_usermetawith the sameuser_id(which is the foreign key for this relation and represents the ID column inwp_users)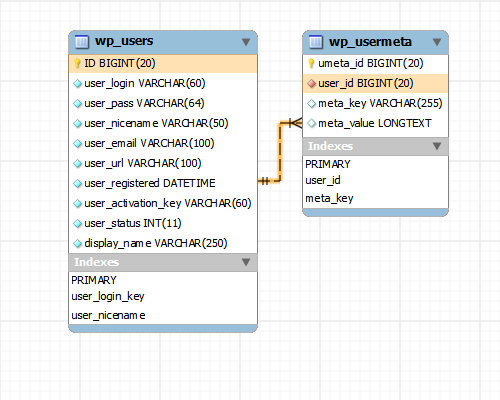
-
Inside the Tables
If we look into the schema of these two tables, we can conclude that wp_users is used to hold a limited and finite amount of data about each user. Some of them are required and mostly used by the WordPress core, themes or plugins like the login, password, email and nice name (also nickname). But it's not the case for the user_url field, for example. This field could fit in the wp_usermeta table since it's not required.
Some required fields are stored in the wp_usermeta like the nickname. Well, actually I'm only aware of this one. However, some critical information like the user capabilities, user level and SSL mode are stored in the wp_usermeta table as well. This makes it no less important than the wp_users table (especially when permissions and security are a huge concern).
That being said, you should be careful when dealing with both tables. I'd recommend that you stick with the WordPress functions for interacting with the users and capabilities system.
Roles and Capabilities in WordPress
Like any other CMS, WordPress features a user permission system to set and restrict privileges for each user. In this section, I'm going to explain the concept behind roles and capabilities in WordPress. So if you have struggled with the Codex explanation, I hope this one makes it clearer as I'm approaching the concept differently.
-
An Overview About Capabilities
Forget about roles. Let's assume for a few minutes that they don't exist.
Let's envisage the following scenario: You have a WordPress blog that you recently setup, and you are the administrator. (So you have got all the possible power out there.) You decided to add a new user to your blog to contribute some blog posts. You also thought that it'd be fair to allow him to comment and customize his display name.
Below is a picture of our user with the capabilities you assigned to him.
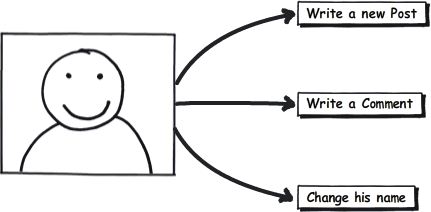
So it's as simple as that. You assign capabilities to users. You are free to name these capabilities. For example, you can name "write_new_post" as the slug for writing a new post.
In your blog, you'll have a list of capabilities with each one giving a special and limited power to the users who have them. Each user can have a limited number of capabilities. A user that has all the capabilities is an Administrator since he can do pretty much everything. Think of it as a permission system, and capabilities are permissions that you are giving to users.
But why do capabilities matter? Well, you are the one responsible for that. For example, in the case you are building your own plugin (or theme), you might create your own "
access_control_panel" capability and assign it to a number of users.When a user is requesting your "Control Panel", you should check that the user has the "
access_control_panel" capability before displaying the Control Panel page. You can also check for capability before running a particular chunk of code to ensure that the user has the required privileges.WordPress comes with a default number of capabilities that are necessary for its functioning. You can make use of these capabilities too, but be careful not to remove them. You can certainly make your own and custom capabilities.
-
How Roles Come Into Play
So now we know what capabilities are. Let's envisage another scenario, where you have a bunch of users. You want to split these users into two groups: Powerful users, and less powerful users. Each group of users will have special capabilities.
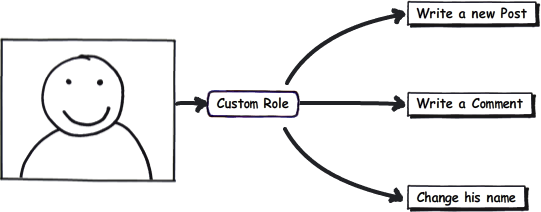
To do that, you need to assign these capabilities to each user which can be a bit frustrating and unproductive. Roles are made exactly for that, they are what users are grouped by.
So instead of assigning capabilities to users, you assign them to roles; and then you assign the roles to the users. It's possible to assign capabilities directly to users, though. A role can be made for one or many users; and one user can have none, one, or many roles.
So reality is much more like that.
It's important to note here that you should check for a user capability and not a user role before running code that requires permission. Never assume that a role has a specific capability because this can be changed by another plugin or theme.
-
Meta Capabilities
There are actions that require multiple capabilities. For example, to edit a blog post, you need the '
edit_post' capability. But what if this blog post was created by another user? You'll then need the 'edit_other_posts' capability too. So you need to check for both before letting the user edit the post.That's where meta capabilities come into play. WordPress has a
map_meta_cap()function which returns an array of the required capabilities to execute a particular capability.So let's get back to the previous example. Let's assume we have a user with an ID of 3, and we want to check if this user can edit a blog post with an ID of 5. This blog post is published by another user with an ID of 6.
In this case,
the map_meta_cap()function will return an array with the following capabilities:edit_post,edit_published_posts, andedit_other_posts. To create that array, themap_meta_cap()function needs to do some checks based on the user and the post.The default capabilities that the function checks for are '
delete_user', 'edit_user', 'remove_user', 'promote_user', 'delete_post', 'delete_page', 'edit_post', 'edit_page', 'read_post', or 'read_page'. It's possible, however, to augment with your own by hooking to the 'map_meta_cap' filter.
Conclusion
So that was, in a nutshell, the WordPress users and permissions system. I have tried to keep it as simple and minimalist as possible; and I avoided including any code for that reason. In the next part, we'll look into a wide range of functions that WordPress provides to interact with this system.

Comments