In the first part of this tutorial, I showed you how to install WooCommerce and start setting it up. By now you should have the following settings configured on your site:
- General
- Products
- Tax
In this second part you'll work through the remaining settings, namely:
- Checkout
- Shipping
- Accounts
- Emails
Once you've done that, you'll be ready to start adding products to your online store!
What You'll Need
To complete this tutorial you'll need the following:
- A working installation of WordPress, with administrator access so you can install and administer plugins.
Configuring the WooCommerce Settings
You've already configured your settings for products and tax as well as the general settings. Next, move on to the checkout settings.
Checkout Settings
Open the Checkout tab to see the Checkout Options screen:
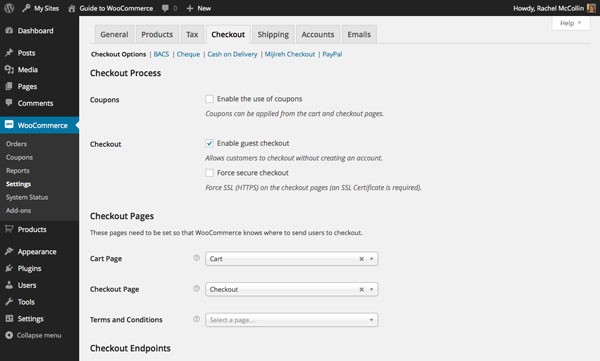
This screen enables you to allow coupons, specify whether guests can checkout without logging into an account, and choose the pages you will use for your checkout process. The only page which WooCommerce doesn't create for you is the Terms and Conditions page: if your site has one, select it from the drop down box. I'm keeping with the default settings as they work for my store.
Scroll down to edit checkout endpoints and gateways:
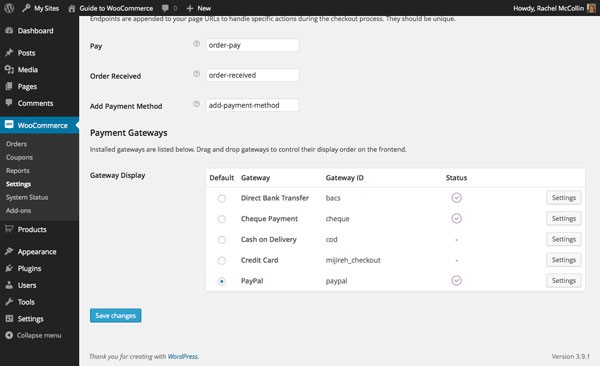
Here you can edit the slugs of your endpoint pages for the checkout process and select which payment gateways your store will use. I'm using the default endpoints and just selecting Paypal for my payment gateway - you can select as many as you need.
Click Save Changes to save your settings and then move on to the screens for your payment gateways.
Payment Gateway Settings
WooCommerce provides a screen for each payment gateway: obviously you only need to work with the ones you're using in your store. I'm using PayPal so I'll work with that screen:
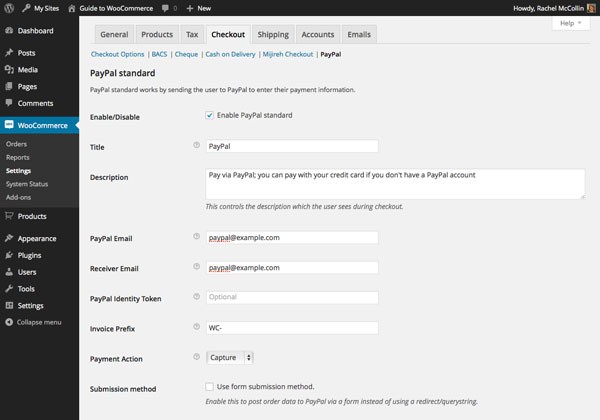
The Enable/Disable box is checked by default as with the free version of WooCommerce your visitors will need to exit your site and go to the PayPal site to make their payment, before being automatically redirected back. If you want to use Paypal to take payments within your site, you'll have to use the premium PayPal Advanced add-on for WooCommerce.
Enter the email for your PayPal account and your identity token if you have one. I'm sticking with the defaults for the rest of the settings. Then scroll down to complete the PayPal settings:
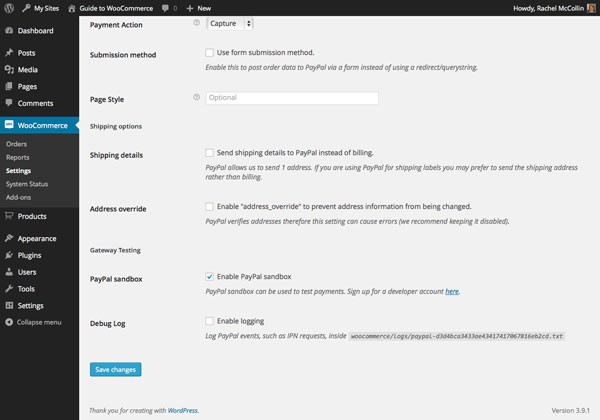
The last two options here are useful if you're testing your site. The PayPal sandbox option lets you make payments without any money changing hands: to use it, you'll need to set up a developer account with PayPal. The Debug Log option lets you create a log of all Paypal transactions to help you debug any problems, and can be useful if you're having problems when testing your site.
Finally, click Save Changes to save your PayPal settings. You'll then need to complete the similar screens for each of the other payment gateways you're using.
Shipping Settings
WooCommerce gives you a range of shipping options meaning you can charge shipping using a flat rate or based on the products you're sending. You can also charge shipping by weight or zone but to do this you'll need another premium add-on: Table Rate Shipping.
Start with the Shipping Options screen:
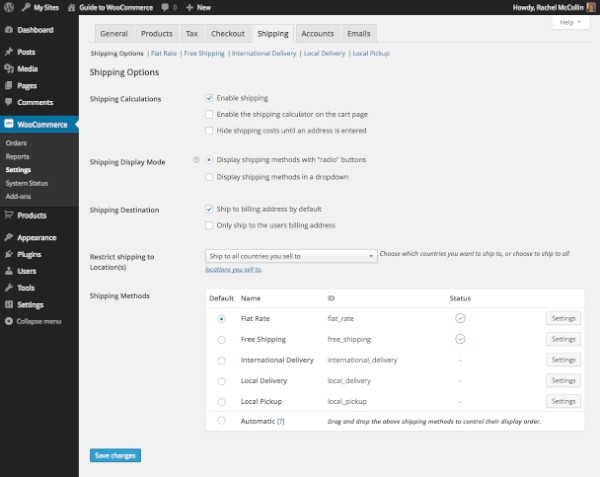
Here you'll need to define the shipping methods your store will be using. You can click on the Settings button next to each one to configure it or use the links at the top of the screen - but make sure you save your changes first.
I've selected Flat Rate for my default shipping method. This doesn't mean you have to just charge one rate for the whole order, as you'll see on the next screen.
Shipping Settings - Flat Rate
On the Flat Rate screen I can configure how my flat rate shipping will work:
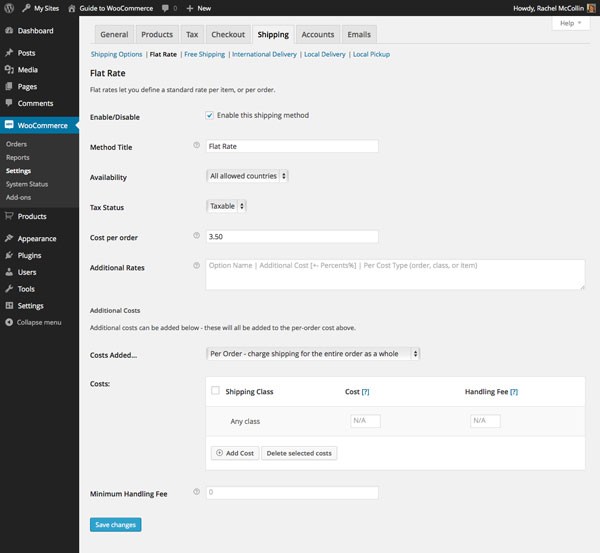
Here's what you can edit:
- The title of your shipping rate
- Which countries this applies to: I'm selecting All allowed countries as I'm only shipping to one country anyway.
- The tax status: this will depend on whether shipping is taxable in your country or state.
- The cost per order.
- Any additional rates for this shipping class. These are extra charges on top of your flat rate shipping, for example next day delivery.
- Extra costs, which you can specify as per order, per item or per shipping class. So for example if you wanted to calculate all your shipping costs per item, you would define the Cost per order as zero and then add an extra cost per item.
You can also add additional classes for different product types, and then select them when you're creating the product. So if you have some products which are more expensive to ship, you'd create a shipping class with a higher cost and then select that as the shipping class when you create the product. I'll demonstrate this in the next part of this series, as it's part of the Products settings in WooCommerce.
Once you've configured your flat rate shipping, click Save Changes and then move on to configure other shipping rates.
Free Shipping
In my store I'll allow free shipping for orders over a certain amount, to encourage people to spend more money! So I'll need to configure my settings in the Free Shipping screen:
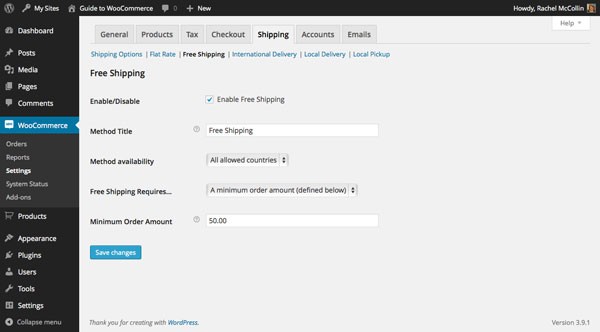
Here I simply select A minimum order amount in the Free shipping requires... dropdown, define the minimum order amount and click Save Changes.
Accounts Settings
Now that I've configured my shipping settings, I'll move on to the next tab: Accounts.
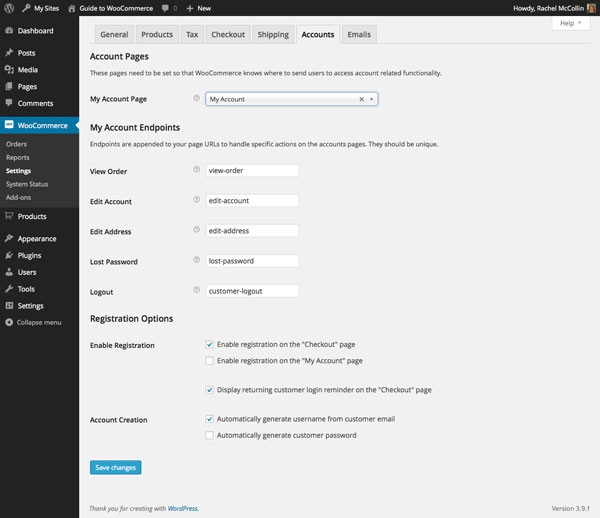
This screen lets you configure how your customers' accounts will operate. WooCommerce creates a set of default pages for managing accounts so I'm not going to change those, and I'll enable registration on the Checkout page but not on the My Account page, as that will only be used by logged in users.
I'm also keeping to the default option of not auto-generating passwords, allowing customers to create their own password which will be easier for them to remember. However you may choose to generate passwords so you have more control over their strength.
Once you've configured the Accounts screen, click Save Changes to save your settings.
Emails Settings
WooCommerce will automatically send you an email when new orders are placed, so you know if you need to take any action. You can also configure the emails it sends to your customers. Start on the Email Options screen:
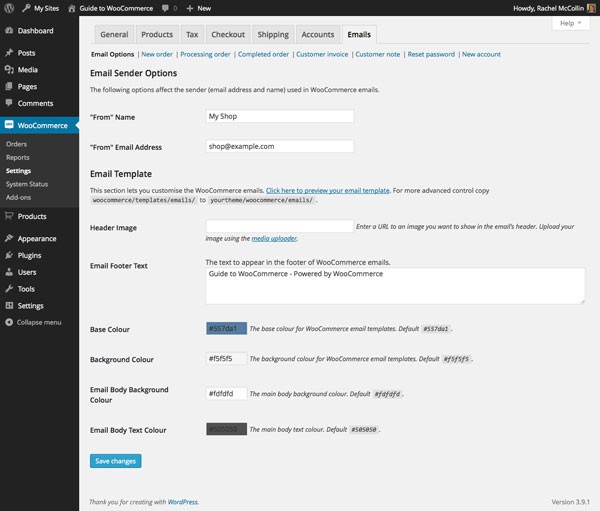
Here you can specify the name and address that emails are sent from, and make styling tweaks to the email template, adding your logo and adjusting the colours to fit with your branding. You can also change the text displayed in the footer of your emails.
Once you've made the required changes, click Save Changes and move on to configuring each of the emails that WooCommerce sends. These are:
- New order: an email sent to you when an order is placed
- Processing order: an email sent to the customer once payment has been received, to let them know you're processing the order
- Completed order: an email sent to the customer when an order is marked as completed by you - normally when you've shipped the order
- Customer invoice: an email invoicing the customer for payment if you aren't taking this through your store
- Customer note: an email sent to the customer when you add a note to their order, for example if there is a delay
- Reset password: email sent to customers requesting a password reset
- New account: a welcome email sent to customers creating a new account.
In each case, you can configure the settings via the relevant screen. If you're comfortable editing WordPress theme template files, you can override the content of each of these emails by creating a template file in your site's theme with the same name as the relevant template file in the WooCommerce plugin. Details of the files you need to create are at the bottom of each of the email settings screens.
Let's take a look at the New Orders screen by way of example:
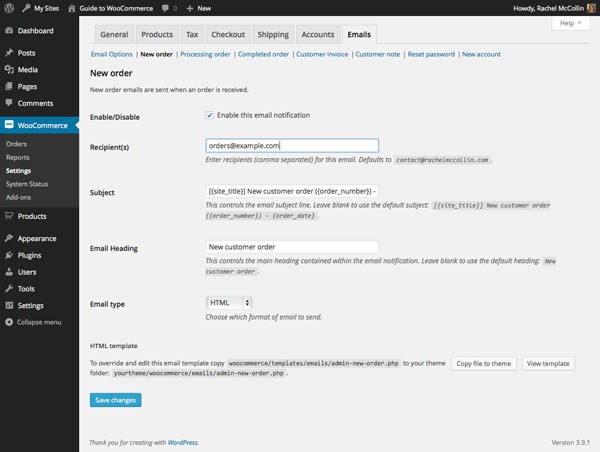
This screen is similar to the others and gives you the following options:
- Enable/disable the email
- Define who will be the recipient (not available for emails being sent to customers)
- Define the subject line and email heading
- Choose whether the email will be sent as HTML or plain text.
- Click on Save Changes when you're done and repeat the process for each of the email types.
Other WooCommerce Screens
It's worth taking a quick look at the other screens available to you in the WooCommerce menu, other than the Settings tabs. These are:
- Orders: once your store is live, use this section to track, process, complete and add notes to your orders.
- Reports: generate sales and customer reports
- System Status: access a status report for your store
- Add-ons: Download and activate premium add-ons for WooCommerce.
Summary
You have now worked through all of the screens in the WooCommerce settings. This means that your store is ready for you to start adding products and selling to the public.
In the next part of this series I'll show you how to add physical products to your store, and then in the final part we'll look at virtual and downloadable products.


Comments