In this tutorial we’ll learn how to load and display a 3DS model file in Flash, using Away3D 4.0 beta and Stage3D's GPU hardware acceleration.
Final Result Preview
Let's take a look at the final result we will be working towards:

Click to download the demo files.
Introduction
To use this tutorial you will need to have a 3D model (exported as a .3ds file) and its texture (as an image file).
I created a simple 3D model of a teapot in Autodesk 3DS Max, and exported it to a file named Teapot.3DS along with its separate texture file, teapot.jpg. You can find both files in the source download.
You will need to download a package SWC of Away3D 4.0.0 beta (you can also find this SWC in the source files).
And you need to know that Away3D 4.0.0 beta version uses the new Stage3D features of Adobe Flash, meaning it can use the GPU for 3D graphics acceleration.
We are going to build this demo using pure AS3, compiled in FlashDevelop (read more about it here). FlashDevelop is a free AS3 IDE, although it is Windows only. If you prefer to use another IDE, you will still be able to follow this tutorial.
Step 1: Create a New Project
If you don’t already have it, be sure to download and install FlashDevelop. Open it and start a new AS3 Project.
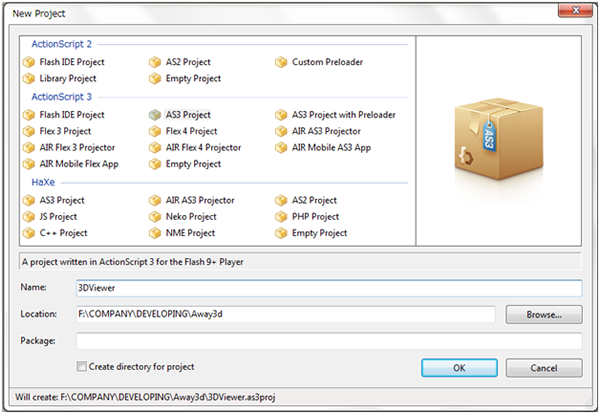
FlashDevelop will create a blank AS3 template project for you. We'll use the Main class for all our code.
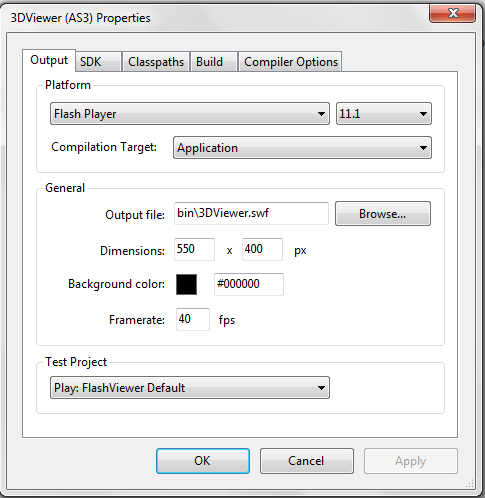
Step 2: Compiler Options
Go into the Project menu, choose Properties and change a few options:
- Set the target platform to Flash Player 11.1.
- Change the SWF size to 550x400px.
- Set the background color to black.
- Change the FPS to 40.
If we want to run this tutorial from the HTML embed code, we have to include the parameter wmode=direct in the parameters of the Flash object in the HTML file. It'll look like this:
<object width="550" height="400" data="3DViewer.swf" type="application/x-shockwave-flash" wmode="direct">
<param name="src" value="3DViewer.swf" />
<param name="wmode" value="direct" />
</object>
In this tutorial we'll load the 3DS file from local storage (rather than from a web server), so we must change some settings in the Compiler Options tab. Set Use Network Services to False.

Step 3: Add Away3D Library
Get away3d-core-fp11_4_0_0_beta.swc from the source files, or download it from Away3D’s site.
Copy that file to your project's lib directory.
In FlashDevelop, right-click the SWC file, and choose Add to Library.

Step 4: Imports
Now let’s start coding with our Main.as file. To begin, we have to import the necessary library files for program to setup the Away3D engine and the Flash components. There are quite a few, so let's get them out of the way:
// 3DS Model Viewer Tutorial
// by Vu Hoang Minh - www.3dgameflash.com
// Created for active.tutsplus.com

package
{
	//Away3D classes
	import away3d.cameras.lenses.PerspectiveLens;
	import away3d.containers.ObjectContainer3D;
	import away3d.containers.View3D;
	import away3d.entities.Mesh;
	import away3d.events.LoaderEvent;
	import away3d.loaders.Loader3D;
	import away3d.loaders.parsers.Max3DSParser;
	import away3d.materials.TextureMaterial;
	import away3d.textures.BitmapTexture;

	//General Flash classes for display and interaction
	import flash.display.Bitmap;
	import flash.display.MovieClip;
	import flash.display.Shape;
	import flash.display.Sprite;
	import flash.events.Event;
	import flash.events.MouseEvent;
	import flash.geom.Vector3D;
	import flash.text.TextField;

	//Classes for loading the 3DS file from the hard drive
	import flash.display.SimpleButton;
	import flash.events.IOErrorEvent;
	import flash.net.FileFilter;
	import flash.net.FileReference;
	import flash.net.URLRequest;
	import flash.system.Security;
Step 5: Initialize Program
Let's get started. We'll declare the variables that we're going to need, initialise the 3D engine, and set up the "Browse" button and debug output text field.
	public class Main extends Sprite
	{
		private var file:FileReference;
		private var view3d:View3D;
		private var loader:Loader3D;
		private var labelDebug:TextField;
		private var object3d:Mesh;

		public function Main():void
		{
			//boilerplate loading code
			if (stage)
				init();
			else
				addEventListener(Event.ADDED_TO_STAGE, init);
		}

		private function init(e:Event = null):void
		{
			//allow us to load a local file
			Security.allowDomain("*");

			removeEventListener(Event.ADDED_TO_STAGE, init);

			//init 3D engine
			view3d = new View3D();
			view3d.camera.lens = new PerspectiveLens();
			view3d.camera.z = 100;
			addChild(view3d);

			//3D loader
			initLoader();

			//Button to open file browser
			var mcBrowse:MovieClip = new MovieClip();
			mcBrowse.graphics.beginFill(0xeeeeee);
			mcBrowse.graphics.drawRoundRect(1, 2, 100, 25, 7, 7);
			mcBrowse.graphics.endFill();
			var labelBrowse:TextField = new TextField();
			labelBrowse.text = "Browse";
			mcBrowse.addChild(labelBrowse);
			mcBrowse.mouseChildren = false;
			mcBrowse.buttonMode = true;
			labelBrowse.x = 25;
			mcBrowse.addEventListener(MouseEvent.CLICK, onClick_mcBrowse);
			addChild(mcBrowse);

			//debug output
			labelDebug = new TextField();
			labelDebug.text = "...";
			labelDebug.textColor = 0xff0000;
			labelDebug.selectable = false;
			labelDebug.y = mcBrowse.height / 2;
			labelDebug.width = 600;
			addChild(labelDebug);

			//file
			file = new FileReference();
		}
In lines 25-29, we initialise the Away3D graphics components. We create a new View3D (a container that stores the camera and objects), configure its lens and camera, and add it to the display list.
After that we make a Browse button: we draw its background, add its label, configure it, and add it to the display list.
To make it easy to keep track of the 3DS loading state, we make a debug label, which is a simple text field.
Finally, we initialise a FileReference instance to handle browsing for the 3DS file.
Step 6: Initialise 3D Loader
The next important thing we must do is create a 3D model loader.
	private function initLoader():void
	{
		//clear all
		removeEventListener(Event.ENTER_FRAME, onEnterFrame);
		while (view3d.scene.numChildren > 0)
		{
			view3d.scene.removeChild(view3d.scene.getChildAt(0));
		}

		//init new 3D loader
        	Loader3D.enableParser(Max3DSParser);
		loader = new Loader3D();
		loader.addEventListener(LoaderEvent.RESOURCE_COMPLETE, onComplete_loader);
		loader.addEventListener(LoaderEvent.LOAD_ERROR, onError_loader);
		view3d.scene.addChild(loader);

   		//config camera
		view3d.camera.lookAt(loader.position);
	}
This function has three sections:
- First, we clear everything out, in case our program has run before.
- After that, we initialise a new
Loader3Dinstance, and add listeners to it which trigger when it fires an Error when a 3D file has completely loaded. To make it visible, we add it to theView3D's scene. - To ensure that we can actually see the object once it has loaded, we tell the camera to look at it.
Step 7: Handle All Events
Next, we'll add all the event handler functions, which all have something to do with loading the 3DS file.
		private function onClick_mcBrowse(e:MouseEvent):void
		{
			file.browse([new FileFilter("3DS", "*.3ds")]);
			file.addEventListener(Event.SELECT, onFileSelected);
			file.addEventListener(SecurityErrorEvent.SECURITY_ERROR, onSecurityError);
			file.addEventListener(IOErrorEvent.IO_ERROR, onIOError);
		}

		private function onSecurityError(e:Event):void
		{
			labelDebug.text += ".Security Error!";
		}

		private function onIOError(e:IOErrorEvent):void
		{
			labelDebug.text += ".File not found Error!";
		}

		private function onFileSelected(e:Event):void
		{
			labelDebug.text = "File :" + file.name;
			file.removeEventListener(Event.SELECT, onFileSelected);
			file.addEventListener(Event.COMPLETE, onFileLoaded);
			file.load();
		}

		private function onFileLoaded(e:Event):void
		{
			file.removeEventListener(Event.COMPLETE, onFileLoaded);
			initLoader();
			loader.loadData(e.target.data);
		}

		private function onError_loader(e:LoaderEvent):void
		{
			trace("Error loading File...");
			labelDebug.text += " .Loading Error";
		}

		private function onComplete_loader(e:LoaderEvent):void
		{
			trace("3D File loaded");
			labelDebug.text += " .Complete.Rendering...";
			loader.removeEventListener(LoaderEvent.RESOURCE_COMPLETE, onComplete_loader);
			loader.removeEventListener(LoaderEvent.LOAD_ERROR, onError_loader);
			object3d = Mesh(loader.getChildAt(0));
			view3d.scene.addChild(object3d);
			loader.dispose();
			loader = null;

			addEventListener(Event.ENTER_FRAME, onEnterFrame);
		}
When the user clicks the Browse button, we display the File Browse Dialog, which uses a FileFilter to restrict the files shown to those with a .3ds extension. We add several event listeners to this dialog, so that we can detect when a file is detected or if an error occurs.
After a file has been selected, we load it to the FileReference instance that we initialised earlier. Once it has loaded, we call the initLoader() function that we defined in the previous step, which loads our 3D model.
At this time, there are two possible states we can catch:
- One is the "error" state, which implies that our program cannot load the 3D model file (perhaps the path is incorrect, or the map texture file is wrong...).
- The other is the "loaded successfully" event, upon which we cast the loaded file to a
Meshand add it to the scene ofView3D.
To free up our memory and reuse it later, we should dispose of our loader.
At the end of above code (assuming the file loaded) we add an ENTER_FRAME event, which we'll use to render the object. We'll write that handler now.
Step 8: Start the Render Loop
Now that everything has been initialized, we are ready to render it all. Every frame, we'll make the 3D object yaw (rotate) and call the render() function of View3D to update the display.
		private function onEnterFrame(e:Event):void
		{
			object3d.yaw(1);  //yaw by one unit
			view3d.render();
		}
Step 9: Compile and Run!
Almost done! Compile your SWF with F5, and see your final result. So interesting, right?
You can do than just rotate the object - try calling object3d.moveFoward(10) or object3d.pitch(1). You could even do this in response to a mouse movement or a key press.
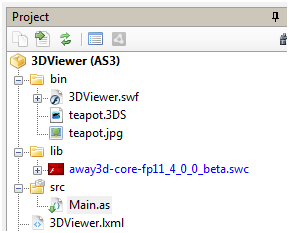
Just for reference, and to ensure that you've used the correct filenames and locations for everything, here is what your FlashDevelop project should look like:
Conclusion
We have finished first basic 3D tutorial on newest 3d Accelarate function of Adobe. I warmly welcome all readers to get in touch with me via the comments, or through my website, any time. Thanks for reading. See you next time. Good luck and HAVE FUN!

Comments