If this is the first tutorial you're reading in this series, then I highly recommend catching up with what we've covered thus far.
Essentially, you're coming in at the end of the show. At this point, we've laid the foundation for our plugin, written the plugin, and defined and explored namespaces and autoloaders. All that's left is to apply what we've learned.
So in this tutorial, we're going to put all of the pieces together. Specifically, we're going to revisit the source code of our plugin, namespace all relevant classes, and write an autoloader so that we can remove all of our include statements.
I'll discuss everything in detail as we work through the code. Again, if this is the first tutorial you're reading in this series, catch up with what we've covered so far and then return to this tutorial.
Before We Write Any Code
By this point, you should be familiar with how we've set up our development environment. As a refresher, here's a quick rundown of the software we're using:
- at least PHP 5.6.20
- the Apache web server
- a MySQL database server
- WordPress 4.6.1
- a working knowledge of the WordPress Plugin API
You're also going to need a copy of the source code of the plugin with which we're working. You can grab a copy of it right here. Assuming it's installed, activated, and you've got your IDE running, let's get started.
Namespacing the Code
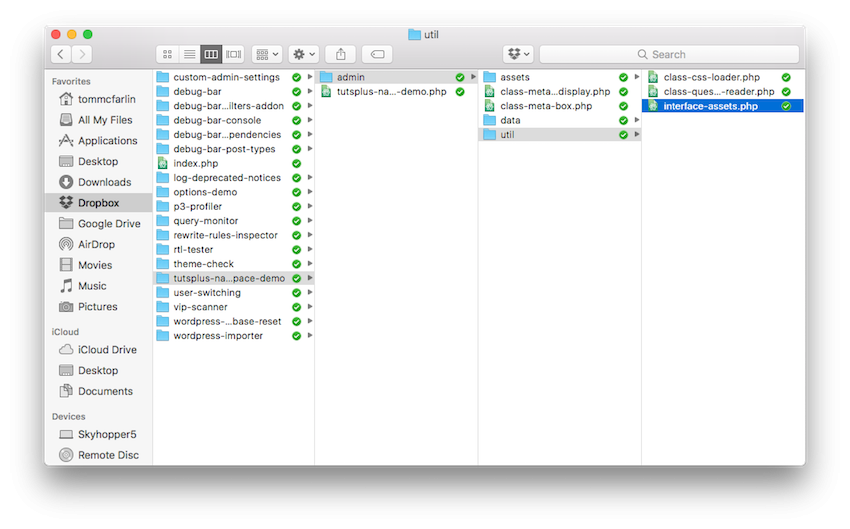
Recall from the previous tutorial, I'm a fan of making sure that our namespaces follow the organization of the files on disk. If you look at the directory structure of our plugin or if you've been following along with the series thus far, you should see something like this:

Note that if you've set up your plugin differently, that's fine. Your namespaces will likely be different, but that shouldn't affect anything that's covered in this series.
Using the directory structure as a guideline, let's go through all of the PHP files that make up our plugin and define their namespaces. Doing this is easy: It's simply a matter of using the namespace keyword and placing a qualified name at the top of each file.
I'll list each one below.
tutsplus-namespace-demo.php
<?php
/**
 * The plugin bootstrap file
 *
 * This file is read by WordPress to generate the plugin information in the
 * plugin admin area. This file also includes all of the dependencies used by
 * the plugin, registers the activation and deactivation functions, and defines
 * a function that starts the plugin.
 *
 * @link              http://.tutsplus.com/tutorials/using-namespaces-and-autoloading-in-wordpress-plugins-part-1
 * @since             0.1.0
 * @package           tutsplus_namespace_demo
 *
 * @wordpress-plugin
 * Plugin Name:       Tuts+ Namespace Demo
 * Plugin URI:        http://.tutsplus.com/tutorials/using-namespaces-and-autoloading-in-wordpress-plugins-part-1
 * Description:       Learn how to use Namespaces and Autoloading in WordPress.
 * Version:           0.2.0
 * Author:            Tom McFarlin
 * Author URI:        https://tommcfarlin.com/
 * License:           GPL-2.0+
 * License URI:       http://www.gnu.org/licenses/gpl-2.0.txt
 */

namespace Tutsplus_Namespace_Demo;

// If this file is accessed directory, then abort.
if ( ! defined( 'WPINC' ) ) {
    die;
}
class-meta-box.php
<?php
/**
 * Represents a meta box to be displayed within the 'Add New Post' page.
 */

namespace Tutsplus_Namespace_Demo\Admin;
class-meta-box-display.php
<?php
/**
 * Defines the functionality required to render the content within the Meta Box
 * to which this display belongs.
 */

namespace Tutsplus_Namespace_Demo\Admin;
interface-assets.php
<?php
namespace Tutsplus_Namespace_Demo\Admin\Util;
class-css-loader.php
<?php
/**
 * Provides a consistent way to enqueue all administrative-related stylesheets.
 */

namespace Tutsplus_Namespace_Demo\Admin\Util;
class-question-reader.php
<?php
/**
 * Reads the contents of a specified file and returns a random line from the
 * file.
 */

namespace Tutsplus_Namespace_Demo\Admin\Util;
There are a few things to notice about the conventions I've used above:
- The root namespace is
Tutsplus_Namespace_Demo, which corresponds to the directory name of the plugin. - The rest of the namespaces such as
Tutsplus_Namespace_Demo\AdminandTutsplus_Namespace_Demo\Admin\Utilalso correspond to their respective directories; however, the directory names are cased (versus being in lowercase).
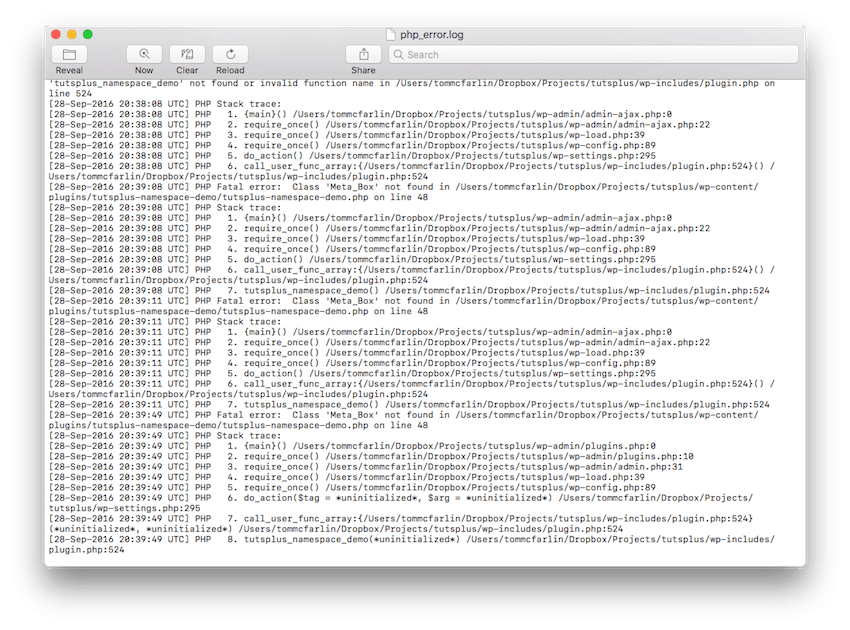
Finally, if you've tried to refresh the page or you've tried to navigate around WordPress since introducing the namespace statements, then you're likely seeing an error in your console that looks something like this:

And it includes the following message:
PHP Warning: call_user_func_array() expects parameter 1 to be a valid callback, function 'tutsplus_namespace_demo' not found or invalid function name in /Users/tommcfarlin/Dropbox/Projects/tutsplus/wp-includes/plugin.php on line 524
Or perhaps it shows:
PHP Fatal error: Class 'Meta_Box' not found in /Users/tommcfarlin/Dropbox/Projects/tutsplus/wp-content/plugins/tutsplus-namespace-demo/tutsplus-namespace-demo.php on line 48
Or you may see any number of other similar error messages. That's okay. It's normal.
But it raises the question: What's up with our plugin? Luckily, nothing. This is expected behavior.
The first message that you see may be a result of another plugin that you have installed. I was unable to reproduce it on its own; however, when I deactivate a few of the other plugins I have running, the plugin generated the second message (which is the message I wanted to demonstrate).
When you namespace code, PHP expects to locate a class within a given namespace. Conceptually you can think of your classes now belonging to their own package (or subpackage) or however you define it. And in order for a function to access a class within a package, it needs to be made aware of the packages that exist.
This is where additional namespace functionality and autoloading comes into play. So before we go about trying to access our code via their namespaces, let's work on an autoloader.
All About Autoloading
Writing an autoloader will require the following:
- understanding a PHP function called
spl_autoload_register - writing a function that will automatically load our namespaced files
- including our custom autoloading function
Don't let the name spl_autoload_register intimidate you. It simply means that this is a function that's part of the "Standard PHP Library" and it's how we "register" an "autoload" function. It's a mouthful to say and a lot of characters to write, but it's just a function that we're going to use to tell PHP how to parse namespaces and class names and where it can find our files.
This function is what allows us to write our own custom code for autoloading files and then hooking said function into PHP. That is, we're going to be telling PHP where to find our files and how to parse namespaces, file names, and so on so that it will include the files.
With all of that said, we're ready to actually write an autoloader.
Writing an Autoloader
When writing an autoloader, the thing to keep in mind is how our files are organized. That is, we want to know how to map our namespaces to our directories.
In the example we're using, it's simple: The namespaces are cased versions of the directory structure. This is not always true for other projects; however, it's yet another reason why I like to logically organize my files based on their physical location.
When PHP attempts to load a class, our autoloader is going to need to do the following:
- Split the namespace up based on the slashes.
- Split the package and the subpackages up based on underscores and replace them with hyphens (if necessary).
- Know how to map class names, interfaces, and so on to file names.
- Create a string representation of the filename based on the above information.
- Include the file.
With all of those points made, we've got our work cut out for us. In the plugin directory, create a subdirectory called inc, and in the inc directory create a file called autoload.php.
Within that file, let's go ahead and stub out the function that we're going to use to autoload our files. It should look something like this:
<?php
/**
 * Dynamically loads the class attempting to be instantiated elsewhere in the
 * plugin.
 *
 * @package Tutsplus_Namespace_Demo\Inc
 */

spl_autoload_register( 'tutsplus_namespace_demo_autoload' );

/**
 * Dynamically loads the class attempting to be instantiated elsewhere in the
 * plugin by looking at the $class_name parameter being passed as an argument.
 *
 * The argument should be in the form: TutsPlus_Namespace_Demo\Namespace. The
 * function will then break the fully-qualified class name into its pieces and
 * will then build a file to the path based on the namespace.
 *
 * The namespaces in this plugin map to the paths in the directory structure.
 *
 * @param string $class_name The fully-qualified name of the class to load.
 */
function tutsplus_namespace_demo_autoload( $class_name ) {

    // If the specified $class_name does not include our namespace, duck out.
    if ( false === strpos( $class_name, 'Tutsplus_Namespace_Demo' ) ) {
        return;
    }

    // More to come...
}
Obviously, this isn't doing anything yet.
A Side Note on Writing an Autoloader
Note that I'm going to be writing the code and code comments to thoroughly explain what we're doing. If you're just venturing into this on your own for the first time, writing an autoloader along with using namespaces and working with files might be a bit frustrating. This is where a debugger and using log files can come in handy.
This is outside the scope of this tutorial, but know that writing an autoloader is not something that you may get right the first time you're doing it.
Completing the Autoloader
Let's start adding some functionality given the steps listed at the beginning of this section.
First, we need to set up a loop that's going to iterate backwards through the parts of the filename that are passed into the autoloading function. We do this because it makes it easier to build a path to the file to autoload.
<?php
function tutsplus_namespace_demo_autoload( $class_name ) {

    // If the specified $class_name does not include our namespace, duck out.
    if ( false === strpos( $class_name, 'Tutsplus_Namespace_Demo' ) ) {
        return;
    }

    // Split the class name into an array to read the namespace and class.
    $file_parts = explode( '\\', $class_name );

    // Do a reverse loop through $file_parts to build the path to the file.
    $namespace = '';
    for ( $i = count( $file_parts ) - 1; $i > 0; $i-- ) {
        // More to come...
    }
}
After this, we need to look at the $file_parts and replace all occurrences of the underscore with a hyphen because all of our class names and interface use underscores whereas our filenames use hyphens.
The following two lines are the first two lines inside of the loop that we stubbed out above:
<?php

// Read the current component of the file part.
$current = strtolower( $file_parts[ $i ] );
$current = str_ireplace( '_', '-', $current );
Next, we're going to need a conditional that does a few things.
- It needs to check to see which entry of the path of the filename that we're reading.
- If we're on the first entry, then we're at the file name; otherwise, we are at its namespace.
- Next, if we're reading the first entry, we need to determine if we're trying to autoload an interface or we're loading a class.
- If it's the former, then we need to adjust the name of the interface so we load it properly based on its filename; otherwise, we'll load the class based on the value in the
$currentvariable.
It reads like a lot, but it shouldn't be terribly complicated to read. See the commented code below:
<?php

// If we're at the first entry, then we're at the filename.
if ( count( $file_parts ) - 1 === $i ) {

        /* If 'interface' is contained in the parts of the file name, then
	 * define the $file_name differently so that it's properly loaded.
	 * Otherwise, just set the $file_name equal to that of the class
	 * filename structure.
	 */
	if ( strpos( strtolower( $file_parts[ count( $file_parts ) - 1 ] ), 'interface' ) ) {

		// Grab the name of the interface from its qualified name.
		$interface_name = explode( '_', $file_parts[ count( $file_parts ) - 1 ] );
		$interface_name = $interface_name[0];

		$file_name = "interface-$interface_name.php";

	} else {
		$file_name = "class-$current.php";
	}
} else {
	$namespace = '/' . $current . $namespace;
}
With that done, it's time to build a fully-qualified path to the file. Luckily, this is little more than basic string concatenation:
<?php

// Now build a path to the file using mapping to the file location.
$filepath  = trailingslashit( dirname( dirname( __FILE__ ) ) . $namespace );
$filepath .= $file_name;
Lastly, we need to make sure the file exists. If not, we'll display a standard WordPress error message:
<?php

// If the file exists in the specified path, then include it.
if ( file_exists( $filepath ) ) {
    include_once( $filepath );
} else {
    wp_die(
        esc_html( "The file attempting to be loaded at $filepath does not exist." )
    );
}
And at this point, we have a full autoloader (which can be retrieved by downloading the files from the link in the sidebar of this post as the source code would be a bit long to post here in the tutorial).
Finally, it's important to note that this particular function could (or should) be rewritten as a class. Furthermore, the class should consist of several smaller functions of which are testable, have a single responsibility, and read more clearly than what's above. Perhaps in a bonus tutorial, I'll walk through the process of what that would look like.
But We're Still Including Files
If you look near the top of the main plugin file (or the bootstrap file that we've often called it), you'll notice several include statements that look like this:
<?php

// Include the files for rendering the display.
include_once( 'admin/class-meta-box.php' );
include_once( 'admin/class-meta-box-display.php' );
include_once( 'admin/util/class-question-reader.php' );

// Include the files for loading the assets
include_once( 'admin/util/interface-assets.php' );
include_once( 'admin/util/class-css-loader.php' );
Given the work that we've done up to this point, we can finally remove these statements and replace them with only one:
<?php

// Include the autoloader so we can dynamically include the rest of the classes.
require_once( trailingslashit( dirname( __FILE__ ) ) . 'inc/autoloader.php' );
To be clear, we're replacing it with our autoloader. At this point, we should be done with our plugin.
Putting It All Together
Now that we've namespaced our code to provide a logical organization of related classes, and written an autoloader to automatically include files based on each class's namespace and file location, we should be able to start our plugin and have it run exactly as it did during the first successful iteration.
The last thing we need to do is make sure that we update the bootstrap file so that we instruct PHP to use the namespaces for the Meta_Box, Meta_Box_Display, the Question_Reader, and the CSS_Loader.
<?php

use Tutsplus_Namespace_Demo\Admin;
use Tutsplus_Namespace_Demo\Admin\Util;

// If this file is accessed directory, then abort.
if ( ! defined( 'WPINC' ) ) {
    die;
}

// Include the autoloader so we can dynamically include the rest of the classes.
require_once( trailingslashit( dirname( __FILE__ ) ) . 'inc/autoloader.php' );

add_action( 'plugins_loaded', 'tutsplus_namespace_demo' );
/**
 * Starts the plugin by initializing the meta box, its display, and then
 * sets the plugin in motion.
 */
function tutsplus_namespace_demo() {

    $meta_box = new Admin\Meta_Box(
        new Admin\Meta_Box_Display(
            new Util\Question_Reader()
        )
    );

    $css_loader = new Util\CSS_Loader();
    $css_loader->init();

    $meta_box->init();
}
Notice in the code above we're using PHP's use keyword, and we're prefixing our class names with their immediate subpackages. You can read more about use in the manual, but the short of it is:
The use keyword must be declared in the outermost scope of a file (the global scope) or inside namespace declarations. This is because the importing is done at compile time and not runtime, so it cannot be block scoped.
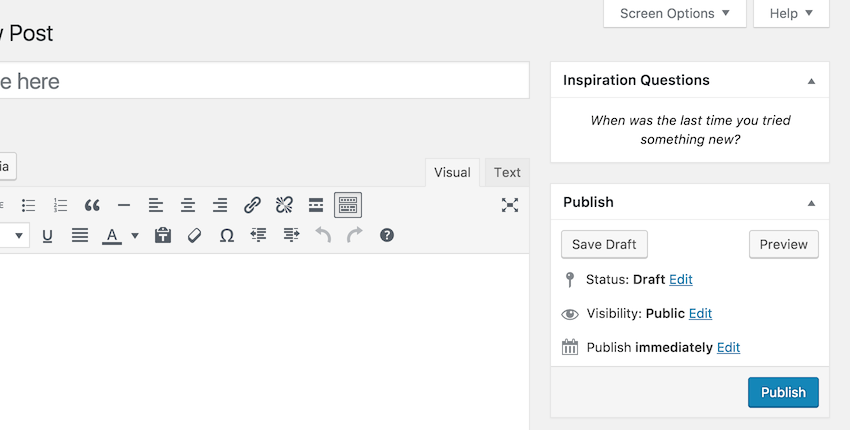
With that said and assuming all works correctly, you should be able to navigate to the Add New Post page (or Edit Post) page, view our meta box, and see a question prompt along the top of the sidebar:

If so, then congratulations. You've successfully set up your plugin to your namespaces and autoloading. If not, double-check the code against what we've shared here, review your error logs, and make sure nothing is showing up out of the ordinary in the WordPress administration screen.
If you do see something, odds are it has to do with something minor. Review the code we've covered, compare it to what's attached here to this post (in the sidebar along with the large blue button), and see if you can narrow down the issue.
Conclusion
At this point, we've reached the end of our series. Throughout the last four tutorials, we've covered a lot of ground:
- We've built a plugin that prompts users with questions to help kickstart their blogging.
- We've used PHP functions for reading files from the filesystem and rendering it in the display.
- We've defined namespaces and autoloading, and taken a look at how they can be applied.
- We've organized our code and written our own autoloader, making the code more readable, organized, and less cluttered.
Ultimately, a lot of the material covered throughout this series can be used in existing and future projects on which you may be working.
Remember that you can also find other WordPress-related products in our marketplace. And if you want to learn more about developing solutions for WordPress, you can find all of my tutorials and series on my profile page. Don't hesitate to follow me on my blog or on Twitter as I discuss software development in the context of WordPress almost daily.
And remember, the link is for downloading the final source code is in the sidebar under a button titled Download Attachment. Of course, don't hesitate to ask any questions in the comments!


Comments