In my last article I discussed the first section of Order Details when we were adding an order manually through the Add Order (WooCommerce > Orders > Add Order) button. Today I will be taking up the sections for Order Items, Custom Fields, and Downloadable Product Permissions. Let's see how to configure further.
Order Items

After Order Details the next section is for Order Items. Broadly speaking, this section will display the list of all items which are part of this order (With me? We are adding an order manually since the last part of this series). You can add multiple products in this part. Here you will also find columns which will list the Tax Class, Qty (quantity), Total, and the amount of Tax which will apply on each product separately.
There are buttons for Add item(s) and Add fee, which are obviously used to enter new items and their fee.
Add Products to Your Order

To add products in an order, first make use of the field for "Search for a product". This will display the list of all the available products which are a part of your online store. Select the desired product(s) and click the Add Item(s) button.

You can choose to add more than one products at a time. For example, I chose two products: Woo Ninja and Happy Ninja.

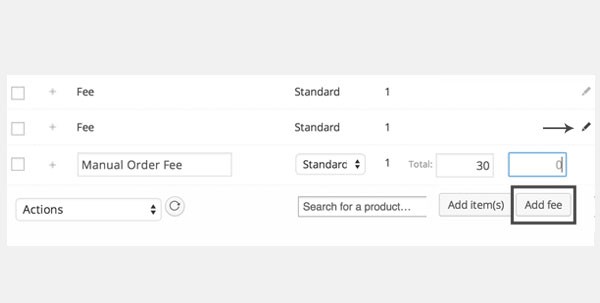
Both these items are then displayed in the form of separate rows. Notice that at the end of each row there is a pencil icon—click it to edit the fields for Tax Class, Qty, Total, and Tax.

Click the pencil icon to edit the following:
- Tax Class: Edit your tax class as either Standard, Reduced Rate or Zero Rate from here. We have discussed these tax classes in previous articles of the series.
- Qty: Specify the number of Woo Ninja products which a customer is buying from your store.
- Subtotal: It is the price which will apply before pre-tax discounts.
- Total: It is the price which will apply after pre-tax discounts.
- Tax: Set the value of Tax in the same way as you adjusted the value for Subtotal and Total.
Add meta

Click the Add meta button if you want to add any product's variable options (which are meta). You can add multiple meta boxes with this option and can delete any of them later. For example, if Woo Ninja is a T-shirt then we can add meta as Meta: Size and Value: XL, etc.
Add fee

Next to the button of Add Item(s), there is an option for Add fee, which allows store owners to enter some additional fee while they are adding an order manually. Just as with products, you can edit the fee name, tax class and price.
Once this fee is added, it will apply on all the items which are part of the order.
Actions

Earlier in this article I mentioned that there are certain Actions which you can apply on your order items. These actions can be considered as the bulk actions which we normally apply on our posts, categories, products, etc. The actions which I'm talking about are displayed in a dropdown menu right before the product searching input area. These are divided mainly into Edit and Stock Actions.
- Under Edit there is an option for Delete Lines which allows you to remove any product you might have added.
- The Stock Actions option allows you to perform certain steps which are related to your stock status. These are Reduce Line Stock and Increase Line Stock. These two options are used to keep a record of your items which are in stock.
Custom Fields

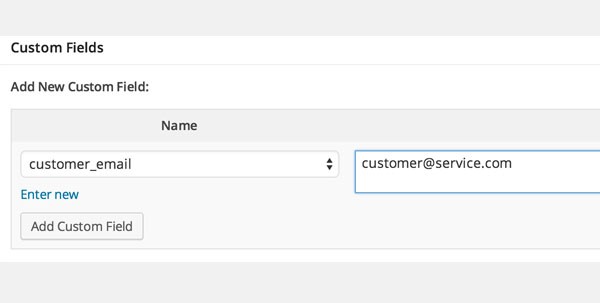
The Custom Fields section allows WooCommerce store owners to add various custom meta fields which can be used to add extra metadata to an order. These custom fields are then displayed on the front-end. So depending on your requirements, you can either use the regular Custom Fields metabox or can add new custom fields by clicking the Add Custom Field button.

Look at the figure above—you can see how I selected the customer_email field and added the customer's email ID in the value text area to define the customer's email.
Downloadable Product Permissions

In my previous articles I have discussed different types of products which you can sell in your online store through WooCommerce. One of the types was downloadable products. Downloadable products are the ones categorized as products which are virtual and cannot be shipped. However, once purchased they appear as a downloadable link to the customer.
This section for Downloadable Product Permissions controls when the permission for any downloadable product is granted to the customer once his or her order changes its status from processing to complete.
All you have to do is make sure there is an email address in the customer's billing address and the product has been added. Then use Search for a downloadable product, select the product, and finally click the Grant Access button.
Conclusion
This completes today's article. In the next article I will be wrapping up the topic of creating a new order in WooCommerce. If you have any queries regarding this article you may ask in the comments section.


Comments