In this tutorial, I'll teach you how to create a visual representation of a sound file's audio spectrum, using Flash's SoundMixer.computeSpectrum method. We'll use four classes for this effect: Sound, SoundChannel, SoundMixer, and ByteArray. I'll explain each classes as we use them.
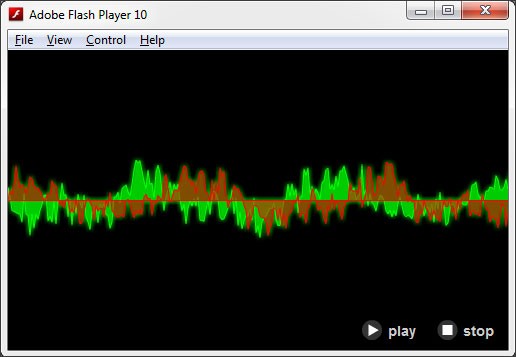
Final Result Preview
Let's take a look at the final result we will be working towards:
Click to view the demo
Step 1: Set Up Your Flash File
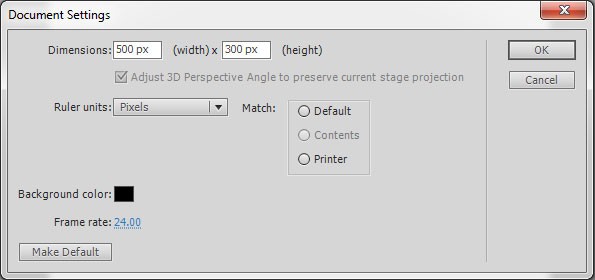
Launch Flash Pro and create a new Flash Document. Set the stage size to 500x300px, the background color to #000000, and the frame rate to 24fps.
In your timeline, select the existing layer and rename it "Buttons". Then click Window > Common Libraries > Buttons.
Select your favorite button set, then drag and drop the 'Play' and 'Stop' buttons to the bottom-right corner of the stage.
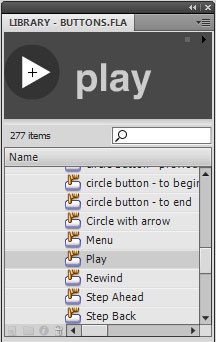
Set the instance names of these buttons to play_btn and stop_btn, respectively.
Step 2: Create the Document Class
Create a new AS file, and save it as Main.as. Add this code (read the comments for more details):
This code should be placed in our new Class:
package  {
	import flash.display.Sprite;
	import flash.media.Sound; //The Sound class is the first step in working with sound. It is used to load a sound, play a sound, and manage basic sound properties.
	import flash.net.URLRequest;

	public class Main extends Sprite {
		private var sound:Sound;
		public function Main() {
			sound = new Sound(new URLRequest("sound.mp3")); //assign music to the sound variable.
			sound.play(); //play assigned sound.
		}
	}
}
You'll need to put an MP3 file called sound.mp3 in the same directory as your FLA's output directory. Any MP3 will do; on is included in the tutorial's source download.
Step 3: Document Class
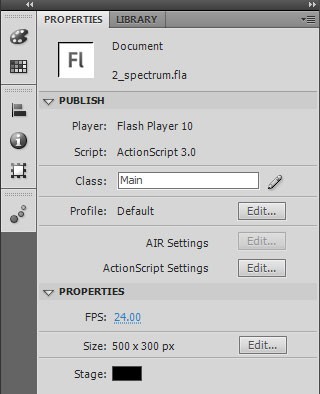
Add the class name to the Class field in the Publish section of the Properties panel to associate the FLA with the Main document class.
If you're not familiar with the concept of a document class,check out this Quick Tip before reading further.
Then press Ctrl+Enter to test your Application.
Step 4: Handling the Sound Using Buttons
Let's add an instance of a new class: SoundChannel. This class is used to keep different sounds in separate audio channels; each channel is created by an instance of SoundChannel, and we use these instances to control the sounds.
package  {
	import flash.display.Sprite;
	import flash.media.Sound;
	import flash.media.SoundChannel;
	import flash.net.URLRequest;
	import flash.events.MouseEvent;
	public class Main extends Sprite {
		private var sound:Sound;
		private var channel:SoundChannel;

		public function Main() {
			sound = new Sound(new URLRequest("sound.mp3"));
			play_btn.addEventListener(MouseEvent.CLICK,onPlayHandler);
			stop_btn.addEventListener(MouseEvent.CLICK,onStopHandler);
		}

		private function onPlayHandler(event:MouseEvent):void{
			channel = sound.play();
		}

		private function onStopHandler(event:MouseEvent):void{
			channel.stop();
		}
	}
}
As you can see, when Play is clicked, we don't just play the MP3, we also assign it to a SoundChannel. We can then control the playback through this SoundChannel instance later - in this case, by making it stop.
Step 5: Create Simple Animation
Now let's create some simple animation for this sound, again using the SoundChannel class.
package {
import flash.display.Sprite;
import flash.media.Sound;
import flash.media.SoundChannel;
import flash.net.URLRequest;
import flash.events.MouseEvent;
import flash.events.Event;
public class Main extends Sprite {
private var sound:Sound;
private var channel:SoundChannel;
public function Main() {
sound = new Sound(new URLRequest("sound.mp3"));
play_btn.addEventListener(MouseEvent.CLICK,onPlayHandler);
stop_btn.addEventListener(MouseEvent.CLICK,onStopHandler);
}
private function onPlayHandler(event:MouseEvent):void{
channel = sound.play();//assign sound to channel class
addEventListener(Event.ENTER_FRAME,animateBars); //render the animation every frame
}
private function onStopHandler(event:MouseEvent):void{
channel.stop();
graphics.clear();
removeEventListener(Event.ENTER_FRAME,animateBars);//stop rendering the animation
}
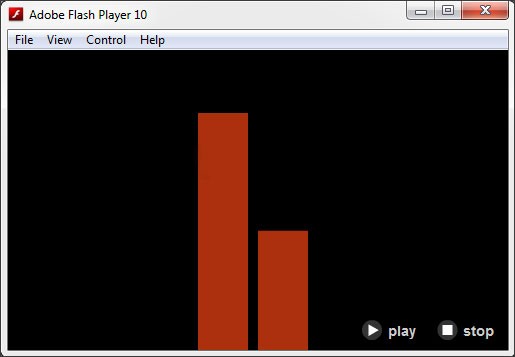
private function animateBars(event:Event):void{
graphics.clear();
graphics.beginFill(0xAB300C,1);
//Draw a rectangle whose height corresponds to channel.leftPeak
graphics.drawRect(190,300,50,-channel.leftPeak * 160 );
graphics.endFill();
graphics.beginFill(0xAB300C,1);
//Draw a rectangle whose height corresponds to channel.rightPeak
graphics.drawRect(250,300,50,-channel.rightPeak * 160 );
graphics.endFill();
}
}
}
The leftPeak and rightPeak properties of a SoundChannel instance correspond to the current amplitude of the sound, through the left and right channels. Think of it this way: if you have stereo speakers, then leftPeak is the volume of the sound coming out of the left speaker, and rightPeak is the volume of the sound coming out of the right speaker.
You can press Ctrl+Enter to test your application:
Step 6: What Is SoundMixer?
The SoundMixer class controls all embedded and streaming sounds in the application, for all SoundChannels at once.
It has three methods: areSoundsInaccessible(), which determines whether any sounds are inaccessible due to security reasons; stopAll(), which stops playback of all sounds; and computeSpectrum(), which is what we're interested in for this tutorial. The latter method takes a "snapshot" of the current sound, and pushes it into a ByteArray object.
Step 7: What Is ByteArray?
The ByteArray class provides methods and properties to optimize reading, writing, and working with binary data. It stores data as an array of bytes, hence its name. Find out more with this Introduction to ByteArray.
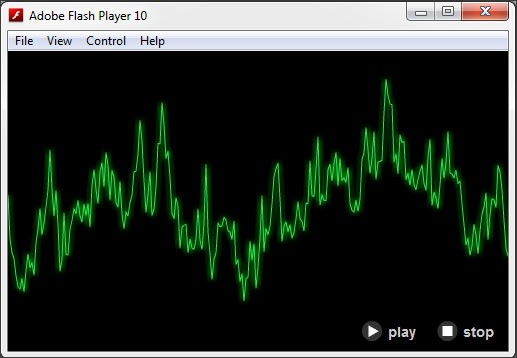
Step 8: More Complex Animation
So now let's create a more complex animation using the SoundMixer.computeSpectrum() method. Again, read the comments in the code to fully understand the behavior:
package {
	import flash.display.Sprite;
	import flash.media.Sound;
	import flash.utils.ByteArray;
	import flash.events.Event;
	import flash.media.SoundMixer;
	import flash.filters.GlowFilter;
	import flash.net.URLRequest;
	import flash.events.MouseEvent;
	import flash.media.SoundChannel;

	public class Main extends Sprite{
		private var sound:Sound;
		private var channel:SoundChannel;
		private var byteArr:ByteArray = new ByteArray();
		private var glow:GlowFilter = new GlowFilter();
		private var filterArr:Array;
		private var line:Sprite = new Sprite();

		public function Main(){
			// create a "glow" effect for the animation we will render
			glow.color = 0x009900;
			glow.alpha = 1;
			glow.blurX = 10;
			glow.blurY = 10;

			// load your MP3 in to the Sound object
			sound = new Sound(new URLRequest("sound.mp3"));
			// apply the glow effect
			filterArr = new Array(glow);
			line.filters = filterArr;
			addChild(line);

			play_btn.addEventListener(MouseEvent.CLICK,onPlayHandler);
			stop_btn.addEventListener(MouseEvent.CLICK,onStopHandler);
		}

		private function onPlayHandler(event:MouseEvent):void{
			channel = sound.play(0,1000);
			addEventListener(Event.ENTER_FRAME,spectrumHandler);
		}

		private function onStopHandler(event:MouseEvent):void{
			channel.stop();
			line.graphics.clear();
			removeEventListener(Event.ENTER_FRAME,spectrumHandler);
		}

		private function spectrumHandler(event:Event):void{
			line.graphics.clear();
			line.graphics.lineStyle(1,Math.random() * 0xFFFFFF);
			line.graphics.moveTo(-1,150);
			// push the spectrum's bytes into the ByteArray
			SoundMixer.computeSpectrum(byteArr);

			for (var i:uint=0; i<256; i++){
				// read bytes and translate to a number between 0 and +300
				var num:Number = byteArr.readFloat() * 150 + 150;
				//use this number to draw a line
				line.graphics.lineTo(i*2,num);
			}
		}
	}
}
The most important parts of this code are lines 53 and 57. Here, the whole sound wave is translated to a ByteArray, which is then read, byte by byte, and translated into a set of numbers.
The ByteArray will be 512 floats long; in the for loop, we only read the first 256 floats, which correspond to the entire sound wave of the left channel (the sound coming through the left speaker).
Press Ctrl+Enter to test your Application.
Step 9: Fill in the Gaps
We can fill in the area underneath the line to give us a different effect:
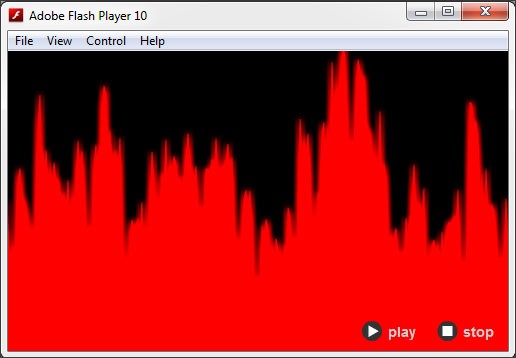
All we need to do is draw a box and fill it in, using graphics methods. The code for this is as follows:
package {
	import flash.display.Sprite;
	import flash.media.Sound;
	import flash.utils.ByteArray;
	import flash.events.Event;
	import flash.media.SoundMixer;
	import flash.filters.GlowFilter;
	import flash.net.URLRequest;
	import flash.events.MouseEvent;
	import flash.media.SoundChannel;

	public class Main extends Sprite{
		private var sound:Sound;
		private var channel:SoundChannel;
		private var byteArr:ByteArray = new ByteArray();
		private var glow:GlowFilter = new GlowFilter();
		private var filterArr:Array;
		private var line:Sprite = new Sprite();

		public function Main(){
			glow.color = 0xFF0000;
			glow.alpha = 1;
			glow.blurX = 10;
			glow.blurY = 10;

			sound = new Sound(new URLRequest("sound.mp3"));

			filterArr = new Array(glow);
			line.filters = filterArr;
			addChild(line);
			addChild(play_btn);
			addChild(stop_btn);

			play_btn.addEventListener(MouseEvent.CLICK,onPlayHandler);
			stop_btn.addEventListener(MouseEvent.CLICK,onStopHandler);
		}

		private function onPlayHandler(event:MouseEvent):void{
			channel = sound.play(0,1000);
			addEventListener(Event.ENTER_FRAME,spectrumHandler);
		}

		private function onStopHandler(event:MouseEvent):void{
			channel.stop();
			line.graphics.clear();
			removeEventListener(Event.ENTER_FRAME,spectrumHandler);
		}

		private function spectrumHandler(event:Event):void{
			// draw one edge of the box, and specify a fill
			line.graphics.clear();
			line.graphics.beginFill(0xFF0000,1);
			line.graphics.lineStyle(1,0xFF0000);
			line.graphics.moveTo(-1,150);
			SoundMixer.computeSpectrum(byteArr);

			for (var i:uint=0; i<256; i++){
				var num:Number = byteArr.readFloat() * 200 + 150;
				line.graphics.lineTo(i*2,num);
			}

			//draw the rest of the box
			line.graphics.lineTo(512,300);
			line.graphics.lineTo(0,300);
			line.graphics.lineTo(-1,150);
		}
	}
}
Step 10: Try Something Different
We can take this idea further, to add even more interesting and complex effects:
In this case, we'll draw two spectra on top of each other, one for the left channel and one for the right. To achieve this, we'll use two for loops that each read in 256 floats, one after the other.
package {
	import flash.display.Sprite;
	import flash.media.Sound;
	import flash.utils.ByteArray;
	import flash.events.Event;
	import flash.media.SoundMixer;
	import flash.filters.GlowFilter;
	import flash.net.URLRequest;
	import flash.events.MouseEvent;
	import flash.media.SoundChannel;

	public class Main extends Sprite{
		private var sound:Sound;
		private var channel:SoundChannel;
		private var byteArr:ByteArray = new ByteArray();
		private var glow:GlowFilter = new GlowFilter();
		private var filterArr:Array;
		private var line:Sprite = new Sprite();
		private var num:Number;
		public const GRAFT_HEIGHT:int = 150; //set animation height
		public const CHANNEL_SIZE:int = 256; //set left/right channel size

		public function Main(){
			glow.color = 0x009900;
			glow.alpha = 1;
			glow.blurX = 10;
			glow.blurY = 10;

			sound = new Sound(new URLRequest("sound.mp3"));

			filterArr = new Array(glow); //add glow to the animation
			line.filters = filterArr;
			addChild(line);

			play_btn.addEventListener(MouseEvent.CLICK,onPlayHandler);
			stop_btn.addEventListener(MouseEvent.CLICK,onStopHandler);
		}

		private function onPlayHandler(event:MouseEvent):void{
			channel = sound.play(0,1000); // play sound 1000 times
			addEventListener(Event.ENTER_FRAME,spectrumHandler);
		}

		private function onStopHandler(event:MouseEvent):void{
			channel.stop();
			line.graphics.clear();
			removeEventListener(Event.ENTER_FRAME,spectrumHandler);
		}

		private function spectrumHandler(event:Event):void{
			num = 0;

			line.graphics.clear(); // create current graphics
			line.graphics.lineStyle(0, 0x00FF00);
			line.graphics.beginFill(0x00FF00,0.5);
			line.graphics.moveTo(0,GRAFT_HEIGHT);

			SoundMixer.computeSpectrum(byteArr);// add bytes to Sound mixer

			for (var i:int = 0; i < CHANNEL_SIZE; i++) {
                		num = (byteArr.readFloat() * GRAFT_HEIGHT);
                		line.graphics.lineTo(i * 2, GRAFT_HEIGHT - num);
            		}

			line.graphics.lineTo(CHANNEL_SIZE * 2, GRAFT_HEIGHT);
			line.graphics.endFill();

			line.graphics.lineStyle(0, 0xFF0000);
			line.graphics.beginFill(0xFF0000, 0.5);
			line.graphics.moveTo(CHANNEL_SIZE * 2,GRAFT_HEIGHT);

			for (i = CHANNEL_SIZE; i > 0; i--) {
				num = (byteArr.readFloat() * GRAFT_HEIGHT);
				line.graphics.lineTo(i * 2, GRAFT_HEIGHT - num);
			}

			line.graphics.lineTo(0, GRAFT_HEIGHT);
			line.graphics.endFill();
		}
	}
}
Conclusion
So we have learnt how to use the various Sound classes, and how to create beautiful sound drawing animations using SoundMixer.
Thank you for taking the time to read this article, because this is my first tutorial. If you have any questions, please leave them in a comment.

Comments