The first developer preview of Android O is here!
In this series, we’re looking at some of the up-and-coming UI features that you can start experimenting with today, via the Android O Developer Preview.
In the first tip, I showed you how to set up your development to support this early O preview, and how to create text that automatically scales up and scales down to suit the current screen configuration. In this tip, we’re going to be looking at how Android O is about to make working with custom fonts a hassle-free experience.
Adding Custom Fonts to Your Project
Have you ever wanted to make a particular piece of text stand out? Or maybe you were convinced that a custom font would be the perfect way to add some extra personality to your application?
While there are many benefits to using custom fonts, working with them in Android has traditionally been a painful experience, requiring you to either use a library or create a custom View.
Thankfully, working with custom fonts in Android is about to get much easier, as custom fonts are set to become a fully supported resource type in Android O. This means that adding a custom font to your app will be as straightforward as adding any other resource, such as images and text.
To follow along with this tutorial, you’ll need some font files that you can add to the Android O project we created in part one.
Android O supports both .otf (OpenType) and .ttf (TrueType) formats. There are plenty of websites offering these kinds of fonts for free, so spend a few minutes searching Google until you find a font you like.
Since we’re just experimenting with Android O’s new features, it doesn’t particularly matter which font you use, but when you’re looking for fonts to use in production releases of your app then you should always check that font’s terms and conditions. Just because a resource is free to download doesn’t automatically mean there aren’t restrictions on how you can use and redistribute this resource, so always check the fine print!
You should also consider your application’s purpose, content and target audience, as different fonts convey different messages. If you’re designing an app to help people complete their tax returns, then your audience may struggle to take your app’s financial and legal advice seriously if it’s delivered in a weird and wacky font!
Once you’ve found a font you want to work with, download and unzip it. At this point, you should check the font’s filename for invalid characters—essentially anything that isn’t lowercase a-z, 0-9 or an underscore. Try to include any other characters, and Android Studio will throw an error as soon as you try to reference that resource.
Once you have your font file(s), you’ll need somewhere to store them:
- Right-click your project’s app/res folder and select New > Android resource directory.
- Open the dropdown menu and select font.
- Enter font as the File name.
- Click OK.

Drag and drop your font file(s) into your new res/font folder.
Using Your Custom Fonts
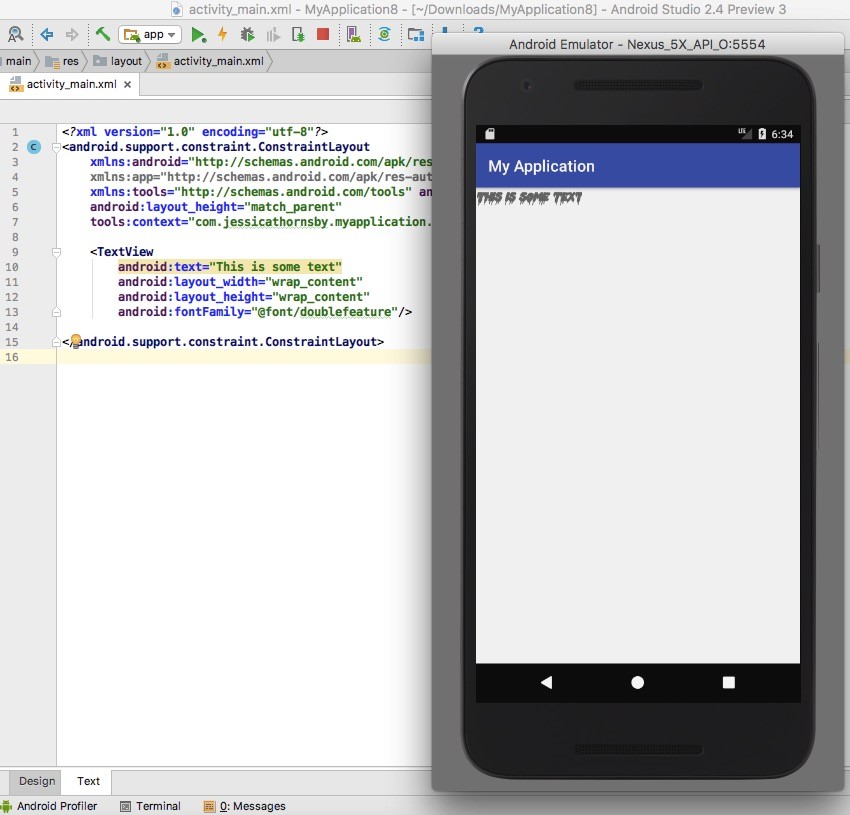
You can apply a custom font to your text using the new android:fontFamily XML attribute:
<TextView
  android:text="This is some text"
  android:layout_width="wrap_content"
  android:layout_height="wrap_content"
  android:fontFamily="@font/doublefeature"/>

You can also add custom fonts to any styles you’ve created in your app:
<style name=“headlineFont" parent="@android:style/TextAppearance.Small">
   <item name="android:fontFamily">@font/doublefeature</item>
</style>
If you want to use custom fonts programmatically, then you can retrieve a custom font using the getFont(int) method, for example:
import android.support.v7.app.AppCompatActivity;
import android.os.Bundle;
import android.widget.LinearLayout;
import android.widget.TextView;
import android.widget.LinearLayout.LayoutParams;
import android.graphics.Typeface;

public class MainActivity extends AppCompatActivity {

  @Override
  protected void onCreate(Bundle savedInstanceState) {
      super.onCreate(savedInstanceState);
      LinearLayout linearLayout = new LinearLayout(this);
      TextView ProgrammaticallyTextView = new TextView(this);
      ProgrammaticallyTextView.setText("This is some text");

//Reference your custom font//

      Typeface typeface = getResources().getFont(R.font.doublefeature);
      ProgrammaticallyTextView.setTypeface(typeface);
      linearLayout.addView(ProgrammaticallyTextView);

      this.setContentView(linearLayout, new LinearLayout.LayoutParams(
              LayoutParams.MATCH_PARENT, LayoutParams.MATCH_PARENT));
  }

}
Creating a Font Family
Sometimes you may unzip a font folder and discover multiple versions of the same font, such as an italicized version, or fonts with varying weights and thicknesses.
If you’re using multiple versions of the same font, then you may want to group them together into a font family. A font family is essentially a dedicated XML file where you define each version of the font, along with its associated style and weight attributes.
To create a font family:
- Make sure you’ve added all the font files to your project’s res/font folder.
- Right-click your project’s res/font folder, and then select New > Font resource file.
- Give this file a name, and then click OK.
- Open this XML file and define all the different versions of this font, along with their style and weight attributes, for example:
<?xml version="1.0" encoding="utf-8"?>
http://schemas.android.com/apk/res/android">
  <font
       android:fontStyle="normal"
       android:fontWeight="400"
       android:font="@font/doublefeature_regular" />

   <font
       android:fontStyle="italic"
       android:fontWeight="400"
       android:font="@font/doublefeature_italic" />

 <font
       android:fontStyle="bold"
       android:fontWeight="400"
       android:font="@font/doublefeature_bold" />

</font-family>
You can then reference any of the fonts in this family using the android:fontFamily attribute. For example:
android:fontFamily="@font/doublefeature_bold"
Don’t Forget to Test!
While it’s easy to get carried away with new features, don’t go overboard with custom fonts! Consistent UIs are easier to navigate and understand, and if your app is constantly switching between fonts then your users may end up paying more attention to how your text looks, rather than what it says.
If you do include custom fonts in your project, then it’s important to test how that font renders across a wide range of different screen configurations, as your top priority should always be ensuring that your text is easy to read.
Conclusion
In this tip, I showed you how to create more stylish and unique text, by adding custom fonts to your projects. In the final post in this series, we’re going to shift our focus from text to images, as I show you how to create adaptive launcher icons that automatically adapt their shape to suit the current device.
In the meantime, check out some of our other tutorials on Android app development!


Comments