In this Quick Tip, I will show you how to create a delete effect inspired by the iPhone iOS interface.
Final Result Preview
Let's take a look at the final result we will be working towards:
Press and hold the "a" icon, then click the "x" when it appears..
Step 1: Brief Overview
On an pre-made iPhone interface we'll make use of the Timer, Tween and Mouse Events to create a nice looking effect for interfaces.
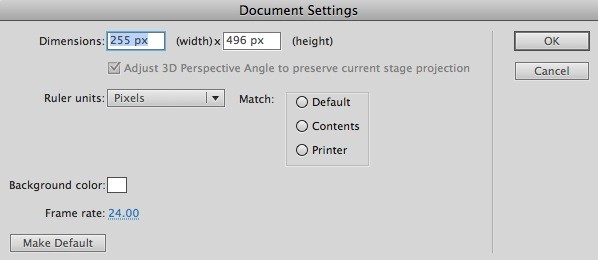
Step 2: Set up Your Flash File
Launch Flash and create a new Flash Document, set the stage size to 255x496px and the frame rate to 24fps.
Step 3: Interface

This is the interface we'll be using, it includes an iPhone 4 template and some GUI elements that you can download from the respective author's site.
There is also an icon that is an interactive element.
Step 4: ActionScript
This is the class that does all the work. It's showing only the actual working code, please read the comments to fully understand what's going on..
private var timer:Timer = new Timer(1000); //The time to hold the mouse button down the icon in order to show the delete button
private var tiltTimer:Timer = new Timer(80); //The time of the rotation change, makes the shake effect
private var rotationValue:int = 2; //The rotation desired for the shake
private var tween:Tween; //A tween instance to animate the alert dialog

public function Main():void
{

/*Hide elements*/
	hideObjects(appIcon.deleteButton, deleteAlert, darkScreen);


/*Add necesary listeners*/
	deleteAlert.cancelBtn.addEventListener(MouseEvent.MOUSE_UP, cancel);
	deleteAlert.deleteBtn.addEventListener(MouseEvent.MOUSE_UP, deleteApp);
	appIcon.deleteButton.addEventListener(MouseEvent.MOUSE_UP, displayAlert);
	appIcon.addEventListener(MouseEvent.MOUSE_UP, stopTimer);
	appIcon.addEventListener(MouseEvent.MOUSE_DOWN, pressAndHold);
}

/*Hide objects function*/
private function hideObjects(...objects):void
{
	for(var i:int = 0; i < objects.length; i++)
	{
		objects[i].visible = false;
	}
}

/*Starts the timer when the mouse is down*/
private function pressAndHold(e:MouseEvent):void
{
	timer.start();
	timer.addEventListener(TimerEvent.TIMER, showDeleteButton);
}

/*If mouse up, timer stops*/
private function stopTimer(e:MouseEvent):void
{
	timer.stop();
}

/*if the hold timer completes, the delete button is shown and the icon shakes*/
private function showDeleteButton(e:TimerEvent):void
{
	timer.stop();
	appIcon.deleteButton.visible = true;
	tiltTimer.addEventListener(TimerEvent.TIMER, tilt);
	tiltTimer.start();
}

/*The shake function, changes the rotation every time the tiltTimer completes*/
private function tilt(e:TimerEvent):void
{
	appIcon.rotation = rotationValue;
	rotationValue *=  -1;
}

/*if the delete button is pressed the alert is shown*/
private function displayAlert(e:MouseEvent):void
{
	deleteAlert.visible = true;
	darkScreen.visible = true;
	tween = new Tween(deleteAlert,"scaleX",Back.easeOut,0.3,1,0.5,true);
	tween = new Tween(deleteAlert,"scaleY",Back.easeOut,0.3,1,0.5,true);
}

/*removes the icon if the delete button in the alert is clicked*/
private function deleteApp(e:MouseEvent):void
{
	hideObjects(appIcon, deleteAlert, darkScreen);
}

/* removes the alert, stops the tilt and doesn't remove the icon, called by the cancel button*/
private function cancel(e:MouseEvent):void
{
	hideObjects(appIcon.deleteButton, deleteAlert, darkScreen);
	tiltTimer.stop();
	appIcon.rotation = 0;
}
Step 5: Document Class
Remember to add the class name to the Class field in the Publish section of the Properties panel.

Conclusion
So there you have it! A nice effect that you can add to your applications, experiment with its uses!
I hope you liked this tutorial, thank you for reading :)

Comments