The Stacks feature has been part of the Mac OS since Leopard and it is a great way to handle display elements. In this Quick Tip we will mimic this feature using ActionScript 3 Classes.
Final Result Preview
Let's take a look at the final result we will be working towards:
Step 1: Brief Overview
We'll make use of the awesome class created by PixelFumes and custom graphics to create a Stacks menu in Flash. You can download the source of the class from the developer's site.
Step 2: Set Up Your Flash File
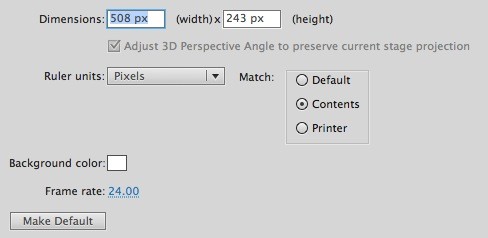
Launch Flash and create a new Flash Document, set the stage size to 508x243px and the frame rate to 24fps.
Step 3: Interface
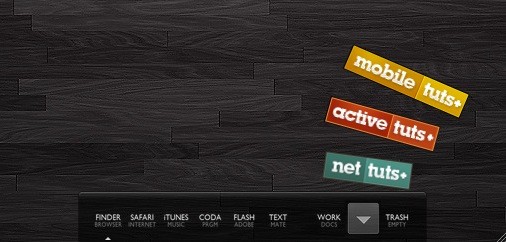
This is the interface we'll be using; the background is an image taken from my desktop and the cool logos are part of the Tuts+ network.
Convert the logos to MovieClip and mark the Export for ActionScript checkbox. The gray square is a stage button called stackButton.
Step 4: ActionScript
Create a new ActionScript Class (Cmd+N), save the file as Main.as and write the following lines; please read the comments in the code to fully understand the class behavior.
package
{
	import flash.display.Sprite;
	import flash.events.Event;
	import flash.events.MouseEvent;
	import com.pixelfumes.stacks.Stack; //Remember to import the custom class
	import fl.transitions.easing.Elastic;

	public final class Main extends Sprite
	{
		private var stack:Stack = new Stack(); //Creates a new Stack container

		/* The next variables are the movieclips names, you can add any movieclip to the stacks */

		private var nt:NT = new NT(); //Nettuts+ logo
		private var at:AT = new AT(); //Activetuts+ logo
		private var mt:MT = new MT(); //Mobiletuts+ logo

		public final function Main():void
		{
			/* Set the stack properties*/

			stack.setRadius(240);
			stack.setAngle(35);
			stack.setStartAngle(0);
			stack.setOpenEasing(Elastic.easeOut);
			stack.setOpenTime(1);
			stack.setCloseEasing(Elastic.easeOut);
			stack.setCloseTime(0.5);

			/* Add the elements to the stack container */

			stack.addItem(nt);
			stack.addItem(at);
			stack.addItem(mt);

			/* Position and add the stacks to the stage */

			addChild(stack);
			stack.x = stackButton.x;
			stack.y = stackButton.y;

			/* Listens for clicks on the stackbutton */
			stackButton.addEventListener(MouseEvent.MOUSE_DOWN, stackClick);
		}

		private final function stackClick(e:Event):void
		{
			if (stack.getStackOpen() == false) //if stack is closed, open it
			{
				stack.openStack();
			}
			else //stack is open, so close it
			{
				stack.closeStack();
			}
		}
	}
}
Step 5: Document Class
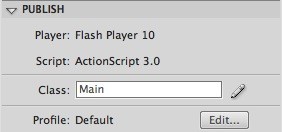
Add the class name to the Class field in the Publish section of the Properties panel.
Conclusion
You've created a useful Stacks menu for your applications or website. You can adapt the project to meet your needs or use this technique to build your custom Stacks.
I hope you liked this Quick Tip, thank you for reading!

Comments