Imagine that you're working on a feature in a Git-controlled software project. You're right in the middle of making some changes when you get a request to fix a critical bug. To start resolving the issue, you need a new branch and a clean working directory. When it comes to basic Git commands, you have two options:
- Run
git reset --hardto remove your uncommitted changes. - Record your incomplete work as a new commit.
The former option loses all of your work while the latter results in a partial commit that isn’t meaningful. Neither of these scenarios is all that desirable.
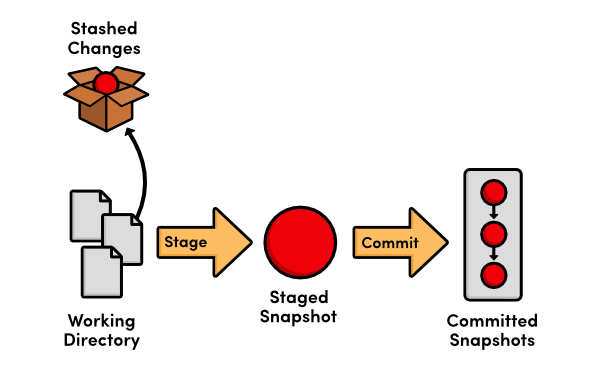
This is where the git stash command comes into play. Like git reset --hard, it gives you a clean working directory, but it also records your incomplete changes internally. After fixing the critical bug, you can re-apply these changes and pick up where you left off. You can think of git stash as a "pause button" for your in-progress work.
Prerequisites
This tutorial assumes that you have installed Git and that you're familiar with its basic workflow. You should be comfortable staging changes, creating commits, and working with branches. You'll also need a Git repository to experiment on.
1. Stashing Changes
Before you can run git stash, you need to have some uncommitted changes in your Git repository. For example, if you edited a file called foo.py, your git status output would look like this:
On branch master
Changes not staged for commit:
  (use "git add <file>..." to update what will be committed)
  (use "git checkout -- <file>..." to discard changes in working directory)

    modified:   foo.py
To stash these changes, simply execute git stash without any arguments.
git stash
This will take both your staged and unstaged changes, record them internally, then clear the working directory. This gives you the opportunity to switch to a new branch and develop other features without worrying about your partial commit messing anything up.
2. Re-Applying Stashed Changes
When you're ready to come back to your incomplete work, run the following command to re-apply the stashed changes:
git stash pop
The most recently stashed changeset will re-appear in your working directory and you can continue exactly where you left off. That's all there is to it.
3. Resolving Conflicts
Much like the git merge command, git stash pop can result in conflicts if the same sections of source code have changed since you executed git stash. When this happens, you'll see the following message after running git stash pop:
Auto-merging foo.py
CONFLICT (content): Merge conflict in foo.py
You'll also find the affected file listed under the Unmerged paths section in the git status output, as well as the affected lines in the source file.
<<<<<<< Updated upstream
print("Recently committed changes");
=======
print("Incomplete work");
>>>>>>> Stashed changes
You'll need to manually resolve the conflict in the source file, but you usually don't want to commit it immediately like you would after a git merge conflict. Most of the time, you'll continue working on your unfinished feature until you have prepared a meaningful commit. Then, you can simply add it to the index and commit it as usual. In other words, you can treat git stash pop conflicts just like any other uncommitted changes.
4. The Stash Stack
For most scenarios, the above commands are all you need when it comes to a "pause button". But, understanding how stashed changes are represented opens the door for more advanced usage.
So far, we've only been talking about stashing a single changeset. However, each time you run git stash, uncommitted changes are stored on a stack. This means that you can stash multiple changesets at the same time.

This is useful in the early stages of development when you're not sure which direction you want to take. Instead of losing your changes with git reset --hard, you can keep your work-in-progress snapshots on the stash stack in case you want to re-apply one of them later.
You can inspect the stash stack with the list parameter.
git stash list
If you had previously executed git stash three times, this would output something like the following:
stash@{0}: WIP on new-feature: 5cedccc Try something crazy
stash@{1}: WIP on new-feature: 9f44b34 Take a different direction
stash@{2}: WIP on new-feature: 5acd291 Begin new feature
The git stash pop command always re-applies the most recent snapshot, the one at the top of the stash stack. But, it's also possible to pick and choose which stashed snapshot you want to re-apply with the apply command. For example, if you wanted to re-apply the second set of changes, you would use the following command:
git stash apply stash@{1}
Just like git stash pop, the changes will re-appear in your working directory and you can continue working on the incomplete feature. Note that this will not automatically remove the snapshot from the stash stack. Instead, you'll need to manually delete it with the drop command.
git stash drop stash@{1}
Again, working with the stash stack is more of an edge case for most Git users. The git stash and git stash pop commands should suffice for most of your needs, although git stash list can also prove useful if you forgot where your last stash operation took place.
Conclusion
Committing meaningful snapshots is at the heart of any Git workflow. Purposeful, encapsulated commits make it much easier to navigate your project history, figure out where bugs were introduced, and revert changes.
While not exactly an everyday command, git stash can be a very convenient tool for creating meaningful commits. It allows you to store incomplete work while avoiding the need to commit partial snapshots to your permanent project history. Keep this in mind the next time you wish you could pause whatever you were working on and come back to it later.

Comments