Usually a website needs a contact form to communicate with the site owner. One of our favorites is Contact Form 7. Let's see what it can do!
Contact Form 7 is a free, simple and flexible (in WordPress this usually means there's a simple set-up for those who like it simple, and a lot of depth and complexity for people who like fiddling) contact form plugin by Takayuki Miyoshi. Some say that Contact Form 7 is one of the best form plugins for our favorite content management system. The plugin was last updated in February and has been downloaded 6,457,967 times in total (at the time of writing this article).
The plugin can handle multiple contact forms as well and supports AJAX submitting, CAPTCHA, Akismet spam filtering and file uploading. The latest version at the writing of this article is 3.1.1. The official website is ContactForm7.com. Download can be made from the WordPress Plugin Directory. Detailed documentation can be reached in the official docs.
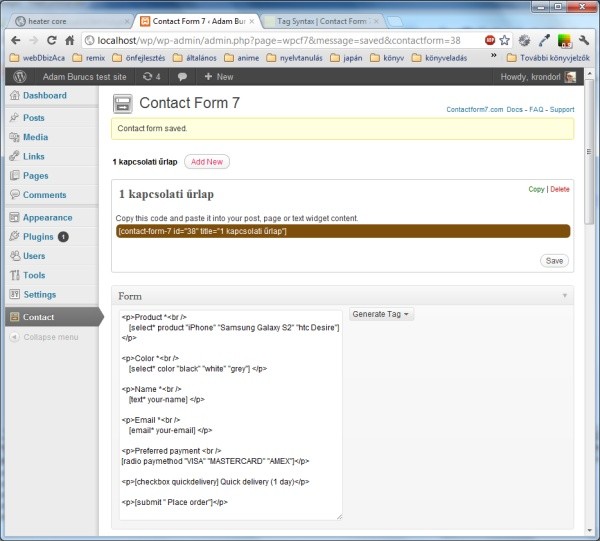
After installing and activating you will find a dedicated menu item called "Contact" in the admin interface.
Form Code
Here is a simple form where you can order a cell phone. You can specify the brand, the color, and the payment method as well.

<p>Product *<br /> [select* product "iPhone" "Samsung Galaxy S2" "htc Desire"] </p>

<p>Color *<br /> [select* color "black" "white" "grey"] </p>

<p>Name *<br /> [text* your-name] </p>

<p>Email *<br /> [email* your-email] </p>

<p>Preferred payment <br /> [radio paymethod "VISA" "MASTERCARD" "AMEX"]</p>

<p>[checkbox quickdelivery] Quick delivery (1 day)</p>

<p>[submit "Place order"]</p>
Insert Form Code
Use this snippet to import the complete form specified above to an arbitrary WordPress article or page.
[contact-form-7 id="38" title="cell-phone-ordering-form"]
Basic syntax
The tag syntax consists of type, name and value fields. With the asterisk it will become a mandatory element.
[type name values] for example: [radio paymethod "VISA" "MASTERCARD" "AMEX"]
Tag Types
Here is a list with all the tags you can use in your forms:
- text fields (text, text*, email, email*, textarea and textarea*),
- checkboxes, radio buttons and menus (checkbox, checkbox*, radio, select and select*),
- file uploading and attachment (file and file*),
- captcha (captchac and captchar),
- quiz (quiz),
- acceptance checkbox (acceptance),
- submit button (submit).
Creating a Two Column Form
We can quickly create a form with the two column style, just use some HTML and CSS. The little secret is that we can combine HTML with the tag code.
<!-- TWO COLUMN FORM -->
<div class="clearfix">
	<div id="left">
		First name [text first-name] <br/>
		Email [email* your-email]
	</div>
	<div id="right">
		Last Name[text last-name] <br/>
		Phone[text your-phone]
	</div>
</div>

Subject [text* your-subject] <br/>
Message [textarea* your-message] <br/>
[submit "Send"]
<!-- /TWO COLUMN FORM -->
Here is the CSS code. Nothing fancy just very basic styling.
#left {
    width: 300px;
    float: left;
}

#right {
    width: 250px;
    float: left;
}

.clearfix:after {
	content:"\0020";
	display:block;
	height:0;
	clear:both;
	visibility:hidden;
	overflow:hidden;
}

.clearfix {
	display:block;
}
Advanced Syntax
The tag syntax can be more detailed as well. The options part specifies the behavior and appearance. Declaring options is not necessary but here is how you can do it. Note that in the following example we use the id and class properties. You can use CSS and JavaScript to extend your form.
[type name options values]

for example:
[radio paymethod id:paynow class:paythis "VISA" "MASTERCARD" "AMEX"]
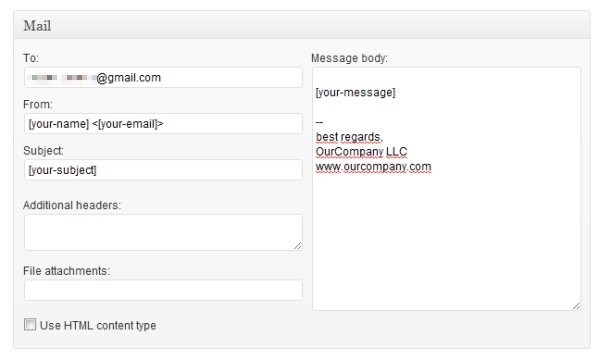
Setting Up a Mail Template
In Contact Form 7 you can edit mail templates very easily. Text, HTML code, and form data can be combined in arbitrary ways. Note the form data with the brackets. Below is an example for the message body.
Dear [yourname],

You have just ordered a [product] product in [color] color!
Soon you will get an email with the link to where you can pay for your order.

---
Thanks for buying!
OurCompany LLC, www.ourcompany.com

Here is a list of what else you can set via the admin panel:
- basic header fields (to, from and subject)
- message body
- additional headers
- file attachments
- HTML mode
Adding CAPTCHA
The form plugin allows you to insert a CAPTCHA into your contact forms to prevent unwanted messages. Contact Form 7 uses Really Simple CAPTCHA as its CAPTCHA module. Before we begin you will have to install the Really Simple CAPTCHA plugin. Make sure your temporary folder for CAPTCHA files exists and is writable. Otherwise, the CAPTCHA can not be created.
For using CAPTCHA in your forms, you must use the captchac and captchar form tags. captchac means CAPTCHA-Challenge and it represents an <img /> element for a CAPTCHA image. captchar means CAPTCHA-Response and it represents an <input type="text" /> element for a response input field. A captchac tag must always be paired with a captchar tag with the same name. For example, tags shown below are valid:
<!-- insert this into your CF7 form code -->
[captchac captcha-1] [captchar captcha-1]
Note that the names must match each other to function properly. Here captcha-1 is given.
Fixing Sending Errors
Failed to send your message. Please try later or contact administrator by other way.
If the server doesn't allow to send mail via sendmail(), you can use a plugin to send mail via SMTP. Both extensions are compatible with WordPress 3.2.1. These plugins can solve your problems:
Download and install your chosen plugin in WordPress. Enter the settings for your SMTP server on the Settings page.
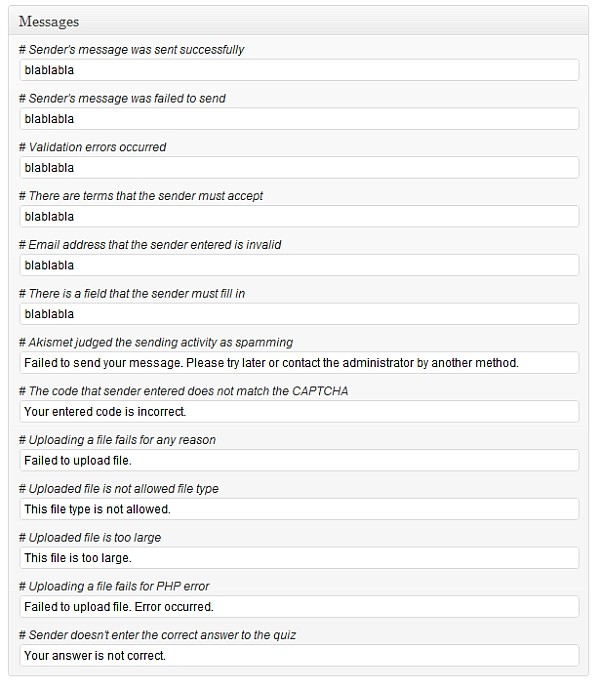
Custom Event Messages
We can freely modify the messages shown on events.

Even nicer, you can use HTML code in the input boxes! Try this (really it's an HTML one-liner, but broken down for clarity here):
Your message was successfully sent. Thank you!
<br/>
<img src="http://domain.com/yourpicture.jpg"/>
Multilanguage Support
Contact Form 7 displays forms in English by default, but it bundles 40+ language translations and you can even create a contact form in any language. To use Contact Form 7's admin interface in your own language set the WPLANG constant in your wp-config.php file.
// Change this line:
define ('WPLANG', 'ja');
Use Posted Form Data in Server Side Instead of Mailing
If you want something else than the default posting (sending in email), then you can use the code below.
add_action("wpcf7_before_send_mail", "wpcf7_do_something_else");

function wpcf7_do_something_else(&$wpcf7_data) {

    // Here is the variable where the data are stored!
    var_dump($wpcf7_data);

    // If you want to skip mailing the data, you can do it...
    $wpcf7_data->skip_mail = true;

}
Set Rights So Only Admins Can Modify Forms
To secure the editing options, use this code.
define('WPCF7_ADMIN_READ_CAPABILITY', 'manage_options');
define('WPCF7_ADMIN_READ_WRITE_CAPABILITY', 'manage_options');
Populating Fields Dynamically
The fact is, default values in Contact Form 7 are static. Say for example, you have a GET parameter that you want to use to populate the contact form. Then the solution is Contact Form 7 Dynamic Text Extension by Sevenspark. This plugin provides a new tag type and allows the dynamic generation of content. After installing and activating the plugin, Contact Form 7 will have two new types: the Dynamic Text Field and the Dynamic Hidden Field.
Summary
As you can see, this form plugin has a lot of potential and we only covered a small percentage of all the features. If you didn't find something here, dive into the docs on the official site. Don't be afraid to use it right now! Have fun!
Do you already use Contact Form 7 and have a tip to share with us? Or is there another contact form plugin for WordPress you'd recommend? Let us know in the comments!


Comments