Last week we took a look at how to migrate a WordPress installation from a local server to production. Today we are going to take a beginner's approach to moving your WordPress Blog either to a new host/server or even changing it's address (url). So if you are changing your provider or just need a change in address (or even both) here is an in depth video on how to do it. If you're a developer, this video is going to be very basic, but it's a great reference for anyone who is trying out their first migration.
Getting Started: What You Need to Know
WordPress is a complex piece of software and to everyday users without a lot of dev experience, it can seem much more complex. So first off, I'm going to break WordPress down and define some terminology so you don't get lost. Then I'm going to slowly take you into the actual nuts and bolts of moving a WordPress installation.
There are a lot of ways to define WordPress, but for the purposes of what we'll be covering in this tutorial, your WordPress installation is comprised of 2 parts:
- Files on your website (php, css, html, javascript, etc.)
- A Database (holds all of the information)
The Files
In order for WordPress to work, it needs the Files to do the work of creating your website while the Database holds the content. These files are mostly made of up the PHP programming language. In order to see the files of WordPress, you have to login to your host or server via FTP (File Transfer Protocal). You can access the FTP of your site by using a program like WinSCP, Firebug or FileZilla for free. The information to connect to it should be provided by your webhost. To move these files, all you need to do is digitally move them like you would a file on a thumb drive. The only difference is that you are using the FTP program to get it to your webhost.
Database (MySQL)
While the WordPress files are pretty easy to get your head around, the database part of a WP installation can often seem a lot more intimidating. For starters, you can't really just move it around like a folder of files; It has a protocol from which to connect to it. WordPress stores its data inside a MySQL database, which should be provided by your webhost/server. You'll need a way to connect to it using a username, password, and hostname (where the database is hosted). Rather than learning the entire database language, you can use a program called PHPMyAdmin which runs on your website (or often in many Hosting Panels). PHPMyAdmin builds an interface for you to perform actions. We are going to use a few of the most basic tools while ignoring the majority of the application as you can seriously mess your blog up with this panel. I'd recommend you get in and out as quick as possible.
To simulate a move I will be creating a new blog sandbox for my own blog by moving it to the sub-domain "sandbox.devnot.es".
A Caution to First-Timers:
It's worth mentioning that messing with your MySQL database can be super dangerous if you're not careful... lots of people are intimidated by even touching it and for good reason - one wrong move inside the database and you can ruin your entire installation! This tutorial is intended to help people out who are just getting their feet wet with this stuff, so I'd highly recommend that you don't use a client project (or anything really important) as the test case for your first migration attempt. With that said, there's really only one way to start learning, and that's by trying it out for yourself!
The Video Tutorial
The video will walk you through the rest (we have some additional written documentation as well afterwards). Be sure to turn on HD and fullscreen for the video if you want to follow each and every letter! I've zoomed in on the important stuff, the text can still get blurry on the 600px wide video ;)
Note: We've updated the written portion below, but it's worth noting up here (near the video) that we're now recommending a small change: In the step where you change the URLs in the database, use a serialized-data sensitive search/replace tool rather than a basic text editor to avoid any problems. Grab one for free from InterconnectIT.
Step 1 File System

Before we can start moving our WordPress site we need to go over a few things about the File System WordPress uses, for those that don't know. WordPress uses a naming convention which uses two characters "wp" to define that WordPress uses or needs that file. However there are only a few exceptions to that rule:
- .htaccess
- index.php
- xmlrpc.php
In addition to those files there are a few optional files that are included with WordPress that aren't required to perform, but are there for information reasons. It is recommended you keep these files as well:
- readme.html
- license
- favicon.ico (if you have one)
From here everything else has a “wp” naming convention and should be easy to see what needs to be moved. You will need all 3 folders and their contents (“wp-admin”, “wp-content”, and “wp-includes”) as well as every other file. This makes a total List of :
If you are moving files on the same host or server you don't need to make a local backup as you can move it on the host/server in a few seconds.
- wp-admin/
- wp-content/
- wp-includes/
- .htaccess
- favicon.ico
- readme.html
- index.php
- license.txt
- wp-load.php
- wp-login.php
- wp-links-opml.php
- wp-config.php
- wp-feed.php
- wp-pass.php
- wp-blog-header.php
- wp-rss.php
- wp-atom.php
- wp-mail.php
- wp-config-sample.php
- wp-settings.php
- wp-activate.php
- wp-cron.php
- wp-comments-post.php
- wp-rss2.php
- wp-commentsrss2.php
- wp-register.php
- wp-app.php
- wp-signup.php
- wp-trackback.php
- wp-rdf.php
- xmlrpc.php
Now that we know what we need we want to download all of the files to our local machine. This will make a hard backup so if we mess something up we will be able to start back where we were before. Once you have the files locally you can then upload then to the new location. Don't worry you won't get a php error, but a message that says it cannot connect to the database until you have finished the move.
Step 2 MySQL Database
If you are having a difficult time finding the username and password you can open up your “wp-config.php” file. This holds your username and password.
If you are moving the blog on the same host or server you can skip this step.
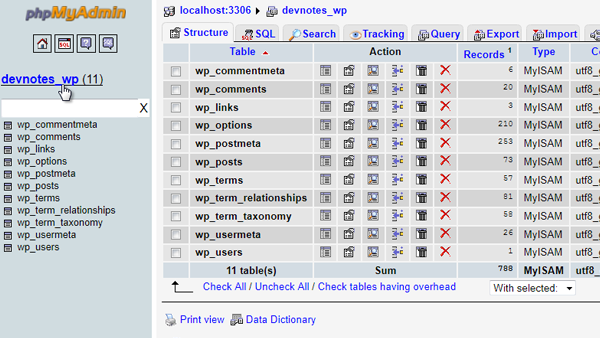
Assuming your changing to a new host/server OR changing the URL of your WordPress site: next we have to move over the Database end of WordPress. The database is what stores all of the interactions, data, and posts you and your users have created in WordPress. Rather than using WordPress's Export Tool we are going to take matters into our own hands and take care of the database with a program called PHPMyAdmin which is a visual admin panel for MySQL databases such as the one WordPress runs on. Every major webhost will provide one with their hosting panel (cpanel, plesk, ect).
Once we are in the panel we need to select the WordPress database. Again we can reference our “wp-config.php” file and see that our database name (“DB_NAME”) is “devnotes_wp”. Click on that link and it will open up the interface on the right hand side. At the right hand top click on a link that says “Export”. From there you will ensure “Save as file” is selected, Compression is set to none, and then click “Go”. This will start a download of [DB_NAME].sql from which you will re-upload a the new host/server.
Don't compress the sql file so we can edit it with ease in the next step.
Step 3 Change URL Address
Skip this step unless you are changing the address of your site or blog. This includes domains, subdomains, and directory changes.
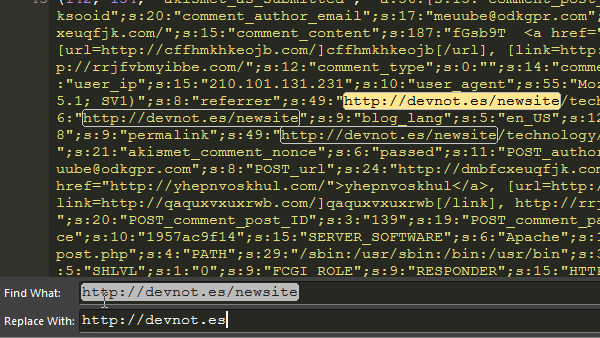
So we are changing the URL of our site, be it the domain (.com), a directory, or a sub-domain. We need to update each reference to the old URL with the new one so our images on our posts and pages, settings, and other options work and won't break once we restore the database to the new location.
You need a Editor program that has a “search and replace” feature. For Windows and Linux you can use NotePad++ for free, another good program is Sublime 2 (which is what I'm using). Search for your old url and replace it with the new one. Make sure you replace all and don't have any unnecessary slashes trailing urls.
UPDATE! While a simple search/replace will work most of the time, it's more and more common nowadays to run into "serialized data" inside the database that can present some serious problems. Using a "serialize-data sensitive" search and replace tool, such as the one provided by InterconnectIT is a solution that everyone running anything more than the most basic migration should consider. In fact, it's probably best to just use that for this step to begin with as it's free and easy to use. Thanks to reader Rarst for the vital correction and the suggestion of the InterconnectIT's plugin!
I'd recommend from here you save as a new file so that in case you made a mistake you can start over again without having to repeat steps.
Step 4 Restoring the Database
Often you need to create a new database when moving to a new host. Additionally you will probably need to add a database user and password to it.
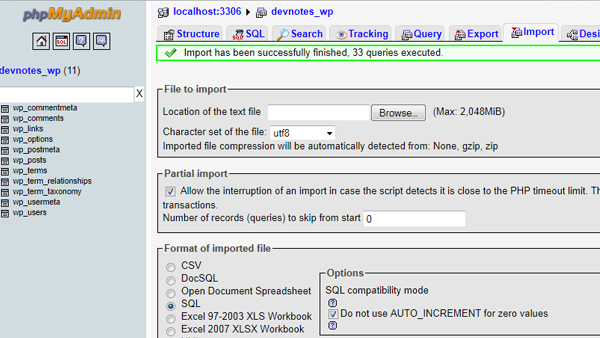
If you have moved the URL or not next you need to restore the database at the new location (or same if all you did was change the URL). To do so you need to login to the new location's PHPMyAdmin.
Once in the new PHPMyAdmin you will select the new database by clicking on its name on the left and then clicking import on the right. Make sure you do it in that order or you might get an error on the next step. Upload the .sql file you downloaded (and/or edited). You should see a confirmation that your database has been uploaded.
Step 5 Getting WordPress Back Online

The last step we need to do is go to your WordPress site's new location and see if we are still having a Database Error. If we are you need to edit the “wp-config.php” file's database settings to mirror the new settings to your MySQL database.
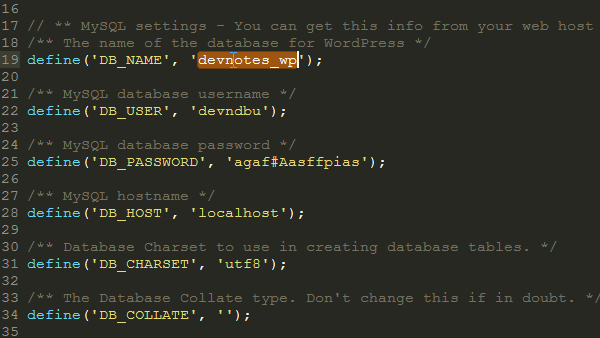
// ** MySQL settings - You can get this info from your web host ** //
/** The name of the database for WordPress */
define('DB_NAME', 'mysite_wp');

/** MySQL database username */
define('DB_USER', 'wordpressDB_user');

/** MySQL database password */
define('DB_PASSWORD', 'secretP@ssword');

/** MySQL hostname */
define('DB_HOST', 'localhost');
- Here is a reference as to what is needed:
- DB_NAME is the name of the database you created for WordPress
- DB_USER is the username that has permission to access the database
- DB_PASSWORD is the password to the username
- DB_HOST is the database hostname. Normally “localhost” unless you are on shared host that specify otherwise.
If you are having problems finding the correct information a quick call to your tech support of your host will typically have someone help you find the information or they will set it up for you (depending on your host).
Once you have made your changes you need to save or re-upload the changed file.
You're Done!
That's it, your done! By now, you should be able to successfully move your WordPress installation from one spot on net to another. This is perfect if you're trying to move WordPress from one webhost to another, from one domain to another, or even just to change the location of the installation on your existing server.
If you enjoyed the video version (it's one of the first on Wptuts+!), let us know in the comments!

Comments