In this article, we’ll introduce the three main design patterns underlying all iOS app development: model-view-controller, delegate objects, and target-action.
The model-view-controller pattern is used to separate the user interface from its underlying data and logic. The delegate object pattern makes it easy to react to important events by abstracting the handling code into a separate object. Finally, the target-action pattern encapsulates a behavior, which provides a very flexible method of performing tasks based on user input.
We’ll discuss these patterns in detail as we’re building up a simple example application. This should also give us some experience with basic user interface components like buttons, labels, and text fields. By the end of this chapter, you should be able to configure basic layouts and capture user input on your own.
Creating a New Project
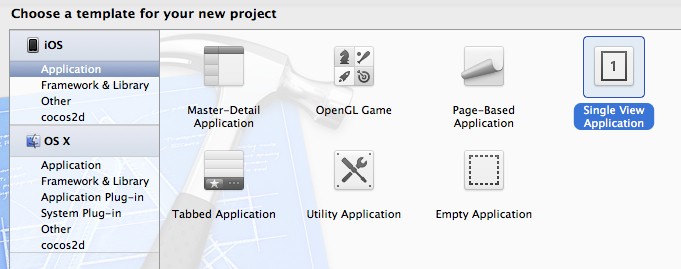
First, we need to create a new Xcode project. Open Xcode and navigate to File > New > Project, or press Cmd+Shift+N to open the template selection screen. In this chapter, we’ll be creating the simplest possible program: a Single View Application. Select the template, and then click next.
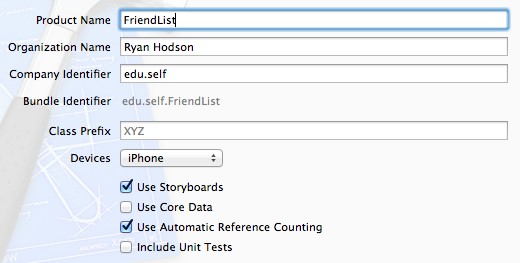
Use HelloWorld as the Product Name, anything you like as Organization Name, and edu.self as the Company Identifier. Make sure that Devices is set to iPhone and that the Use Storyboards and Use Automatic Reference Counting options are selected.
After choosing a location to save the file, you’ll have your very first iOS app to experiment with.
Compiling the App
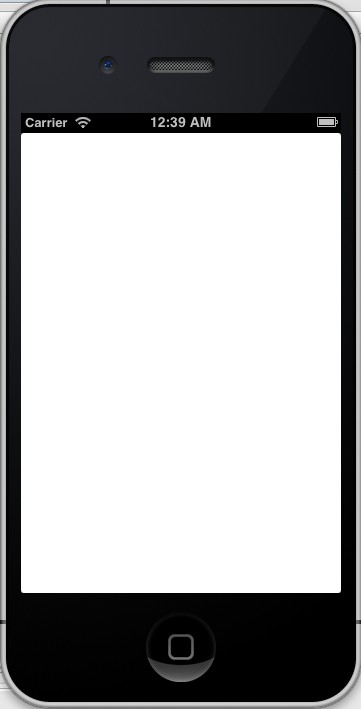
As we saw with the command-line application in Objective-C Succinctly, you can compile the project by clicking the Run button in the upper-left corner of Xcode or using the Cmd+R keyboard shortcut. But, unlike Objective-C Succinctly, our application is a graphical program that is destined for an iPhone. Instead of simply compiling the code and executing it, Xcode launches it using the iOS Simulator application. This allows us to see what our app will look like on the iPhone without having to upload it to an actual device every time we make the slightest change. The template we used is a blank project, so you’ll just see a white screen when you run it.
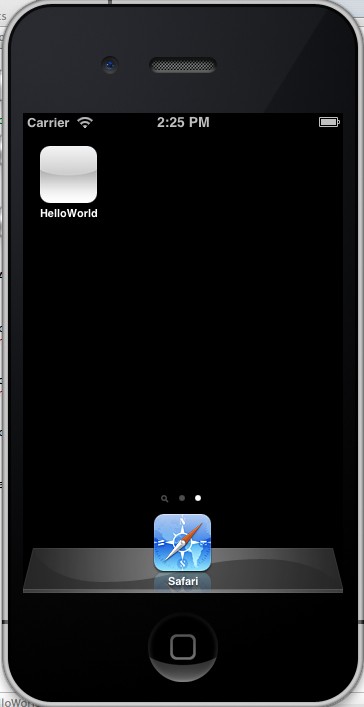
While we can’t really tell with our current app, the simulator is a quite detailed replica of the actual iPhone environment. You can click the home button, which will display all the apps that we’ve launched in the simulator, along with a few built-in ones. As we’ll see in a moment, this lets us test the various states of our application.
App Structure Overview
Before we start writing any code, let’s take a brief tour of the files provided by the template. This section introduces the most important aspects of our HelloWorld project.
main.m
As with any Objective-C program, an application starts in the main() function of main.m. The main.m file for our HelloWorld project can be found in the Supporting Files folder in Xcode’s Project Navigator panel. The default code provided by your template should look like the following.
#import <UIKit/UIKit.h>

#import "AppDelegate.h"

int main(int argc, char *argv[]) {
    @autoreleasepool {
        return UIApplicationMain(argc,
                                 argv,
                                 nil,
                                 NSStringFromClass([AppDelegate class]));
    }
}
This launches your application by calling the UIApplicationMain() function, and passing [AppDelegate class] as the last argument tells the application to transfer control over to our custom AppDelegate class. We’ll discuss this more in the next section.
For most applications, you’ll never have to change the default main.m. Any custom setup can be deferred to the AppDelegate or ViewController classes.
AppDelegate.h and AppDelegate.m
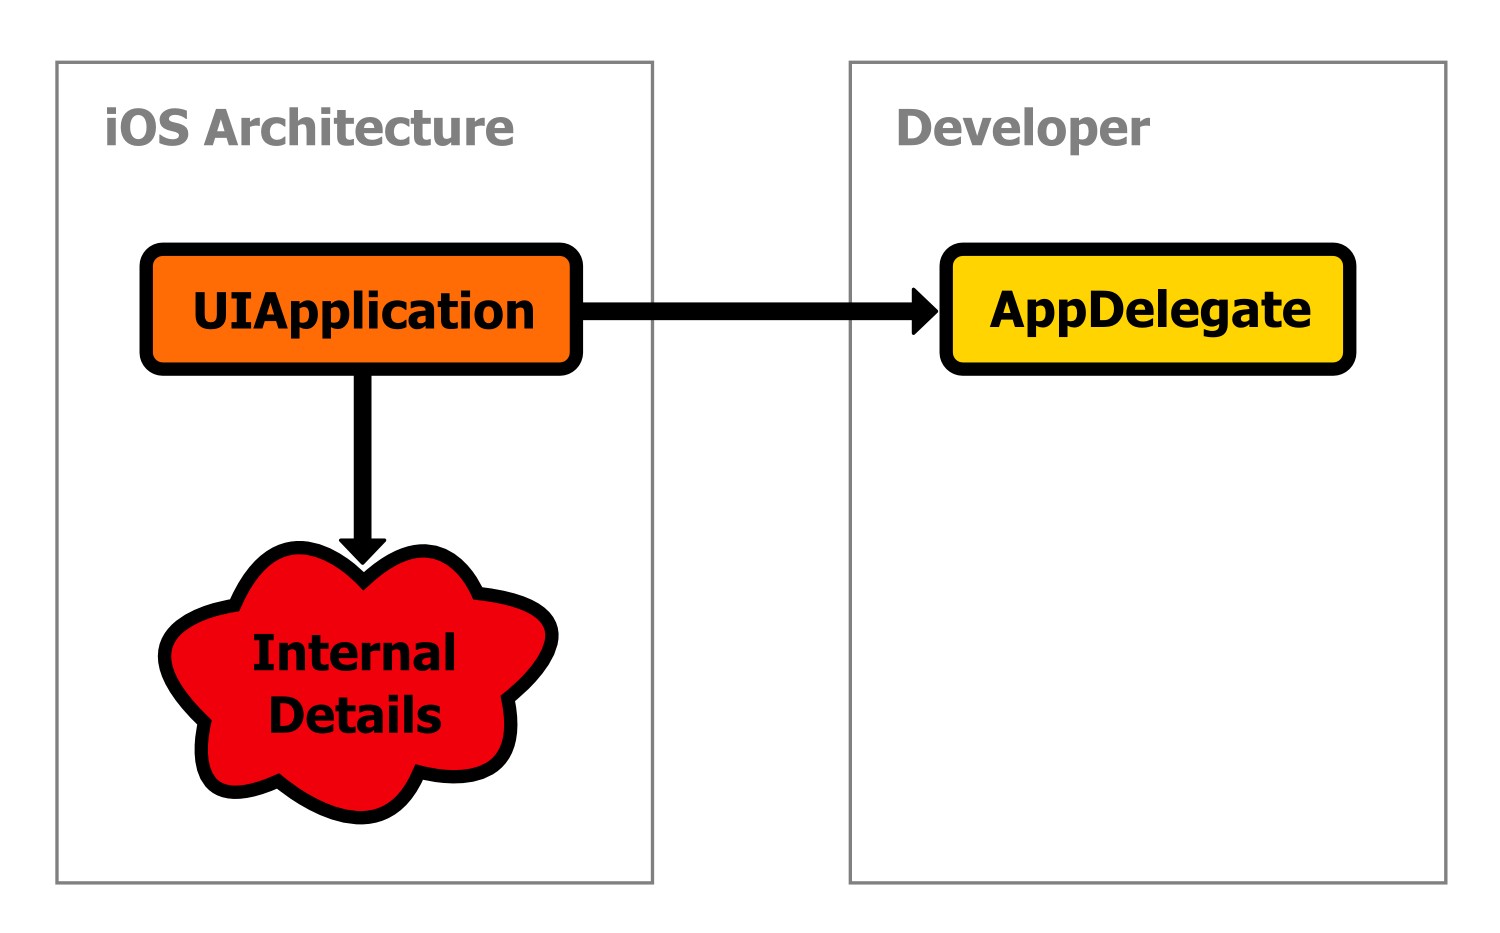
The iOS architecture relies heavily on the delegate design pattern. This pattern lets an object transfer control over some of its tasks to another object. For example, every iOS application is internally represented as a UIApplication object, but developers rarely create a UIApplication instance directly. Instead, the UIApplicationMain() function in main.m creates one for you and points it to a delegate object, which then serves as the root of the application. In the instance of our HelloWorld project, an instance of the custom AppDelegate class acts as the delegate object.
This creates a convenient separation of concerns: the UIApplication object deals with the nitty-gritty details that happen behind the scenes, and it simply informs our custom AppDelegate class when important things happen. This gives you as a developer the opportunity to react to important events in the app’s life cycle without worrying about how those events are detected or processed. The relationship between the built-in UIApplication instance and our AppDelegate class can be visualized as follows.
Recall from Objective-C Succinctly that a protocol declares an arbitrary group of methods or properties that any class can implement. Since a delegate is designed to take control over an arbitrary set of tasks, this makes protocols the logical choice for representing delegates. The UIApplicationDelegate protocol declares the methods that a delegate for UIApplication should define, and we can see that our AppDelegate class adopts it in AppDelegate.h.
@interface AppDelegate : UIResponder <UIApplicationDelegate>
This is what formally turns our AppDelegate class into the delegate for the main UIApplication instance. If you open AppDelegate.m, you’ll also see implementation stubs for the following methods:
- (BOOL)application:(UIApplication *)application
        didFinishLaunchingWithOptions:(NSDictionary *)launchOptions;
- (void)applicationWillResignActive:(UIApplication *)application;
- (void)applicationDidEnterBackground:(UIApplication *)application;
- (void)applicationWillEnterForeground:(UIApplication *)application;
- (void)applicationDidBecomeActive:(UIApplication *)application;
- (void)applicationWillTerminate:(UIApplication *)application;
These methods are called by UIApplication when certain events occur internally. For example, the application:didFinishLaunchingWithOptions: method is called immediately after the application launches. Let’s take a look at how this works by adding an NSLog() call to some of these methods.
- (BOOL)application:(UIApplication *)application
        didFinishLaunchingWithOptions:(NSDictionary *)launchOptions {
    NSLog(@"Application has been launched");
    return YES;
}
- (void)applicationDidEnterBackground:(UIApplication *)application {
    NSLog(@"Entering background");
}
- (void)applicationWillEnterForeground:(UIApplication *)application {
    NSLog(@"Entering foreground");
}
Now, when you compile the project and run it in the iOS Simulator, you should see the Application has been launched as soon as it opens. You can click the simulator’s home button to move the application to the background, and click the application icon on the home screen to move it back to the foreground. Internally, clicking the home button makes the UIApplication instance call applicationDidEnterBackground::
This should display the following messages in Xcode’s output panel.
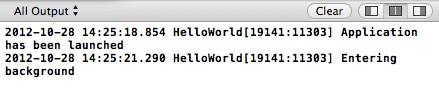
These NSLog() messages show us the basic mechanics behind an application delegate, but in the real world, you would write custom setup and cleanup code to these methods. For example, if you were creating a 3-D application with OpenGL, you would need to stop rendering content and free up any associated resources in the applicationDidEnterBackground: method. This makes sure that your application isn’t hogging memory after the user closes it.
To summarize, our AppDelegate class serves as the practical entry point into our application. Its job is to define what happens when an application opens, closes, or goes into a number of other states. It accomplishes this by acting as a delegate for the UIApplication instance, which is the internal representation of the entire application.
ViewController.h and ViewController.m
Outside of the application delegate, iOS applications follow a model-view-controller (MVC) design pattern. The model encapsulates the application data, the view is the graphical representation of that data, and the controller manages the model/view components and processes user input.
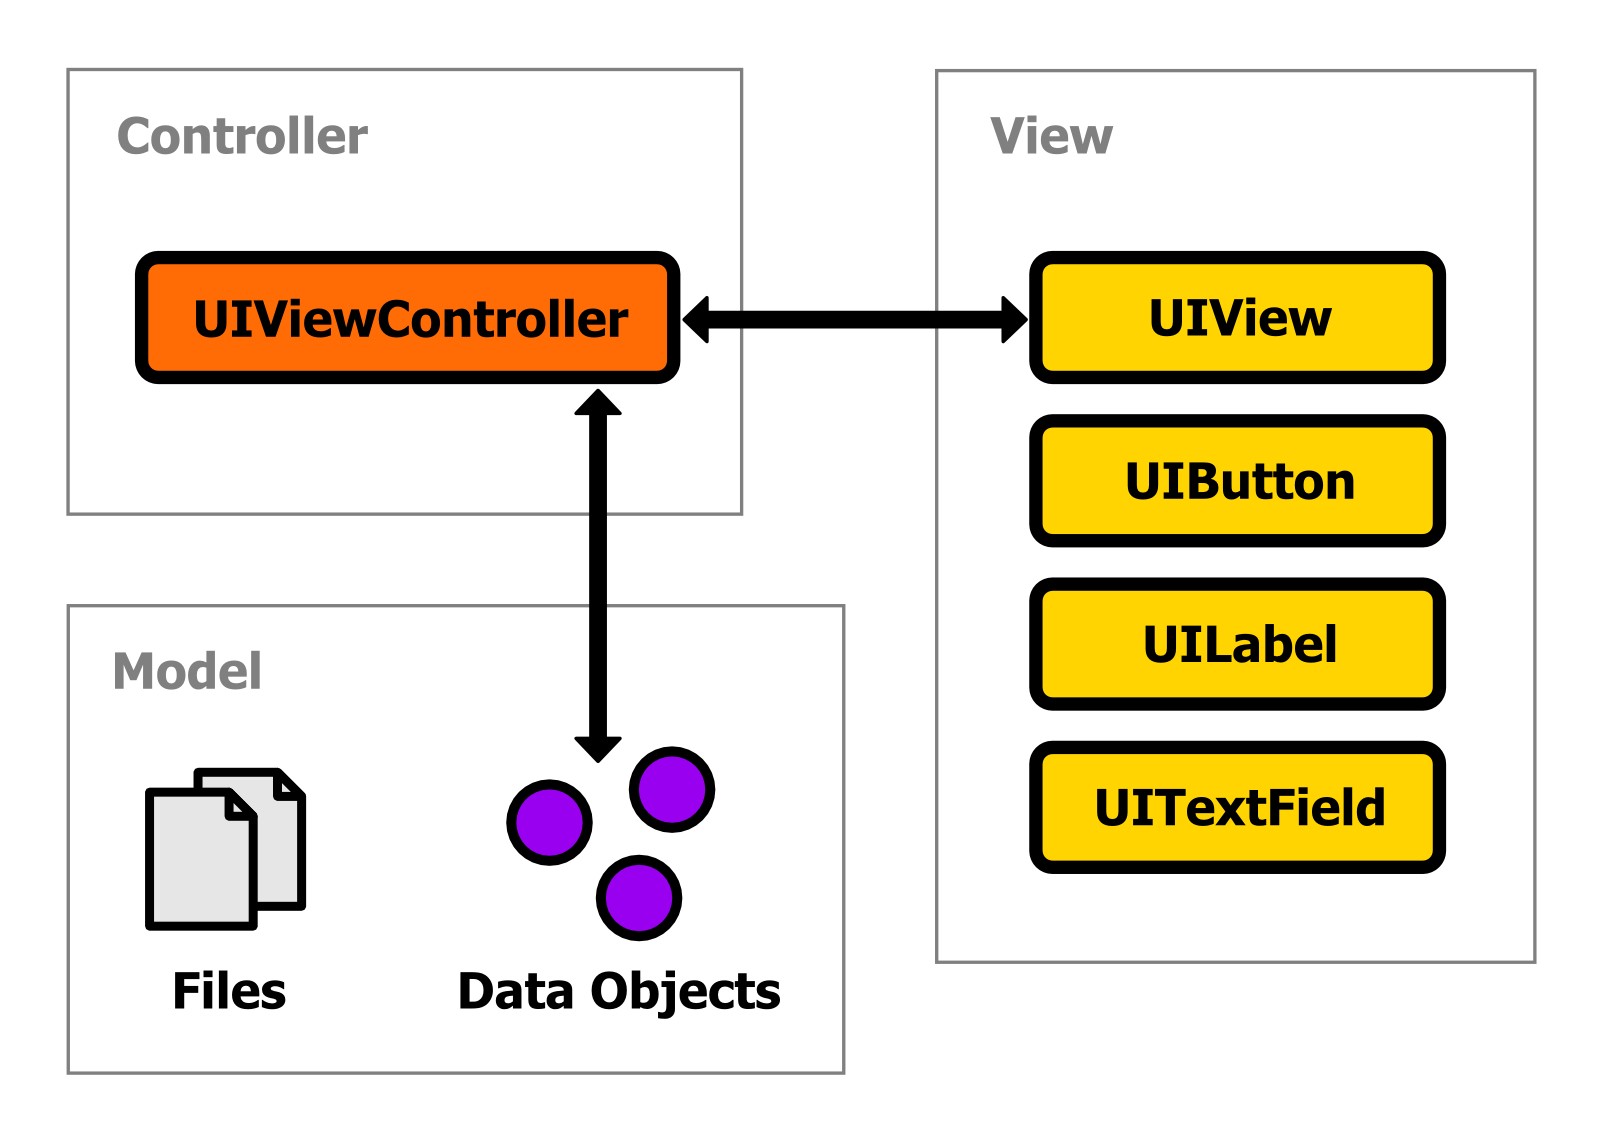
Model data is typically represented as files, objects from the CoreData framework, or custom objects. The application we’re building in this chapter doesn’t need a dedicated model component; we’ll be focusing on the view and controller aspects of the MVC pattern until the next chapter.
View components are represented by the UIView class. Its UIButton, UILabel, UITextField and other subclasses represent specific types of user interface components, and UIView itself can act as a generic container for all of these objects. This means that assembling a user interface is really just a matter of configuring UIView instances. For our example, the ViewController automatically creates a root UIView instance, so we don’t need to manually instantiate one.
And, as you probably could have guessed, the ViewController class is the custom controller for our project. Its job is to lay out all of the UI components, handle user input like button clicks, text field input, etc., and update the model data when necessary. You can think of it as a scene manager.
Controllers typically inherit from the UIViewController class, which provide the basic functionality required of any view controller. In our HelloWorld program, the storyboard (discussed in the next section) automatically instantiates the root ViewController class for us.
While the AppDelegate is the programmatic entry point into the application, our ViewController is the graphical root of the project. The viewDidLoad method in ViewController.m is called after the root UIView instance is loaded. This is where we can create new user interface components and add them to the scene (we’ll do this in a moment).
MainStoryboard.storyboard
The last file we need to take a look at is MainStoryboard.storyboard. This is a special type of file that stores the entire flow of your application and lets you edit it visually instead of programmatically. Selecting it in Xcode’s Project Navigator will open up the Interface Builder instead of the normal source code editor, which should look something like this:
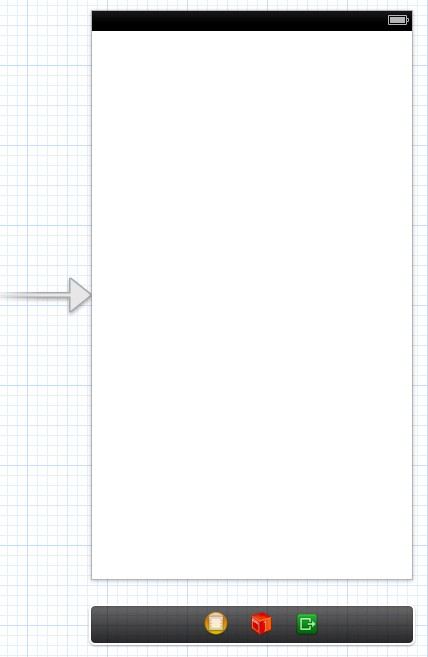
The large white area is called a scene, and it represents a screen worth of content on the iPhone. This is what you’re seeing when you compile and run the empty template, and it’s where we can visually create a layout by dragging and dropping user interface components. The arrow pointing into the left of the scene tells us that this is the root scene for our app. Underneath it is the dock, which contains icons representing relevant classes and other entities. We’ll see why this is important once we start making connections between graphical components and our custom classes.
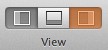
Before we start adding buttons and text fields, let’s take a moment to examine the left-most yellow icon in the dock. First, make sure the Utilities panel is open by toggling the right-most button in the View selection tab:
Then, click the yellow icon in the dock to select it:

This icon represents the controller for the scene. For our project, this is an instance of the custom ViewController class. We can verify this by selecting the Identity inspector in the Utilities panel, which will display the class associated with the controller:

That Class field creates a connection between the storyboard’s graphical interface and our source code. This is important to keep in mind when we start accessing user interface components from our classes.
It’s also worth taking a look at the Attributes inspector, which is the next tab over in the Utilities panel.
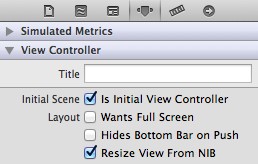
That Is Initial View Controller check box is what makes this the root scene. Every app needs to have exactly one root scene, otherwise iOS won’t know how to launch your application. If you clear the box, the arrow pointing into the scene will disappear, and you’ll get the following message when you try to compile the project.

Make sure Is Initial View Controller is selected before moving on.
Designing a User Interface
There are two ways to design the user interface of your application. You can either programmatically create graphical components by instantiating UIView and related classes in your source code, or you can visually design layouts by dragging components into the Interface Builder. This section takes a brief look at both methods.
Programmatic Layouts
We’ll start with the programmatic method, as it shows us what’s going on behind the scenes when we construct layouts using the Interface Builder. Remember that one of the main jobs of our ViewController is to manage UI components, so this is where we should create our layout. In ViewController.m, change the viewDidLoad method to the following.
- (void)viewDidLoad {
    [super viewDidLoad];

    UIButton *aButton = [UIButton buttonWithType:UIButtonTypeRoundedRect];
    [aButton setTitle:@"Say Hello" forState:UIControlStateNormal];
    aButton.frame = CGRectMake(100.0, 200.0, 120.0, 40.0);
    [[self view] addSubview:aButton];
}
First, we create a UIButton object, which is the object-oriented representation of a button. Then, we define its label using the setTitle:forState: method. The UIControlStateNormal constant tells the button to use this value for its “up” state. All graphical components use the frame property to determine their position and location. It accepts a CGRect struct, which can be created using the CGRectMake() convenience function. The previous sample tells the button to position itself at (x=100, y=200) and to use a width of 120 pixels and a height of 40 pixels. The most important part is the [[self view] addSubview:aButton] line. This adds the new UIButton object to the root UIView instance, which is accessed via the view property of our ViewController.
After compiling the project, you should see the button in the middle of the iOS Simulator.
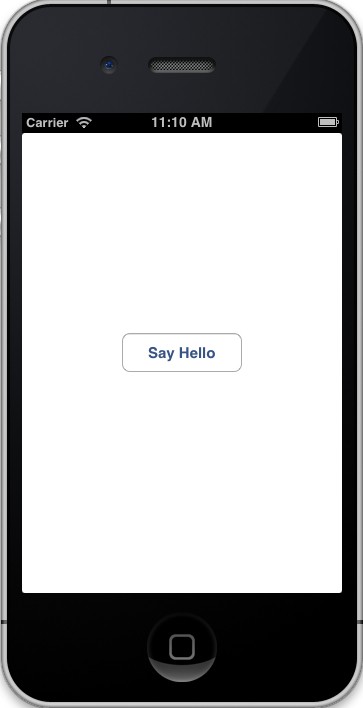
You can click the button to see the default states, but actually making it do anything will take a bit more work. We’ll learn how to do this in the Connecting Code with UI Components section.
Remember that UIButton is but one of many UIView subclasses that can be added to a scene. Fortunately, all the other user interface components can be managed using the same process: instantiate an object, configure it, and add it with the addSubview: method of the parent UIView.
Interface Builder Layouts
Creating components in the Interface Builder is a little bit more intuitive than the programmatic method, but it essentially does the same thing behind the scenes. All you need to do is drag a component from the Object Library onto a scene. The Object Library is located at the bottom of the Utilities panel, and it looks something like the following:
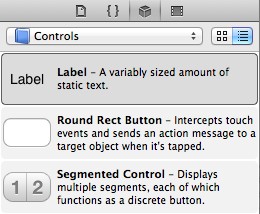
In the previous screenshot, we opted to display only the user interface controls by selecting Controls from the drop-down menu. These are the basic graphical components for requesting input from the user.
Let’s add another Button, along with a Label and a Text Field component by dragging the associated objects from the library onto the large white area representing the root scene. After they are on the stage, you can position them by dragging them around, and you can resize them by clicking the target component then dragging the white squares surrounding it. As you move the components around, you’ll notice dotted guidelines popping up to help you align elements and create consistent margins. Try to arrange your layout to look something like Figure 17. The Say Goodbye button should be centered on both the x-axis and the y-axis:
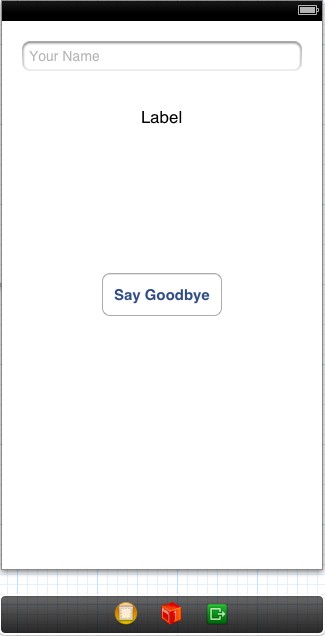
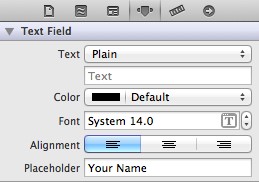
To change the text in the button, simply double-click it and enter the desired title (in this case, Say Goodbye). The Interface Builder also provides several other tools for editing the appearance and behavior of a component. For instance, you can set the placeholder text of our text field in the Attribute panel. Try changing it to Your Name:
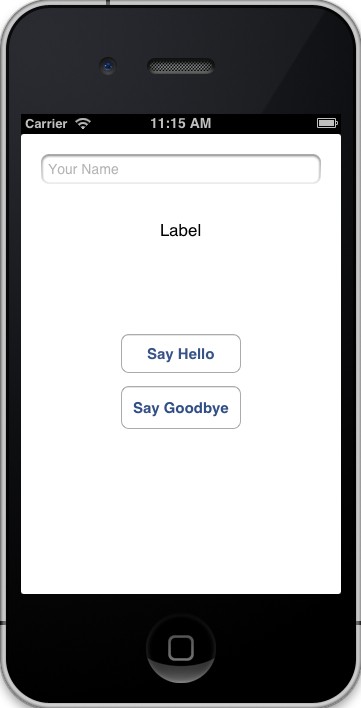
This will display some instructional text when the field is empty, which is usually a good idea from a user experience standpoint. When you compile your app, it should look something like this (note that we’re still using the Say Hello button that we added in viewDidLoad).
If you click on the text field in the iOS Simulator, it will open the keyboard—just like you would expect from any iOS app. You’ll be able to enter text, but you won’t be able to dismiss the keyboard. We’ll fix this issue in the Delegates portion of the next section. Until then, don’t click the text field while testing the app.
As you might imagine, trying to lay out an interface using both the programmatic method and the Interface Builder can be a little confusing, so it’s usually best to stick to one or the other for real-world applications.
These four components are all that we’ll need for this project, but notice that we’ve only learned how to add components to a scene—they can’t do anything useful yet. The next step is to get these user interface components to communicate with our code.
Connecting Code with UI Components
This section discusses the three most important types of connections between your source code and your user interface components: actions, outlets, and delegates. An action is a method that should be called when a particular event happens (e.g., when a user taps a button). An outlet connects a source code variable to a graphical component in the Interface Builder. We’ve already worked with delegates in the AppDelegate class, but this design pattern is also prevalent in the graphical aspects of iOS. It lets you control the behavior of a component from an arbitrary object (e.g., our custom ViewController).
Just like adding components to a layout, connecting them to your custom classes can be done either programmatically or through the Interface Builder. We’ll introduce both methods in the Actions section that follows, but we’ll rely on the Interface Builder for outlets and delegates.
Actions
Many interface controls use the target-action design pattern to react to user input. The target is the object that knows how to perform the desired action, and the action is just a method name. Both the target and the action are stored in the UI component that needs to respond to user input, along with an event that should trigger the action. When the event occurs, the component calls the action method on the specified target.
Programmatic Actions
The UIControl class from which UIButton inherits defines an addTarget:action:forControlEvents: method that lets you attach a target-action pair to an event. For example, we can make our Say Hello button display a greeting when we tap it by changing the viewDidLoad method in ViewController.m to the following.
- (void)viewDidLoad {
    [super viewDidLoad];

    UIButton *aButton = [UIButton buttonWithType:UIButtonTypeRoundedRect];
    [aButton setTitle:@"Say Hello" forState:UIControlStateNormal];
    aButton.frame = CGRectMake(100.0, 200.0, 120.0, 40.0);
    [[self view] addSubview:aButton];
    // Configure an action.
    [aButton addTarget:self
                action:@selector(sayHello:)
      forControlEvents:UIControlEventTouchUpInside];
}
This code tells the button to call the sayHello: method on self when the UIControlEventTouchUpInside event occurs. This event is triggered when the user releases a touch on the inside of the button. Other events are defined by the UIControlEvents enumeration contained in UIControl.
Of course, for the target-action pair in the previous code sample to work, we need to define the action method. The action should accept a single argument, which represents the user interface component that triggered the event. Add the following method to ViewController.m.
- (void)sayHello:(id)sender {
    NSLog(@"Hello, World!");
}
Now, when you compile the project and click the Say Hello button in the iOS Simulator, it should display Hello, World! in the Xcode output panel. If you needed to access the UIButton that triggered the event, you could do so through the sender argument. This could be useful, for example, when you want to disable the button after the user clicks it.
Interface Builder Actions
Configuring actions through the Interface Builder takes a couple more steps, but it’s more intuitive when working with components that haven’t been created programmatically. In this section, we’ll use the Interface Builder to create an action for the Say Goodbye button.
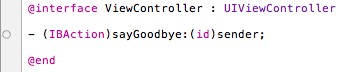
Actions need to be publicly declared, so our first task is to add the action method in ViewController.h.
- (IBAction)sayGoodbye:(id)sender;
Notice the IBAction return type. Technically, this is just a typedef for void; however, using it as a return type makes Xcode and the Interface Builder aware of the fact that this is meant to be an action—not just an ordinary method. This is reflected by the small circle that appears next to the method in the source code editor.
Next, we need to implement the action method. In ViewController.m, add the following method.
- (IBAction)sayGoodbye:(id)sender {
    NSLog(@"See you later!");
}
Instead of attaching it programmatically with addTarget:action:forControlEvents:, we’ll use the Interface Builder to connect this method to the Say Goodbye button. Select the MainStoryboard.storyboard file to open the Interface Builder, and select the yellow View Controller icon in the dock.

Then, open the Connections inspector, which is the right-most tab in the Utilities panel.
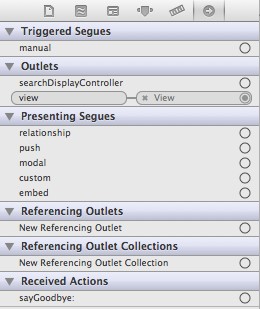
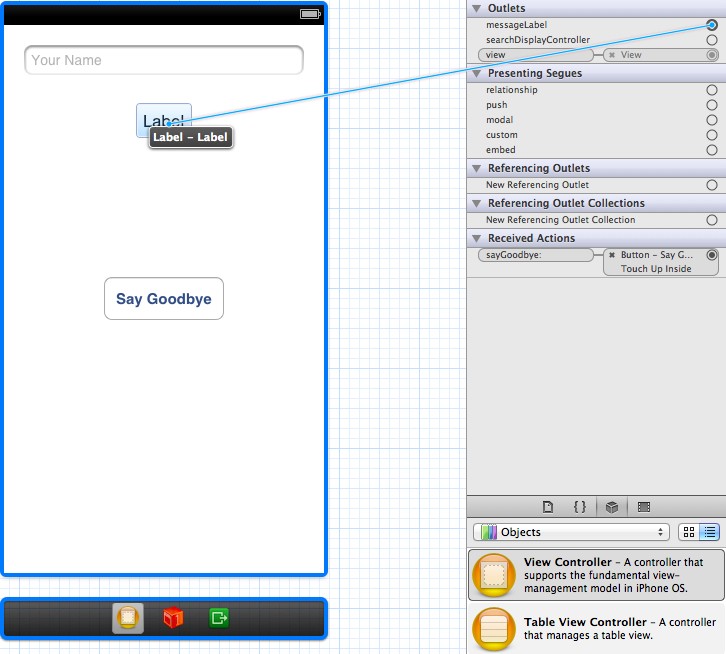
This panel contains all of the relationships available to our ViewController class. Notice the sayGoodbye: method listed under Received Actions. This is only available because we used the IBAction return type in the method declaration.
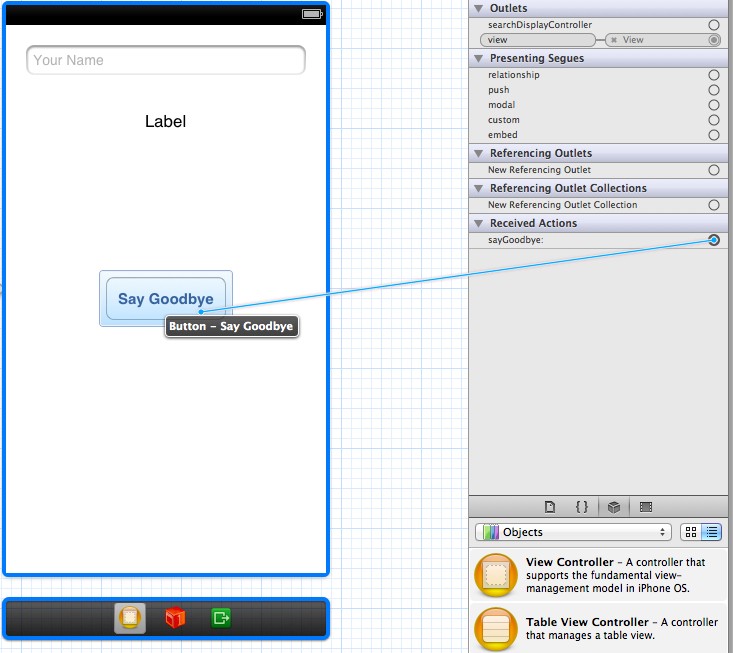
To create a connection between the sayGoodbye: method and the Say Goodbye button, click the circle next to sayGoodbye: in the Connections panel, and then drag it to the button on the scene. You should see a blue line while you drag, as shown in the following figure.
When you release over the button, a menu will pop up containing all of the available events that can trigger the action. It should look something like the following.
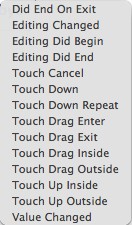
Select Touch Up Inside, which is the equivalent of the UIControlEventTouchUpInside enumerator we used in the previous section. This creates a target-action connection between the ViewController and the UIButton instance. Essentially, this is the exact same addTarget:action:forControlEvents: call we used for the Say Hello button in the previous section, but we did it entirely through the Interface Builder. You should now be able to compile the project and click the Say Goodbye button to display the See You Later! message in the output panel.
Note that instead of being stored as source code, the connection we just created is recorded in the storyboard. Again, it can be confusing to maintain actions in both source code and the storyboard, so it’s usually best to stick to one method or the other in real-world applications. Typically, if you’re creating your layout in the Interface Builder, you’ll want to create your connections there as well.
Outlets
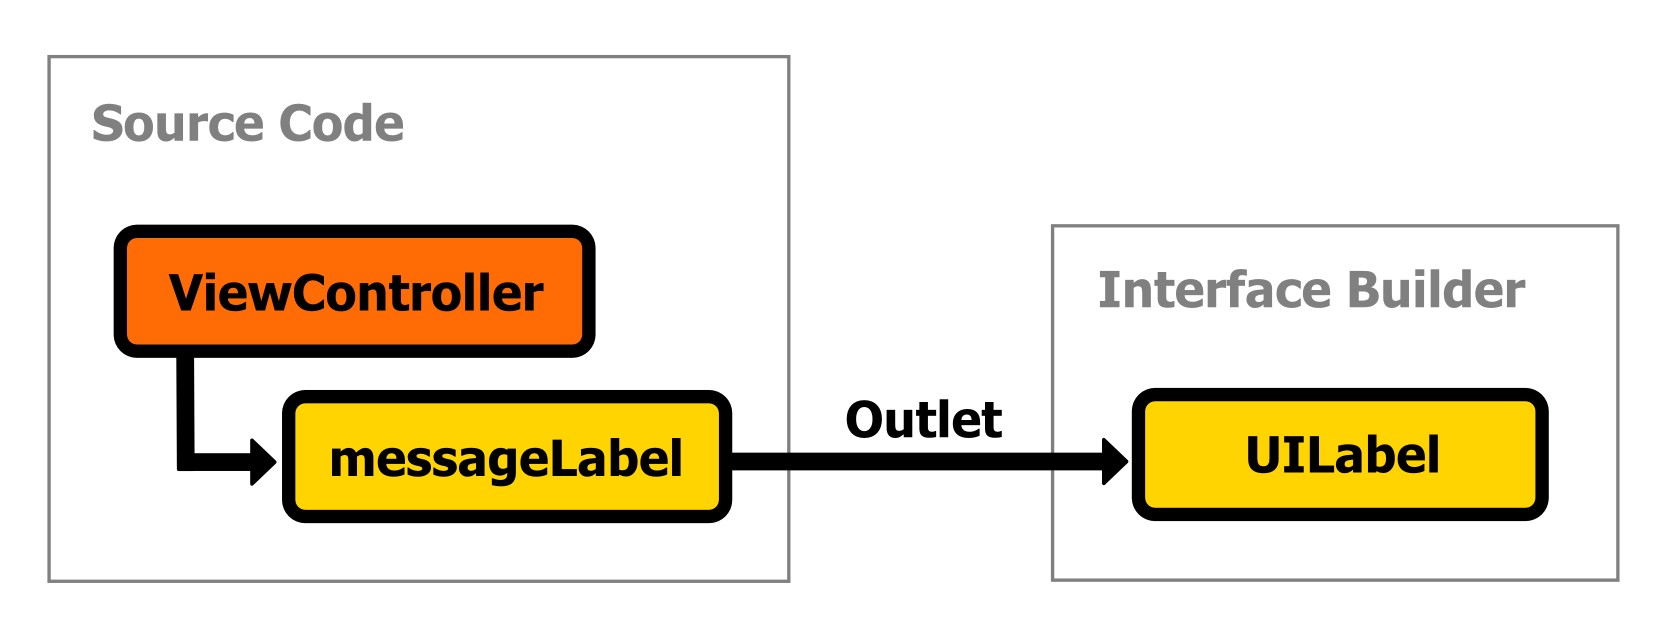
An outlet is a simpler type of connection that links a source code variable with a user interface component. This is an important ability, as it lets you access and manipulate properties of the storyboard from custom classes. Outlets always originate from the custom class and are received by a UI component in the Interface Builder. For example, this section creates an outlet from a variable called messageLabel to a UILabel component in the storyboard. This can be visualized as follows:
To create an outlet, we first need to declare the property that will be associated with the UI component. Outlets are typically configured in a controller, so open ViewController.h and add the following property.
@property (weak, nonatomic) IBOutlet UILabel *messageLabel;
This looks like any other property declaration, except for the new IBOutlet qualifier. Just like IBAction, this designates the property as an outlet and makes it available through the Interface Builder, but doesn’t affect the variable itself. Once we set up the connection, we can use messageLabel as a direct reference to the UILabel instance that we added to the storyboard.
But before we do that, we need to synthesize the accessor methods in ViewController.m:
@synthesize messageLabel = _messageLabel;
Back in MainStoryboard.storyboard, select the yellow View Controller icon again and take a look at the Connections inspector.

Notice how the messageLabel property we just created appears in the Outlets listing. We can now connect it to a user interface component just like we did with the button action in the previous section. Click and drag from the circle next to messageLabel to the UILabel in the scene, like so:
When you release the mouse, the outlet will be created, and you can use messageLabel to set the properties of the UILabel instance in the Interface Builder. As an example, try changing the text and color of the label in the sayHello: and sayGoodbye: methods of ViewController.m:
- (void)sayHello:(id)sender {
    _messageLabel.text = @"Hello, World!";
    _messageLabel.textColor = [UIColor colorWithRed:0.0
                                              green:0.3
                                               blue:1.0
                                              alpha:1.0];
}

- (IBAction)sayGoodbye:(id)sender {
    _messageLabel.text = @"See you later!";
    _messageLabel.textColor = [UIColor colorWithRed:1.0
                                              green:0.0
                                               blue:0.0
                                              alpha:1.0];
}
Now, when you compile the project and click the buttons, they should display different messages in the label. As you can see, outlets are a necessary tool for updating the interface in reaction to user input or changes in the underlying data model.
Before we continue on to delegate connections, we need to set up another outlet for the UITextField that we added in the Interface Builder. This will be the exact same process as the UILabel. First, declare the property and synthesize its accessors:
// ViewController.h
@property (weak, nonatomic) IBOutlet UITextField *nameField;
// ViewController.m
@synthesize nameField = _nameField;
Then, open the Interface Builder, select the yellow View Controller icon in the dock, and make sure the Connections inspector is visible. To create the connection, click and drag from the circle next to nameField to the text field component in the scene. In the next section, this outlet will let us access the text entered by the user.
Delegates
The delegate design pattern serves the same purpose for UI components as it does for the AppDelegate discussed earlier: it allows a component to transfer some of its responsibilities to an arbitrary object. For our current example, we’re going to use the ViewController class as a delegate for the text field we added to the storyboard. As with the AppDelegate, this allows us to react to important text field events while hiding the complexities of its internal workings.
First, let’s turn the ViewController class into a formal delegate for the text field. Remember that the delegate design pattern is implemented through protocols, so all we have to do is tell ViewController.h to adopt the UITextFieldDelegate protocol, like so:
@interface ViewController : UIViewController <UITextFieldDelegate>
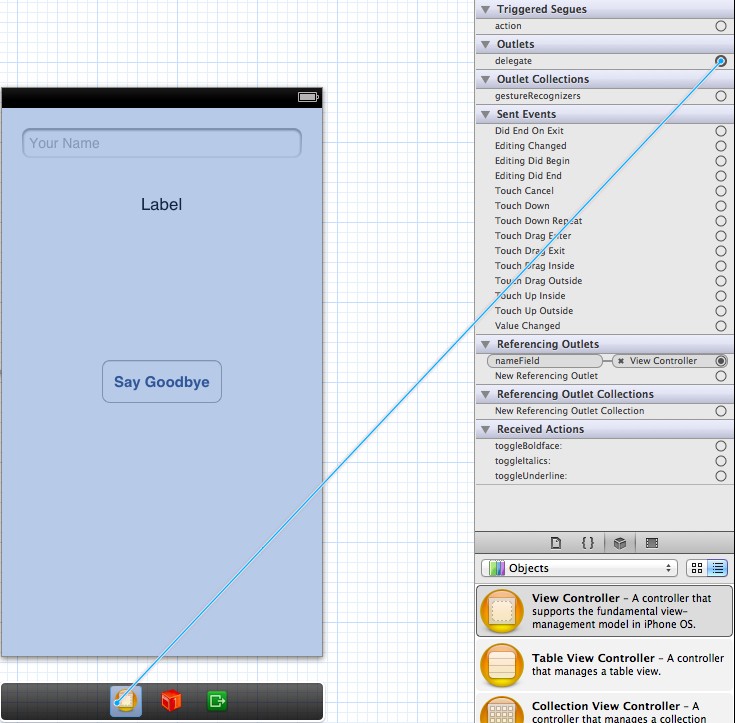
Next, we need to connect the text field and the ViewController class using the Interface Builder. This connection flows in the opposite direction as the outlets we created in the previous section, so instead of dragging from the ViewController to a UI component, we need to drag from the text field to the ViewController. In the Interface Builder, select the text field component and open the Connections panel. You should see a delegate field under the Outlets section:
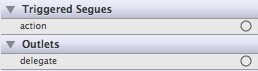
To create the delegate connection, drag from the circle next to delegate to the yellow View Controller icon in the dock:
Now, the ViewController can control the behavior of the text field by implementing the methods defined in UITextFieldDelegate. We’re interested in the textFieldShouldReturn: method, which gets called when the user clicks the Return button on the keyboard. In ViewController.m, implement the method as follows:
- (BOOL)textFieldShouldReturn:(UITextField *)textField {
    self.name = textField.text;
    if (textField == self.nameField) {
        [textField resignFirstResponder];
    }
    return YES;
}
This saves the value the user entered (textField.text) into the name property after they press the Return button. Then, we make the keyboard disappear by removing focus from the text field with the resignFirstResponder method. The textField == self.nameField conditional is a best practice to make sure that we’re working with the correct component (this isn’t actually necessary unless the ViewController is a delegate for multiple text fields). Note that we still have to declare that name field in ViewController.h:
@property (copy, nonatomic) NSString *name;
It’s always better to isolate the model data in dedicated properties in this fashion rather than rely directly on the values stored in UI components. This makes sure that they will be accessible even if the UI component has been removed or altered in the meantime. Our last step is to use this new name property to personalize the messages in sayHello: and sayGoodbye:. In ViewController.m, change these two methods to the following:
- (void)sayHello:(id)sender {
    if ([self.name length] == 0) {
        self.name = @"World";
    }
    _messageLabel.text = [NSString stringWithFormat:@"Hello, %@!"
                                                    self.name];
    _messageLabel.textColor = [UIColor colorWithRed:0.0
                                              green:0.3
                                               blue:1.0
                                              alpha:1.0];
}

- (IBAction)sayGoodbye:(id)sender {
    if ([self.name length] == 0) {
        self.name = @"World";
    }
    _messageLabel.text = [NSString stringWithFormat:@"See you later, %@!",
                                                    self.name];
    _messageLabel.textColor = [UIColor colorWithRed:1.0
                                              green:0.0
                                               blue:0.0
                                              alpha:1.0];
}
You should now be able to compile the application, edit the text field component, dismiss the keyboard, and see the resulting value when you click the Say Hello and Say Goodbye buttons.
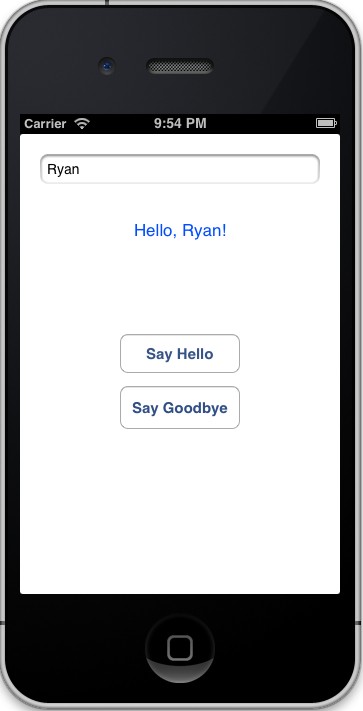
Figure 30: Implementing the Text Field component
Summary
This chapter introduced the fundamentals of iOS development. We learned about the basic file structure of a project: the main file, the application delegate, the custom view controller, and the storyboard. We also designed a layout by programmatically adding components to the stage, as well as by visually editing components in the Interface Builder. And, to enable our code to communicate with buttons, labels, and text fields in the storyboard, we created action, outlet, and delegate connections using the Interface Builder.
That was a lot of work to create such a simple application, but we now have nearly all the skills we need to build real-world applications. Once we understand the basic workflow behind connecting code with user interface elements and capturing user input, all that’s left is exploring the capabilities of individual components/frameworks and making them all work together.
The next chapter will flesh out some of the topics we glossed over in the previous example by walking through a more complex application. We’ll learn about segues for transitioning between scenes, and we’ll also have the opportunity to discuss the model-view-controller pattern in more detail.
This lesson represents a chapter from iOS Succinctly, a free eBook from the team at Syncfusion.

Comments