Delegates are a useful tool in communicating between objects. In this tutorial we will create and implement a custom delegate to allow three UISliders to adjust the background color of a ViewController.
About Delegates
Messages in Objective-C are a one-way street. A parent class can send a message to its child, but the child cannot, on its own, send a message to its parent. However, with the help of a delegate, two-way communication can be achieved. UIScrollView and UITableView use delegates routinely to communicate between the model, view, and controller. There are many reasons why the delegate pattern is useful. A delegate might be used to make an object reusable, to provide a flexible way to send messages, or to implement customization.
Step 1: Create a New Project
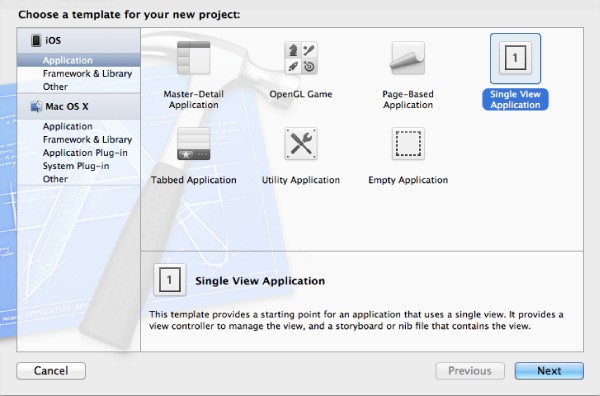
Launch Xcode and click File > New > Project. Select an iOS Single View Application and click "Next." Name your product "Delegates" and enter a name for your Company Identifier, such as "com.companyName.delegates." Choose the iPhone device family and click "Next." Choose a location to store your project and click "Create."

Step 2: Subclassing UISlider
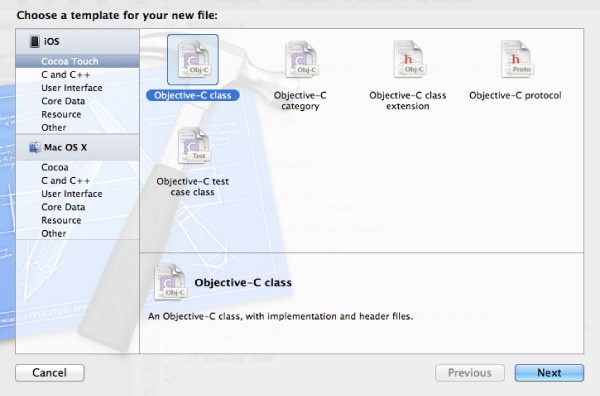
Click File > New > File and choose a Cocoa Touch Objective-C class. Name your class "MTSlider" and choose UISlider from the "Subclass of" drop down menu. Click "Next," then click "Create."

Step 3: Adding the Delegate Protocol Methods
First we need to declare the methods for the delegate. Click on "MTSlider.h." Type the following code above the interface.
@class MTSlider;
@protocol MTSliderDelegate <NSObject>
@optional
- (void)MTSliderDidChange:(MTSlider *)MTSlider withValue:(CGFloat)value;
@required
- (CGFloat)startPositionForMTSlider:(MTSlider *)MTSlider;
@end
Compiler Directive
Notice the line @class MTSlider. By placing this code above everything else, the compiler is informed that at some point down the line, MTSlider will be declared. Without this compiler directive, the compiler will give you a warning because it is expecting to find the interface for MTSlider right away.
Declaring the Delegate Methods
The delegate's methods are declared starting with @protocol. The protocol MTSliderDelegate conforms to the NSObject protocol for a specific reason. The NSObject protocol contains a method, respondsToSelector:, that can be used to ensure the delegate object actually implements an optional method before the method is called. Calling a method that isn't implemented by the delegate object will cause an application to crash.
Optional Method
Plainly speaking, an optional method is a method that does not have to be implemented by the delegate object; in this case the delegate object will be the ViewController, however it could be any object. The optional method MTSliderDidChange:withValue: is messaged in the delegate object when the slider's value changes.
Required Method
On the other hand, a required method is a method that must be implemented by the delegate object or else you will get a compiler warning. The required method startPositionForMTSlider: asks the delegate object where the sliders should start and gets its starting position value in return from the delegate.
Creating an Instance Variable for the Delegate
Still in "MTSlider.h," type the following code directly below @interface to declare an instance variable, or ivar, for the delegate.
id <MTSliderDelegate> sliderDelegate;
If you are using ARC, type the following code instead:
__weak id <MTSliderDelegate> sliderDelegate;
The ivar is of type id so it is flexible and can accept any object type. The next part, MTSliderDelegate says that whatever object ends up being assigned to sliderDelegate will contain the protocol methods of MTSliderDelegate as part of its own implementation.
Creating the Setters and Getters
Finish by synthesizing the setter and getter methods. Type the following code just below the instance variable closing brace.
@property (nonatomic, assign) id <MTSliderDelegate> sliderDelegate;
If you are using ARC, type the following code instead:
@property (nonatomic, weak) id <MTSliderDelegate> sliderDelegate;
Click on "MTSlider.m" and type the following code just below @implementation to complete the property.
@synthesize sliderDelegate;
Step 4: Conforming to the Delegate Protocol Methods
Click on the "ViewController.h" file. Type the following code to conform to the MTSliderDelegate protocol and import "MTSlider.h."
#import "MTSlider.h"
@interface ViewController : UIViewController <MTSliderDelegate>
Implementing the Delegate Protocol Methods
Click on the "ViewController.m" file and type the following code to implement the MTSliderDelegate protocol methods.
- (CGFloat)startPositionForMTSlider:(MTSlider *)MTSlider{

}

- (void)MTSliderDidChange:(MTSlider *)MTSlider withValue:(CGFloat)value{

}
Step 5: Setting the Delegate
Custom Initializer
Creating a custom initializer is key to getting the starting position for the sliders. In "MTSlider.h," add the following code to declare the new initializer.
- (id)initWithFrame:(CGRect)frame andDelegate:(id<MTSliderDelegate>)delegateObject;
Click on "MTSlider.m" and look for the initWithFrame: method. Delete the existing method and replace it with the following code.
- (id)initWithFrame:(CGRect)frame andDelegate:(id<MTSliderDelegate>)delegateObject{
    self = [super initWithFrame:frame];
    if (self) {
        self.sliderDelegate = delegateObject;
        self.value = [sliderDelegate startPositionForMTSlider:self];
    }
    return self;
}
Setting the delegate during initialization allows the delegate method to be called immediately. The method startPositionForMTSlider: gets the starting location for the sliders. Because it is called in the initializer, the sliders' positions are set before they are drawn on the screen.
Overriding UISlider Method
The UISlider method setValue:animated: is called automatically each time a slider peg is moved. Still in the "MTSlider.m" file, add the following method.
- (void)setValue:(float)value animated:(BOOL)animated{
    [super setValue:value animated:animated];
    if (sliderDelegate != nil && [sliderDelegate respondsToSelector:@selector(MTSliderDidChange:withValue:)]){
		[[self sliderDelegate] MTSliderDidChange:self withValue:value];
	}
}
By overriding setValue:animated: each time a slider peg moves, a message is sent to the delegate object. Notice the call to super, super setValue:animated:. It is important that we don't accidentally mess up something the method is doing behind the scenes when overriding an existing method.
The delegate method MTSliderDidChange:withValue: is the optional protocol method declared earlier. The delegate object is messaged each time the slider changes. Remember, calling a method that hasn't been implemented will cause the application to crash. Calling respondsToSelector: on the delegate object verifies it is okay to go ahead and message the optional delegate method.
Step 6: Setting the Background Color and Instantiating the Sliders
Click on the "ViewController.m" file and type the following code inside viewDidLoad to set the view's background color with four color components and instantiate the red, green, and blue MTSlider objects. If you are using ARC, be sure to remove the lines [redSlider release];, [greenSlider release];, and [blueSlider release]; as these calls are not necessary.
CGFloat sliderColorPosition = 0.3f;
self.view.backgroundColor = [UIColor colorWithRed:sliderColorPosition green:sliderColorPosition blue:sliderColorPosition alpha:1.0f];

CGRect redSliderFrame = CGRectMake(20.0f, 20.0f, 280.0f, 28.0f);
MTSlider *redSlider = [[MTSlider alloc] initWithFrame:redSliderFrame andDelegate:self];
redSlider.tag = 1;
[self.view addSubview:redSlider];
[redSlider release];

CGRect greenSliderFrame = CGRectMake(20.0f, 70.0f, 280.0f, 28.0f);
MTSlider *greenSlider = [[MTSlider alloc] initWithFrame:greenSliderFrame andDelegate:self];
greenSlider.tag = 2;
[self.view addSubview:greenSlider];
[greenSlider release];

CGRect blueSliderFrame = CGRectMake(20.0f, 120.0f, 280.0f, 28.0f);
MTSlider *blueSlider = [[MTSlider alloc] initWithFrame:blueSliderFrame andDelegate:self];
blueSlider.tag = 3;
[self.view addSubview:blueSlider];
[blueSlider release];
By using the custom MTSlider initializer, initWithFrame:andDelegate:, the delegate is set and the ViewController object becomes the delegate object of each slider. Normally you might expect to see a delegate set using the following code: redSlider.sliderDelegate=self;. However, in this case, the delegate assignment is passed in during the initialization.
Notice each slider's tag property has been set. Initially, the background color of the ViewController is set to dark gray. As each slider is adjusted, the background color will change accordingly because the tag identifies which slider is active.
Step 7: Changing the Background Color
Find the implementation of startPositionForMTSlider:, and type the following code inside the braces to set the initial value of the sliders to 0.3.
CGFloat sliderStartPosition = 0.3f;
return sliderStartPosition;
Adjusting the Background Color
Find the implementation of MTSliderDidChange:withValue:, and add the following code to adjust the background color.
if (MTSlider.tag == 1) { //Red Slider
	CGColorRef bgColor = self.view.backgroundColor.CGColor;
	const CGFloat *colorsPointer = CGColorGetComponents(bgColor);
	CGFloat currentGreen = colorsPointer[1];
	CGFloat currentBlue = colorsPointer[2];
	self.view.backgroundColor = [UIColor colorWithRed:value green:currentGreen blue:currentBlue alpha:1.0f];

}
if (MTSlider.tag == 2) { //Green Slider
	CGColorRef bgColor = self.view.backgroundColor.CGColor;
	const CGFloat *colorsPointer = CGColorGetComponents(bgColor);
	CGFloat currentRed = colorsPointer[0];
	CGFloat currentBlue = colorsPointer[2];
	self.view.backgroundColor = [UIColor colorWithRed:currentRed green:value blue:currentBlue alpha:1.0f];

}
if (MTSlider.tag == 3) { //Blue Slider
	CGColorRef bgColor = self.view.backgroundColor.CGColor;
	const CGFloat *colorsPointer = CGColorGetComponents(bgColor);
	CGFloat currentRed = colorsPointer[0];
	CGFloat currentGreen = colorsPointer[1];
	self.view.backgroundColor = [UIColor colorWithRed:currentRed green:currentGreen blue:value alpha:1.0f];
}
Each time the slider changes, a message is sent to the delegate method. The message contains the current MTSlider and its value. The current slider's tag property is accessed to determine which slider sent the message, and the background color is updated accordingly.
Step 8: Testing the Delegate
Click Product > Run, or click the "Run" arrow in the upper left corner, to view the sliders in action. Adjust the sliders to see how the child elements are able to control the parent element's background color.
Conclusion
There are many other ways to control the background color of a UIViewController, including targets or notifications. Apple designed UISlider to use a target pattern to pass data. However, if you want to add more functionality, the best way to communcate from a child to its parent is by creating a custom delegate.


Comments