On iOS, navigation controllers are one of the primary tools for presenting multiple screens of content. This article teaches you how to use navigation controllers by creating an application for browsing the books of a library.
Introduction
In the previous tutorial, you learned that UIKit's table view class is great for presenting tabular or columnar data. When content needs to be spread across multiple screens, though, a navigation controller is often the tool of choice. The UINavigationController class implements this type of functionality.
Just like any other UIViewController subclass, a navigation controller manages a view, an instance of the UIView class. The navigation controller's view manages several subviews, including a navigation bar at the top, a view containing custom content, and an optional toolbar at the bottom. What makes a navigation controller special is that it creates and manages a hierarchy of view controllers, often referred to as a navigation stack.
In this article, we create a new iOS application to become familiar with the UINavigationController class. You'll learn that the combination of a navigation controller and a stack of (table) view controllers is an elegant and powerful solution for presenting nested data sets.
In addition to UINavigationController, you will also encounter UITableViewController in this tutorial, another UIViewController subclass. UITableViewController manages a UITableView instance instead of a UIView instance. Table view controllers automatically adopt the UITableViewDataSource and UITableViewDelegate protocols and that is going to save us some time.
Another Project
The application we are about to create is named Library. With this application, users can browse a list of authors and view the books they've written. The list of authors is presented in a table view.
If the user taps the name of an author, a list of books written by that author animates into view. Similarly, when the user selects a title from the list of books, another view animates into view, showing an image of the book cover. Let's create a new Xcode project to get us started.
Creating the Project
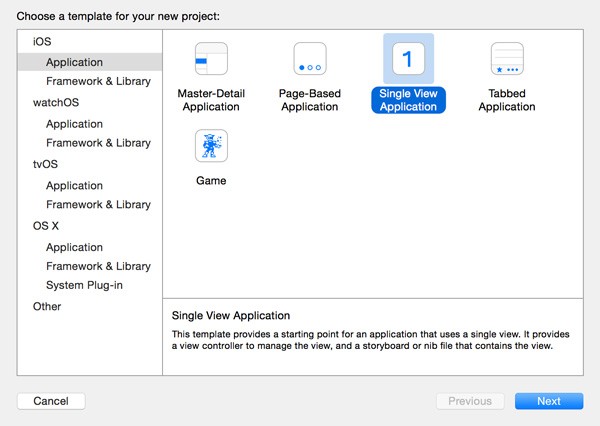
Open Xcode, create a new project by selecting New > Project... from the File menu, and select the Single View Application template from the list of iOS > Application templates.
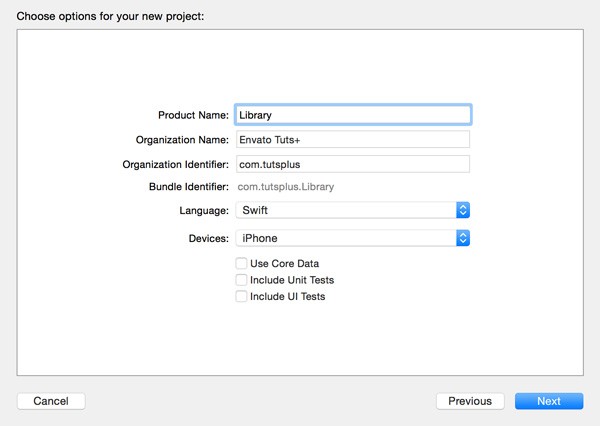
Name the project Library and assign an organization name and identifier. Set Language to Swift and Devices to iPhone. Tell Xcode where you want to save the project and click Create.
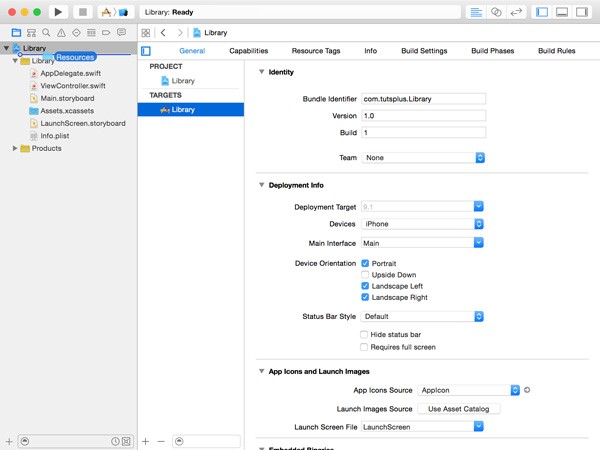
The Single View Application template contains an application delegate class, AppDelegate, a storyboard, Main.storyboard, and a UIViewController subclass, ViewController. Open AppDelegate.swift and take a look at the implementation of application(_:didFinishLaunchingWithOptions:). Its implementation is short and should look familiar by now.
func application(application: UIApplication, didFinishLaunchingWithOptions launchOptions: [NSObject: AnyObject]?) -> Bool {
    return true
}
Adding Resources
The source files of this tutorial include the data that we will be using. You can find them in the folder named Resources. It includes a property list, Books.plist, containing information about the authors, the books they've written, some information about each book, and an image for each book included in the property list.
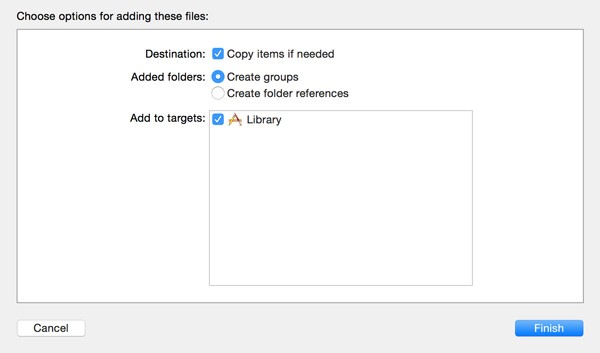
Drag the Resources folder into your project to add them to the project. Xcode will show you a few options when you add the folder to the project. Make sure to check the checkbox Copy items if needed and don't forget to add the files to the Library target.
Property Lists
Before continuing, I want to take a moment to talk about property lists and what they are. A property list is nothing more than a representation of an object graph. As we saw earlier in this series, an object graph is a group of objects, forming a network through the connections or references they share with each other.
It's easy to read and write property lists from and to disk, which makes them ideal for storing small amounts of data. When working with property lists, it's also important to remember that only certain types of data can be stored in property lists, such as strings, numbers, dates, arrays, dictionaries, and binary data.
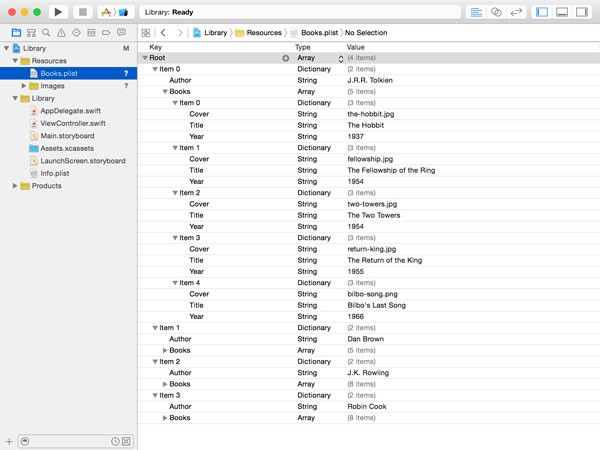
Xcode makes browsing property lists very easy. Select Books.plist from the Resources folder you added to the project and browse its contents using Xcode's built-in property list editor. This will be a helpful tool later in this article when we start working with the contents of Books.plist.
Subclassing UITableViewController
Before we can start using the data stored in Books.plist, we first need to lay some groundwork. This includes creating a view controller that manages a table view and that will display the authors listed in the property list.
In the previous article, we created a UIViewController subclass and added a table view to the view controller's view to present data to the user. In this tutorial, we take a shortcut by subclassing UITableViewController.
Start by removing ViewController.swift from your project. Create a new class by selecting New > File... from the File menu. Select the Cocoa Touch Class template in the list of iOS > Source templates.
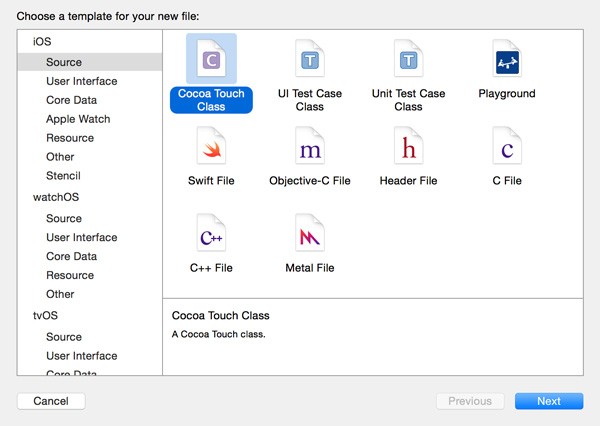
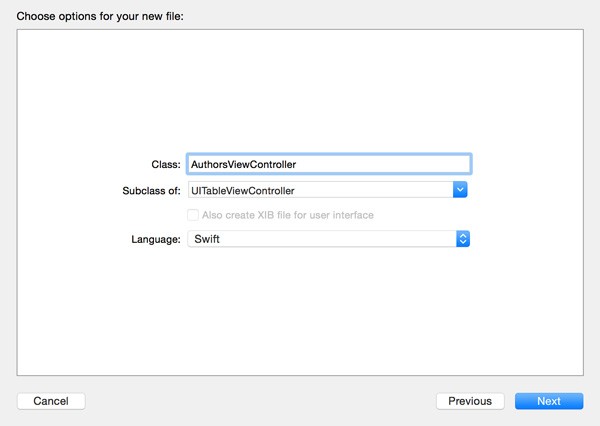
Name the new class AuthorsViewController and make it a subclass of UITableViewController. There's no need to check the checkbox Also create XIB file for user interface, because we'll be using the storyboard to create the application's user interface.
Open Main.storyboard to replace the view controller in the storyboard with a table view controller. Select the view controller in the storyboard, hit the delete key, and drag a UITableViewController instance from the Object Library on the right. Select the new view controller, open the Identity Inspector on the right, and set its class to AuthorsViewController.
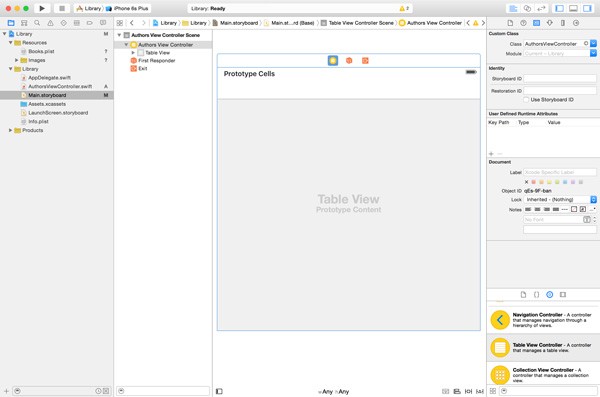
In the previous article, we made use of prototype cells to populate the table view. In this tutorial, I'll be showing you an alternative approach. Select the table view object in the workspace or from the list of objects on the left, open the Attributes Inspector on the right, and set Prototype Cells to 0.
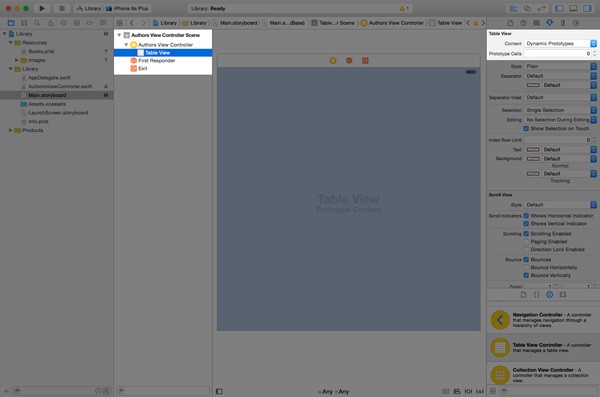
Every storyboard needs an initial view controller. This is the view controller that is instantiated when the storyboard is loaded. We can mark the authors view controller as the initial view controller by selecting the Authors View Controller object on the left, opening the Attributes Inspector on the right, and checking the checkbox Is Initial View Controller.
Populating the Table View
Open AuthorsViewController.swift and inspect the file's contents. Because AuthorsViewController is a subclass of UITableViewController, AuthorsViewController already conforms to the UITableViewDataSource and UITableViewDelegate protocols.
Before we can display data in the table view, we need data to display. As I mentioned earlier, the data contained in Books.plist serves as the data source of the table view. To use this data, we first need to load it into an object, an array to be precise.
We declare a variable property authors and set its initial value to an empty array of type [AnyObject]. Remember that the AnyObject type can represent any class or structure.
The view controller's viewDidLoad() method is a good place to load the data from Books.plist into the view controller's authors property. We do this by invoking the init(contentsOfFile:) initializer of the NSArray class. We cast the resulting object to an instance of type [AnyObject].
authors = NSArray(contentsOfFile: path) as! [AnyObject]
The method accepts a file path, which means that we need to figure out what the file path of Books.plist is. The file, Books.plist, is located in the application bundle, which is a fancy word for the directory that contains the application executable and the application's resources, such as images and sounds.
To obtain the file path of Books.plist, we first need a reference to the application's main bundle by calling mainBundle() on the NSBundle class. The next step is to ask the application's bundle for the path of one of its resources, Books.plist. We invoke pathForResource(_:ofType:) on the application's main bundle, passing in the name and type (extension) of the file we're interested in. We store the file path in a constant, filePath.
let filePath = NSBundle.mainBundle().pathForResource("Books", ofType: "plist")
Because it's possible that we're asking for a resource that isn't present in the application bundle, pathForResource(_:ofType:) returns an optional. As a general rule, if a method can return nil, an optional should be used. The filePath constant is of type String?. To safely unwrap the optional, we make use of optional binding, which we discussed earlier in this series.
If we put the two pieces together, we end up with the following implementation of viewDidLoad(). I also added a print statement to print the contents of the authors property to the console. This lets us take a look at its contents.
override func viewDidLoad() {
    super.viewDidLoad()

    let filePath = NSBundle.mainBundle().pathForResource("Books", ofType: "plist")

    if let path = filePath {
        authors = NSArray(contentsOfFile: path) as! [AnyObject]
        print(authors)
    }
}
If you've read the previous article of this series, then populating the table view should be straightforward. Because the table view contains only one section, the implementation of numberOfSectionsInTableView(_:) is straightforward. The AuthorsViewController inherits from UITableViewController, which already conforms to and implements the UITableViewDataSource protocol. That's why we need to use the override keyword. We are overriding a method that's implemented by the parent class.
override func numberOfSectionsInTableView(tableView: UITableView) -> Int {
    return 1
}
The number of rows in the only section of the table view is equal to the number of authors in the authors array so all we need to do is count the array's items.
override func tableView(tableView: UITableView, numberOfRowsInSection section: Int) -> Int {
    return authors.count
}
The implementation of tableView(_:cellForRowAtIndexPath:) is similar to the one we saw in the previous article. The main difference is how we fetch the data that we display in the table view cell.
The array of authors contains an ordered list of dictionaries, with each dictionary containing two key-value pairs. The object for the key named Author is of type String, whereas the object for the key Books is an array of dictionaries with each dictionary representing a book written by the author. Open Books.plist in Xcode to inspect the structure of the data source if this isn't entirely clear.
Before we implement tableView(_:cellForRowAtIndexPath:), we need to take care of two things. First, we declare a constant for the cell reuse identifier we're going to be using.
import UIKit

class AuthorsViewController: UITableViewController {

    let CellIdentifier = "Cell Identifier"

    var authors = [AnyObject]()

    ...

}
Second, we call registerClass(_:forCellReuseIdentifier:) on the table view, passing in UITableViewCell.classForCoder() and the cell reuse identifier. We invoke this method in viewDidLoad() to make sure it's called only once.
override func viewDidLoad() {
    super.viewDidLoad()

    let filePath = NSBundle.mainBundle().pathForResource("Books", ofType: "plist")

    if let path = filePath {
        authors = NSArray(contentsOfFile: path) as! [AnyObject]
        print(authors)
    }

    tableView.registerClass(UITableViewCell.classForCoder(), forCellReuseIdentifier: CellIdentifier)
}
With the above in place, the implementation of tableView(_:cellForRowAtIndexPath:) becomes pretty short.
override func tableView(tableView: UITableView, cellForRowAtIndexPath indexPath: NSIndexPath) -> UITableViewCell {
    // Dequeue Resuable Cell
    let cell = tableView.dequeueReusableCellWithIdentifier(CellIdentifier, forIndexPath: indexPath)

    if let author = authors[indexPath.row] as? [String: AnyObject], let name = author["Author"] as? String {
        // Configure Cell
        cell.textLabel?.text = name
    }

    return cell;
}
Note that we chain optional bindings with a comma. This is a convenient approach to avoid nested if statements. We ask authors for the element at indexPath.row and downcast it as [String: AnyObject]. Because we need the author's name, we ask author for the value for key "Author", downcasting the result to String.
Adding a Navigation Controller
Adding a navigation controller is easy using a storyboard. However, before we add a navigation controller, it's important to understand how navigation controllers work on iOS.
Just like any other UIViewController subclass, a navigation controller manages a UIView instance. The navigation controller's view manages several subviews including a navigation bar at the top, a view containing custom content, and an optional toolbar at the bottom. What makes a navigation controller unique is that it manages a stack of view controllers.
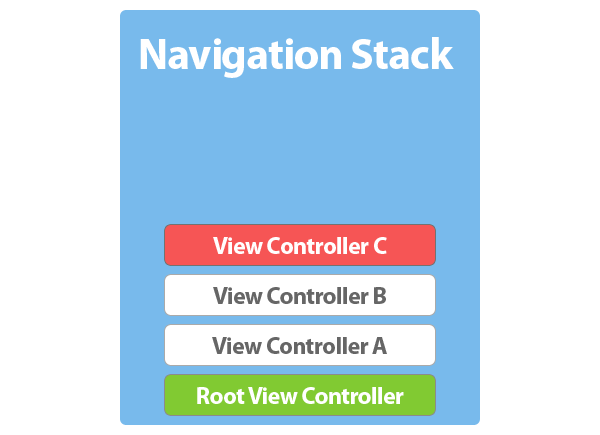
The term stack can almost be taken literally. When a navigation controller is initialized, the navigation controller is given a root view controller. The root view controller is the view controller at the bottom of the navigation stack.
By pushing another view controller onto the navigation stack, the view of the root view controller is replaced with the view of the new view controller. When working with navigation controllers, the visible view is always the view of the topmost view controller of the navigation stack.
When a view controller is removed or popped from the navigation stack, the view of the view controller beneath it becomes visible again. By pushing and popping view controllers onto and from a navigation controller's navigation stack, a view hierarchy is created and, as a result, a nested data set can be presented to the user. Let's see how all this pushing and popping works in practice.
Revisit the project's storyboard (Main.storyboard) and select the view controller. To add a navigation controller to the mix, select Embed In > Navigation Controller from the Editor menu. A few things change:
- the navigation controller becomes the storyboard's initial view controller
- a new scene named Navigation Controller Scene is added
- a navigation bar is added to the navigation and authors view controller
- the navigation controller and the authors view controller are connected by a segue
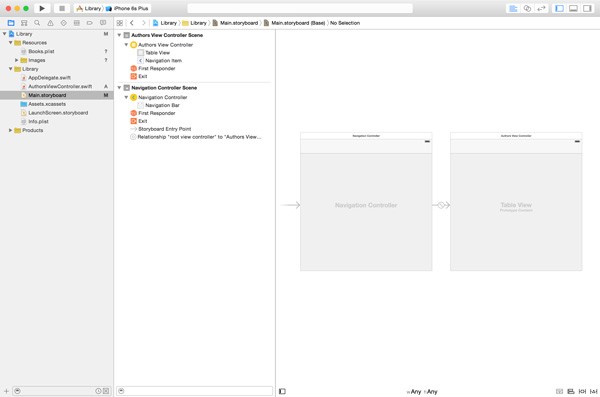
Segues are common in storyboards and we'll learn more about them later in this series. There are various kinds of segues and the segue connecting the navigation controller and the authors view controller is a relationship segue.
Every navigation controller has a root view controller, the view controller at the bottom of the navigation stack. It cannot be popped from the navigation stack, because a navigation controller always needs a view controller to show to the user. The relationship segue between the navigation controller and the authors view controller symbolizes that the latter is the root view controller of the navigation controller.
The navigation bar at the top of the navigation controller and authors view controller is something you get for free when working with navigation controllers. It's an instance of UINavigationBar and helps navigating the navigation stack.
Even though the navigation controller is the initial view controller of the storyboard, the authors view controller is the first view controller we'll see when launching the application. As I mentioned earlier, the navigation controller is nothing more than a wrapper that helps navigate between a hierarchy of view controllers. Its view is populated by the views of the view controllers in its navigation stack.
To add a title to the navigation bar, add the following line to the viewDidLoad() method of the AuthorsViewController class.
// Set Title
title = "Authors"
Every view controller has a title property that is used in various places. The navigation bar is one of them. Run the application to see the result of this small change.
Pushing and Popping
Let's now add the ability to see a list of books when the user taps the name of an author. This means that we need to capture the selection (the name of the author) instantiate a new view controller based on that selection, and push the new view controller onto the navigation stack. Does this sound complicated? It's not. Let me show you.
Another Table View Controller
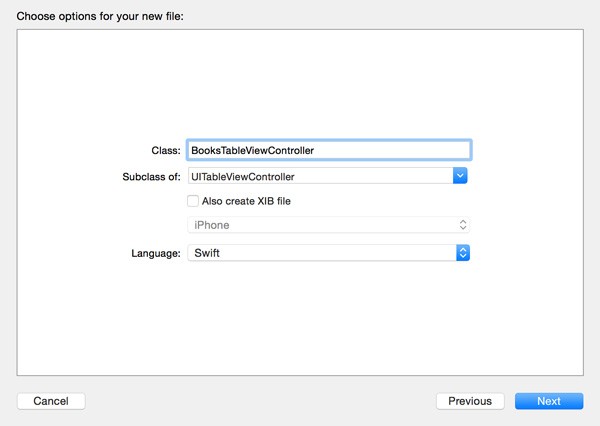
Why not display the list of books in another table view. Create a new subclass of UITableViewController and name it BooksViewController.
Loading the list of books is easy as we saw earlier, but how does the books view controller know what author the user tapped? There are several ways to tell the new view controller about the user's selection, but the approach that Apple recommends is known as passing by reference. How does this work?
The books view controller declares an author property that we can set to configure the books view controller. The books view controller uses the author property to show the books of the selected author. Open BooksViewController.swift and add a variable property of type [String: AnyObject]! and name it author.
import UIKit

class BooksViewController: UIViewController {

    var author: [String: AnyObject]!

    ...

}
Why don't we declare author as a [String: AnyObject]? or [String: AnyObject]? Because a variable needs to have an initial value, we cannot declare author as [String: AnyObject]. We could use [String: AnyObject]?, but that would mean we would have to unwrap the optional every time we want to access its value.
In Swift, you'll commonly use forced unwrapped optionals if you know the property has a value and, more importantly, if it needs to have a value for your application to work as expected. If the author property doesn't have a value, then the books view controller is of little use to us since it wouldn't be able to show any data.
To make it easier to access the books of the author, we also declare a computed property. As the name implies, a computed property doesn't store a value. It defines a getter and/or setter for getting and setting the value of another property. Take a look at the books computed property below.
var books: [AnyObject] {
    get {
        if let books = author["Books"] as? [AnyObject] {
            return books
        } else {
            return [AnyObject]()
        }
    }
}
The value of books depends on the value of author. We check whether author has a value for key "Books" and downcast the value to an array of AnyObject objects. If author doesn't have a value for "Books" we create an empty array of type [AnyObject]. Because the books computed property only defines a getter, we can simplify the implementation like this:
var books: [AnyObject] {
    if let books = author["Books"] as? [AnyObject] {
        return books
    } else {
        return [AnyObject]()
    }
}
The rest of the BooksViewController class is easy. Take a look at the implementations of the three UITableViewDataSource protocol methods shown below.
override func numberOfSectionsInTableView(tableView: UITableView) -> Int {
    return 1
}

override func tableView(tableView: UITableView, numberOfRowsInSection section: Int) -> Int {
    return books.count
}

override func tableView(tableView: UITableView, cellForRowAtIndexPath indexPath: NSIndexPath) -> UITableViewCell {
    // Dequeue Resuable Cell
    let cell = tableView.dequeueReusableCellWithIdentifier(CellIdentifier, forIndexPath: indexPath)

    if let book = books[indexPath.row] as? [String: String], let title = book["Title"] {
        // Configure Cell
        cell.textLabel?.text = title
    }

    return cell;
}
This also means that we need to declare a constant property for the cell reuse identifier and register a class for cell reuse in viewDidLoad(). This isn't anything new.
import UIKit

class BooksViewController: UITableViewController {

    let CellIdentifier = "Cell Identifier"

    ...

}
override func viewDidLoad() {
    super.viewDidLoad()

    tableView.registerClass(UITableViewCell.classForCoder(), forCellReuseIdentifier: CellIdentifier)
}
Pushing a View Controller
When the user taps an author's name in the authors view controller, the application should show the list of books written by that author. This means that we need to instantiate an instance of the BooksViewController class, tell the instance what author was selected by the user, and push the new view controller onto the navigation stack.
Storyboards will helps us with this. Open Main.storyboard, drag another UITableViewController instance from the Object Library, and set its class to BooksViewController in the Identity Inspector.
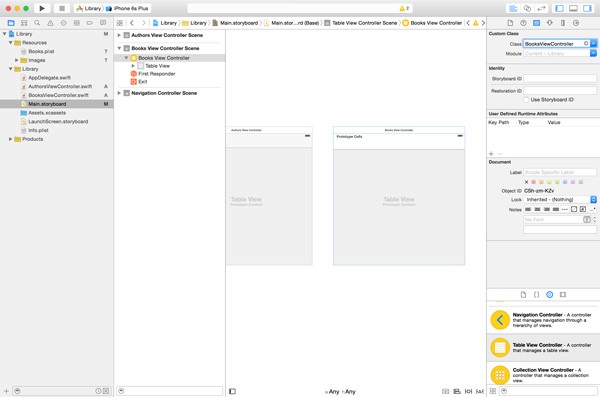
Select the table view in the new view controller and set the number of Prototype Cells to 0 in the Attributes Inspector. To push the books view controller onto the navigation stack of the navigation controller, we need to create another segue. This time, however, we create a manual segue, a show segue to be precise.
Select the authors view controller in the storyboard, hold down the Control key, and drag from the authors view controller to the books view controller. Select Manual Segue > Show from the menu that appears to create a segue from the authors view controller to the books view controller.
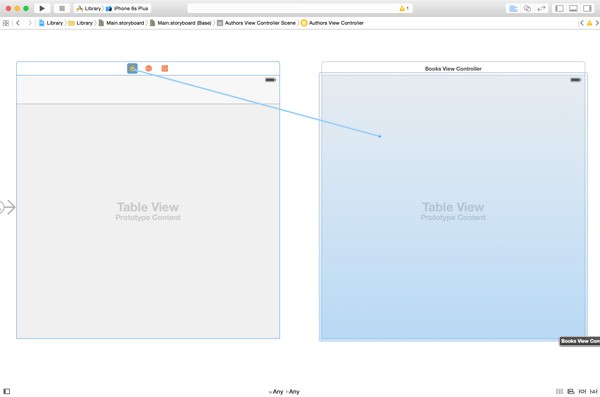
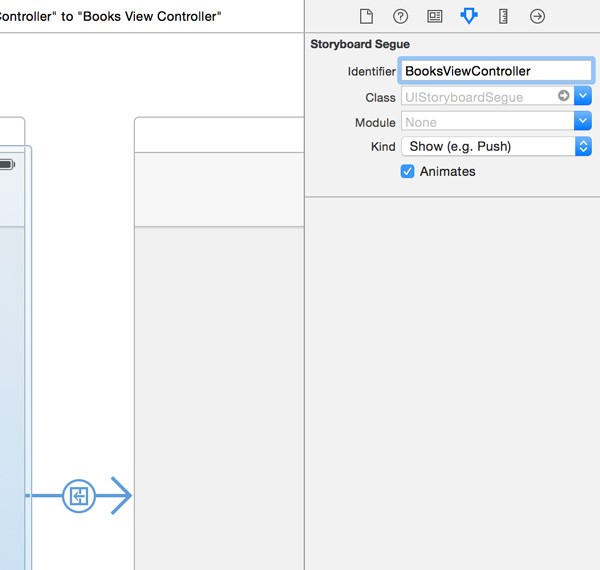
There's one more thing we need to do before returning to the implementation of the books view controller. Select the segue we created, open the Attributes Inspector on the right, and set the segue's Identifier to BooksViewController. By giving the segue a name, we can refer to it later in code.
To put the segue to use, we need to implement tableView(_:didSelectRowAtIndexPath:) in the authors view controller. This method is defined in the UITableViewDelegate protocol as we saw in the previous article about table views. In this method, we invoke performSegueWithIdentifier(_:sender:) to perform the segue we created in the storyboard. The performSegueWithIdentifier(_:sender:) method takes two arguments, the identifier of the segue and the sender of the message. It should now be clear why we gave the segue an identifier in the storyboard? Also note that we reset the selection after performing the segue.
override func tableView(tableView: UITableView, didSelectRowAtIndexPath indexPath: NSIndexPath) {
    // Perform Segue
    performSegueWithIdentifier(SegueBooksViewController, sender: self)

    tableView.deselectRowAtIndexPath(indexPath, animated: true)
}
The SegueBooksViewController constant is another constant property of the AuthorsViewController class.
import UIKit

class AuthorsViewController: UITableViewController {

    let CellIdentifier = "Cell Identifier"
    let SegueBooksViewController = "BooksViewController"

    ...

}
Before a segue is performed, the view controller has the opportunity to prepare for the segue in prepareForSegue(_:sender:). In this method, the view controller can configure the destination view controller, the books view controller. Let's implement prepareForSegue(_:sender:) to see how this works.
override func prepareForSegue(segue: UIStoryboardSegue, sender: AnyObject?) {
    if segue.identifier == SegueBooksViewController {
        if let indexPath = tableView.indexPathForSelectedRow, let author = authors[indexPath.row] as? [String: AnyObject]  {
            let destinationViewController = segue.destinationViewController as! BooksViewController
            destinationViewController.author = author
        }
    }
}
This method is invoked whenever a segue is performed. We first check if the identifier of the segue is equal to SegueBooksViewController. We then ask the table view for the index path of the current selection using optional binding. If a row is selected, we ask authors for the author that corresponds with this selection.
In the if statement, we get a reference to the books view controller (the destination view controller of the segue) and set its author property to the currently selected author in the table view.
You may be wondering when or where we initialize the books view controller? We don't explicitly instantiate an instance of the books view controller. The storyboard knows what class it needs to instantiate and initializes an instance of BooksViewController for us.
Before you run your application, open BooksViewController.swift and set the view controller's title to the name of the author to update the title of the navigation bar.
override func viewDidLoad() {
    super.viewDidLoad()

    if let name = author["Author"] as? String {
        title = name
    }

    tableView.registerClass(UITableViewCell.classForCoder(), forCellReuseIdentifier: CellIdentifier)
}
Run the application. Tap the name of an author in the table view and observe how a new BooksViewController instance is pushed onto the navigation stack and displayed to the user. Have you noticed that we also get a back button for free when using a navigation controller. The title of the previous view controller is used as the title of the back button.
Adding a Book Cover
When the user taps a book in the books view controller, the application should show the book's cover. We won't be using a table view controller for this. Instead, we use a plain vanilla UIViewController subclass and display the book cover in an instance of the UIImageView class. UIImageView is a UIView subclass specialized in displaying images.
Create a new subclass of UIViewController—not UITableViewController—and name it BookCoverViewController.
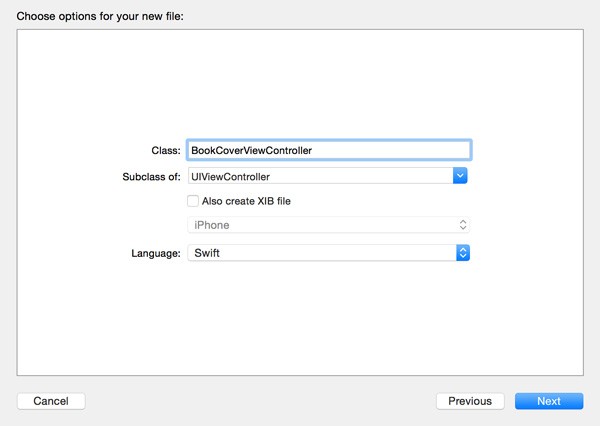
We need to declare two stored properties in the new view controller. The first stored property is a reference to the image view that we'll be using to display the book cover. The @IBOutlet keyword indicates that we will make the connection in the storyboard. The second stored property, Book, is of type [String: String]!. This property represents the book that is displayed in the book cover view controller.
import UIKit

class BookCoverViewController: UIViewController {

    @IBOutlet var bookCoverView: UIImageView!

    var book: [String: String]!

    ...

}
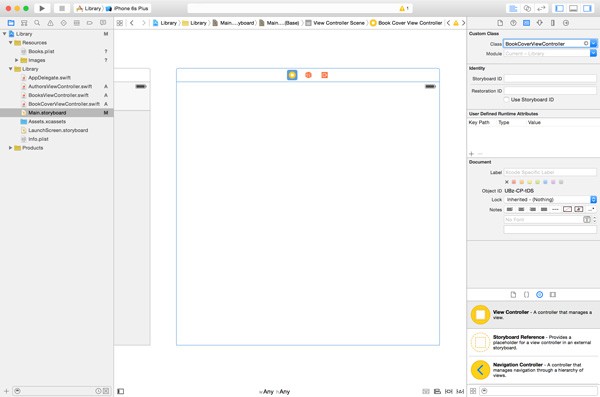
Open Main.storyboard to create the user interface of the book view controller. Drag a UIViewController instance from the Object Library to the workspace and set its class to BookCoverViewController in the Identity Inspector.
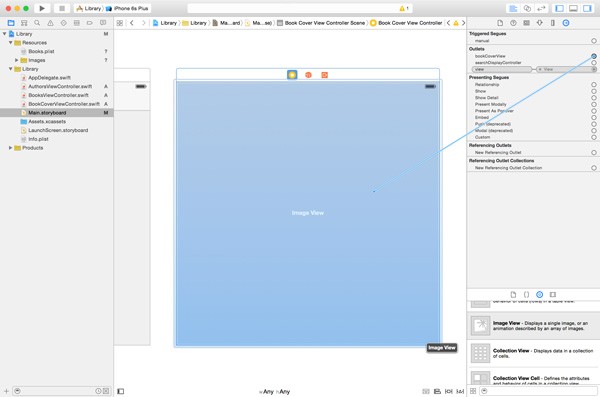
Drag a UIImageView instance from the Object Library to the view controller's view and make it cover the entire view of the view controller. In the Connections Inspector, connect it with the bookCoverView outlet of the view controller.
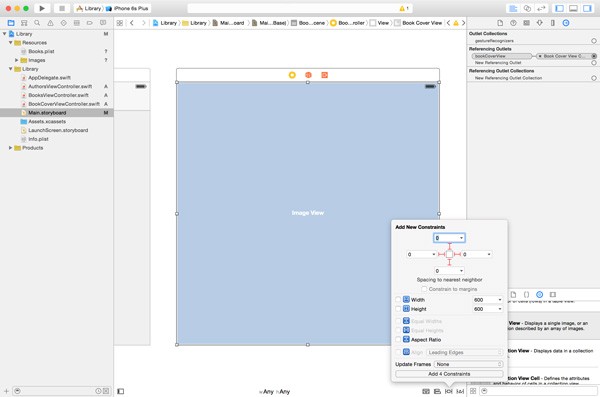
To make sure the image view is correctly displayed on every device, we need to apply the necessary layout constraints as shown below.
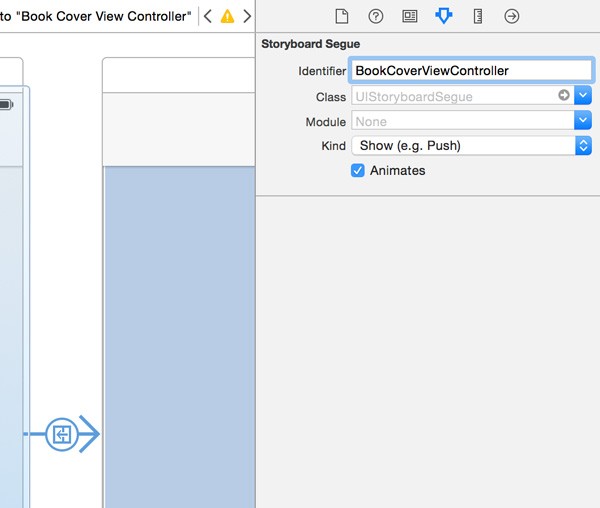
Before we implement the view controller, create a push segue between the books view controller and the book cover view controller. Select the segue and set its identifier to BookCoverViewController in the Attributes Inspector.
In the BooksViewController class, declare a constant property for the segue identifier.
import UIKit

class BooksViewController: UITableViewController {

    let CellIdentifier = "Cell Identifier"
    let SegueBookCoverViewController = "BookCoverViewController"

    ...

}
We use this property in tableView(_:didSelectRowAtIndexPath:) to perform the segue we created in the storyboard. Don't forget to deselect the row after performing the segue.
override func tableView(tableView: UITableView, didSelectRowAtIndexPath indexPath: NSIndexPath) {
    // Perform Segue
    performSegueWithIdentifier(SegueBookCoverViewController, sender: self)

    tableView.deselectRowAtIndexPath(indexPath, animated: true)
}
The implementation of prepareForSegue(_:sender:) looks very similar to that of the BooksViewController class. We check whether the segue's identifier is equal to SegueBookCoverViewController and ask the table view for the index path of the currently selected row. We ask books for the book that corresponds with the user's selection and set the book property of the destination view controller, an instance of BookCoverViewController.
override func prepareForSegue(segue: UIStoryboardSegue, sender: AnyObject?) {
    if segue.identifier == SegueBookCoverViewController {
        if let indexPath = tableView.indexPathForSelectedRow, let book = books[indexPath.row] as? [String: String]  {
            let destinationViewController = segue.destinationViewController as! BookCoverViewController
            destinationViewController.book = book
        }
    }
}
We configure the image view of the BookCoverViewController class in its viewDidLoad() method. We ask book for the value for key "Cover" and instantiate a UIImage object by invoking the init(named:) initializer, passing in the file name. We assign the UIImage object to the image property of bookCoverView.
override func viewDidLoad() {
    super.viewDidLoad()

    if let fileName = book["Cover"] {
        bookCoverView.image = UIImage(named: fileName)
        bookCoverView.contentMode = .ScaleAspectFit
    }
}
In viewDidLoad(), we also set the content mode of the image view to ScaleAspectFit. The contentMode property is of type UIViewContentMode, an enumeration. The value we assign, ScaleAspectFit, tells the image view to stretch the image as much as possible while respecting its aspect ratio.
Run the application and take it for a spin. You should now be able to browse the books in stored in Books.plist.
Where Does It Pop?
Earlier in this article, I explained that view controllers can be pushed onto and popped from a navigation stack. So far, we only pushed view controllers onto a navigation stack. Popping a view controller from a navigation stack takes place when the user taps the back button of the navigation bar. This is another bit of functionality that we get for free.
At some point, however, you will run into a situation in which you manually need to pop a view controller from a navigation stack. You can do so by calling popViewControllerAnimated(_:) on the navigation view controller. This removes the topmost view controller from the navigation stack.
Alternatively, you can pop all the view controllers from the navigation stack—with the exception of the root view controller—by calling popToRootViewControllerAnimated(_:) on the navigation controller.
How do you access the navigation controller of a view controller? The UIViewController class declares a computed property, navigationController, of type UINavigationController?. If the view controller is on a navigation stack, then this property references the navigation controller to which the navigation stack belongs.
Conclusion
I hope you agree that navigation controllers aren't that complicated. This article could have been much shorter, but I hope that you've learned a few more things along the way. In the next article, we take a look at tab bar controllers. Even though tab bar controllers also manage a collection of view controllers, they are quite different from navigation controllers.
If you have any questions or comments, you can leave them in the comments below or reach out to me on Twitter.


Comments