Introduction
If you're developing a mobile app that has any kind of audio output, be it a game or any other kind of app, then you will want your audio to sound the best it possibly can on every device it is compatible with.
Some mobile devices support Dolby Digital Plus, in particular the Kindle Fire range but also a growing number of other Android devices. Dolby Digital Plus can dramatically improve the audio output of your app by applying filters that can boost certain parts of your audio output, for example music or voice. This may sound like a complicated thing to achieve, but luckily Dolby have provided an API that makes using this functionality incredibly simple.
In this tutorial, you will learn how you can develop an app using the Marmalade SDK that can take advantage of Dolby Digital Plus using the Dolby Audio API Marmalade extension. If you're only interested in integrating the Dolby Audio API into your Marmalade application, then head to the bottom of this article.
1. Overview
The app we'll be creating in this tutorial will provide a simple user interface containing a top row of buttons that can start and stop different kinds of audio, and a bottom row of buttons to set the type of audio filtering that needs to be applied.
We'll first create a new Marmalade project, and the folders and source files that will make up the project.
Next I'll explain how to implement the user interface by loading an image containing the required button images and drawing different parts of it on the screen. I will also illustrate how to use Marmalade to respond to user touches.
Once the user interface is up and running, I'll show you how to make Marmalade play two different types of audio, compressed audio, such as an MP3 file, and raw sound sample data.
Finally, I'll integrate the Dolby Audio API into the app and make use of the different audio filter types it provides.
Throughout this tutorial, I will assume you are developing on a machine running Windows and already have the Marmalade SDK and a version of Microsoft Visual Studio installed. Marmalade can also be used with Xcode on OS X and you should still find it easy to follow the steps of this tutorial if you are using a Mac for development.
2. Setting Up the Marmalade Project
Step 1: Creating the Source Files and Folder Structure
Create a top level folder called DolbyTestApp to contain the project files. Within this folder, create another folder called source. Let's also create the files we'll be needing in our project. In the source folder, create five empty files called button.cpp, button.h, main.cpp, sound.cpp, and sound.h.
Step 2: Creating the MKB File
Create an empty file called DolbyTestApp.mkb in the DolbyTestApp folder and open it in a code editor. The MKB file is the file used by Marmalade to configure the project. It brings together all your source and data files, and allows you to configure things like the icons used by your app when installed on the different platforms supported by Marmalade. Add the following to the DolbyTestApp.mkb file.
{
    [Source]
    (source)
    button.cpp
    button.h
    main.cpp
    sound.cpp
    sound.h
}

subprojects
{
    iwgeom
    iwgx
}
The files section of an MKB file is used to list all the source files needed by your project. It also allows you to apply arbitrary groupings to these files and reference files from more than one folder. Groups are defined using square brackets, so the line [Source] will create a group called Source. Using groups allows us to create organizational folders within the Visual Studio solution that we'll generate in the next step.
Rounded brackets are used to specify a folder in which Marmalade should look for source files. The line (source) instructs Marmalade to look in the source subfolder of our main project folder. The five source files for the project are listed after this line.
The subprojects section allows you to reference other source code modules that your project requires. This project will need the iwgeom and iwgx modules which are standard components provided by the Marmalade SDK.
Step 3: Creating a Visual Studio Project
You can now use the MKB file to create a Visual Studio solution that can be used to build and test the app. Double-click the MKB file in Windows File Explorer, which should automatically launch Visual Studio and open the solution.
If you take a look at the DolbyTestApp folder, you will see that a few new files have been created. There's a folder called build_dolbytestapp_vcxx, where the xx part of the folder name depends on the version of Visual Studio you're using. This folder is used by Marmalade to contain all files needed as part of the build process, including the Visual Studio solution file.
A data folder has also been created, which is where you should place any resources required by the app, such as graphics and audio files. Two files have also been automatically created for you in this folder:
- app.icf: a configuration file that allows you to change app settings, such as the maximum amount of RAM the app can use
- app.config.txt: used to define custom application specific parameters that can then be used in the app.icf file
For this tutorial you can safely ignore these files as no changes will need to be made to it.
3. Building the User Interface
Step 1: Implementing the Main Program Loop
Let's start writing the main program loop for our app. In Visual Studio open the Source folder in the Solution Explorer, double-click the main.cpp file, and add the following code snippet.
#include "IwGx.h"
#include "s3e.h"
#include "button.h"
#include "sound.h"

void Initialise()
{
}

void Terminate()
{
}

void Update()
{
}

void Render()
{
}

int main()
{
    Initialise();
    while (!s3eDeviceCheckQuitRequest())
    {
        Update();
        Render();
    }
    Terminate();
    return 0;
}
This code snippet starts by including two Marmalade header files. The IwGx.h file declares the functions and structures that make up Marmalade's IwGx API, which can be used for rendering both 2D and 3D graphics in the most efficient manner possible on the target device.
The s3e.h header file lets you access all the lower level functions that provide direct access to such things as device settings, touch screen input, sound support, and much more.
The main function is self-explanatory. It starts by calling Initialise, which will perform any setup required by the app and ends by calling Terminate, which will release any resources used by the app.
The main while loop starts after invoking Initialise. The exit condition is little more than a call to s3eDeviceCheckQuitRequest, which is a Marmalade function that checks to see if a request to close the app has been received, for example, when the user has closed the app or the operating system has requested it to shut down for some reason.
The main loop just calls the Update and Render functions continuously. The Update function will be used for things like detecting user input while Render is responsible for drawing the user interface.
The Initialise, Update, Render, and Terminate functions are all empty at the moment, but the app can be built and executed. If you want to give it a try in the Marmalade Windows Simulator, select the x86 Debug option from the Solution Configurations drop-down menu in the Visual Studio toolbar, press F7 to build the app, and F5 to execute it. You should see something similar to the screenshot below.

Step 2: Loading an Image
To display the user interface the app is going to need to have some images to render, so I'll now show you how to load a PNG image into memory and get it into a state where it can be rendered to the screen.
First, add the following line at the top of the main.cpp file, below the include statements at the top:
CIwTexture* gpTexture = NULL;
The CIwTexture class is used to represent a bitmapped image. In the above snippet, I'm declaring a global variable called gpTexture, which will be used to store a pointer to the image used in the app's user interface. The image file we'll be using is named ui.png.

The image can be loaded into memory and prepared for use by adding the following lines to the Initialise function.
// Initialise Marmalade modules
IwGxInit();

// Create a new CIwTexture and use it to load the GUI image file
gpTexture = new CIwTexture;
gpTexture->LoadFromFile("ui.png");
gpTexture->Upload();
The call to IwGxInit performs all the necessary initialization steps needed to allow the app to draw to the screen, which includes being able to load image files.
The gpTexture variable is used to store a pointer to a new instance of the CIwTexture class. A call to the LoadFromFile method with the file name of the image will load the PNG file into memory and convert it into a suitable format for rendering. The image file name is specified relative to the app's data folder, so you'll need to ensure the ui.png file is copied to this folder.
The call to the Upload method will upload the converted image data to the device's video memory, ready to be drawn on screen.
It's also important that we tidy up after ourselves, so when the app shuts down it should release any resources it may be using. Add the following to the Terminate function.
// Destroy texture instance
delete gpTexture;

// Terminate Marmalade modules
IwGxTerminate();
The above snippet first destroys the CIwTexture instance, representing the ui.png image, which will also release any hardware resources and memory used by the image. The call to IwGxTerminate releases any resources that were initially allocated by the call to IwGxInit in Initialise.
Step 3: Creating a Button Class
The user interface for this app is going to need some clickable buttons, so let's create a new class called Button that will implement this behavior. Open button.h file and enter the following code.
#ifndef BUTTON_H
#define BUTTON_H

#include "IwGx.h"

class Button
{
public:
    Button(CIwTexture* apTexture, int32 aX, int32 aY,
           int32 aWidth, int32 aHeight, int32 aU, int32 aV,
           int32 aUWidth, int32 aVWidth, bool aEnabled);
    ~Button();

    void Render();

private:
    CIwMaterial* mpMaterial;
    CIwSVec2 mTopLeft;
    CIwSVec2 mSize;
    CIwFVec2 mUV;
    CIwFVec2 mUVSize;
    bool mEnabled;
};

#endif
The constructor for this class is used to position and size the button on screen, and also to indicate which region of the source image should be displayed on the button. It also indicates whether this button should be enabled for user input.
The destructor will release any resources created by the constructor while the Render method will, unsurprisingly, draw the button on the screen.
Some more Marmalade classes are introduced for the member variables of the Button class. The CIwMaterial class is used by Marmalade to combine images with other rendering information, such as color data that might be required when rendering. The CIwSVec2 class is a two component vector where each component is a 16-bit signed integer. The CIwFVec2 class is another two component vector with each component being of type float.
Open button.cpp and add the following code snippet to implement the Button class.
#include "button.h"
#include "s3e.h"

Button::Button(CIwTexture* apTexture, int32 aX, int32 aY,
               int32 aWidth, int32 aHeight,
               int32 aU, int32 aV,
               int32 aUWidth, int32 aVHeight, bool aEnabled)
{
    mpMaterial = new CIwMaterial();
    mpMaterial->SetTexture(apTexture);

    float lTextureWidth = (float) apTexture->GetWidth();
    float lTextureHeight = (float) apTexture->GetHeight();

    mTopLeft.x = aX;
    mTopLeft.y = aY;
    mSize.x = aWidth;
    mSize.y = aHeight;
    mUV.x = (float) aU / lTextureWidth;
    mUV.y = (float) aV / lTextureHeight;
    mUVSize.x = (float) aUWidth / lTextureWidth;
    mUVSize.y = (float) aVHeight / lTextureHeight;

    mEnabled = aEnabled;
}
The constructor for the Button class starts by creating a new instance of CIwMaterial, which will be used to render the button image. Each Button instance has its own CIwMaterial instance as it makes it easier to change the button's color. Once the CIwMaterial instance is created, the CIwTexture instance passed into the constructor is set as its image.
The mTopLeft member variable is used to store the top left corner of the Button on the screen while mSize stores the width and height. These values are specified in pixels.
The mUV and mUVSize member variables store the top left corner and dimensions of the image region to be rendered. These are specified as a floating point fraction of the source image size, with (0, 0) being the top left corner of the image and (1, 1) being the bottom right corner.
The values passed into the constructor are specified as pixel offsets into the texture, so you need to convert these into fractional values by dividing by the pixel width or height of the source image. It is possible to find the image dimensions by calling the GetWidth and GetHeight methods on the CIwTexture class.
The next code snippet shows the class's destructor. As you can see, all it has to do is delete the CIwMaterial instance that was allocated in the constructor.
Button::~Button()
{
    delete mpMaterial;
}
The Render method will draw the Button on screen. It starts by checking the mEnabled member variable and sets the ambient color of the CIwMaterial, so that the Button is drawn at full brightness when enabled and a bit darker when disabled. A call to IwGxSetMaterial tells Marmalade which CIwMaterial instance to draw with and IwGxDrawRectScreenSpace will cause the Button to be rendered.
void Button::Render()
{
    if (!mEnabled)
        mpMaterial->SetColAmbient(96, 96, 96, 255);
    else
        mpMaterial->SetColAmbient(255, 255, 255, 255);

    IwGxSetMaterial(mpMaterial);
    IwGxDrawRectScreenSpace(&mTopLeft, &mSize, &mUV, &mUVSize);
}
Step 4: Laying Out the User Interface
The user interface for the app is going to automatically adjust to the screen resolution of the device it is running on, but to make things a little simpler we're only going to support landscape orientation. The first step is to force landscape by entering the following into the app.icf file.
[S3E]
DispFixRot=LANDSCAPE
MemSize0=12000000

{OS=WINDOWS}
WinWidth=1280
WinHeight=800
{}
All settings in the app.icf file have a group associated with them. Square brackets are used to denote a group, so in this case the line [S3E] indicates the settings that follow are part of the S3E group, which is a group reserved by Marmalade for hardware related settings.
The DispFixRot setting will force the screen to always be in landscape orientation. The MemSize0 setting has also been added to increase the amount of RAM the app has available to it. When you add sound support later in this tutorial, the extra RAM will be needed to store the sound sample data.
The WinWidth and WinHeight settings are used to specify the dimensions of the windows used when running in the simulator. The {OS=WINDOWS} line ensures these settings are only used on the Windows simulator. The {} line disables this restriction so any settings following it become global settings again.
You can now start creating the elements of the user interface. Open the main.cpp file and start by adding the following snippet after the declaration of the gpTexture global variable.
enum ButtonIDs
{
    BUTTON_AUDIO_LABEL,
    BUTTON_AUDIO_OFF,
    BUTTON_AUDIO_MUSIC,
    BUTTON_AUDIO_SFX,
    BUTTON_AUDIO_SPEECH,
    BUTTON_FILTER_LABEL,
    BUTTON_FILTER_OFF,
    BUTTON_FILTER_MOVIE,
    BUTTON_FILTER_MUSIC,
    BUTTON_FILTER_GAME,
    BUTTON_FILTER_VOICE,
    BUTTON_COUNT
};

Button* gButton[BUTTON_COUNT];

bool gDolbySupported;
The ButtonIDs enumeration provides a convenient way of naming each of the user interface elements. The gButton array will store pointers to each of the Button instances in the user interface and the gDolbySupported boolean flag will be used to disable parts of the interface if the target device does not support the Dolby Audio API.
To create the required Button instances, add the following code to the end of the Initialise function.
// Check for Dolby Digital Plus support
gDolbySupported = false;

// Create our interface buttons
int32 lSize = IwGxGetScreenWidth() / 5;
int32 lGap = (int32) ((float) lSize * 0.1f);
lSize = (int32) ((float) lSize * 0.9f);

int32 lRowSize = IwGxGetScreenHeight() / 4;
int32 lTopRowX = (IwGxGetScreenWidth() - (4 * lSize) -
                 (3 * lGap)) / 2;
int32 lTopRowY = lRowSize - (lSize / 2);
int32 lBottomRowX = (IwGxGetScreenWidth() - (5 * lSize) -
                    (4 * lGap)) / 2;
int32 lBottomRowY = (3 * lRowSize) - (lSize / 2);
int32 lLabelWidth = (240 * lSize) / 160;
int32 lLabelHeight = (42 * lSize) / 160;
int32 lLabelX = (IwGxGetScreenWidth() - lLabelWidth) / 2;

gButton[BUTTON_AUDIO_LABEL] = new Button(gpTexture,
               lLabelX, lTopRowY - lLabelHeight - 10,
               lLabelWidth, lLabelHeight, 4, 408,
               240, 42, false);
gButton[BUTTON_AUDIO_OFF] = new Button(gpTexture,
               lTopRowX, lTopRowY, lSize, lSize, 347, 3,
               160, 160, true);
gButton[BUTTON_AUDIO_MUSIC] = new Button(gpTexture,
               lTopRowX + (lSize + lGap), lTopRowY,
               lSize, lSize, 175, 3, 160, 160, true);
gButton[BUTTON_AUDIO_SFX] = new Button(gpTexture,
               lTopRowX + (2 * (lSize + lGap)), lTopRowY,
               lSize, lSize, 2, 173, 160, 160, true);
gButton[BUTTON_AUDIO_SPEECH] = new Button(gpTexture,
               lTopRowX + (3 * (lSize + lGap)), lTopRowY,
               lSize, lSize, 174, 173, 160, 160, true);
gButton[BUTTON_FILTER_LABEL] = new Button(gpTexture,
               lLabelX, lBottomRowY - lLabelHeight - 10,
               lLabelWidth, lLabelHeight, 2, 353,
               240, 42, false);
gButton[BUTTON_FILTER_OFF] = new Button(gpTexture,
               lBottomRowX, lBottomRowY, lSize, lSize,
               347, 3, 160, 160, gDolbySupported);
gButton[BUTTON_FILTER_MOVIE] = new Button(gpTexture,
               lBottomRowX + (lSize + lGap), lBottomRowY,
               lSize, lSize, 2, 3, 160, 160, gDolbySupported);
gButton[BUTTON_FILTER_MUSIC] = new Button(gpTexture,
               lBottomRowX + (2 * (lSize + lGap)),
               lBottomRowY, lSize, lSize, 175, 3,
               160, 160, gDolbySupported);
gButton[BUTTON_FILTER_GAME] = new Button(gpTexture,
               lBottomRowX + (3 * (lSize + lGap)),
               lBottomRowY, lSize, lSize, 2, 173,
               160, 160, gDolbySupported);
gButton[BUTTON_FILTER_VOICE] = new Button(gpTexture,
               lBottomRowX + (4 * (lSize + lGap)), lBottomRowY,
               lSize, lSize, 174, 173,
               160, 160, gDolbySupported);
In this code block, we start by assuming the Dolby Audio API isn't supported by the user's device by setting gDolbySupported to false. Next, the IwGxGetScreenWidth and IwGxGetScreenHeight functions are used to infer the dimensions of the screen and suitable sizes and positions for the user interface elements are calculated. Finally, a number of Button instances are created, defining the user interface.
You may have noticed that the Button instances for controlling the current filter type use the gDolbySupported variable to indicate whether they should be enabled or not. I've cheated a little by using two disabled Button instances to draw some labels.
You've now created the user interface, but you should always ensure that you tidy up after yourself. Add the following code block at the start of the Terminate function to release the Button instances when the app shuts down.
// Destroy Button instances
for (uint32 i = 0; i < BUTTON_COUNT; i++)
{
    delete gButton[i];
}
If you were to run the app at this point, the user interface would be created and destroyed, but it still won't be rendered. You will need to add the following code snippet to the Render function before anything will be displayed on screen.
// Clear the screen to a pale blue
IwGxSetColClear(128, 224, 255, 0);
IwGxClear(IW_GX_COLOUR_BUFFER_F | IW_GX_DEPTH_BUFFER_F);

// Render the UI
for (uint32 i = 0; i < BUTTON_COUNT; i++)
{
    gButton[i]->Render();
}

// Finish rendering and display on screen
IwGxFlush();
IwGxSwapBuffers();
The above code snippet first clears the screen to light blue using calls to IwGxSetColClear and IwGxClear. Then, the user interface is drawn by calling the Render method on each of the Button instances. Finally, a call to IwGxFlush causes all render requests to be completed before IwGxSwapBuffers makes the user interface actually appear on screen.
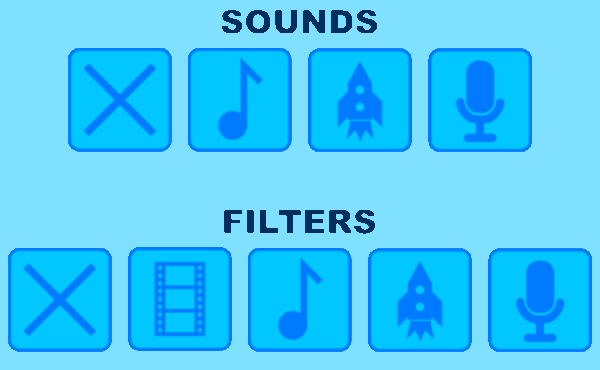
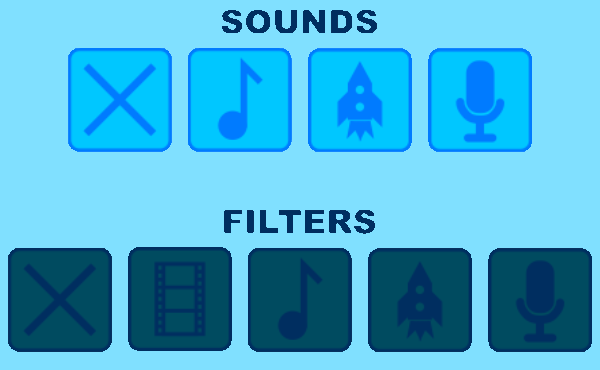
If you build and run the app in the Marmalade Windows Simulator, you should see two rows of buttons, with the bottom row drawn darker as they are in a disabled state.
Step 5: Responding to User Input
Let's now make this app a little more interactive by tracking touch input from the user. To start, you'll need to add a new method to the Button class, so open button.h and add the following method prototypes.
void Update(uint32 aTouchState, int32 aX, int32 aY);
bool IsReleased();
You should also add the following additional private member variables to the Button class.
bool mPressed;
bool mDown;
bool mReleased;
Next, open button.cpp and add the following lines to the end of the class constructor to ensure the new member variables are initialized to sensible values.
mDown = false;
mPressed = false;
mReleased = false;
The next code block shows the implementations of the Update and IsReleased methods.
void Button::Update(uint32 aTouchState, int32 aX, int32 aY)
{
    if (!mEnabled)
        return;

    // Check if the touch position is within bounds of
    // this button
    aX -= mTopLeft.x;
    aY -= mTopLeft.y;

    bool lInBounds = (aX >= 0) && (aX < mSize.x) &&
                     (aY >= 0) && (aY < mSize.y);

    // Clear the released flag
    mReleased = false;

    // Check touch screen state
    if (aTouchState & S3E_POINTER_STATE_PRESSED)
    {
        // User has just touched the screen
        if (lInBounds)
        {
            mPressed = true;
            mDown = true;
        }
    }
    else if (aTouchState & S3E_POINTER_STATE_DOWN)
    {
        // If button has been pressed, check if user
        // is still touching inside it
        if (mPressed)
        {
            mDown = lInBounds;
        }
    }
    else if (aTouchState & S3E_POINTER_STATE_RELEASED)
    {
        // If user has released screen over a pressed
        // button, we set the release flag to true
        if (mPressed && mDown)
        {
            mReleased = true;
        }

        // Button is no longer pressed or down!
        mDown = false;
        mPressed = false;
    }
}

bool Button::IsReleased()
{
    return mReleased;
}
The Update method takes three parameters, the current touch status and the screen coordinates of the touch. You'll learn how to obtain this information shortly. The method first checks to see if the Button is disabled and immediately exits if it is. The screen coordinates passed to the method are then checked against the bounds of the Button to see if the Button is being touched.
The aTouchState parameter of the Update method is a bit mask comprised of three possible flags:
-
S3E_POINTER_STATE_PRESSEDis set when the user has just touched the screen -
S3E_POINTER_STATE_DOWNis set while the screen is being touched -
S3E_POINTER_STATE_RELEASEDis set when the user lifts its finger from the screen
The Update method uses the current value of aTouchState to update the internal member variables of the class accordingly.
The IsReleased method is trivial, it returns the current state of the mReleased variable.
We need to make one final change to the Button class. In the Render method, we draw the Button slightly darker while the user is pressing it. This visual feedback benefits the user experience of the application. Change the beginning of the Render method to the following:
if (!mEnabled)
    mpMaterial->SetColAmbient(96, 96, 96, 255);
else if (mDown)
    mpMaterial->SetColAmbient(192, 192, 192, 255);
else
    mpMaterial->SetColAmbient(255, 255, 255, 255);
With the Button class updated, you now just have to add some logic to detect touch input from the user. Open main.cpp again and add the following to the currently empty Update function:
// Allow device OS time to do its processing
s3eDeviceYield(0);

// Update pointer (actually touch screen!) inputs
s3ePointerUpdate();

// Read current touch screen inputs and use them to update Button states
uint32 lTouchState =
           s3ePointerGetState(S3E_POINTER_BUTTON_SELECT);
int32 x = s3ePointerGetX();
int32 y = s3ePointerGetY();
for (uint32 i = 0; i < BUTTON_COUNT; i++)
{
    gButton[i]->Update(lTouchState, x, y);
}
The call to s3eDeviceYield is vitally important in a Marmalade app as it allows the device's operating system time to handle any events, such as touch input, incoming calls, etc. The s3ePointerUpdate function takes a snapshot of the current touch screen status.
The current state of the first detected touch input is then found by calling s3ePointerGetState. It returns a value using the bit mask I described earlier. The s3ePointer functions are also used to detect mouse events on desktop operating systems. The value passed to s3ePointerGetState is S3E_POINTER_BUTTON_SELECT, which will return the status of the first detected touch event or the left mouse button, depending on the capabilities of the device the app is running on.
s3ePointerGetX and s3ePointerGetY return the screen coordinates of the touch. We then loop through the button instances and call Button::Update on each button, passing in the current touch screen status and touch coordinates.
The app is now capable of detecting user input and the Button instances will change color when they're pressed.
4. Adding Audio Playback
Step 1: Playing Compressed Audio Files
Playing back compressed audio files, such as MP3 files, is incredibly easy in Marmalade. In fact, it only takes a single line of code. Add the following code block to the end of the Update function in main.cpp.
// Check for button presses
if (gButton[BUTTON_AUDIO_MUSIC]->IsReleased())
{
    s3eAudioPlay("black-hole.mp3");
}
Whenever the user presses and releases the music note button on the top row of buttons, the app will call the s3eAudioPlay function, which will attempt to play the MP3 file called black-hole.mp3. This file must exist in the project data folder, so it can be located at runtime.
The black-hole.mp3 file was obtained from http://www.freesfx.co.uk and was composed by Craig Riley (SOCAN).
Step 2: Playing Uncompressed Sound Samples
Playing uncompressed sound samples is also possible in Marmalade. While it isn't quite as simple as playing a compressed sound file, it's more flexible as it allows you to play multiple sounds at a time, whereas most devices will only allow a single compressed audio track to be played back at any time.
Marmalade expects sound sample data to be in 16-bit signed PCM format and most audio editing software will allow you to save out files in this format using the WAV file format. However, Marmalade doesn't support the WAV file format directly, so for the purposes of this tutorial I have taken sound files saved in WAV format and removed the header from the file leaving only the sample data. For your own apps, you'd probably want to support WAV files directly, but that is beyond the scope of this tutorial.
I've added two sound files to the data folder called female-counting.raw and gun-battle.raw. The original WAV format files were obtained from http://soundbible.com and have been released under the Attribution 3.0 Creative Commons license.
In order to play a sampled sound effect, it is necessary to have the sound data in memory. I have created a Sound class that will take care of this for us. To implement this class, open up sound.h and add the following code block to it:
#ifndef SOUND_H
#define SOUND_H

#include "s3e.h"

class Sound
{
public:
    Sound(const char* apFileName);
    ~Sound();

    void Play();

private:
    int16* mpSoundData;
    uint32 mSamples;
};

#endif
Next, open sound.cpp and insert the following code block:
#include "sound.h"

Sound::Sound(const char* apFileName)
{
    // Attempt to open the sound effect file
    s3eFile* f = s3eFileOpen(apFileName, "rb");
    if (f)
    {
        // Seek to end of file to find its length
        s3eFileSeek(f, 0, S3E_FILESEEK_END);

        // Number of samples is file size divided by the
        // size of an int16
        mSamples = s3eFileTell(f) / sizeof(int16);
        s3eFileSeek(f, 0, S3E_FILESEEK_SET);

        // Allocate buffer for sound data
        mpSoundData = new int16[mSamples];

        // Read in sound data
        s3eFileRead(mpSoundData, sizeof(int16), mSamples, f);

        // Close the file
        s3eFileClose(f);
    }
    else
    {
        // File open failed, zero the member variables
        mpSoundData = NULL;
        mSamples = 0;
    }
}

Sound::~Sound()
{
    if (mpSoundData)
        delete[] mpSoundData;
}

void Sound::Play()
{
    if (mpSoundData)
    {
        int lChannel = s3eSoundGetFreeChannel();
        s3eSoundChannelPlay(lChannel, mpSoundData,
                            mSamples, 0, 0);
    }
}
The constructor takes the file name of a sound effect and finds the length of the file in bytes. An array of 16-bit signed integers is created, big enough to hold the entire sound, and the file is read into this buffer. The destructor deletes this buffer.
The Play method will actually start the sound sample playing. It does this by first asking Marmalade for a free sound channel with a call to s3eSoundGetFreeChannel. The sound is then started on that channel by calling s3eSoundChannelPlay, passing in the channel number, start of the sound buffer, and the number of sound samples in the sound. The remaining two parameters indicate whether the sound sample should loop when it reaches the end and the offset into the sample data where subsequent loops should begin playing. By passing in zero for both of these parameters, the entire sound effect will loop continuously.
With the Sound class implemented, return to main.cpp and add some code to load and destroy the sound samples and to start the sounds playing when the user presses a button. Start by adding two new global variables after the declaration of the gpButton array.
Sound* gpGunBattleSound;
Sound* gpFemaleCountingSound;
Next, add the following to the end of the Initialise function. This code block will load the two sound files into memory and then set the default sound sample frequency to 44100Hz, which just so happens to be the frequency of both sounds used in the app.
// Load sound effects into memory
gpGunBattleSound = new Sound("gun-battle.raw");
gpFemaleCountingSound = new Sound("female-counting.raw");

// Configure default sample rate for s3eSound
s3eSoundSetInt(S3E_SOUND_DEFAULT_FREQ, 44100);
We also need to release the sound data on shut down. We do this by adding the following code block to the beginning of the Terminate function to destroy the Sound instances.
// Destroy sound effects
delete gpGunBattleSound;
delete gpFemaleCountingSound;
Finally, add the next code snippet to the end of the Update function, immediately after the end of the last if statement. This will start the sound effects playing in response to the user pressing the correct buttons.
else if (gButton[BUTTON_AUDIO_SFX]->IsReleased())
{
    if (gpGunBattleSound)
        gpGunBattleSound->Play();
}
else if (gButton[BUTTON_AUDIO_SPEECH]->IsReleased())
{
    if (gpFemaleCountingSound)
        gpFemaleCountingSound->Play();
}
Step 3: Stopping Audio Output
If you want to start a piece of audio playing, chances are you'll also eventually want to stop it playing. The code block below illustrates how to do this in Marmalade by having a button in the user interface stop all currently playing audio. Add the following block to the end of the if...else block at the very end of the Update function in main.cpp.
else if (gButton[BUTTON_AUDIO_OFF]->IsReleased())
{
    s3eAudioStop();
    s3eSoundStopAllChannels();
}
The call to s3eAudioStop will stop playback of any compressed audio track that is playing, while s3eSoundStopAllChannels will stop all uncompressed sampled sounds. It is possible to stop sampled sounds on a channel by channel basis, but for the purposes of this app it's fine to stop all channels that are currently active.
5. Integrating the Dolby Audio API
Step 1: Downloading the Dolby Audio API Marmalade Extension
Now that we have an app that can play some sounds, it's time to turn our attention to the Dolby Audio API. As you'll notice, adding support for the Dolby Audio API is incredibly simple and can be done in no more than five minutes.
You first need to obtain the Dolby Audio API Marmalade extension by visiting the Dolby Developer website. After creating a free developer account, you can download the Marmalade extension from the framework tab.
Step 2: Adding the Dolby Audio API to the Project
Extract the Dolby Audio API Marmalade extension archive to a folder on your development machine and find in the extracted Libraries folder for a folder named s3eDolbyAudio. Copy this folder and its contents into our project's DolbyTestApp folder, alongside the source and data folders.
To include the extension in your project, edit the DolbyTestApp.mkb file and add s3eDolbyAudio to the list of subprojects. If you then rebuild the project in Visual Studio, the MKB file will be reprocessed and the Dolby Audio API extension will be added to to the project.
Step 3: Initializing the Dolby Audio API
Before you can use the functionality of the Dolby Audio API, you must first check whether the device your app is running on supports Dolby Digital Plus. To implement the necessary checks, edit main.cpp and add the following #include at the top of the file.
#include "s3eDolbyAudio.h"
Next, declare a global variable named gDolbyInitialised after the declaration of gDolbySupported.
bool gDolbyInitialised;
To check whether Dolby Digital Plus is supported, you can add the following code block to the Initialise function, after the statement gDolbySupported = false;.
if (s3eDolbyAudioAvailable() == S3E_TRUE)
{
    if (s3eDolbyAudioSupported() == S3E_TRUE)
    {
        gDolbySupported = true;
    }
    s3eDeviceYield(0);
}
The first call to s3eDolbyAudioAvailable checks whether the Dolby Audio API extension is supported on the target platform. If the extension is available a call is made to s3eDolbyAudioSupported, which will return S3E_TRUE if the target device supports Dolby Digital Plus. If supported, the gDolbySupported flag is set true.
The call to s3eDeviceYield is to give the device time to perform background processing after doing the Dolby Digital Plus support test. Dolby recommend that you do not initialize Dolby Digital Plus immediately after checking whether it's supported, so the s3eDeviceYield call will help prevent issues during initialization.
At the end of the Initialise function, you can initialize Dolby Digital Plus by calling the s3eDolbyAudioInitialize function. Only if this function returns S3E_TRUE will the gDolbyInitialised flag be set true. The code you need to add is as follows:
// Initialise Dolby API
if (gDolbySupported)
{
    if (s3eDolbyAudioInitialize() == S3E_TRUE)
    {
        gDolbyInitialised = true;
    }
}
You should also shut down the Dolby Audio API when your program terminates, so add the following to the Terminate function, before the call to IwGxTerminate.
// Release resources used by Dolby API
if (gDolbySupported)
{
    s3eDolbyAudioRelease();
}
Step 4: Handling Suspending and Resuming
Since mobile phones and tablets are used for a plethora of tasks, it isn't uncommon for your app to be suspended, either because the user wants to perform a different task or an event such as an incoming call has occurred. Under these conditions the Dolby Audio API should be suspended so that it isn't active whilst your app is paused or running as a background task.
Marmalade allows us to set up some callback functions that will be triggered whenever the app loses or regains focus. To implement these, add the following code to the Initialise function immediately after the check for Dolby Digital Plus support.
// Initialise Pause/Resume callbacks
s3eDeviceRegister(S3E_DEVICE_PAUSE, AppSuspended, NULL);
s3eDeviceRegister(S3E_DEVICE_BACKGROUND, AppSuspended, NULL);
s3eDeviceRegister(S3E_DEVICE_UNPAUSE, AppResumed, NULL);
s3eDeviceRegister(S3E_DEVICE_FOREGROUND, AppResumed, NULL);
You should also remove these callback functions at shut down, so add the following lines to the Terminate function immediately after the delete gpTexture line.
// Disable Pause/Resume callbacks
s3eDeviceUnRegister(S3E_DEVICE_PAUSE, AppSuspended);
s3eDeviceUnRegister(S3E_DEVICE_BACKGROUND, AppSuspended);
s3eDeviceUnRegister(S3E_DEVICE_UNPAUSE, AppResumed);
s3eDeviceUnRegister(S3E_DEVICE_FOREGROUND, AppResumed);
Now you just need to implement the AppSuspended and AppResumed callback functions. Add this code after the declaration of the global variables at the top of main.cpp.
int32 AppSuspended(void* apSystemData, void* apUserData)
{
    if (gDolbyInitialised)
        s3eDolbyAudioSuspendSession();
    return 0;
}

int32 AppResumed(void* apSystemData, void* apUserData)
{
    if (gDolbyInitialised)
        s3eDolbyAudioRestartSession();
    return 0;
}
When the app is suspended or goes into background processing, the AppSuspended callback will be triggered, which calls s3eDolbyAudioSuspendSession if the gDolbyInitialised flag is true. When the app regains focus, AppResumed will be called, which invokes s3eDolbyAudioRestartSession if the Dolby Audio API has been initialized.
Step 5: Using the Dolby Audio API Filters
The final step to integrating the Dolby Audio API is to actually make use of the different audio filters it provides. There are four predefined filters available, which suit different types of audio output, movie, music, voice, and game.
Once the Dolby Audio API is active, pass S3E_TRUE to s3eDolbyAudioSetEnabled to ensure filtering support is switched on followed by a call to s3eDolbyAudioSetProfile. If you want to stop filtering you can do this with a call to s3eDolbyAudioSetEnabled, passing in S3E_FALSE.
Add the following code block to the end of the Update function to enable the bottom row of buttons to switch between the different filter types.
if (gButton[BUTTON_FILTER_OFF]->IsReleased())
{
    if (gDolbyInitialised)
    {
        s3eDolbyAudioSetEnabled(S3E_FALSE);
    }
}
else if (gButton[BUTTON_FILTER_MUSIC]->IsReleased())
{
    if (gDolbyInitialised)
    {
        s3eDolbyAudioSetEnabled(S3E_TRUE);
        s3eDolbyAudioSetProfile(MUSIC);
    }
}
else if (gButton[BUTTON_FILTER_MOVIE]->IsReleased())
{
    if (gDolbyInitialised)
    {
        s3eDolbyAudioSetEnabled(S3E_TRUE);
        s3eDolbyAudioSetProfile(MOVIE);
    }
}
else if (gButton[BUTTON_FILTER_GAME]->IsReleased())
{
    if (gDolbyInitialised)
    {
        s3eDolbyAudioSetEnabled(S3E_TRUE);
        s3eDolbyAudioSetProfile(GAME);
    }
}
else if (gButton[BUTTON_FILTER_VOICE]->IsReleased())
{
    if (gDolbyInitialised)
    {
        s3eDolbyAudioSetEnabled(S3E_TRUE);
        s3eDolbyAudioSetProfile(VOICE);
    }
}
6. Making a Device Build
Step 1: Including the Resource Files
Let's round off by getting the app running on a device. The first step is to ensure that the final deployment package contains all the necessary resource files. Edit DolbyTestApp.mkb and append the following code snippet to the end of the file.
assets
{
    [default]
    (data)
    black-hole.mp3
    female-counting.raw
    gun-battle.raw
    ui.png
}

deployments
{
    name="DolbyTestApp"
    caption="Dolby Test App"

    assets="default"
}
The assets section of an MKB file is used to list the resource files that need to be shipped with the executable in order for the app to run. The format is similar to the files section, using square brackets to make groupings of files and rounded brackets to indicate folder names where files can be found.
The deployments section lets you configure the final installation package. The name parameter lets us specify the file name that will be used for the package file and the caption parameter is used to declare the text that will appear beneath the app icon when it is installed on a device. The assets parameter references one of the groups defined in the assets section, so it is possible to switch between different asset sets should you need to, for example, if you want to create a full and lite version of your app.
Step 2: Making the Installation Package
To create an installation package for the device of your choosing, you must first compile the app source code for the type of processor used by the target device. In most cases, this will be an ARM chip, so you should select the GCC ARM Release option from the Solutions Configurations drop-down menu at the top of the Visual Studio toolbar.
Press F7 to build the app, followed by F5 to launch the Marmalade Deployment Tool.
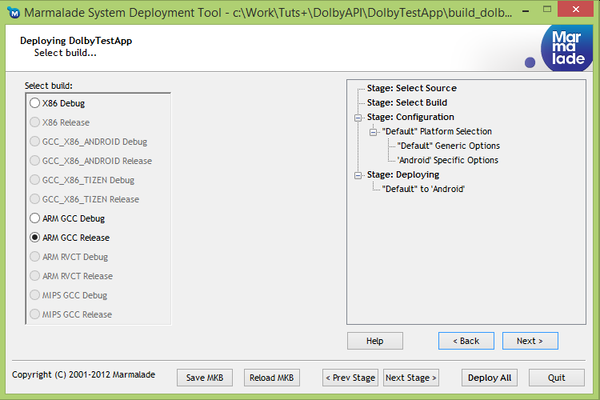
The Marmalade Deployment Tool shows a wizard to create the installation packages. For example, if you want to create an Android build, which will also run on Kindle Fire devices, then you must first choose the build type, ARM GCC Release.
After clicking the Next Stage > button, you will be asked to choose which project configuration you wish to deploy. Check the Default configuration, which is the only configuration of our project, and click the Next Stage > button once more to see a list of platforms supported by your version of Marmalade. Tick the box next to Android and click the Next Stage > button again.
You can now choose what actions to take when creating the installation package. The drop-down menu lets you choose to just create the package, which means you'll need to manually install it on a device, create it and install it on a device connected via USB, or create, install, and run the app on a connected device. For the latter two options to work, you'll need the Android SDK installed on your development machine, because these options make use of the ADB tool, which is part of the Android SDK.
A discussion of how to set up an Android device for development use is beyond the scope of this tutorial, but you can read more about this topic on the Android Developer website.
Conclusion
As you can see, using the Dolby Audio API in a Marmalade app is a very simple process. Most of this tutorial was concerned with setting up the user interface or playing sounds rather than integrating the Dolby Audio API.
If you've written a game or any other kind of app in Marmalade that has rich audio output, then you really should consider adding support for Dolby Digital Plus to give your users the best possible audio experience.

Comments