React is a JavaScript library for building user interfaces that has taken the web development world by storm. However, in a community that favours choice and flexibility, it can be hard to know where to start!
Not to worry—some patterns and modules have emerged as best practices. One of these is Redux for managing application state.
In this video from my course on Modern Web Apps With React and Redux, I'll show you how to use the react-redux package.
It’s a best practice in Redux applications to make a distinction between presentational components and container components. In this video, I’ll explain what these are and how we can use them.
I'll be referring to code we've already created in earlier parts of the course, but you should be able to follow along and see what I'm doing. You can find the full source code for the course on GitHub.
How to Use the react-redux Package
Why Use react-redux?
In earlier parts of this course, we built a sample app using React and Redux. However, almost all of our components need to work with the store, either by reading specific states or by dispatching actions back to the store. Remember, the Redux store holds all the state for your entire application. This means that most, if not all, of our components need to be able to access the store in some way.

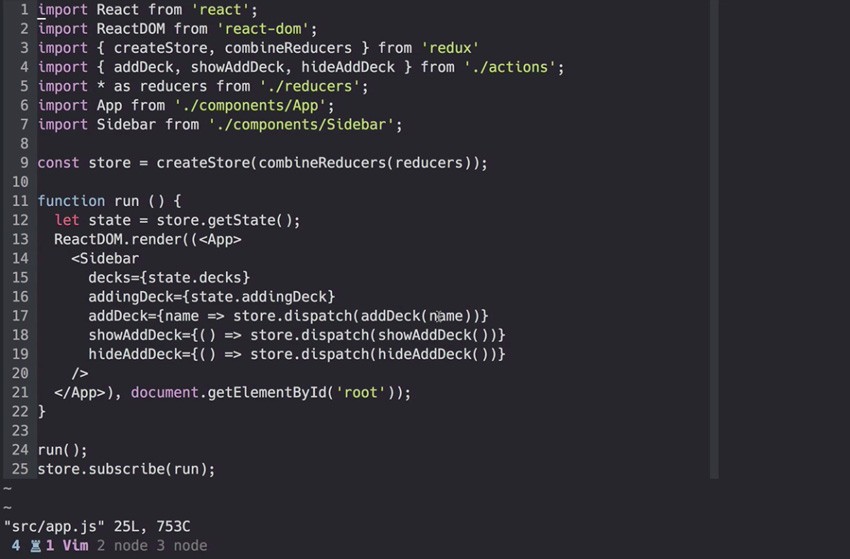
So far, we have a global store object that we can access directly in the section where we are assigning properties to our sidebar.
However, having a global store like this is not great for a lot of reasons. One of the simplest reasons is that it's not actually global—it's only accessible from within this file. That means that we would have to use it from within this file or we'd have to start passing it around from this file to other files, which will become very messy.
Also, if we have a lot of nested components, it means that if an in-between component doesn't really need the store but one of its children does, we'll have to pass it to that in-between component anyway because it needs it so that it can pass it to its child.
Now it would be nice if there was some way we could give all of our components access to the store without having a global variable, and without manually passing it around.
And the truth is, there is a way. We can use a package called react-redux. You can read a little bit more about the ideas behind this package if you head over to the Redux documentation.
How react-redux Works
One of the main ideas behind this package is the idea of presentational components and container components. Basically, we can break our application up into two sets of components.
The first set is the presentational components. These are concerned with how things look. They don't have to be aware of Redux at all. They just read data from their properties, and they can change data by invoking callbacks that we also assign as properties.
Containers, on the other hand, are aware of Redux, and they specifically subscribe to Redux state and dispatch Redux actions. We can create a container component by simply wrapping a presentational component with some of these instructions.
A Practical Example: Splitting the Sidebar's Components
Now let's dive in and see how this can work. We're going to use the sidebar as an example of a component that we can split into presentational and container components.
Now, you might be a bit confused here how we're going to split our sidebar into two separate components. But the truth is that container components are always going to be wrapping presentational components. In fact, often you may have a presentational component that has only one job, and that is to be wrapped by one specific container component. That's exactly what we're going to do with the sidebar.
Install react-redux
Of course, we'll have to start by installing the react-redux library. So let's do npm install --save react-redux.
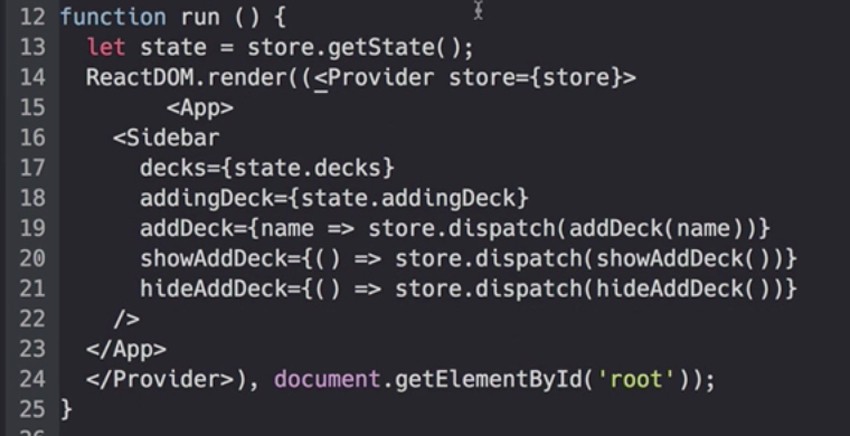
When that has installed, we can go ahead and import it using import { Provider } from 'react-redux'; in our main file, app.js. In this file, we actually only need the provider component given to us by react-redux.
Now, the provider component is actually the part of react-redux that's going to take our store and pass it around to these different components. Actually what happens is, behind the scenes, the provider is using the context feature of React. So if you have a little bit more advanced React experience and you've played around with the context before, that might give you an insight into how exactly the provider is working.
The provider actually makes it really, really simple to use the store everywhere. All we have to do is wrap our top-level application component in a provider component, as shown here:

And now our application is using the react-redux provider.
Use the connect() Function
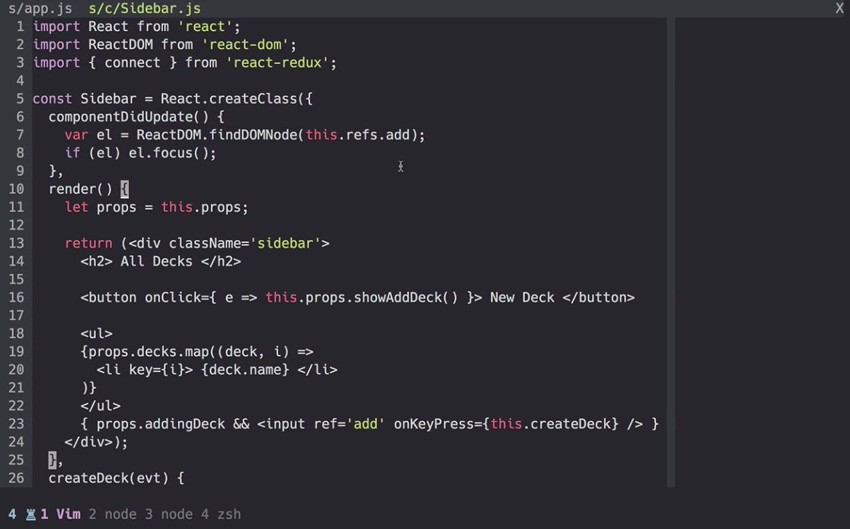
Now let's open up our sidebar file, and let's import the connect() function from react-redux. The connect() function allows us to define exactly what properties and functions we want a container component to have, and then we can take that definition, apply it to a presentational component, and get a complete React component.
Now I understand that sounds a little bit confusing. So let's see how this is done.

The Presentational Component
The beauty of the sidebar that we've already written is that it's actually already a presentational component.
First of all, our sidebar is only really concerned with how things look. It gives us markup styling, of course, and it's not aware of Redux at all. We do have these methods that we call showAddDeck, addDeck, and hideAddDeck, but those methods know about Redux. The sidebar itself doesn't know anything at all about Redux. In fact, if we wanted to take Redux out of this project and use some alternative, we could just change the definitions of these functions, and this sidebar component doesn't have to change at all. It just calls these functions.
How does it read data? Well, it just reads data from properties that we've given it. How about changing data? Well, it just invokes callbacks that are from properties. We have three methods, and when it invokes those, the data is changed in the store. And finally, of course, yes, it is written by hand. And as you'll see in a second, container components will be generated by react-redux.
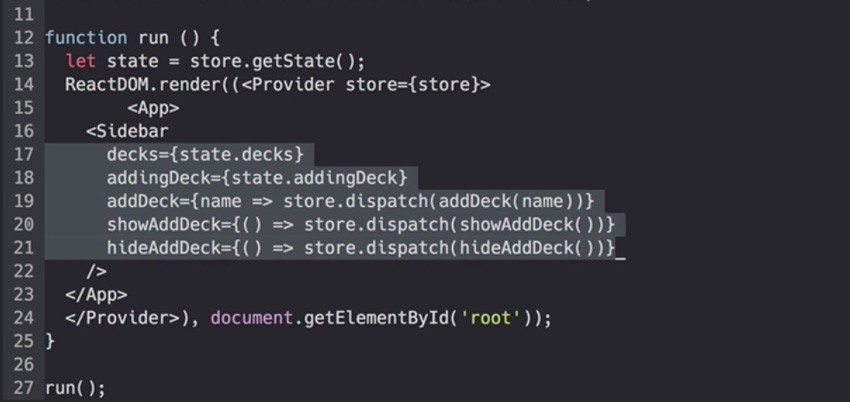
So we already have one of the two pieces we need: this sidebar is a presentational component. The next thing we want to do is take these property definitions that we're giving to the sidebar, and instead of defining them here, we'll define them as part of our container component.
So I'm just going to copy these lines:

And I'm going to paste them at the top here:

Create Mapping Functions
Now these properties are actually nicely split into two sets: the properties that are data, and the properties that are functions to call, which perform actions that change the store.
So what we need to do now is create two functions that will map the state to these properties. Traditionally within React, these functions are called mapStateToProps and mapDispatchToProps.
So let's go ahead and start with mapStateToProps. This is a function that will receive the latest state from the store.
We just need to return an object, which is going to have two properties and, as we already saw, they are the decks and addingDeck properties. So I can actually just copy and paste them in here because this is practically the same data—we just need to convert the syntax to be object literal syntax instead of JSX syntax.

So this is our mapStateToProps function. Basically, it just takes the current state from the store, and it returns whatever data or presentational component will need. So it needs the decks and the addingDeck property, and so we return those within an object.
Clean Up the Code
We can do a few things to clean this up a little bit. First of all, we could actually get rid of these curly braces that are the block for this function because we only have one statement that we're returning. But then, because we only have that one line, we can get rid of the return statement.
However, now we have curly braces around the object literal, and JavaScript is going to think this is a function block, so we'll wrap those in parentheses.
We can shorten this up a little bit more, because we don't need the whole state object, so we can just use the destructuring syntax, and say we just want the decks property and the addingDeck property from this object.
Of course, then, inside this function, we don't say state.decks, we just say decks. And we don't say state.addingDeck, we just say addingDeck. And now I think you can see where we're going with this—because the key and the property have the same name, we can get rid of one of those and we can just say decks and addingDeck.
And this is the shorter version of our function thanks to ES6.

So now what about mapDispatchToProps? Well, this is a function as well, and it's going to take dispatch as its only parameter. Now dispatch, of course, is the store's dispatch function.
Once again, we're just going to return an object literal, so don't forget those parentheses, and inside we need the three properties that we have up at the top: addDeck, showAddDeck, and hideAddDeck. So now we have a function that maps the dispatch function to the three callbacks that we need for a sidebar.

So now we have everything we need to create our container component. We have two functions that will map our state object in our dispatch function to the properties that this function needs. And we have a presentational component that expects these properties.
Now, the connect() function is what we can use to connect these two mapping functions with a presentational component. And what this connect function will return is our container component. We're not actually going to write another component here—instead we pass these three pieces to the connect() function, and it is going to return our container component.
So down at the bottom, instead of exporting sidebar, let's export a call to connect(). We're going to pass it two parameters—the mapStateToProps and mapDispatchToProps functions—and connect() will return a new function.
export default connect(mapStateToProps, mapDispatchToProps)(Sidebar);
Now what's actually exported from this file is not a presentational sidebar but instead it's our new container component, which outside of this function we could still refer to as <Sidebar>.
So that's the react-redux package in action. You can check the course source files on GitHub to see how the code works in full.
Watch the Full Course
In the full course, Modern Web Apps With React and Redux, I'll show you how to get started building modern web apps with React and Redux.
Starting from nothing, you'll use these two libraries to build a complete web application. You'll start with the simplest possible architecture and slowly build up the app, feature by feature. You'll learn about basic concepts like tooling, reducers, and routing. You'll also learn about some more advanced techniques like smart and dumb components, pure components, and asynchronous actions. By the end, you'll have created a complete flashcards app for learning by spaced repetition.
Along the way, you'll get a chance to sharpen your ES6 (ECMAScript 2015) skills and learn the patterns and modules that work best with React and Redux!
You can also build on your knowledge of React with these courses:


Comments