On most WordPress sites, sending email isn't something you spend much time thinking about. The default functionality is just fine: email is sent directly from your web host using PHP's mail functionality, and most of the time, it reaches the recipient just fine.
That said, there are some projects like e-commerce or membership sites, where this is not quite enough: when email is a crucial part of your business, you need to make sure the messages get delivered as reliably and quickly as possible. If you also can track the open and click rates, even better.
In those cases, you need to look into transactional email services such as Mandrill and Postmark. In this tutorial, we will focus on Mandrill: The transactional email sending service developed by the company behind the popular mailing list service, MailChimp. Mandrill is fast and reliable, and best of all, it is free for up to 12,000 messages every month, which means that small web sites and businesses will (almost) never have to pay for the service at all.
In this tutorial, I will first show you how to connect Mandrill with WordPress to make it do all the email sending for us. Then, we will take the integration a step further and replace the standard new user welcome message with a pretty HTML message sent using the Mandrill API.
Requirements for the Mandrill API are as follows:
- PHP 5.2.x or higher
- PHP cURL extension
Let's get started.
Create a WordPress Plugin
When developing new WordPress functionality, the first question to ask yourself is whether what you are building should be a plugin or a part of a theme. Code-wise, both are so similar that you can always go either way. This is why, to answer the question, we need to think about usage: as emailing is something that isn't dependent on the blog theme and the same code can be used on any site and any theme, this functionality seems to be best implemented in a plugin.
To get started, let's create a plugin and insert some basic functionality.
If you don't feel like coding a plugin while reading the tutorial, you can download the entire plugin as a tutorial attachment and go through the tutorial while following the plugin code.
Step 1: Create the Plugin
First, create a directory for the plugin and call it mandrill_emailer.
In this directory, create two PHP files: index.php for the plugin functionality and mandrill_settings.php to hold the settings page for the plugin.
In index.php, add the basic plugin declaration and a line to include the settings page to the plugin. The source file for the settings page, mandrill_settings.php, can still be empty.
<?php
/**
 * Plugin Name: Mandrill Emailer
 * Description: Routes all outgoing email through Mandrill.
 * Author: Jarkko Laine
 * Version: 1.0
*/

require_once "mandrill_settings.php";
?>
Step 2: Download and Include the Mandrill API
In the first step in the Mandrill integration, you won't actually need the API yet. So, if all you are interested in is using Mandrill as an email server and don't care about HTML email and templates, you can skip this step and jump straight to the next section.
However, if you plan to go all the way and use the API to send nice looking email messages, now is as good a time to install the API than any.
You can download the Mandrill API from the download page either as a zip file or using the PHP dependency manager, Composer. A zip file is easy, so unless you are familiar with Composer, just go ahead and download the package, unpack it, then copy its contents (the file Mandrill.php and the sub directory Mandrill) to the plugin directory.
Now that you have placed the Mandrill API library inside the plugin's code base, you still need to include it in the project. To do this, add a new line to index.php, right above the line that imports the Mandrill settings page:
require_once 'Mandrill.php';
require_once 'mandrill_settings.php';
The Mandrill API is now included in the project and we have a basic plugin in place. Go ahead and activate it in WordPress settings if you like (it doesn't do anything yet).
Step 3: Create Settings Page
Before digging into the email functionality, let's do one last setup step and add some content to mandrill_settings.php.
Here's the list of options I have identified as useful for the plugin at this point:
| Option name | Description |
|---|---|
mandrill_emailer_use_mandrill |
A general checkbox for enabling and disabling the Mandrill functionality. |
mandrill_emailer_username |
Your Mandrill user name |
mandrill_emailer_api_key |
Your Mandrill API key |
mandrill_emailer_from_name |
The name to use as the sender (the From header) in email messages sent through Mandrill |
mandrill_emailer_from_email |
The email address to use as the sender (the From header) in email messages sent through Mandrill. |
In addition to these general settings, we will need the names of the Mandrill templates used for sending HTML messages. We will get back to these in a while as we talk about HTML email.
As this tutorial is about email sending rather than settings, I will go through the settings page code only briefly. You can take a closer look at how the page has been constructed by examining the file mandrill_settings.php in the attached download. For a good tutorial about creating settings pages, check out The Complete Guide to the WordPress Settings API series written by Tom McFarlin.
Create a function to initialize the options page and register it as an action with the admin_menu action hook:
add_action( 'admin_menu', 'mandrill_emailer_settings_init' );

/**
 * The action function for initializing the settings page.
 */
function mandrill_emailer_settings_init() {
    add_options_page( __( 'Mandrill Emailer Settings', 'mandrill_emailer' ),
        __( 'Mandrill Emailer', 'mandrill_emailer' ),
        'manage_options',
        'mandrill-emailer',
        'mandrill_emailer_settings_page'
    );

    // Settings sections:
    // - General
    // - Templates

    add_settings_section(
        'mandrill_emailer_setting_section_general',
        __( 'General Settings', 'mandrill_emailer' ),
        'mandrill_emailer_settings_section_callback_general',
        'mandrill-emailer'
    );

    add_settings_section(
        'mandrill_emailer_setting_section_templates',
        __( 'Templates', 'mandrill_emailer' ),
        'mandrill_emailer_settings_section_callback_templates',
        'mandrill-emailer'
    );

    // Settings fields

    add_settings_field(
        'mandrill_emailer_use_mandrill',
        __( 'Use Mandrill for email', 'mandrill_emailer' ),
        'mandrill_emailer_setting_callback_use_mandrill',
        'mandrill-emailer',
        'mandrill_emailer_setting_section_general'
    );
    register_setting( 'mandrill-emailer', 'mandrill_emailer_use_mandrill' );

    add_settings_field(
        'mandrill_emailer_username',
        __( 'Mandrill user name', 'mandrill_emailer' ),
        'mandrill_emailer_setting_callback_username',
        'mandrill-emailer',
        'mandrill_emailer_setting_section_general'
    );
    register_setting( 'mandrill-emailer', 'mandrill_emailer_username' );

    add_settings_field(
        'mandrill_emailer_api_key',
        __( 'Mandrill API key', 'mandrill_emailer' ),
        'mandrill_emailer_setting_callback_api_key',
        'mandrill-emailer',
        'mandrill_emailer_setting_section_general'
    );
    register_setting( 'mandrill-emailer', 'mandrill_emailer_api_key' );

    add_settings_field(
        'mandrill_emailer_from_name',
        __( 'Mandrill "From" name', 'mandrill_emailer' ),
        'mandrill_emailer_setting_callback_from_name',
        'mandrill-emailer',
        'mandrill_emailer_setting_section_general'
    );
    register_setting( 'mandrill-emailer', 'mandrill_emailer_from_name' );

    add_settings_field(
        'mandrill_emailer_from_email',
        __( 'Mandrill "From" email', 'mandrill_emailer' ),
        'mandrill_emailer_setting_callback_from_email',
        'mandrill-emailer',
        'mandrill_emailer_setting_section_general'
    );
    register_setting( 'mandrill-emailer', 'mandrill_emailer_from_email' );

    add_settings_field(
        'mandrill_emailer_new_user_template',
        __( 'New user welcome', 'mandrill_emailer' ),
        'mandrill_emailer_setting_callback_new_user_template',
        'mandrill-emailer',
        'mandrill_emailer_setting_section_templates'
    );
    register_setting( 'mandrill-emailer', 'mandrill_emailer_new_user_template' );
}
Let's go through the key points in the function:
First, on lines 7-12, we create the settings page, making it as a sub menu to the default WordPress Options page. mandrill_emailer_settings_page is the name of a callback function that will do the rendering for the settings page:
function mandrill_emailer_settings_page() {
?>
    <div class="wrap">
        <div id="icon-themes" class="icon32"></div>
        <h2>Mandrill Emailer Settings</h2>

        <?php settings_errors(); ?>

        <!-- Create the form that will be used to render our options -->
        <form method="post" action="options.php">
            <?php settings_fields( 'mandrill-emailer' ); ?>
            <?php do_settings_sections( 'mandrill-emailer' ); ?>
            <?php submit_button(); ?>
        </form>
    </div>
<?php
}
Second, still in mandrill_emailer_settings_init, on lines 18-30, we create two settings sections, one for the general Mandrill settings such as the API key and user name, and one for the names of the templates to be used when sending HTML email. Here too, both settings sections need a callback function to do their rendering:
function mandrill_emailer_settings_section_callback_general() {
    echo '<p>Mandrill API configuration.</p>';
}

function mandrill_emailer_settings_section_callback_templates() {
    echo '<p>Copy template names from Mandrill template definition page.</p>';
}
Finally, the remainder of mandrill_emailer_settings_init is all about creating and registering the actual settings fields one by one.
As an example, here's the definition for the Mandrill API key setting again:
 add_settings_field(
    'mandrill_emailer_api_key',
    __('Mandrill API key', 'mandrill_emailer'),
    'mandrill_emailer_setting_callback_api_key',
    'mandrill-emailer',
    'mandrill_emailer_setting_section_general'
);
register_setting( 'mandrill-emailer', 'mandrill_emailer_api_key' );
And the callback function that renders the input field for the setting:
function mandrill_emailer_setting_callback_api_key() {
    echo '<input name="mandrill_emailer_api_key" id="mandrill_emailer_api_key" '
       . 'class="regular-text" type="text" value="' . get_option( 'mandrill_emailer_api_key' ) . '" />';
}
Check the plugin code (attachment) for the remaining settings. And finally, with all of them in place, here's how the settings page will look like:
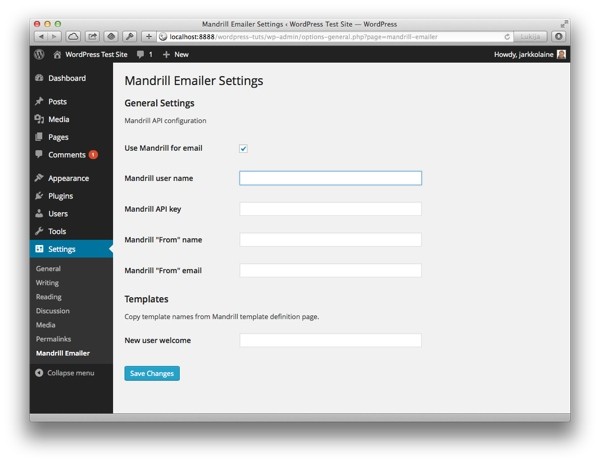
Now, with the plugin and its settings page created, we can finally get to work on Mandrill and email sending.
Let's start by making all outgoing email go through Mandrill.
Use SMTP to Route All Outgoing Email Through Mandrill
If all we worry about is deliverability and tracking, we can get away with a very little code: we just need to route the outgoing email to go through the Mandrill email server. In fact, as I mentioned above, we won't even need the API (We do need two of the settings above however: the API key and username. The From name and email are optional, but nice to have).
SMTP (short for Simple Mail Transfer Protocol) is the standard mail protocol for sending email, used since the dawn of email (first defined in 1982!!). So, sending mail with Mandrill using the SMTP protocol is actually just like sending mail through a regular email service provider.
Here's how you can do that in WordPress.
Step 1: Create Action to Customize PHPMailer Initialization
In WordPress, all email sending is done through the function wp_mail (you can find its definition in pluggable.php). The function does all kind of parameter validation and email formatting and then passes the message to the PHPMailer class that finally sends the message. By default, PHPMailer is configured to send the email using PHP's mail function.
But we are not limited to using the default configuration: WordPress provides an action hook, phpmailer_init that we can use to configure PHPMailer any way we like. In this case, we want to make it use the SMTP protocol and the Mandrill server (smtp.mandrillapp.com, port 587):
/**
 * SMTP configuration to pass all emails (even non-templated ones)
 * through Mandrill.
 */
add_action( 'phpmailer_init', 'mandrill_emailer_phpmailer_init' );
function mandrill_emailer_phpmailer_init( $phpmailer ) {

$phpmailer->isSMTP();
    $phpmailer->SMTPAuth = true;
    $phpmailer->SMTPSecure = "tls";

    $phpmailer->Host = "smtp.mandrillapp.com";
    $phpmailer->Port = "587";

    // Credentials for SMTP authentication
    $phpmailer->Username = get_option("mandrill_emailer_username");
    $phpmailer->Password = get_option("mandrill_emailer_api_key");

    // From email and name
    $from_name = get_option("mandrill_emailer_from_name");
    if ( ! isset( $from_name ) ) {
        $from_name = 'WordPress';
    }

    $from_email = get_option("mandrill_emailer_from_email");
    if ( ! isset( $from_email ) ) {
        // Get the site domain and get rid of www.
        $sitename = strtolower( $_SERVER['SERVER_NAME'] );
        if ( 'www.' == substr( $sitename, 0, 4 )  ) {
            $sitename = substr( $sitename, 4 );
        }

        $from_email = 'wordpress@' . $sitename;
    }

    $phpmailer->From = $from_email;
    $phpmailer->FromName = $from_name;

}
On lines 8-13, we configure PHPMailer to use an authenticated version of the SMTP protocol and specify the Mandrill server's URL and port followed.
On lines 16-17, we retrieve the users user name and password from WordPress options and set pass them to PHPMailer
Finally, we set the From headers using the settings we created earlier. If no value is stored in the settings, the From name and email are generated the same way as in the default wp_mail function, using the site's URL.
Step 2: Find and Store API Credentials
We have now created an action to set up PHPMailer to use Mandrill instead of PHP's mail but before it can function, we need to give it the proper user name and password.
To do this, log in to Mandrill (or create an account if you don't have one yet). Once logged in, click on SMTP & API Credentials in the top right pull down menu:
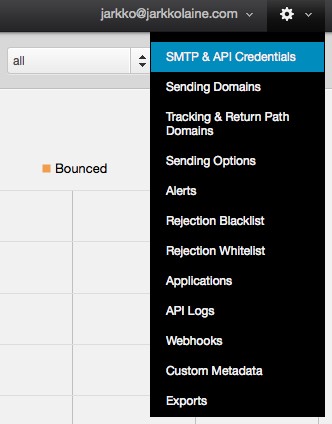
On the SMTP & API Credentials page, create a new API key.
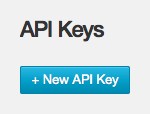
To do this, start by clicking on the + New API Key button. A menu for creating a new API key will appear in its place.
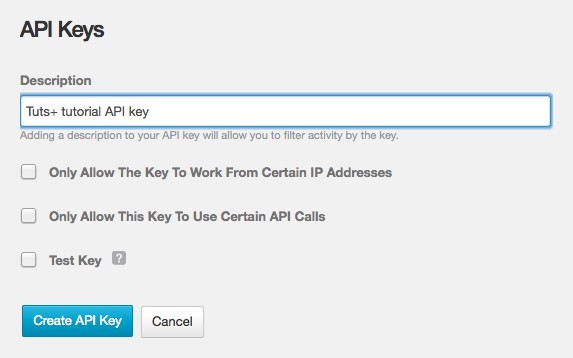
In the menu that appears, enter a description for the API key and click on Create API Key. If you use the API on multiple sites or applications, it's a good practice to create a separate API key for each of them so that if one of them is compromised, you can just disable that API key without affecting the other sites.
The API key is added to the list of API keys. Copy the API key you just created and save it in the WordPress options using in the Mandrill Emailer settings page we created earlier. The email address you use to log in to your Mandrill account is your user name.
With the settings saved, I'm sure you want to test if the email really is delivered by Mandrill rather than your web server. To do this, visit your WordPress blog as a logged out user and leave a comment. Then check your email inbox to see where the new comment notification email came from:

As in the screen shot above shows, at least if you are using Gmail, you will see mandrillapp.com mentioned as the actual sender of the message, identified by the word "via" right after the information you provided as the From name and email in the settings.
The test confirms it: the email messages are now being sent by Mandrill.
But while this ensures deliverability, we can still do better… It’s time to look at templates!
4. Make Email Beautiful Using HTML Templates
Now that we have made WordPress send all of our emails through Mandrill's SMTP server, it's time to take the integration a step further and use the Mandrill API to send HTML email.
Templates are a handy way to separate the design of the email from the code that is used to send it. In our case, this means we can design a HTML template that fits the site theme and branding and store it in a different place outside the plugin code base for easier maintenance. In a bigger project, maybe a designer will work on the HTML while a programmer writes the code.
Now, we will take one of the default email actions in the WordPress flow, the new user welcome message, and replace it with our own HTML email message sent through Mandrill.
Step 1: Create the HTML Email
Let's start by designing the HTML message. I will go through the steps rather quickly, but if you want to learn more about email design, there are great tutorials and courses to learn from here at Tuts+.
Here's a simple sketch I made to plan how the welcome message should be laid out. The message will start with a logo followed by a short welcome text and the account information. On the bottom, there will be a link back to the site:
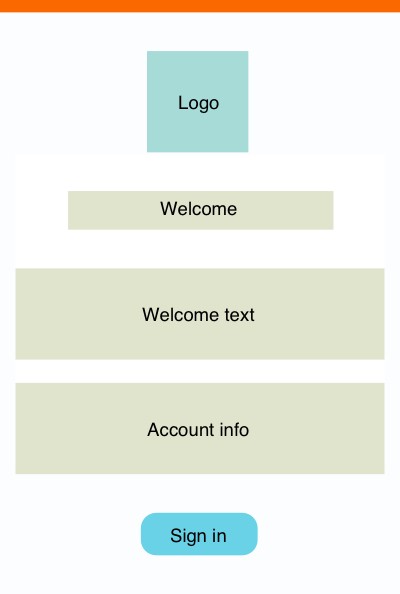
Using the sketch as a guideline, we will now create a basic HTML template.
As you see in the code below, when writing HTML for e-mails, you will need to give up on many of the best practices and write HTML as if it was 1995 again: just go ahead and use tables, inline your CSS and do all the bad things you already left behind long time ago on the web.
Fail to do this and some email recipients won't see the nice design you created for them...
<!DOCTYPE html PUBLIC "-//W3C//DTD XHTML 1.0 Transitional//EN" "http://www.w3.org/TR/xhtml1/DTD/xhtml1-transitional.dtd">
<html xmlns="http://www.w3.org/1999/xhtml">
<head>
<meta http-equiv="Content-Type" content="text/html; charset=UTF-8"/>
<meta name="viewport" content="width=device-width, initial-scale=1.0"/>
<title>Message Title</title>
</head>
<body style="margin:0; padding:0; font-family:Helvetica,sans-serif; font-size:13pt; line-height:150%;">
<table border="0" cellpadding="0" cellspacing="0" width="100%">
<tr>
<td>
<table align="center" border="0" cellpadding="0" cellspacing="0" width="600">
<tr>
<td style="text-align:center; padding:20px 0px 0px 0px; border-top:10px solid #FA6900;">
<img src="https://s3.amazonaws.com/jl-tutsplus/logo.png" width="113" height="116" alt="Logo"/>
</td>
</tr>
</table>
</td>
</tr>
<tr>
<td>
<table align="center" border="0" cellpadding="0" cellspacing="0" width="600"
style="border-collapse:collapse; border:0px; background-color:#ffffff;">
<tr>
<td style="padding: 20px 0 30px 0;">
<table align="center" border="0" cellpadding="0" cellspacing="0" width="520"
style="border-collapse: collapse;">
<tr>
<td style="font-size: 14px; padding: 0px 0px 10px 0px;">
<p style="text-align:center; margin-bottom: 25px;">
<b style="font-size:24px;">Welcome, John!</b>
</p>
<p>
It's great to have you with us!
Here's your account information.
Click on the link below to sign in and edit your account.
</p>
</td>
</tr>
<tr>
<td style="text-align: center;">
<table width="400" border="0" style="border-collapse: collapse; margin: auto;">
<tr>
<th style="text-align: right; border-bottom: 1px solid #A7DBD8; padding: 10px;">User name:</th>
<td style="text-align: left; border-bottom: 1px solid #A7DBD8; padding: 10px;">john_doe</td>
</tr>
<tr>
<th style="text-align: right; border-bottom: 1px solid #A7DBD8; padding: 10px;">Password:</th>
<td style="text-align: left; border-bottom: 1px solid #A7DBD8; padding: 10px;">abc123</td>
</tr>
<tr>
<th style="text-align: right; border-bottom: 1px solid #A7DBD8; padding: 10px;">First name:</th>
<td style="text-align: left; border-bottom: 1px solid #A7DBD8; padding: 10px;">John</td>
</tr>
<tr>
<th style="text-align: right; border-bottom: 1px solid #A7DBD8; padding: 10px;">Last name:</th>
<td style="text-align: left; border-bottom: 1px solid #A7DBD8; padding: 10px;">Doe</td>
</tr>
<tr>
<th style="text-align: right; padding: 10px;">E-mail address:</th>
<td style="text-align: left; padding: 10px;">[email protected]</td>
</tr>
</table>
<p>
</p>
</td>
</tr>
<tr>
<td>
<a href="#login" style="display: block; width: 100px; text-align: center; background-color: #69D2E7; color: #ffffff; text-decoration: none; padding: 15px 30px; border-radius: 5px; margin: auto;">Sign In</a>
</td>
</tr>
</table>
</td>
</tr>
</table>
</td>
</tr>
<tr>
<td>
<table align="center" border="0" cellpadding="0" cellspacing="0" width="600">
<tr>
<td style="text-align: center; padding: 20px; border-bottom: 30px solid #E0E4CC;"> </td>
</tr>
</table>
</td>
</tr>
</table>
</body>
</html>
That's a lot of HTML, but nothing fancy — mostly just nested tables and some lines created with inlined CSS.
When opened in a web browser, our HTML template looks pretty nice. But we still have work to do: all the information shown in the template is hard-coded and needs to be replaced with variables.
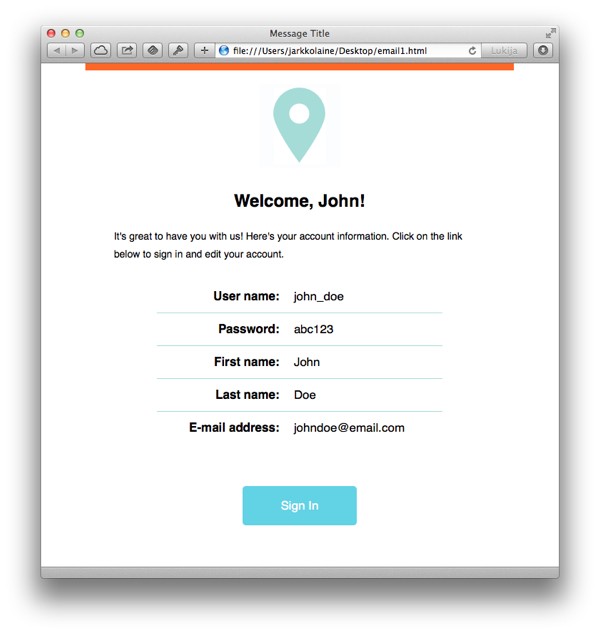
Step 2: Place the Variables in the Template
With the HTML template designed, our next task is to mark the sections that will change from one message to the other:
- First name
- Last name
- User name
- E-mail address
- Sign in link
In Mandrill templates, you can mark variable content in two ways (both are also used in MailChimp templates, so if you have ever developed a newsletter template, you have seen these already):
| Format | How it works? |
|---|---|
*|VARIABLE|* |
Using this notation, you can embed variables anywhere inside the template. Useful for embedded text into lines of text. This is also the only way to include variables to the plain text message. |
mc:edit="VARIABLE" |
This notation can be used in HTML elements to define that the contents of the element will be replaced by the value passed in VARIABLE.Useful when you need to change longer blocks of content, even passing in some HTML. |
Now, let's go through the pieces in the HTML that we want to change to variables.
First, the header. Here we want to use the first name of the user who just registered. Create a "merge variable" and call it FIRST_NAME:
<p style="text-align:center; margin-bottom: 25px;">
    <b style="font-size:24px;">Welcome, *|FIRST_NAME|*</b>
</p>
The welcome text is something that is best kept in the template to make it easier to update, so the next place for variables is in the table containing the account information.
Put in the variables USER_NAME, PASSWORD, FIRST_NAME, LAST_NAME and EMAIL:
<table width="400" border="0" style="border-collapse: collapse; margin: auto;">
    <tr>
        <th style="text-align: right; border-bottom: 1px solid #A7DBD8; padding: 10px;">User name:</th>
        <td style="text-align: left; border-bottom: 1px solid #A7DBD8; padding: 10px;">*|USER_NAME|*</td>
    </tr>
    <tr>
        <th style="text-align: right; border-bottom: 1px solid #A7DBD8; padding: 10px;">Password:</th>
        <td style="text-align: left; border-bottom: 1px solid #A7DBD8; padding: 10px;">*|PASSWORD|*</td>
    </tr>
    <tr>
        <th style="text-align: right; border-bottom: 1px solid #A7DBD8; padding: 10px;">First name:</th>
        <td style="text-align: left; border-bottom: 1px solid #A7DBD8; padding: 10px;">*|FIRST_NAME|*</td>
    </tr>
    <tr>
        <th style="text-align: right; border-bottom: 1px solid #A7DBD8; padding: 10px;">Last name:</th>
        <td style="text-align: left; border-bottom: 1px solid #A7DBD8; padding: 10px;">*|LAST_NAME|*</td>
    </tr>
    <tr>
        <th style="text-align: right; padding: 10px;">E-mail address:</th>
        <td style="text-align: left; padding: 10px;">*|EMAIL|*</td>
    </tr>
</table>
Finally, include the link to sign in to the site (LOGIN_URL):
<a href="*|LOGIN_URL|*" style="display: block; width: 100px; text-align: center; background-color: #69D2E7; color: #ffffff; text-decoration: none; padding: 15px 30px; border-radius: 5px; margin: auto;">Sign In</a>
And that's it. The template is ready to be used.
Step 4: Upload the Template to Mandrill
Now that we have created our HTML template, let's upload it to Mandrill so that we can start sending it to our new users.
To create a new template in Mandrill, start by choosing the item Templates from the drop-down menu Outbound:
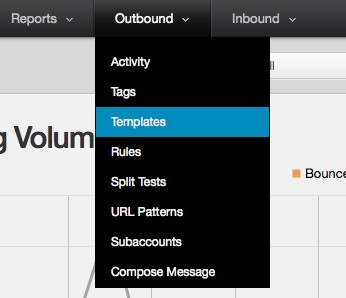
On the next page, you will be asked to name your template. The final ID of the template will be built using this name and cannot be changed, so take a while to think about what you want to call the template. I'm calling mine "Tutsplus New User Welcome", which will be tutsplus-new-user-welcome when turned into an ID.
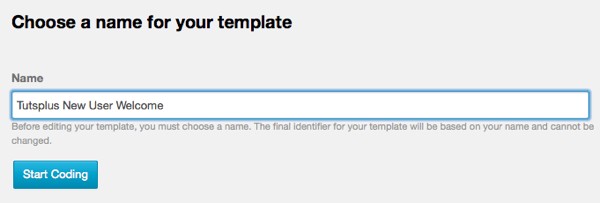
Click on Start Coding.
Now, you get to enter your HTML. Copy and paste the HTML template to the big text field on the right:
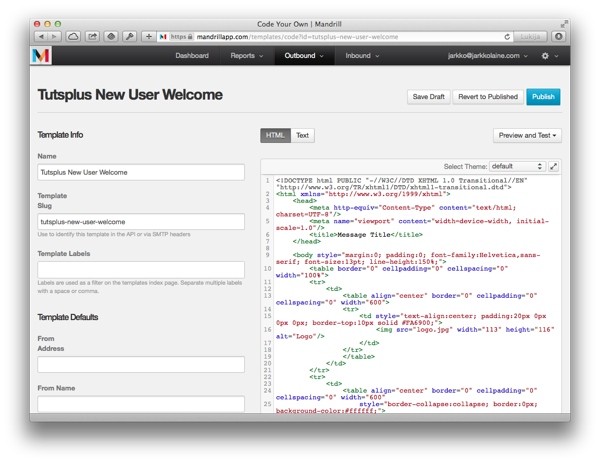
Save the template using the Save Draft button.
Step 5: Include a Text-Only Version
Although most email clients handle HTML email alright, there are still some luddites out there who only want to read their emails in plain text. To make sure that even those users get our messages OK, we need to remember to create a plain text version of the template.
To do this, use the Text tab on the template edit page in the Mandrill admin:

Other than the fact that you cannot use HTML in the plain text version, things are pretty much the same as earlier. Using the same template tags as above, let's create a plain text template:
Welcome, *|FIRST_NAME|*!

It's great to have you with us! Here's your account
information. Click on the link below to sign in and
edit your account.

User name: *|USER_NAME|*
Password: *|PASSWORD|*
First name: *|FIRST_NAME|*
Last name: *|LAST_NAME|*
E-mail address: *|EMAIL|*

Sign in:
*|LOGIN_URL|*
Save the template and make it available to the plugin by clicking on Publish. Copy the template ID and save it in the plugin's settings.
And now, we are all set for sending the message. It's time to write some code.
Make WordPress Send the HTML Message
Now that we have created our HTML template and uploaded it to Mandrill, it's time to use it. To do this, we will first create a function to make the API call and then replace the WordPress new user notification functionality to use the new function.
Step 1: Create a Function for Sending E-mail Using the Mandrill API
Let's start by creating the function that will send an email message through the Mandrill API using a HTML template.
/**
 * Function for sending templated email messages through Mandrill API.
 *
 * @param string    $to			The recipient's e-mail address
 * @param string	$to_name	The recipient's name
 * @param string	$template	The name of the HTML template to use
 * @param string	$subject	The subject of the e-mail message
 * @param array		$data		The data for the template fields
 */
function mandrill_send_mail( $to, $to_name, $template, $subject, $data ) {
    try {
        // Init Mandrill API
        $mandrill = new Mandrill( get_option( 'mandrill_emailer_api_key' ) );

        // From email and name
        $from_name = get_option( 'mandrill_emailer_from_name' );
        if ( ! isset( $from_name ) ) {
            $from_name = 'WordPress';
        }

        $from_email = get_option( 'mandrill_emailer_from_email' );
        if ( ! isset( $from_email ) ) {
            // Get the site domain and get rid of www.
            $sitename = strtolower( $_SERVER['SERVER_NAME'] );
            if ( substr( $sitename, 0, 4 ) == 'www.' ) {
                $sitename = substr( $sitename, 4 );
            }

            $from_email = 'wordpress@' . $sitename;
        }

        // Message recipient and contents
        $mandrill_to = array( array( 'email' => $to, 'name' => $to_name, 'type' => 'to' ) );

        $message = array(
            'subject' => $subject,
            'from_email' => apply_filters( 'wp_mail_from', $from_email ),
            'from_name' => apply_filters( 'wp_mail_from_name', $from_name ),
            'to' => $mandrill_to,

            // Pass the same parameters for merge vars and template params
            // to make them available in both variable passing methods
            'global_merge_vars' => $data
        );

        $result = $mandrill->messages->sendTemplate( $template, $data, $message );

        return true;
    } catch( Mandrill_Error $e ) {
        echo 'A mandrill error occurred: ' . get_class( $e ) . ' - ' . $e->getMessage();
        return false;
    }
}
And now, let's go through the code above in some detail.
First, on line 13, we initialize the Mandrill API. The API key is retrieved from WordPress options.
On lines 15-30 you will find the same functionality for setting the sender information that we already implemented in the SMTP email configuration. (This would be a good place for some refactoring by moving the from_email and from_name parsing into their own functions...).
From there, we move on to creating an array of email recipients (line 33). If you were sending to more than one recipient, you could add them to the array like this:
$mandrill_to = array(
    array('email' => $to, 'name' => $to_name, 'type' => 'to'),
    array('email' => $to_2, 'name' => $to_name_2, 'type' => 'to'),
    // etc...
);
Then, with the data now formatted correctly, we put it all together (lines 35-44) and collect the parameters into an array we named $message. Most of the array is self-explanatory, but the last parameter requires some explanation.
This is one of two places where we pass our variable data to the template. As you remember from the template we created above, a Mandrill template can contain two kinds of fields for placing the variable data. To keep things simple for the designer, we send the same set of variables for both options, first here as global_merge_vars and then again on line 46 as the second parameter to the email sending function sendTemplate.
These are the bare bones of using the API method sendTemplate, and all we need for the functionality created in this tutorial. For the rest of the available parameters, check out the API documentation. One of the more interesting ones is merge_vars (which allows sending recipient specific parameters — useful when sending email to multiple users at once).
Step 2: Replace the Notifications Function
One of the nice (and not too well known) features in WordPress from a plugin developers point of view is that every function defined in pluggable.php can be replaced in a plugin. If a function is defined in a plugin, that version of the function will be used instead of the one from WordPress core.
This is a powerful feature and you need to be careful with it (if many plugins started doing this all at once, it could lead to unwanted side effects) but it is also just what we need for what we are doing.
The email notifications when a new user is added are sent in the function wp_new_user_notification. So, that is the one we need to replace with our own function, if we want to send our own welcome message through Mandrill.
To do this, in index.php, add the following function:
/**
 * Email login credentials to a newly registered user.
 *
 * A new user registration notification is also sent to admin email.
 *
 * @since 2.0.0
 *
 * @param int    $user_id        User ID.
 * @param string $plaintext_pass Optional. The user's plaintext password. Default empty.
 */
function wp_new_user_notification( $user_id, $plaintext_pass = '' ) {
    $user = get_userdata( $user_id );

    // The blogname option is escaped with esc_html on the way into
    // the database in sanitize_option we want to reverse this for the plain
    // text arena of emails.
    $blogname = wp_specialchars_decode( get_option( 'blogname' ), ENT_QUOTES );

    // To keep things simple, we still send the admin notification
    // through wp_mail just as in the default version
    $message  = sprintf( __( 'New user registration on your site %s:' ), $blogname ) . "\r\n\r\n";
    $message .= sprintf( __( 'Username: %s' ), $user->user_login ) . "\r\n\r\n";
    $message .= sprintf( __( 'E-mail: %s' ), $user->user_email ) . "\r\n";

    @wp_mail( get_option( 'admin_email' ), sprintf( __( '[%s] New User Registration' ), $blogname ), $message );

    // Send welcome e-mail to new user
    $email_params = array(
        array( 'name' => 'BLOGNAME', 'content' => $blogname ),
        array( 'name' => 'USER_NAME', 'content' => $user->user_login ),
        array( 'name' => 'EMAIL', 'content' => $user->user_email ),
        array( 'name' => 'FIRST_NAME', 'content' => $user->first_name ),
        array( 'name' => 'LAST_NAME', 'content' => $user->last_name ),
        array( 'name' => 'PASSWORD', 'content' => $plaintext_pass ),
        array( 'name' => 'LOGIN_URL', 'content' => wp_login_url() ),
    );

    $template = get_option( 'mandrill_emailer_new_user_template' );
    $subject = sprintf( __( '[%s] Your username and password' ), $blogname );

    $to_name = $user->first_name . " " . $user->last_name;
    mandrill_send_mail( $user->user_email, $to_name, $template, $subject, $email_params );
}
The first part of the function is exactly the same as the original from pluggable.php (lines 12-25). That block of code sends a notification about the new user to the administrator.
After this, things get more interesting.
Now, instead of sending a message through wp_mail like we do when sending the admin notification, to send the welcome message, we use mandrill_send_mail and the template we just created.
The most interesting piece in this function is the section on lines 28-36 where we initialize the parameters meant to be used in the HTML template. The parameters are passed as an array containing arrays, each array representing one variable:
array( "name" => "BLOGNAME", "content" => $blog_name )
As you see above, a variable definition is stored as an array consisting of two elements: the name of the variable (name) and the text that will replace it in the template (content).
Step 3: Test
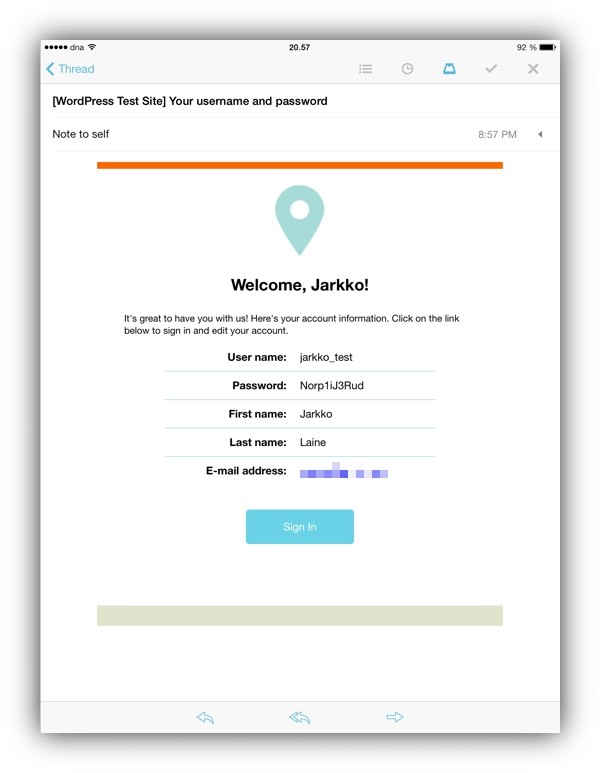
Now, the functionality is in place so let's give it a try: In the WordPress admin, use the Users > Add New menu to create a new user. Make sure to choose an email address you have access to so that you will receive the welcome email and can inspect it.
Create the new user and wait for a welcome email. It should appear quickly and look like this:
What's Next?
We have now successfully built a WordPress plugin that routes all outgoing email communication through Mandrill and created an HTML email template to send a nice and user friendly welcome message to new members who register to the site.
The next natural step in expanding the plugin would be to add similar templates to all other WordPress messaging actions. First for the admin notification about the new user that we still left untouched and then the three other messaging functions in pluggable.php: wp_notify_postauthor, wp_notify_moderator and wp_password_change_notification.
Another idea for further development would be to improve the plugin's error handling: While you can always use the Mandrill admin page to track the delivery and to find out if some of your outgoing messages failed to reach the user (for example if he mistyped his email address), Mandrill also provides a set of web hooks that you can use to let Mandrill notify your WordPress site of those events. Implementing a web hook is out of the scope of this tutorial, but a good way to have more visibility into what happens to your email once it has been sent.
Finally, you could also use the email scheduling functionality in Mandrill (a paid feature) to create something like an auto responder to remind the user about your site, for example one week after the registration.
Happy emailing!


Comments