
Introduction
Regardless how simple we try to make our web applications, it's often helpful to guide new users through their first experience. Visual tours are likely the easiest way.
If you've followed my Envato Tuts+ Building Your Startup With PHP series, you're familiar with Meeting Planner. After watching users scheduling their first meeting, I decided it would be best to build some kind of guide.
At first, I considered building it myself, but then I found an open-source option, Shepherd.
In today's tutorial, I'll introduce you to building a visual user tour with Shepherd. Using Shepherd is relatively straightforward, and I'll review some of my own code that I used to streamline the authoring process.
Shepherd is an open-source offering from HubSpot, an inbound marketing service. Kudos to them for offering a robust library with good documentation.
I do participate in the comment threads below, so please feel free to ask questions and share your feedback. I'd especially be interested in your experience with other visual tour guide solutions. You can also reach me on Twitter @lookahead_io.
How Shepherd Works
Let's walk through a simple scenario for Shepherd.
Integrating a basic tour with Shepherd to your application is straightforward. First, you choose a theme file and integrate their JavaScript like this:
<link rel="stylesheet" href="shepherd-theme-arrows.css" />
<script src="tether.min.js"></script>
<script src="shepherd.min.js"></script>
You can download the files from the Shepherd GitHub page. I'm using the shepherd-theme-arrows.css above, but you can choose from any of the defaults below and customize them:
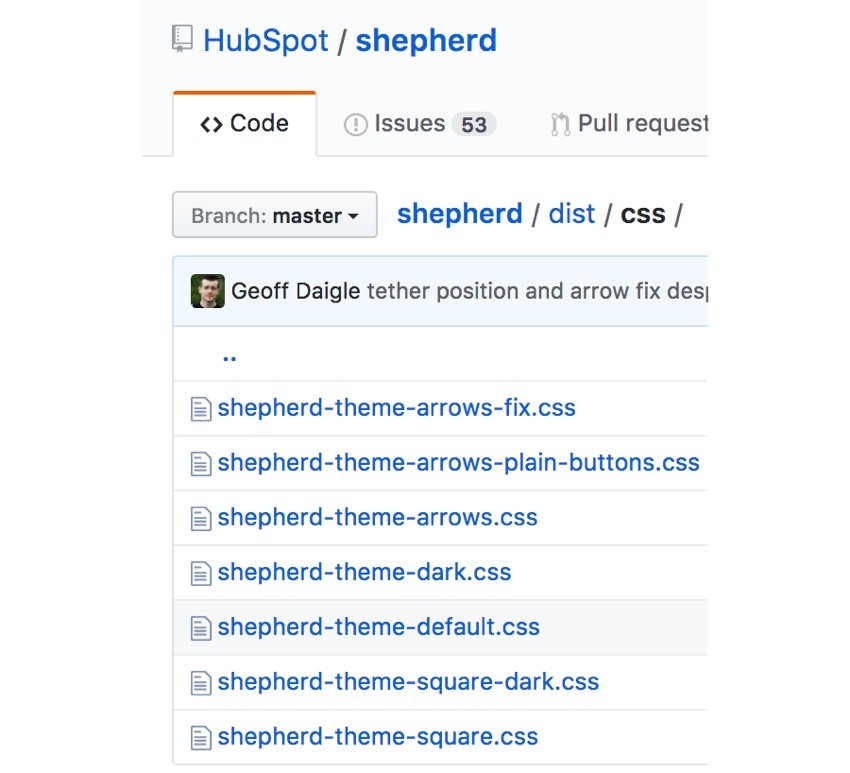
Next, you create a tour object:
var tour;

tour = new Shepherd.Tour({
  defaults: {
    classes: 'shepherd-theme-arrows',
    scrollTo: true
  }
});
The defaults can be defined for all steps when you create the tour. The classes refer to the theme definitions you used, e.g. shepherd-theme-arrows. And scrollTo helpfully ensures all steps appear in the visible viewport.
Then, you add individual steps to the tour:
tour.addStep('example-step', {
  text: 'This step is attached to the bottom of the <code>.
         example-css-selector</code> element.',
  attachTo: '.example-css-selector bottom',
  classes: 'example-step-extra-class',
  buttons: [
    {
      text: 'Next',
      action: tour.next
    }
  ]
});
The text is what appears in the body of the visual tour. attachTo points to a CSS selector for the item you want the tour popup to point to in this step. The buttons allow you to define one or more buttons and their actions, e.g. Next.
And finally, you start the tour:
tour.start();
Shepherd builds on Tether, another HubSpot open-source offering, which helps position elements to other elements on a page. Tether makes sure your steps never overflow the screen or get cropped.
While I didn't have any problems with Tether, I did find problems with Shepherd not properly displaying arrows on some elements. This occurred randomly, and I'm not the only one with this problem. The HubSpot team has not responded to any of my GitHub requests after two weeks, which is a bit disappointing. Still, Shepherd is overall a great JavaScript library.
Integrating Tether Into Your Own Application
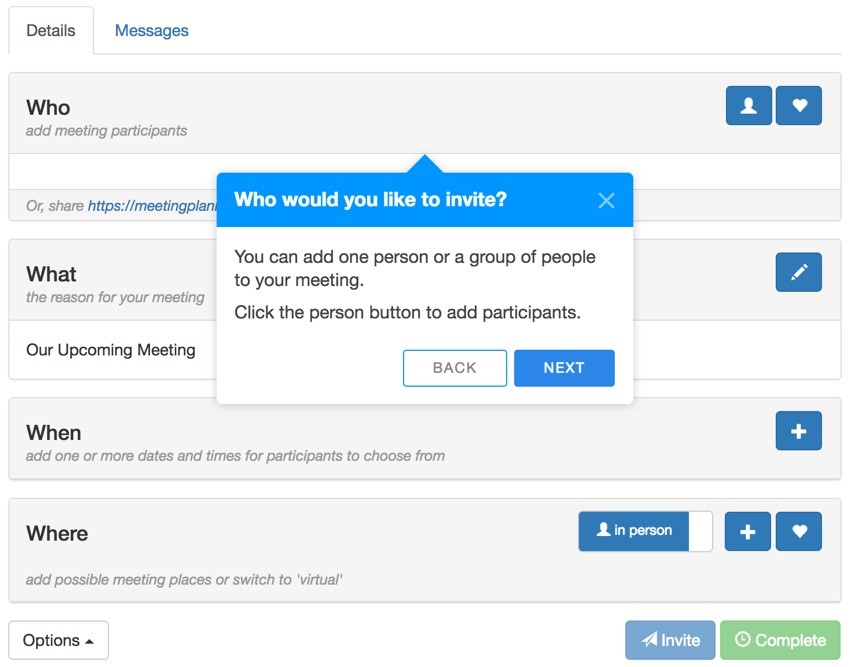
As I began experimenting with Shepherd, I discovered quickly that authoring a guide with many steps could get fairly lengthy. This is something I addressed in my own implementation.
I didn't want to author the tour with a lengthy bundle of JavaScript code which would need to be maintained over time. Instead, I chose to create an array and programmatically customize the buttons based on whether users were at the beginning or the end of the tour.
For example, I create a steps[] array and defined the tour by populating the array:
var tour;
var steps =[];
steps.push(['.nav-tabs top','Welcome','Allow me to show you how to plan a '+title+'. <p>If you prefer, you can <a href="javascript::return false;" onclick="turnOffGuide();">turn off this guide</a>.<br /><br />']);
steps.push(['#headingWho top','Who would you like to invite?','You can add one person or a group of people to your '+title+'. <p>Click the person button to add participants.</p>']);
steps.push(['#invitation-url bottom','Inviting by email','Alternately, you can email the meeting link to your participant(s)']);
steps.push(['#headingWhat bottom','What is your meeting about?','You can customize the subject of your '+title+'. We\'ll use it for the invitation and reminder emails.<p>Click the pencil button to edit the subject.</p>']);
if ($('#headingActivity').length>0) {
  steps.push(['#headingActivity top','What do you want to do?','You can suggest one or more activity ideas. With multiple ideas, your participants can help you select their favorite. <p>Click the plus button to suggest activities.</p>']);
}
steps.push(['#headingWhen top','When do you want to meet?','Suggest one or more dates and times for your '+title+'. With more than one, your participants can help you choose. <p>Click the + button to add them.</p>']);
steps.push(['#headingWhere top','Where do you want to meet?','Suggest one or more places for your '+title+'. With multiple places, your participants can help you choose. <p>We use Google Places to simplify adding them. Click the + button to begin.</p>']);
steps.push(['.virtualThing top','Is this a virtual meeting?','Switch between <em>in person</em> and <em>virtual</em> '+title+'s such as phone calls or online conferences.']);
steps.push(['#actionSend top','Sending invitations','Scheduling is collaborative. After you add times and places, you can <strong>Invite</strong> participants to select their favorites. <em>A place isn\'t necessary for virtual '+title+'\s.</em>']);
steps.push(['#actionFinalize right','Finalizing the plan','Once you choose a time and place, you can <strong>Complete</strong> the plan. We\'ll email the invitations and setup reminders.']);
steps.push(['#tourDiscussion left','Share messages with participants ','You can write back and forth with participants on the <strong>Messages</strong> tab. <p>Messages are delivered via email.</p>']);
steps.push(['.container ','Ask a question','Need help? <a href="'+$('#url_prefix').val()+'/ticket/create">Ask a question</a> and we\'ll respond as quickly as we can. <p>If you prefer, you can <a href="'+$('#url_prefix').val()+'/user-setting?tab=guide">turn off the guide</a> in settings.</p>']);
Each array element that I added included three items:
- The CSS visual element this step points to and where, e.g.
'#headingWho top' - Text for the header, e.g.
'When do you want to meet?' - Text for the instruction
Maintaining this array was much simpler for me than defining buttons for every single step of the tutorial. However, this meant that I needed to programmatically define buttons as I loaded the steps into the tour.
I wrote this code to add and respond to buttons for the tour properly. With each step, it creates a button array, which I would otherwise have to define manually:
for (i = 0; i < steps.length; i++) {
  buttons=[];
  // no back button at the start
  if (i>0) {
    buttons.push({
      text: 'Back',
      classes: 'shepherd-button-secondary',
      action: function() {
        return tour.back();
      }
    });
  }
  // no next button on last step
  if (i!=(steps.length-1)) {
    buttons.push({
      text: 'Next',
      classes: 'shepherd-button-primary',
      action: function() {
        return tour.next();
      }
    });
  } else {
    buttons.push({
      text: 'Close',
      classes: 'shepherd-button-primary',
      action: function() {
        return tour.hide();
      }
    });
  }
For example, the first step has no Back button, and the last step has no Next button. But the last step does have a Close button.
Then, each step from my array and each button array is added to the tour.
tour.addStep('step_'+i,{
    text: steps[i][2],
    title: steps[i][1],
    attachTo: steps[i][0],
    //classes: 'shepherd shepherd-open shepherd-theme-arrows shepherd-transparent-text',
    buttons: buttons,
  });
Using this approach, I didn't have to repeatedly redefine the same buttons for every step of my tutorial. It also offers some programmatic ability to customize the tour dynamically for the future.
Using Yii, my chosen PHP programming framework, I added necessary include files to my asset file. This gets loaded on particular pages where the tour is needed. In my case, the meeting scheduling page:
<?php
namespace frontend\assets;
use yii\web\AssetBundle;

class MeetingAsset extends AssetBundle
{
    public $basePath = '@webroot';
    public $baseUrl = '@web';
    public $css = [
      ...
      'css/shepherd-theme-arrows.css',
    ];
    public $js = [
      'js/meeting.js',
      ...
      'js/tether.min.js',
      'js/shepherd.min.js',
      'js/meeting_tour.js',
    ];
    ...
You'll see above the CSS for the Shepherd theme and the JavaScript for Tether, Shepherd and my tour definition file, meeting_tour.js.
I also added CSS to control the overall width of my tour popup to 40% of the viewport:
.shepherd-element.shepherd-theme-arrows {
  max-width: 40%;
}
You can watch the example tour video above or at Vimeo. If you'd like to try it yourself, sign up at Meeting Planner and you'll be immediately taken to the scheduling tour.
Other Things to Consider
Turning Off the Visual Tour
I created a user setting for people to quickly turn off the tour. Rather than include a distracting Off button on every step, I added a link to turn off the guide on the first and last steps of the tour:
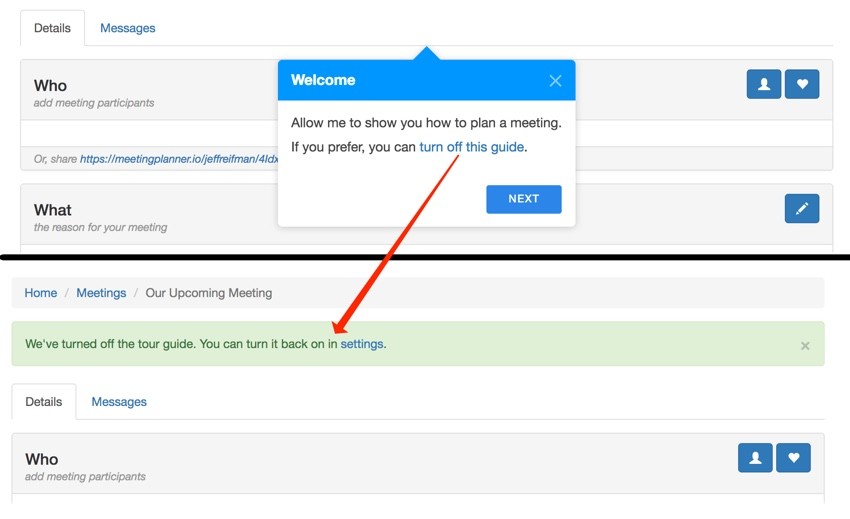
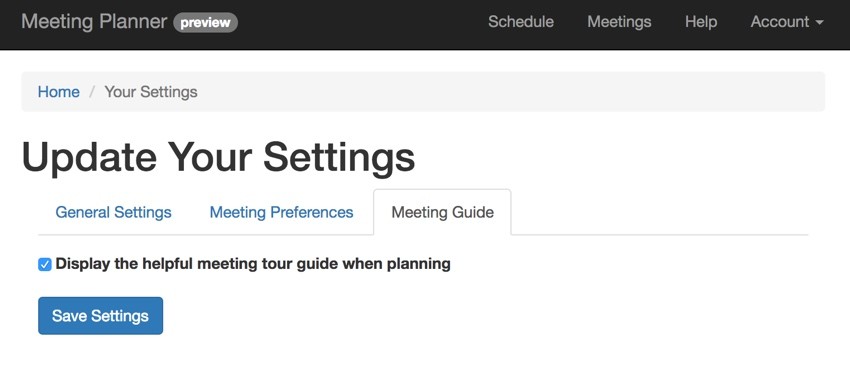
Turning it off happens interactively via AJAX and displays a helpful link to the settings page below. This helps new users easily find how to turn the tour back on:
Shepherd's Advanced Capabilities
I've just been showing you the basics of Shepherd and how to integrate it quickly into your web application. So far, it's worked well for me aside from the occasional problems with arrows. However, Shepherd offers a lot more than I've reviewed, specifically around event processing and management. This allows you to adapt your tour to your application and the user's current state in a more customized way. They have very good documentation too.
For example, if a user jumps to some area of your web page, you can have the event automatically trigger a jump to another step of the tour. I might dive into this in a future tutorial.
In Closing
I hope you've enjoyed learning about Shepherd. It certainly is a visually polished, developer-friendly visual tour that you can quickly integrate into any application.
Please share your experience with Shepherd and other visual tour libraries in the comments. And feel free to ask questions.
You can also always reach me on Twitter @lookahead_io directly. If you'd like to read more of my Envato Tuts+ tutorials, here are a few interesting ones:
 TwitterBuilding With the Twitter API: Creating Friends to Follow
 PHPBuilding Your Startup: Increasing Security
 PHPUpgrading Your Linux Server to PHP 7.0
Related Links
- Shepherd Tour
- Shepherd on GitHub
- Meeting Planner (create your first meeting to see the visual tour)


Comments