In the first part of this tutorial, I introduced you to the HealthKit framework. Based on my own experience of integrating HealthKit in one of my apps, I've pointed out a few things that are important to keep in mind. We've also started working on our sample app, HealthBasics, which will explain the basic concepts of working with HealthKit.
In the first part, we implemented the GSHealthKitManager class, which we'll use to interact with HealthKit. Let's now use the GSHealthKitManager class to implement the functionality of the first view controller of the sample app.
1. Implementing the First View Controller
In the Project Navigator, open FirstViewController.m and replace its contents with the following:
#import "FirstViewController.h"
#import "GSHealthKitManager.h"

@interface FirstViewController ()

@property (nonatomic, weak) IBOutlet UILabel *ageLabel;
@property (nonatomic, weak) IBOutlet UITextField *weightTextField;

@end


@implementation FirstViewController

- (IBAction)healthIntegrationButtonSwitched:(UISwitch *)sender {

    if (sender.isOn) {
        [[GSHealthKitManager sharedManager] requestAuthorization];
    } else {
        // Possibly disable HealthKit functionality in your app.
    }
}

- (IBAction)readAgeButtonPressed:(id)sender {

    NSDate *birthDate = [[GSHealthKitManager sharedManager] readBirthDate];

    if (birthDate == nil) {
        // Either user didn't set the date, or an error occured. Simply return.
        return;
    }

    NSDateComponents *ageComponents = [[NSCalendar currentCalendar]
                                       components:NSCalendarUnitYear
                                       fromDate:birthDate
                                       toDate:[NSDate date]
                                       options:0];

    self.ageLabel.text = [@(ageComponents.year) stringValue];
}

- (IBAction)writeWeightButtonPressed:(id)sender {
    [[GSHealthKitManager sharedManager] writeWeightSample:self.weightTextField.text.floatValue];
}

@end
If you have some iOS development experience, then the implementation shouldn't be difficult to understand. In the first view controller, we respond to the user toggling the switch and tapping one of the buttons. Each of these interactions triggers a method of the GSHealthKitManager class.
There's a reason why I've chosen to use a switch to ask the user's permission to access their HealthKit data. Once you understand the implementation, you'll understand that it's a much better solution.
It's easy for the user to understand that, when the switch is on, the app integrates with HealthKit. When it's off, it doesn't. In addition to that, turning this switch on for the first time will prompt the user to grant access to the health data types the app will use. This, again, is a good user experience, because the user understands why she is prompted and what benefits she gets by permitting access.
2. Connecting the User Interface
In the Project Navigator, open Main.storyboard. In the first scene, select the switch. In the Utilities pane on the right, open the Connections Inspector and, in the Sent Events section, drag from Value Changed to the First View controller in the Document Outline. From the pop-up menu that lists the actions of the view controller, select healthIntegrationButtonSwitched:. This ensures the healthIntegrationButtonSwitched: method is called whenever the switch is toggled.
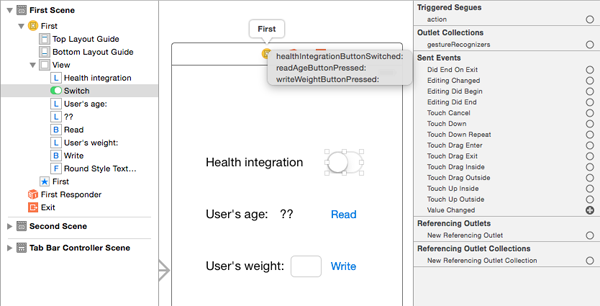
The steps to connect the Read and Write buttons are almost identical. Click the Read button, only this time, drag from the Touch Up Inside event to the First View Controller. Select the readAgeButtonPressed: action from the pop-up menu.
Click the Write button and drag from the Touch Up Inside event to the First View Controller, select the writeWeightButtonPressed: method from the pop-up menu.
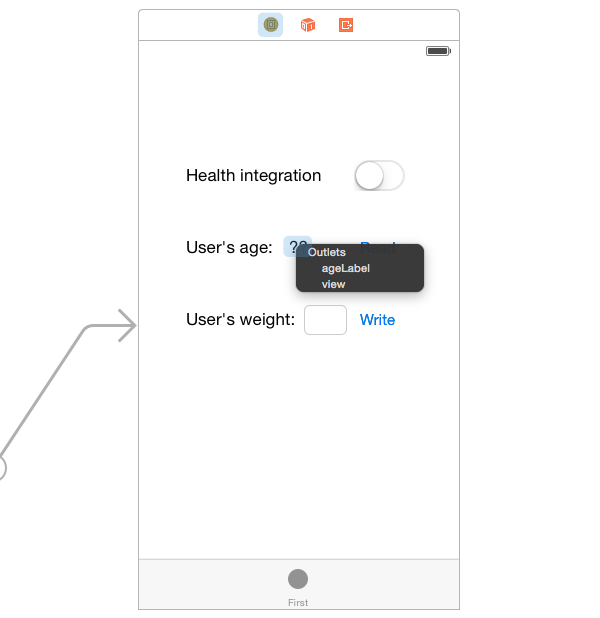
We now need to connect the outlets we declared to the user interface elements. Press Control and drag from First View Controller to the label with the two question marks. From the pop-up menu titled Outlets, click on ageLabel. This will connect the outlet to the label.
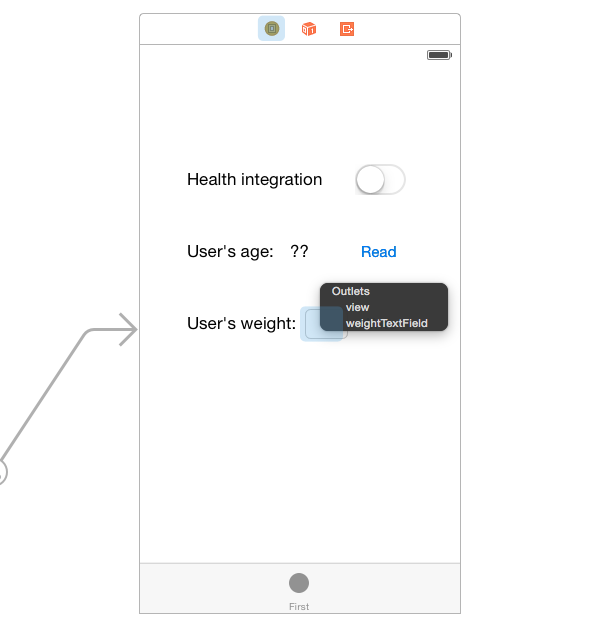
Repeat these steps for the text field, connecting it to the weightTextField outlet of the view controller.
3. Build and Run
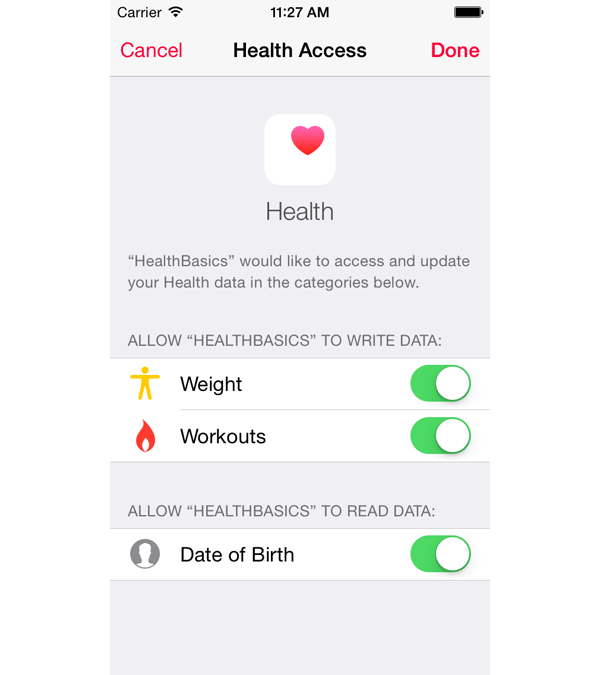
The first scene should now be fully functional. Launch the app and turn the switch on. You should be prompted with the following HealthKit permissions user interface:
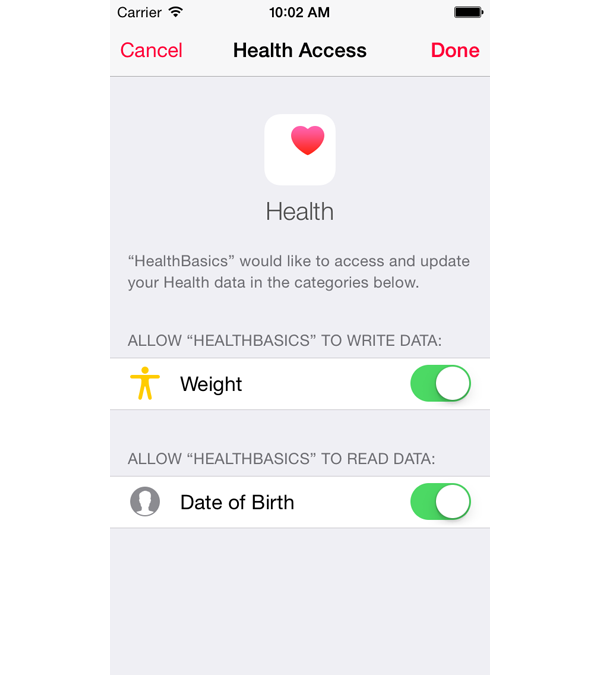
Make sure to turn on both switches before tapping Done, otherwise your app won't have access to the data we need in the sample app.
You can now try tapping the Read button. If you are running the app in the iOS Simulator, probably nothing will happen, because you haven't set a birth date. You can head over to the Health app in the iOS Simulator and set it.
- Open the Health app.
- Select Health Data tab.
- Tap Me.
- Tap Edit.
- Tap Birthdate and set a date. Tap Done.
You can now go back to our HealthBasics app and tap the Read button again. This time your age should be displayed.
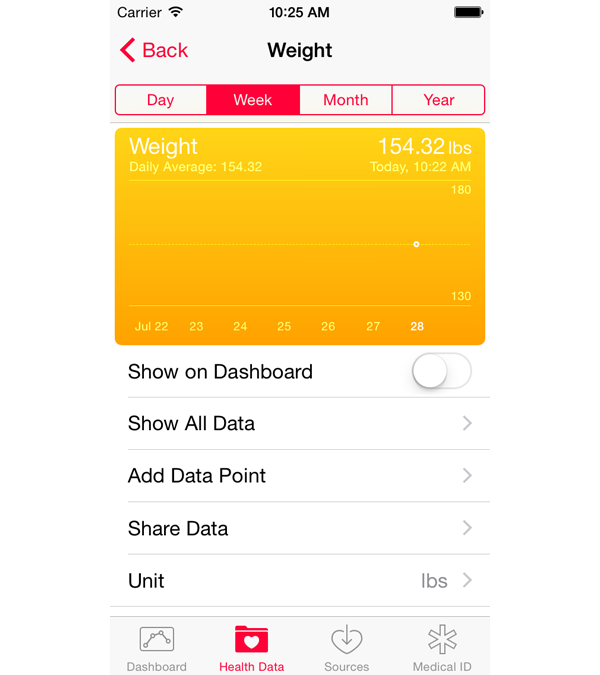
You can also test the weight sharing. Select the weight text field and enter a value in kilograms. After you tap Write, head back to the Health app and, in the Health Data tab, select Body Measurements and Weight. The sample you just added should be visible.
So far, you've learned the basics of working with HealthKit.
- how to ask the user for permission
- how to read and write basic data
- how to encapsulate HealthKit-related code in a separated class
4. Adding a Workout
In the second part of our sample app, I will show you how to write a workout to HealthKit. This is useful if you are building any kind of workout (running, cycling, walking, etc.) app. Most of the building blocks are similar.
Step 1: Extending the GSHealthKitManager Class
We start by extending the GSHealthKitManager class. Add the following method declaration to GSHealthKitManager.h:
- (void)writeWorkoutDataFromModelObject:(id)workoutModelObject;
Add a new share type to the requestAuthorizationToShareTypes:readTypes:completion: method by adding the workout type to the writeTypes array.
NSArray *writeTypes = @[[HKObjectType quantityTypeForIdentifier:HKQuantityTypeIdentifierBodyMass],
                        [HKObjectType workoutType]];
Finally, add the writeWorkoutDataFromModelObject: method at bottom of the GSHealthKitManager class.
- (void)writeWorkoutDataFromModelObject:(id)workoutModelObject {

    // In a real world app, you would pass in a model object representing your workout data, and you would pull the relevant data here and pass it to the HealthKit workout method.

    // For the sake of simplicity of this example, we will just set arbitrary data.
    NSDate *startDate = [NSDate date];
    NSDate *endDate = [startDate dateByAddingTimeInterval:60 * 60 * 2];
    NSTimeInterval duration = [endDate timeIntervalSinceDate:startDate];
    CGFloat distanceInMeters = 57000.;

    HKQuantity *distanceQuantity = [HKQuantity quantityWithUnit:[HKUnit meterUnit] doubleValue:(double)distanceInMeters];

    HKWorkout *workout = [HKWorkout workoutWithActivityType:HKWorkoutActivityTypeRunning
                                                  startDate:startDate
                                                    endDate:endDate
                                                   duration:duration
                                          totalEnergyBurned:nil
                                              totalDistance:distanceQuantity
                                                   metadata:nil];

    [self.healthStore saveObject:workout withCompletion:^(BOOL success, NSError *error) {
        NSLog(@"Saving workout to healthStore - success: %@", success ? @"YES" : @"NO");
        if (error != nil) {
            NSLog(@"error: %@", error);
        }
    }];
}
In my own app, Routie, I've used the approach of passing a model object to the writeWorkoutDataFromModelObject: method, delegating the heavy lifting to the manager class. The latter pulls the required data from the model object and passes the information to the HKHealthStore instance. I believe it's a good approach to keep the HealthKit-related code confined in the manager class.
The implementation of the writeWorkoutDataFromModelObject: method is pretty straightforward. There are just three steps:
- We first prepare the data. In this example, we are making the numbers up.
- We then create a
HKWorkoutobject by invoking one of the convenience initializers of the class. - Finally, we save the
HKWorkoutobject to theHKHealthStoreinstance.
This is the first time we've worked with the HKWorkout class so let me briefly introduce this class. The HealthKit framework uses the HKWorkout class to track activities. Workouts are mostly immutable, so you have to provide the values of the workout during initialization.
When initializing a workout, you are required to provide an activity type, a start date, and and end date. You can optionally pass in total distance, total energy burned, and metadata. The metadata can be used to assign additional information to the workout. This is really useful when you want to share more information about a workout with a different application that you also created.
Step 2: Implementing the writeWorkoutButtonPressed: Action
Open SecondViewController.m and add the following import to the top of the file:
#import "GSHealthKitManager.h"
Next, implement the writeWorkoutButtonPressed: method as shown below.
- (IBAction)writeWorkoutButtonPressed:(id)sender {
    // In a real world app, you would obtain reference to a relevant model object and pass it to following method.
    [[GSHealthKitManager sharedManager] requestAuthorization];
    [[GSHealthKitManager sharedManager] writeWorkoutDataFromModelObject:nil];
}
Step 3: Creating the Workout User Interface
We will just add a single button to the second scene of the app to write the workout. Open Main.storyboard and focus on the second scene. Delete the labels that are currently in the Second View Controller.
Add a button in the center of the view controller's view and set its title to Write Workout. Connect its Touch Up Inside event to the writeWorkoutButtonPressed: action we implemented in the previous step.
5. Testing
Build and run the application, and set the Health integration switch to on. The Health Access screen will be presented with the newly requested workout type switched off. Switch it on and tap Done. This is only needed, because we added the workout share type to the list of share types. This means that we need to ask the user for permission before we use it.
Open the second tab at the bottom and tap Write Workout. If everything went right, you should see the following message in Xcode's Console:
Saving workout to healthStore - success: YES
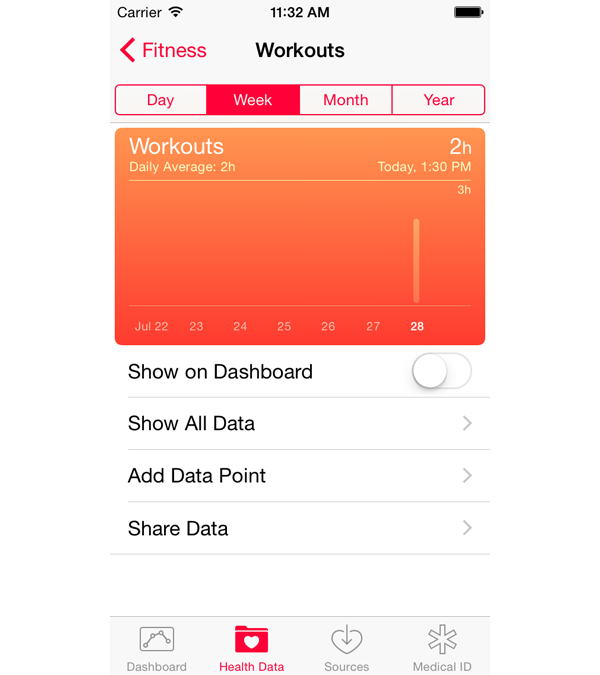
Now you can switch to the Health app and go to Health Data > Fitness > Workouts. There you should see the workout that was just added.
Conclusion
In this tutorial, I've showed you how you can write a workout to HealthKit. I've also shown you how to separate HealthKit-related code by passing a model object to the method that writes the workout to HealthKit.
I hope you've enjoyed this tutorial and that you've learnt all the basics you need to go out there and integrate your own app with HealthKit. I also hope that I've convinced you to give HealthKit a try.
Let me know in the comments how you liked this tutorial or if anything was unclear. You can also find me on Twitter.
Links
The list below includes a number of relevant links so you can quickly jump to what you need:
- Apple's HealthKit Framework Reference: I highly recommend reading it.
-
Fit: Store and Retrieve HealthKit Data: sample HealthKit application provided by Apple
- App Store Review Guidelines - HealthKit: the section in the App Store Review Guidelines covering HealthKit
- Introducing HealthKit (WWDC 2014 Session Videos)
- What's New in HealthKit (WWDC 2015 Session Videos)


Comments