In the first part of this series, I showed you how to customize the WordPress login screen by adding a custom logo and some custom styling.
The next thing your users will see after they've logged in is the Dashboard, so in this tutorial you'll learn how to customize it by removing some of the existing metaboxes, moving some around, and adding some new ones.
The steps I'm going to demonstrate in this tutorial are:
- Removing some of the metaboxes that may confuse your users
- Moving a metabox to a different position on the screen
- Adding your own custom metaboxes to help users
I'm going to create a plugin to do this - if you've already created a plugin after following Part 1 of this series you may prefer to add the code from this tutorial to that plugin, giving you one plugin with all of your admin customization.
What You Will Need to Complete This Tutorial
To complete this tutorial you will need:
- A WordPress installation
- Access to your site's plugins folder to add your plugin
- A text editor to create your plugin
Setting Up the Plugin
At the beginning of my plugin, I'm adding the following lines:
/*
Plugin Name: WPTutsPlus Customize the Admin Part 2 - The Dashboard
Plugin URI: http://rachelmccollin.co.uk
Description: This plugin supports the tutorial in WPTutsPlus. It customizes the WordPress dashboard.
Version: 1.0
Author: Rachel McCollin
Author URI: http://rachelmccollin.com
License: GPLv2
*/
1. Remove Unwanted Metaboxes
The first step is to remove any metaboxes that we don't want. This will only apply to users with a role lower than "administrator," as I still want access to all of the WordPress Dashboard as the administrator.
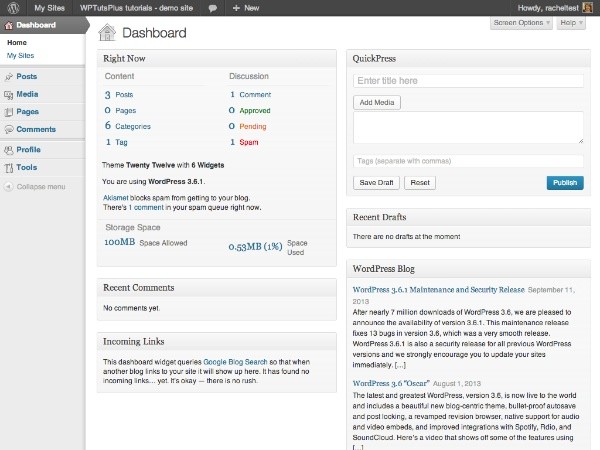
I'll start by reviewing what users with the "editor" role see when they access the Dashboard:

There's so much in there that users have to scroll down to see it, and to users not familiar with WordPress, a lot of it will be unhelpful. In addition, if your site doesn't use comments or pingbacks, the metaboxes for those aren't very helpful.
So I'm going to move the following:
- Recent Comments
- Incoming Links
- QuickPress
- WordPress Blog
- Other WordPress News
To remove those metaboxes for users other than administrators, add the following to your plugin:
// remove unwanted dashboard widgets for relevant users
function wptutsplus_remove_dashboard_widgets() {
	$user = wp_get_current_user();
	if ( ! $user->has_cap( 'manage_options' ) ) {
		remove_meta_box( 'dashboard_recent_comments', 'dashboard', 'normal' );
		remove_meta_box( 'dashboard_incoming_links', 'dashboard', 'normal' );
		remove_meta_box( 'dashboard_quick_press', 'dashboard', 'side' );
		remove_meta_box( 'dashboard_primary', 'dashboard', 'side' );
		remove_meta_box( 'dashboard_secondary', 'dashboard', 'side' );
	}
}
add_action( 'wp_dashboard_setup', 'wptutsplus_remove_dashboard_widgets' );
This targets user roles below administrator by checking whether the user has the manage_options capability, which is only held by administrators. It then removes the metaboxes and finally attaches the function to the wp_dashboard_setup hook.
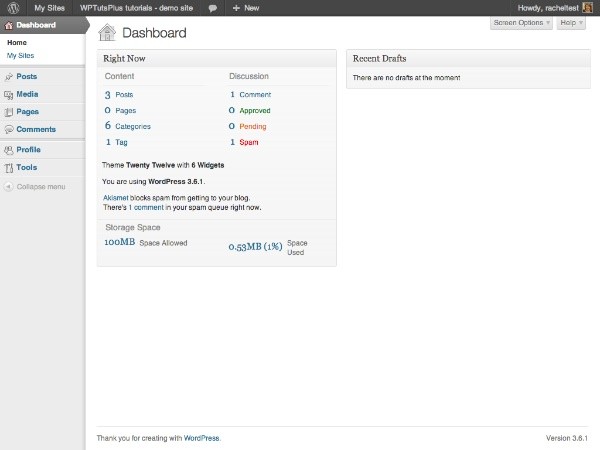
Now the Dashboard looks a lot cleaner:

It's maybe a bit too sparse! Don't worry, I'll show you how to add some new metaboxes shortly.
But first I'll move the 'Right Now' metabox, as I want to add another metabox in the top left position.
2. Move a Dashboard Metabox
Moving Dashboard metaboxes can help you to make the Dashboard more relevant to your site by prioritizing the metaboxes that you or your users will need to use most. I'll move the 'Right Now' metabox to the right.
In your plugin, add the following code:
// Move the 'Right Now' dashboard widget to the right hand side
function wptutsplus_move_dashboard_widget() {
	$user = wp_get_current_user();
	if ( ! $user->has_cap( 'manage_options' ) ) {
		global $wp_meta_boxes;
		$widget = $wp_meta_boxes['dashboard']['normal']['core']['dashboard_right_now'];
		unset( $wp_meta_boxes['dashboard']['normal']['core']['dashboard_right_now'] );
		$wp_meta_boxes['dashboard']['side']['core']['dashboard_right_now'] = $widget;
	}
}
add_action( 'wp_dashboard_setup', 'wptutsplus_move_dashboard_widget' );
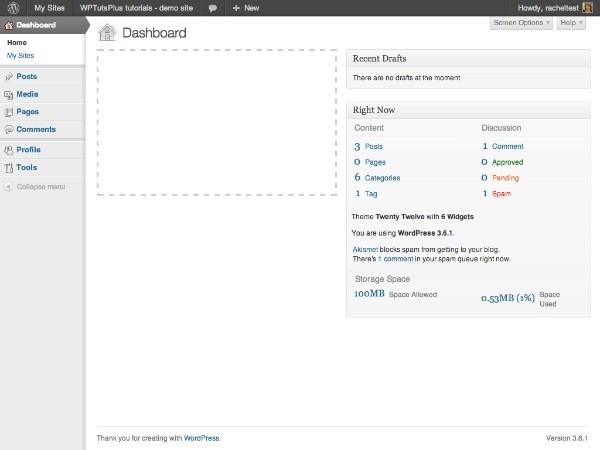
This moves the 'Right Now' metabox from the 'normal' position on the left to the 'right' position, as shown in the screenshot:

The next step is to fill that gaping hole on the left hand side with a couple of custom metaboxes.
3. Add New Dashboard Metaboxes
Adding metaboxes to the Dashboard consists of two steps:
- Use the
wp_add_dashboard_widget()function to define the widget's parameters - its ID, the title, and the callback function defining its contents. Activate this via thewp_dashboard_setuphook. - Write the callback function to define the content of the metabox.
In this case I'm going to add the new metaboxes for all users, so I won't be checking for user capabilities - if you want to, simply copy the code you used in the earlier sections (or enclose all of the parts of this tutorial in the original test for the manage_options capability).
In your plugin, add the following:
// add new dashboard widgets
function wptutsplus_add_dashboard_widgets() {
	wp_add_dashboard_widget( 'wptutsplus_dashboard_welcome', 'Welcome', 'wptutsplus_add_welcome_widget' );
	wp_add_dashboard_widget( 'wptutsplus_dashboard_links', 'Useful Links', 'wptutsplus_add_links_widget' );
}
function wptutsplus_add_welcome_widget(){ ?>

	This content management system lets you edit the pages and posts on your website.

	Your site consists of the following content, which you can access via the menu on the left:

	<ul>
		<li><strong>Pages</strong> - static pages which you can edit.</li>
		<li><strong>Posts</strong> - news or blog articles - you can edit these and add more.</li>
		<li><strong>Media</strong> - images and documents which you can upload via the Media menu on the left or within each post or page.</li>
	</ul>

	On each editing screen there are instructions to help you add and edit content.

<?php }

function wptutsplus_add_links_widget() { ?>

	Some links to resources which will help you manage your site:

	<ul>
		<li><a href="http://wordpress.org">The WordPress Codex</a></li>
		<li><a href="http://easywpguide.com">Easy WP Guide</a></li>
		<li><a href="http://www.wpbeginner.com">WP Beginner</a></li>
	</ul>
<?php }
add_action( 'wp_dashboard_setup', 'wptutsplus_add_dashboard_widgets' );
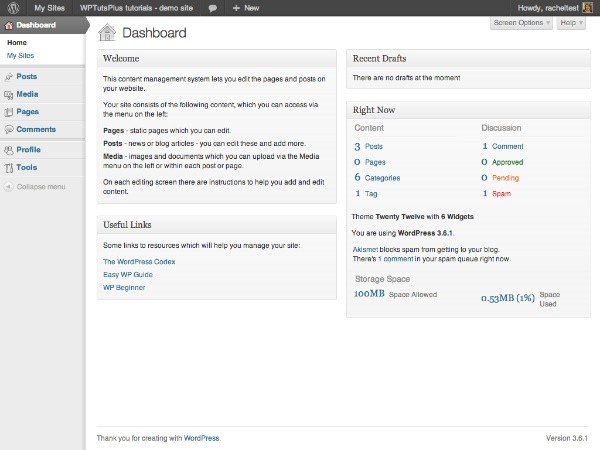
This adds two new metaboxes on the left hand side of the Dashboard screen. You now have a customized Dashboard!
Summary
In this tutorial you learned how to do three things:
- Remove metaboxes from the dashboard
- Move metaboxes from one part of the Dashboard to another
- Add new dashboard metaboxes
What you choose to add to your metaboxes is up to you. You could include links to training videos helping users to edit their site, or add a link to your own blog or site. Or you could put a thought for the day in there - whatever works for you!


Comments