For a while now, Magento has been the benchmark set amongst the e-commerce frameworks available in the market. Credit goes to the plethora of rich built-in features it comes with and the extendability of the base framework itself to develop tailor-made extensions.
In this tutorial, you'll learn the concept of widgets in Magento and how you can use them. I'll demonstrate how you can create a custom widget, which is a really powerful way to plug in extra features in Magento.
Introduction to Widgets
As a Magento developer or site administrator, you're probably aware of the front-end layout structure of Magento. Almost every piece of content which is displayed in the front-end of Magento is generated by "Content Blocks". Magento blocks are a really powerful way to structure the front-end content, and provide flexibility in allowing you to deal with them using XML files.
On the other hand, widgets are small goodies which allow site administrators to enable new features in the front-end using a predefined set of configuration options. We can say that widgets are more friendly to administrators compared to blocks, because they don't have to deal with the block short codes to insert the blocks. To insert a widget in the page, you just need to select the widget from the widgets drop-down and select the configuration options if provided.
Let's try to understand this through a simple example. In the informational pages of your site, you would like to display "Print" and "Contact Us" links. The "Print" link allows users to print the selected page, and the "Contact Us" link allows them to send a query email to the support department. To accomplish this, we can simply develop a Magento widget which allows the site administrators to insert this widget into the selected static page of the site.
So without wasting any further time, let's dive in and see exactly what it takes to develop a custom widget! And yes, I'll stick with the example just mentioned above.
Custom Widget Development
We'll develop a custom widget which will allow the site administrator to insert the "Print" and "Contact Us" links in CMS pages. We'll also provide the widget configuration for the links so that the administrator can select which links she wants to display in the CMS page.
I assume that you're familiar with the structure of the Magento modules. First, let's see the file structure which we'll need to implement for our custom widget.
-
app/etc/modules/Envato_All.xml: It's a file used to enable our widget module. -
app/code/local/Envato/WidgetLinks/etc/config.xml: It's a module configuration file. -
app/code/local/Envato/WidgetLinks/etc/widget.xml: It's a widget declaration file which is used to declare widget information and parameters. -
app/code/local/Envato/WidgetLinks/Model/Options.php: It's a model file which provides the options for the configuration. -
app/code/local/Envato/WidgetLinks/Helper/Data.php: It's a file which is just there as per the standards. -
app/code/local/Envato/WidgetLinks/Block/Links.php: The display logic for the widget goes here.
File Setup
As per the Magento conventions, first we need to create the module enabler file. Create app/etc/modules/Envato_All.xml and paste the following contents in that file. We've used "Envato" as our module namespace and "WidgetLinks" as our module name. It'll enable our "WidgetLinks" module by default.
<!-- app/etc/modules/Envato_All.xml -->
<?xml version="1.0"?>
<config>
<modules>
<Envato_WidgetLinks>
<active>true</active>
<codePool>local</codePool>
</Envato_WidgetLinks>
</modules>
</config>
From now on, we'll create the required files under app/code/local/Envato/WidgetLinks, which is our widget module path. Create app/code/local/Envato/WidgetLinks/etc/config.xml and paste the following contents in that file. As you can see, we've just declared the model, helper and block class names as per the Magento module XML conventions.
<!-- app/code/local/Envato/WidgetLinks/etc/config.xml -->
<?xml version="1.0"?>
<config>
<modules>
<Envato_WidgetLinks>
<version>0.0.1</version>
</Envato_WidgetLinks>
</modules>
<global>
<helpers>
<widgetlinks>
<class>Envato_WidgetLinks_Helper</class>
</widgetlinks>
</helpers>
<blocks>
<widgetlinks>
<class>Envato_WidgetLinks_Block</class>
</widgetlinks>
</blocks>
<models>
<widgetlinks>
<class>Envato_WidgetLinks_Model</class>
</widgetlinks>
</models>
</global>
</config>
Now for the interesting stuff: let's create the app/code/local/Envato/WidgetLinks/etc/widget.xml file and paste the following contents in it.
<!-- app/code/local/Envato/WidgetLinks/etc/widget.xml -->
<?xml version="1.0"?>
<widgets>
<widgetlinks_links type="widgetlinks/links" translate="name description" module="widgetlinks">
<name>Print and Inquiry Options</name>
<description>Allows to add Print and Inquiry link options</description>
<parameters>
<link_options>
<label>Link Options</label>
<visible>1</visible>
<required>1</required>
<type>multiselect</type>
<source_model>widgetlinks/options</source_model>
</link_options>
</parameters>
</widgetlinks_links>
</widgets>
Let's understand this file in a bit of detail. First, we declare our widget by wrapping it up using the unique identifier widgetlinks_links. Next, the type attribute is used to map the name of the widget file—in our case it'll be app/code/local/Envato/WidgetLinks/Block/Links.php. The translate and module attributes are self-explanatory.
Further, as we want to provide the configuration for our widget, we've declared this using the <parameters> tags. You can declare as many parameters as you would like to provide, but in our case it's only a single parameter named <link_options>. It'll be a simple multi-select drop-down with two options: "Print" and "Contact Us". And yes, the <source_model> tag maps to the model file app/code/local/Envato/WidgetLinks/Model/Options.php, from where we'll get our options for the drop-down.
Next, let's create the model file app/code/local/Envato/WidgetLinks/Model/Options.php.
<?php
// app/code/local/Envato/WidgetLinks/Model/Options.php
class Envato_WidgetLinks_Model_Options {
/**
  * Provide available options as a value/label array
  *
  * @return array
  */
  public function toOptionArray() {
    return array(
      array('value' => 'print', 'label' => 'Print Button'),
      array('value' => 'email', 'label' => 'Inquiry Email Button'),
    );
  }
}
Does this need any explanation? It's just used to return the options for our configuration drop-down!
Going further, create the app/code/local/Envato/WidgetLinks/Block/Links.php file and insert the following code in that file.
<?php
// app/code/local/Envato/WidgetLinks/Block/Links.php
class Envato_WidgetLinks_Block_Links extends Mage_Core_Block_Abstract implements Mage_Widget_Block_Interface {
/**
* Produce links list rendered as html
*
* @return string
*/
protected function _toHtml() {
$html = '';
$link_options = $this>getData('link_options');
if (empty($link_options)) {
return $html;
}
$arr_options = explode(',', $link_options);
if (is_array($arr_options) && count($arr_options)) {
foreach ($arr_options as $option) {
Switch ($option) {
case 'print':
$html .= '<div><a href="javascript: window.print();">Print</a></div>';
break;
case 'email':
$html .= '<div><a href="mailto:[email protected]&subject=Inquiry">Contact Us</a></div>';
break;
}
}
}
return $html;
}
}
This is the file which will do the real work of displaying the widget links in the front-end. First, we fetch the value of the configuration variable link_options using the following code snippet.
$link_options = $this>getData('link_options');
It's just the selected options by the site administrator while setting up the widget in the CMS page. The rest of the code is fairly easy to understand, as we just prepare the html output as per the configured options.
Finally, we'll need to create the app/code/local/Envato/WidgetLinks/Helper/Data.php file just to make sure that Magento's translation system is working properly. It's almost a blank file, but it should be there! So let's create it.
<?php
// app/code/local/Envato/WidgetLinks/Helper/Data.php
/**
  * Sample Widget Helper
  */
class Envato_WidgetLinks_Helper_Data extends Mage_Core_Helper_Abstract
{
}
Thanks for the patience, we've almost done it! In the next section, we'll see how to use our custom widget in the back-end CMS pages.
Plug in the Widget Using the Admin UI
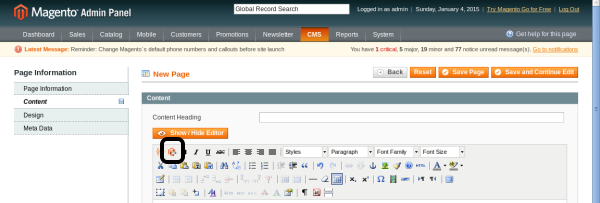
Now, clear all the caches from the back end of Magento and make sure our module is enabled. After that, go to CMS > Pages and add a new CMS page using Add New Page. Fill the necessary information as required, and while you're in the Content tab, there is an icon in the WYSIWYG editor as shown below.

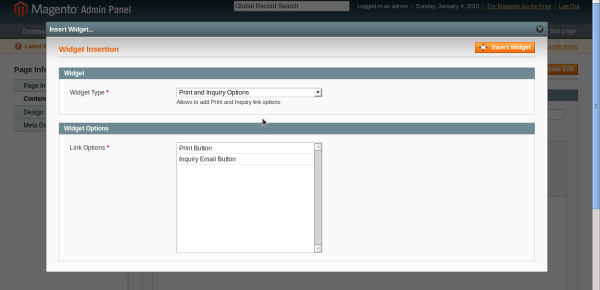
Click on that icon, which will open the Widget Insertion interface as shown in the following screenshot.

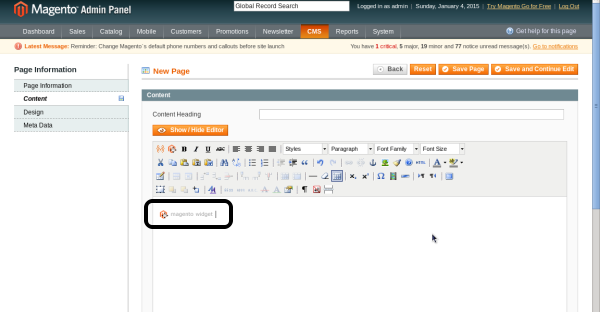
In the Widget Type field, select our custom widget Print and Inquiry Options. When you select that, it should show the configuration option Link Options. Select the options as you wish and click on the Insert Widget button to insert our widget into the CMS page. Here's what it looks like after inserting into the CMS page.

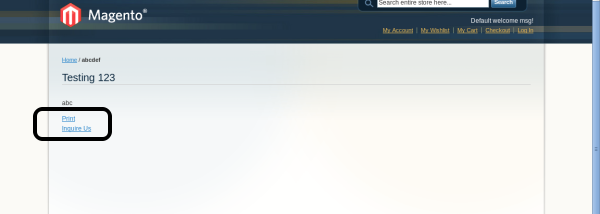
Now, save the CMS page after filling all the required information and head over to the front-end to see how it looks!

So as you can see, there are two links displayed on the CMS page in the front-end of Magento: Print and Contact Us. So this was a very basic example to understand the concept of widgets, and I hope you can extend it to something more useful in your case as per your requirements.
Conclusion
Widgets in Magento provide a way to enrich the front-end functionality specifically for non-technical back-end administrators of the site. Apart from that, Magento allows you to create custom widgets as per your own requirements, which is really easy to set up as well.
So I hope this tutorial has helped you to grasp the concept of widgets and the development of custom widgets! Looking forward to your thoughts in the feed below!


Comments