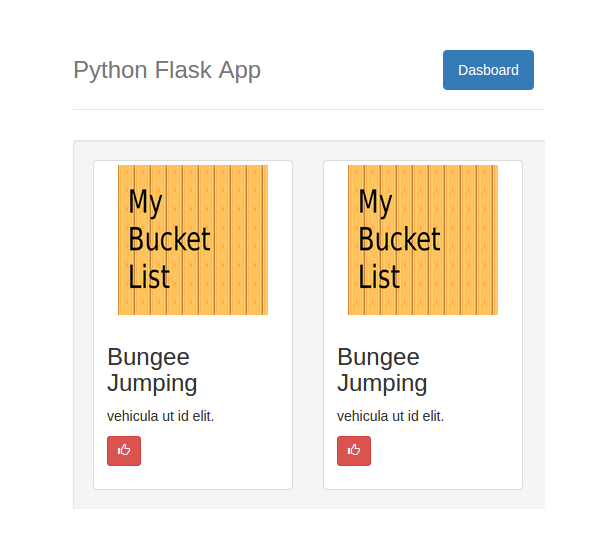
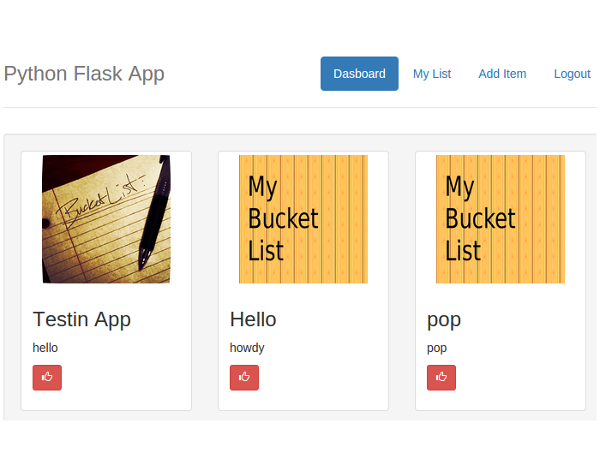
In the previous part of this series, we implemented image upload functionality for the users while adding a wish. We also added a few more options related to a user's wish on the Add Wish page. In this tutorial, we'll take it to the next level by implementing the functionality to like a particular wish.
Getting Started
Let's start by cloning the previous part of the tutorial from GitHub.
git clone https://github.com/jay3dec/PythonFlaskMySQLApp_Part6.git
Once the source code has been cloned, navigate to the project directory and start the web server.
cd PythonFlaskMySQLApp_Part6
python app.py
Point your browser to http://localhost:5002/ and you should have the application running.
Creating the Dashboard UI
We'll be creating a new page called dashboard where all the wishes from different users will be displayed. Any user can like or comment on the wishes displayed in the dashboard. So navigate to the templates folder and create a file called dashboard.html. Open up dashboard.html and add the following HTML code:
<!DOCTYPE html>
<html lang="en">
<head>
<title>Python Flask Bucket List App</title>
<link rel="stylesheet" href="https://maxcdn.bootstrapcdn.com/bootstrap/3.3.2/css/bootstrap.min.css">
<link href="http://getbootstrap.com/examples/jumbotron-narrow/jumbotron-narrow.css" rel="stylesheet">
</head>
<body>
<div class="container">
<div class="header">
<nav>
<ul class="nav nav-pills pull-right">
<li role="presentation" class="active"><a href="#">Dashboard</a></li>
<li role="presentation"><a href="/userHome">My List</a></li>
<li role="presentation"><a href="/showAddWish">Add Item</a></li>
<li role="presentation"><a href="/logout">Logout</a></li>
</ul>
</nav>
<h3 class="text-muted">Python Flask App</h3>
</div>
<div class="well">
<div class="row">
<div class="col-sm-4 col-md-4">
<div class="thumbnail">
<img alt="100%x200" src="static/Uploads/bucketList.png" data-holder-rendered="true" style="height: 150px; width: 150px; display: block;">
<div class="caption">
<h3>Bungee Jumping</h3>
<p>vehicula ut id elit.</p>
<p>
<button type="button" class="btn btn-danger btn-sm">
<span class="glyphicon glyphicon-thumbs-up" aria-hidden="true"></span>
</button>
</p>
</div>
</div>
</div>
</div>
</div>
<footer class="footer">
<p>© Company 2015</p>
</footer>
</div>
</body>
</html>
Open up app.py and create a new route called /showDashboard. Using this route we'll render the dashboard page.
@app.route('/showDashboard')
def showDashboard():
    return render_template('dashboard.html')
Modify the /validateLogin method to redirect the user on successful sign-in to the dashboard page instead of the user home page.
return redirect('/showDashboard')
Save the above changes and restart the server. Point your browser to http://localhost:50002 and sign in using a valid email address and password. Once signed in, you should be able to see the dashboard page.

As seen in the image above, we'll be showing all the wishes created by different users and giving access to other users to like them.
Populate the Dashboard
First, we need to fetch the data from the database to populate the dashboard. So let's create a stored procedure to get the wishes created by users.
USE `BucketList`;
DROP procedure IF EXISTS `sp_GetAllWishes`;

DELIMITER $$
USE `BucketList`$$
CREATE DEFINER=`root`@`localhost` PROCEDURE `sp_GetAllWishes`()
BEGIN
    select wish_id,wish_title,wish_description,wish_file_path from tbl_wish where wish_private = 0;
END$$

DELIMITER ;
The above stored procedure will fetch all the wishes from tbl_wish which are not marked as private.
Next, we'll create a new Python method to call the stored procedure sp_GetAllWishes. Open app.py and add the following code for the getAllWishes method.
@app.route('/getAllWishes')
def getAllWishes():
    try:
        if session.get('user'):

            conn = mysql.connect()
            cursor = conn.cursor()
            cursor.callproc('sp_GetAllWishes')
            result = cursor.fetchall()


            wishes_dict = []
            for wish in result:
                wish_dict = {
                        'Id': wish[0],
                        'Title': wish[1],
                        'Description': wish[2],
                        'FilePath': wish[3]}
                wishes_dict.append(wish_dict)


            return json.dumps(wishes_dict)
        else:
            return render_template('error.html', error = 'Unauthorized Access')
    except Exception as e:
        return render_template('error.html',error = str(e))
In the above method, we have first checked for a valid user session and then created a MySQL connection. Using the MySQL connection conn, we used a cursor to call the stored procedure sp_GetAllWishes to get the required data. Once the data has been fetched, we have parsed the result and returned a proper JSON string.
We'll call the above created /getAllWishes method when the dashboard page loads. Open dashboard.html and, using jQuery AJAX, make a call to /getAllWishes on document.ready.
$(function() {
    $.ajax({
        url: '/getAllWishes',
        type: 'GET',
        success: function(response) {
            console.log(response);
        },
        error: function(error) {
            console.log(error);
        }
    });
})
Save the above changes and restart the server. Once logged in to the application, check your browser console and you should be able to view the data fetched from the database.
[{
    "Description": "Bungee Jumping",
    "FilePath": "static/Uploads/de5f8a10-54ea-49f4-80ce-35626277047e.jpg",
    "Id": 10,
    "Title": "Bungee Jumping"
}, {
    "Description": "Mount Everest climb",
    "FilePath": "static/Uploads/e3e8f7fa-6cb9-4cc3-9989-a80e5089546f.png",
    "Id": 11,
    "Title": "Mount Everest climb"
}, {
    "Description": "River Rafting",
    "FilePath": "static/Uploads/dff3a64c-5193-42b5-9cdb-9d67a7bbacab.png",
    "Id": 14,
    "Title": "River Rafting"
}, {
    "Description": "Deep Sea Diving",
    "FilePath": "static/Uploads/b0656759-c038-46b4-9529-c208aaa6bfb7.png",
    "Id": 15,
    "Title": "Deep Sea Diving"
}]
Using the data from the response, we'll populate our dashboard page. First, remove the HTML code between the .well div from dashboard.html.
<div class="well">

<!-- We'll populate this dynamically -->

</div>
In the success callback of the AJAX call, parse the response to a JavaScript object.
var data = JSON.parse(response);
We'll need to create the thumbnail HTML code dynamically using jQuery for each set of three wishes in a row. So first let's create a JavaScript function to create the HTML code dynamically. Here is the HTML code that we'll be creating dynamically using jQuery:
<div class="col-sm-4 col-md-4">
    <div class="thumbnail"><img src="static/Uploads/de5f8a10-54ea-49f4-80ce-35626277047e.jpg" data-holder-rendered="true" style="height: 150px; width: 150px; display: block">
        <div class="caption">
            <h3>Testing App</h3>
            <p>hello</p>
            <p>
                <button type="button" class="btn btn-danger btn-sm"><span class="glyphicon glyphicon-thumbs-up" aria-hidden="true"></span></button>
            </p>
        </div>
    </div>
</div>
We'll name the JavaScript function CreateThumb. In this function, we'll create the HTML elements and append them to their parent elements to get the HTML code shown above.
function CreateThumb(id,title, desc, filepath) {

    var mainDiv = $('<div>').attr('class', 'col-sm-4 col-md-4');

    var thumbNail = $('<div>').attr('class', 'thumbnail');

    var img = $('<img>').attr({
        'src': filepath,
        'data-holder-rendered': true,
        'style': 'height: 150px; width: 150px; display: block'
    });

    var caption = $('<div>').attr('class', 'caption');

    var title = $('<h3>').text(title);

    var desc = $('<p>').text(desc);


    var p = $('<p>');

    var btn = $('<button>').attr({
        'id': 'btn_' + id,
        'type': 'button',
        'class': 'btn btn-danger btn-sm'
    });

    var span = $('<span>').attr({
        'class': 'glyphicon glyphicon-thumbs-up',
        'aria-hidden': 'true'
    });

    p.append(btn.append(span));


    caption.append(title);
    caption.append(desc);
    caption.append(p);

    thumbNail.append(img);
    thumbNail.append(caption);
    mainDiv.append(thumbNail);
    return mainDiv;


}
The above code is quite straightforward so I won't be going into the details.
Moving forward, we'll iterate the parsed JSON response and create the HTML using the CreateThumb function. We plan to display three wishes per row. So we'll check for that and create a new row each time for three wishes. Add the following code to the success callback of the AJAX call in dashboard.html.
var itemsPerRow = 0;
var div = $('<div>').attr('class', 'row');
for (var i = 0; i < data.length; i++) {


    if (itemsPerRow < 3) {

        if (i == data.length - 1) {
            div.append(CreateThumb(data[i].Id,data[i].Title, data[i].Description, data[i].FilePath));
            $('.well').append(div);
        } else {
            div.append(CreateThumb(data[i].Id,data[i].Title, data[i].Description, data[i].FilePath));
            itemsPerRow++;
        }
    } else {
        $('.well').append(div);
        div = $('<div>').attr('class', 'row');
        div.append(CreateThumb(data[i].Id,data[i].Title, data[i].Description, data[i].FilePath));
        if (i == data.length - 1) {
            $('.well').append(div);
        }
        itemsPerRow = 1;
    }

}
Save the changes and restart the server. Sign in to the application and when on the dashboard page, you should be able to view the wishes added by different users, with an option to like them.

Next, let's add a click event to the like buttons under the wishes thumbnails. Since we have dynamically created the buttons, we'll need to attach the click event to the buttons using the jQuery on method.
$(document).on('click', '[id^="btn_"]', function() {
    // Event function can be added here
});
Implementing Like Functionality
Let's start by creating a table which will keep track of the likes a particular wish has garnered. Create a table called tbl_likes.
CREATE TABLE `BucketList`.`tbl_likes` (
  `wish_id` INT NOT NULL,
  `like_id` INT NOT NULL AUTO_INCREMENT,
  `user_id` INT NULL,
  `wish_like` INT NULL DEFAULT 0 ;
  PRIMARY KEY (`like_id`));
Now whenever a user likes or dislikes a particular wish, we'll update this table. Let's create a MySQL stored procedure to update the above table.
DELIMITER $$

CREATE DEFINER=`root`@`localhost` PROCEDURE `sp_AddUpdateLikes`(
    p_wish_id int,
	p_user_id int,
	p_like int
)
BEGIN
	if (select exists (select 1 from tbl_likes where wish_id = p_wish_id and user_id = p_user_id)) then

		update tbl_likes set wish_like = p_like where wish_id = p_wish_id and user_id = p_user_id;

	else

		insert into tbl_likes(
			wish_id,
			user_id,
			wish_like
		)
		values(
			p_wish_id,
			p_user_id,
			p_like
		);

	end if;
END
In this stored procedure, we have simply checked if the person has already liked the wish or not. If he or she has already liked, then we have updated that like entry or added a new one.
Let's create a Python method to call the above stored procedure.
@app.route('/addUpdateLike',methods=['POST'])
def addUpdateLike():
    try:
        if session.get('user'):
            _wishId = request.form['wish']
            _like = request.form['like']
            _user = session.get('user')


            conn = mysql.connect()
            cursor = conn.cursor()
            cursor.callproc('sp_AddUpdateLikes',(_wishId,_user,_like))
            data = cursor.fetchall()

            if len(data) is 0:
                conn.commit()
                return json.dumps({'status':'OK'})
            else:
                return render_template('error.html',error = 'An error occurred!')

        else:
            return render_template('error.html',error = 'Unauthorized Access')
    except Exception as e:
        return render_template('error.html',error = str(e))
    finally:
        cursor.close()
        conn.close()
This is the Python method which will call the stored procedure sp_AddUpdateLikes. In this method we have checked for a valid user session and then passed the wish ID and like status to the stored procedure for update. When the user clicks the like button, we need to call the Python method /addUpdateLike. So add the following code to the like button click event function in dashboard.html.
$(document).on('click', '[id^="btn_"]', function() {
    $.ajax({
        url: '/addUpdateLike',
        method: 'POST',
        data: {
            wish: $(this).attr('id').split('_')[1],
            like: 1
        },
        success: function(response) {
            console.log(response);
        },
        error: function(error) {
            console.log(error);
        }
    });
});
For the time being, we have hard-coded the value of like in the above call. So save the changes and restart the server. Sign in to the application and click on the like button under any wish thumbnail. Now check tbl_likes and you should have an entry in there.
Conclusion
In this part of the tutorial, we populated the dashboard page of our application with the wishes created by different users. We also attached a like button to each so that users can like a particular wish. In the next part, we'll see how to toggle the like display and show the total number of likes received by a particular wish.
Post your suggestions or any corrections in the comment box below. Source code from this tutorial is available on GitHub.


Comments